How to create visual effects for games
The main tasks of visual effects artists
If we talk only about visual effects, then they can be divided into two main types of tasks: gameplay effects and natural effects (or environmental effects). The principle of their separation depends on the specific project. For example, in a game like Castlevania (a hack'n'slash genre), 90% of the visual effects consisted of character and magic skills that strongly influenced the gameplay. Such tasks require a serious understanding of the game mechanic and constant communication with the design team, with which you need to constantly negotiate. For example, let's take a flamethrower. Gameplay designers pick up the attack damage area, and then you need to create an effect on top of the debugging cylinder. Gradually diminishing fire does not fully correspond to the area of damage, and designers begin to complain about it. Here is one example of the “conflict” between the two disciplines, because if you follow strict rules, fire will not be like fire. Therefore, you have to look for alternatives and convince designers that the player will not notice that a small fading fire did not cause any damage.
Among other genres, gameplay effects are more "important" in fighting games and RPGs.
There are other game genres, for example, shooters (especially realistic ones), in which natural effects are as important as gameplay. In this case, the artist responsible for natural effects becomes practically an artist in environments and mostly collaborates with this team. Examples of natural effects are waterfalls, fog, rain, etc. Most of the natural effects I created in Gears of War 4, where we worked on multiplayer maps and had to take care of the performance effects, because the game was required to run at 1080p at 60 fps.
')
Realistic effects
The more powerful the technologies become, the less we have barriers in creating realistic visual effects. Especially in the cutscene, where we achieve a quality comparable to the visual effects in the movie.
Part of this is the merit of a large number of software for creating stunning textures, which appeared over the past few years. Here is a simple list of creative tools:
- Fire, smoke, explosions: Fume FX , Phoenix FD , Maya fluids , etc.
- Fluids: Phoenix FD, RealFlow , Blender , etc.
- Destructions, solids simulations: Rayfire , MassFX, etc.
And for all of the above: Houdini . The guys from SideFX create a terrific product, especially the latest release, which brought them amazing software to game development. Thanks to its extensive capabilities, Houdini is becoming the standard for the gaming industry, at least for the most realistic projects. If you can simplify the learning curve, then more people will use the program, just as it did some time ago with the Allegorithmic package.
But all this software is mainly focused on creating ready-made resources (textures, meshes (mesh), animations), which we then use in our game. We get high quality results, but without the possibility of any variations. The finished blast texture always looks and feels the same. And here the real problems begin, we must achieve this quality in real time. Gradually, we approach this, companies will improve real-time techniques, and we can already see this in the example of real-time physics, simulation of fluids and complex shaders, such as interpolation of frames by motion vector from Guerrilla ( Anatomy of a Nuke ) or real-time raymarching for fire and smoke in Uncharted 4 ( bulk shader from Siggraph 2015 ).
Particle effects
A good way to understand how particle effects work in real time is to analyze how a popcorn machine works:
- First, you need to decide how much popcorn we need. This will be our spawnrate.
- Corn kernels are points where particles will be located
- The revealed grain will be a particle render. We can choose whether it will be a grid (3D) or a sprite (the traditional plane of two triangles)
- After the grain has opened, the popcorn takes off and drops over time. This symbolizes the initial velocity plus gravity (dynamics).
The difference between a popcorn machine and real-time particle effects is that although you can't get any amount of popcorn you want, you can choose between butter-flavored popcorn, sweet, salty, etc., and in the real-time engine have to make compromises. The more complex the shader, the less particles can be created on the screen so that they do not affect the frame rate.
Production
I love to consider us, visual effects artists, wizards and can't help but share all the tricks I used to create this effect.
This effect was created as a result of a graphics test. The test requirements were as follows:
The purpose of the test was to demonstrate the ability to create AAA-level effects.
- Create a multi-layer magic attack that destroys a cube.
- The effect should consist of: lead, attack and impact, followed by the destruction of the cube.
- All textures must be made by yourself.
- Use single-frame textures and / or a maximum of one animated flipbook.
Given these limitations, the first thing I do is create a library of reference materials (videos, photos, Pinterest, etc.). Some artists, who paint better than me, prefer to work with storyboards, drawings, or drawing artists, but it’s much faster for me to gather materials and mentally put everything together.
After I determine the general appearance of the effect, I select the main element. That is, the rays. I decided that I would use the same technique that I used to create the effect of teleport smoke in Castlevania LoS2.
3ds max
Spatial rays
First, we create one spiral-like grid, which will determine the trajectory from the attacker to the victim. Since the effect can be seen from different angles, I prefer not to use traces or bundles. The grid will consist of three planes rotated in increments of 60 degrees.
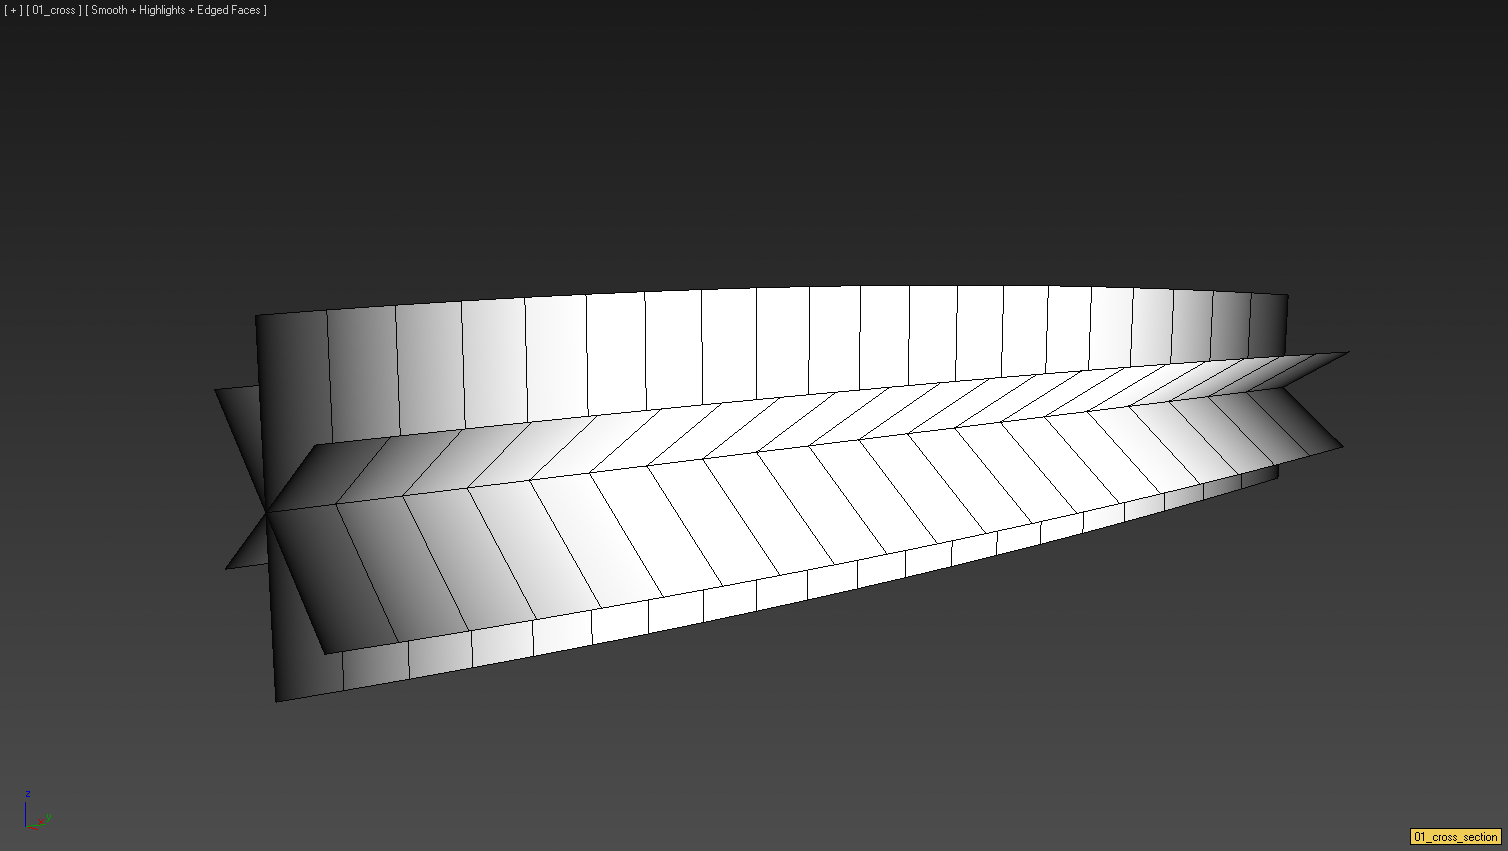
Without a texture / shader, this looks weird, but the end result will look like a three-dimensional beam.

The next stage is the creation of a spline, which will determine the trajectory of the beam. We use this spline to apply to the strain modifier mesh along the guide.
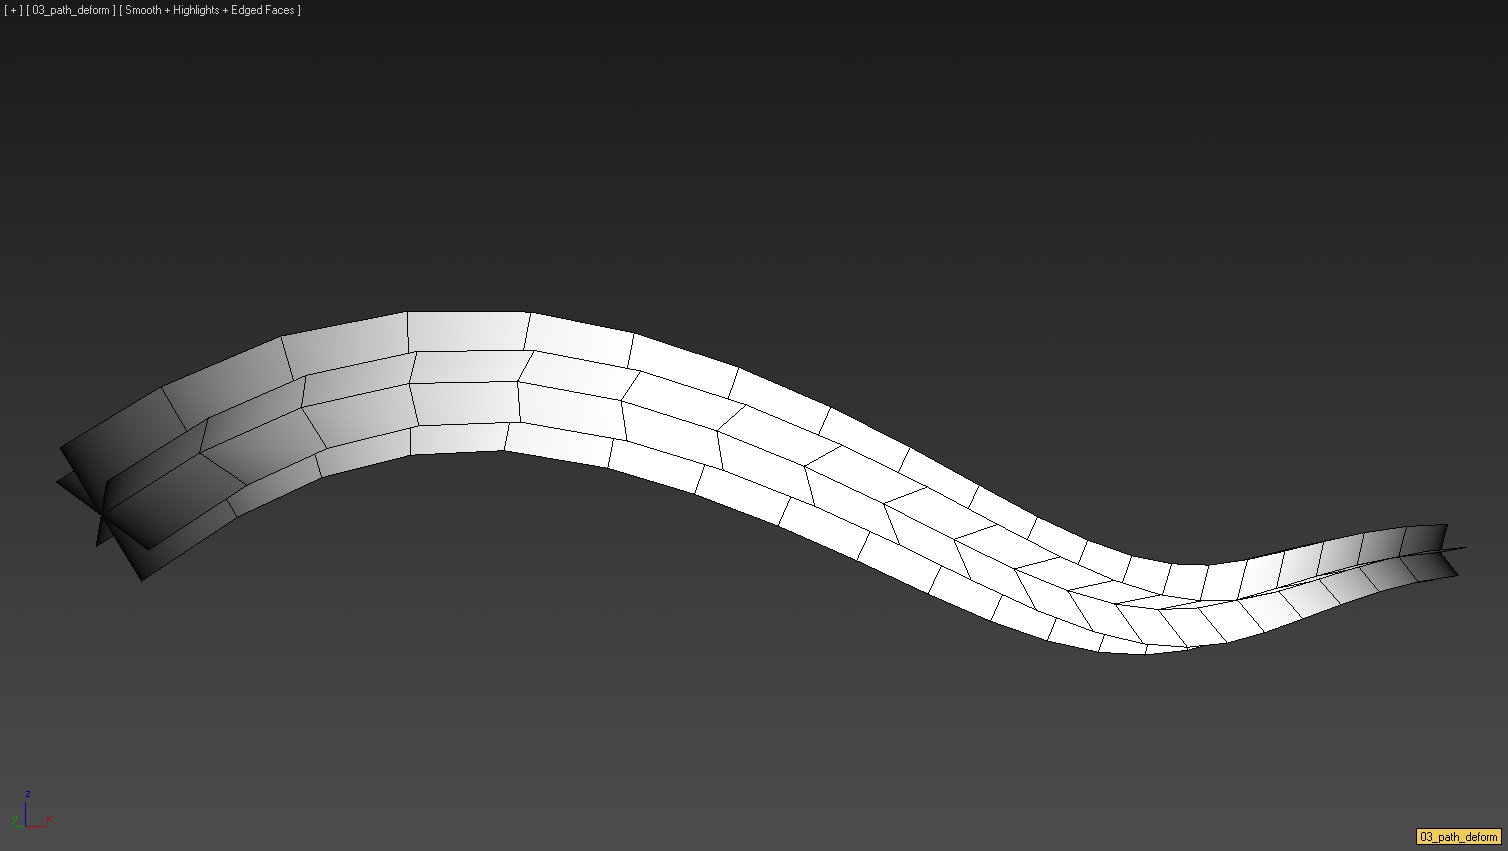
Now we have a static beam. Making it appear and disappear is very simple: we will perform vertical scrolling of the UV texture using a shader. The trick here is to select the Clamped option for the texture in Unreal. In this case, when UV is outside the space 0-1, the grid will be transparent. Otherwise, the beam will repeat.
You can see the difference here by changing the texture parameter to Tile:
And here the Clamp parameter is selected for the texture:
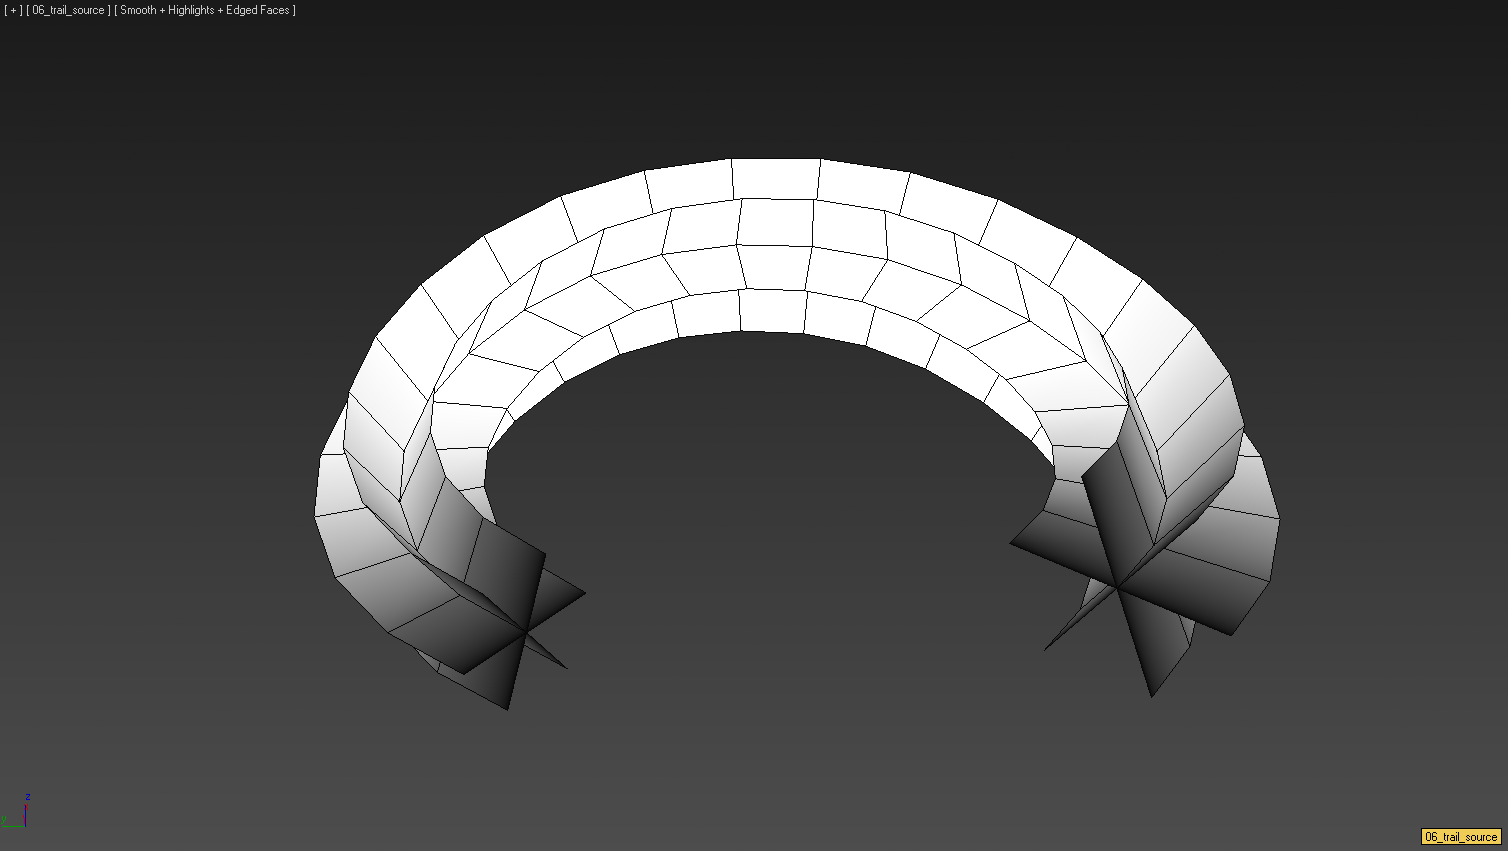
Arc rays: so, we have the main element of the effect. Let's decorate it a little more. We want the attacker to have some kind of preemption. We need to inform the player that something is about to happen. For this, I decided to use the same rays, but with a different trajectory. This time we will create a 200-degree arc and apply a deformation along the guide to the mesh.
Fault
The next element of the sequence is the explosion of the cube. There are several ways to solve this problem in 3dsmax, but I chose the Rayfire plugin. I exported the effect as an animation to use later in Unreal.

UNREAL
It is time to put it all together. I started by adding a lead effect. For this, I created the effect of particles using the arcs we created. By creating these grids with a random rotation of 360 degrees and moving them UV, we provide the effect of surrounding the sphere with particles that resemble a shield. To get rid of the stiffness of the grids, I decided to add GPU particles with Vector Field. At first, with these elements, I did not see clearly when it was necessary to turn on the directed rays.
I realized that I was missing something important, and it turned out that it was a change of state. To turn on the attack, I always love to make a short-term greater emphasis on preemption. Then I decided to change the color and grids, and particles to something more threatening. I chose an orange color because it reminded me of fire, and the shades of red always help to signify something dangerous. In addition, in order to add more power to the effect, I added orange lighting, which made it possible to convey the feeling of accumulating energy.
Having finished with the effect of anticipation, it was possible to move on to the transfer of energy forward, to the enemy. I wanted the effect to be powerful, so I created a particle effect consisting of three emitters. Each of them had a copy of a directional beam rotated 60 degrees from the previous emitter. I adjusted the delay of emitters and scrolling UV, so that all three are not created at the same time and with the same speed, but still worked in one frame. It is to such subtleties that an artist of visual effects should strive. Most viewers / players will not notice these minor changes, but if you show this effect with variations in delays / scrolling / sizes and without them, they will see the difference.
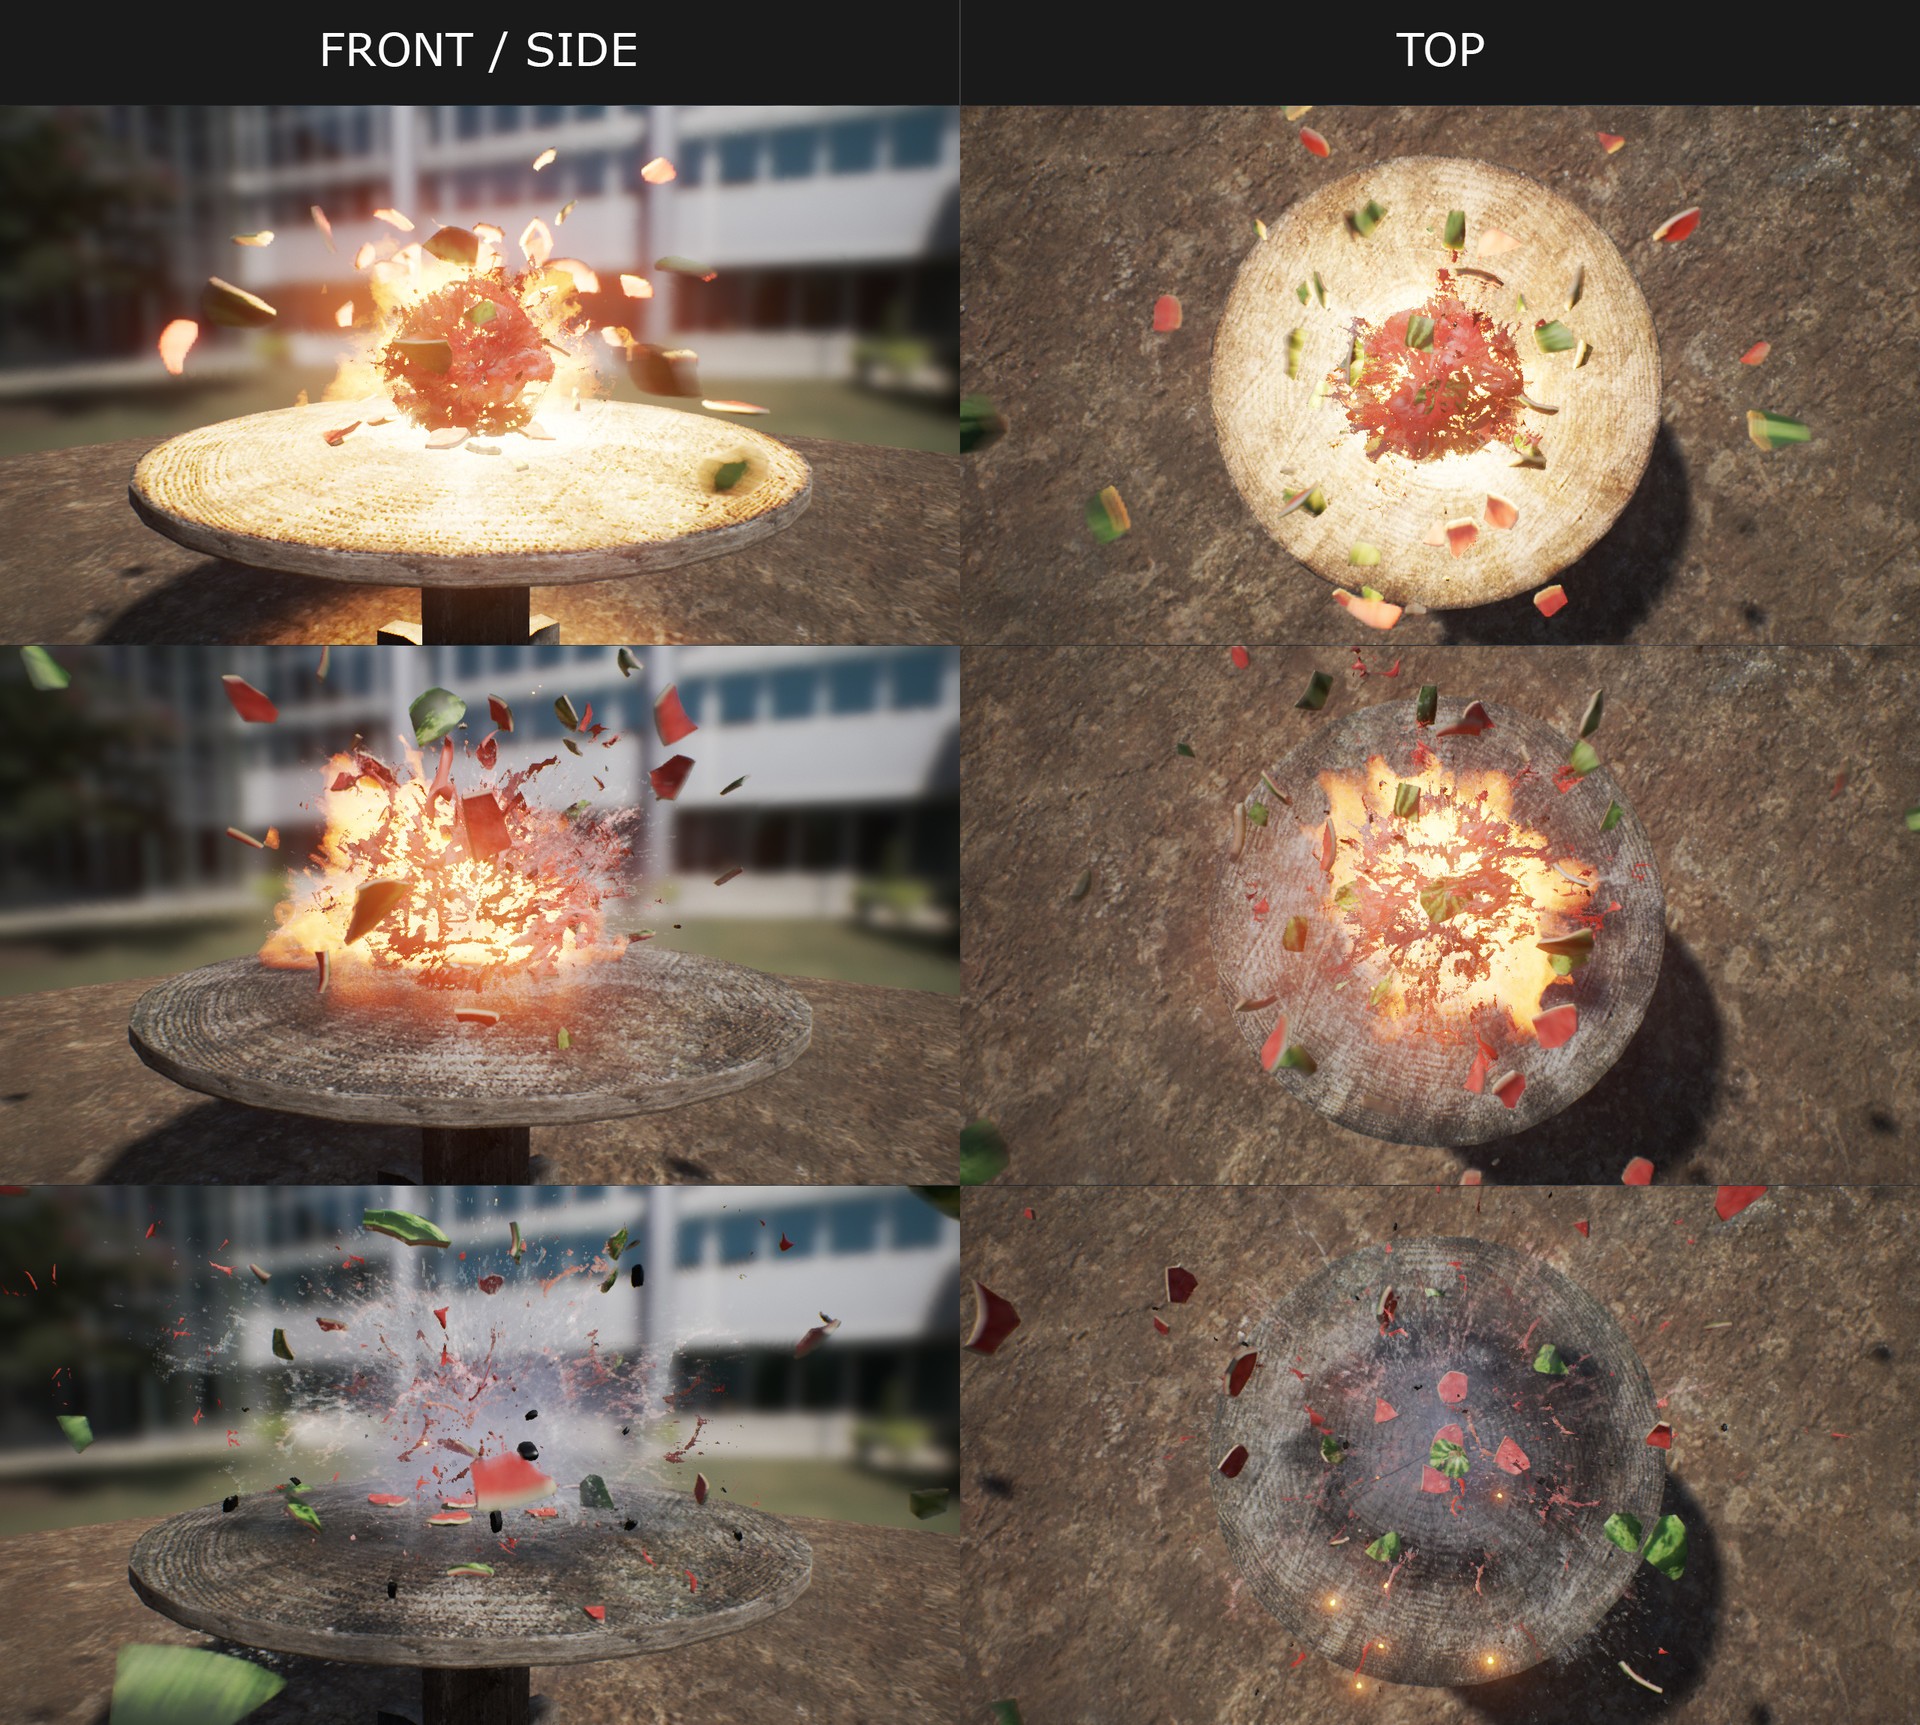
The last part is the impact. The first stage in Unreal is to launch the animation in Blueprints at the exact moment in time. Then I created the effect of particles for destruction. The effect of particles consisted of various elements: lighting, sparks (GPU particles without collisions, for reasons of performance preservation), lightning, smoke after destruction, screen deformation (which compresses the cube for 0.1 seconds and adds power to the explosion). A special element in this effect has become lightning. I created one sprite texture with UV Distortion to animate it through the shader:
In addition, I added Erosion. This is a very convenient shader that allows particles to fade away effectively, and not just to go out:
So our sequence is ready. Of course, after combining all the parts, small changes in the schedule or timings are added.
Instruments
The most obvious choice for visualizing effects is to start with Unreal 4. Not because this is the best option, but the engine has a large community and you can find thousands of tutorials, examples, stores, etc. Here, for a start . Then you can find on Youtube a lot of tutorials.
In addition, there is Unity, with which I did not have the opportunity to work, because I mainly worked with proprietary engines, and my only commercial engines were Unreal 3 and 4.
Speaking of creating resources: there are several programs that are very useful for visual effects artists. Fume FX, for example, is very good for producing animated textures of fire, explosions and smoke. I want to thank the developers, because it was one of the first plug-ins that I found when I started working in this area. I was very impressed with how they managed to create a tool with which you can get high-quality results in a very short time.
Recently, I began to work a lot with Blender . I started because it is free, and you do not need to deal with licenses, but in the end I really liked it. It can achieve the same as in Fume FX, plus liquids, simulations of solids, tools of destruction, etc. I managed to create in this software an ocean grid for several multiplayer maps in Gears 4, blood textures for Red Dead Redemption 2, oil stains, etc.
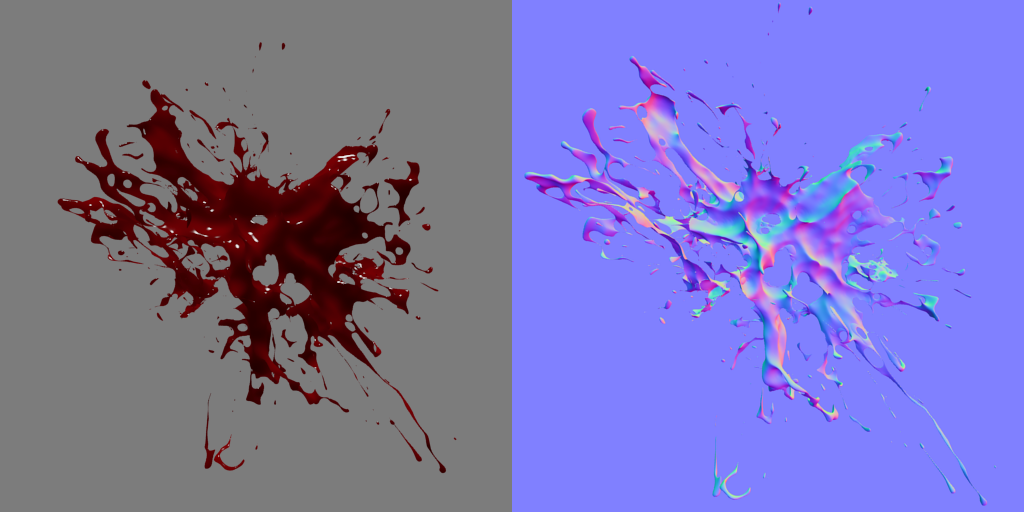
Blood Spray Simulated and Rendered in Blender
Most of the time I work in 3d studio max. In it, I make low poly grids, UV scans, rigging, etc. We also use Adobe Photoshop to make changes to the rendered images or to create text from scratch for use in particles.
Animation
Most of my work was to create gameplay effects. That is, more often than not, I was given an animation, which I needed to stick to and add another layer of effects (blood, magic, collisions, explosions, etc.). It could be a game animation or a cutscene animation.
When working with animations, visual effects are usually attached to bones, helper objects, and objects in the scene. This is an iterative process in which teams of animators and visual effects artists interact. The latter may be asked to make changes or additions to the animation, for example, add more keyframes for a smoother sword trail, rotate the helper to use its rotation as a direction for blood splashes, or change camera switching to avoid an ugly look on particle grids.
In addition, the game engine has features that can help with the animation or the dynamics of the effects. For example, when I worked at Mercury Steam, we used a proprietary engine and I was very close to the technology team. I even managed to ask them to add new features to the engine. I won from this because I asked to add new ways of attaching effects to the bones: I could tie the effect to the bone using its position, but not turning, or taking the position and turning of the bone, but always using the Z (height) of the earth (this is very convenient for rectilinear fire attacks in Castlevania).
I remember how I liked the most about the fact that the programmer fulfilled my request even without the certainty that it would work. I asked to add a way to set the initial particle velocity after the emitter lifetime. Thus, using this method with a trace, I could get a spray of blood, always connected to the point of contact. This extra layer added a sense of viscosity that I needed and that I am very proud of. In fact, for all my projects (probably, I am obsessed with blood after working on Castlevania) I always demanded the use of this function. It is very useful in modeling and other objects, such as water, oil, etc ...
One day, a programmer approached me and asked: “How did you manage to do this effect in the cutscene with blood from the hands of the enemy?” I had to remind him that he was involved in the implementation of this function, and as a result, she justified herself.
Frame frequency
One of the most serious tasks of the visual effects artist when using resources in the game is optimization. The most important word for us is “overdraw”. Usually, game engines render the final image in several passes (albedo, roughness, metalness ...) and in each frame in which the particle is on the screen, it affects the rendering pipeline. Depending on the type of rendering, this effect is different. For example, if we have two translucent particles on the screen that overlap each other, the cost of rendering the overlapping pixels doubles. This is especially bad for performance when particles are full-screen, because the engine needs to render X times 1920 × 1080 pixels (in the case of Full HD). Here is a good discussion to learn more about redrawing.
Most often, our elements are not the most complex: particles from grids have few triangles, shaders are not very complex (usually), particles are illuminated in much more “cheaper” ways than characters or environments, some particles are not illuminated at all, etc. But even with this in mind, particles can be very expensive during execution, and this depends on how they are rendered. If to simplify, then there are three main ways of rendering particles (in Unreal they are called Blend Mode):
Opaque: the cheapest, but it is rarely used, unless we are talking about particles from grids. This is the cheapest method, because particles overlapping other particles cut them off. Therefore, the engine is easier to drop pixels.

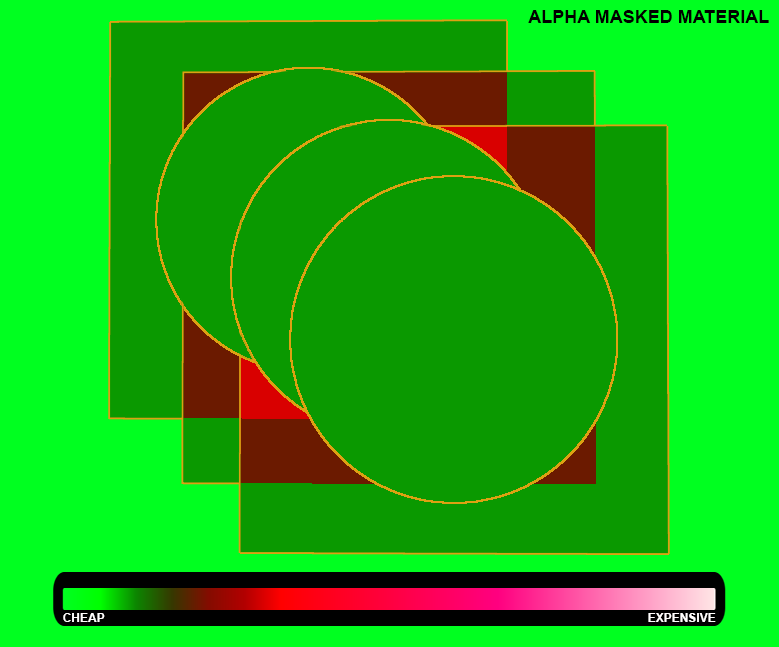
With alpha mask (Alpha masked): it is also called the alpha test (alpha test). In it, we have the values of transparency 0 and 1. Therefore, the pixels are only visible and invisible, without translucency. This is the easiest way to get transparency, at least in console games. Opaque pixels cut off the pixels below them, just as with the opacity method described above.
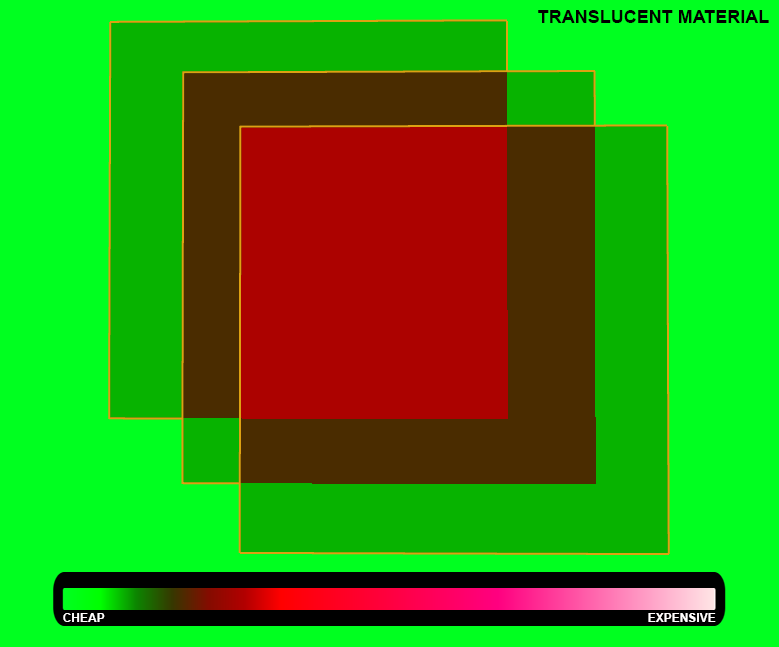
Translucency: also called alpha blending. In this case, we have no clipping. This is the most expensive way to render particles. The biggest problem for performance is that it is difficult for the engines to sort the rendering of translucent pixels, because they usually do not store depth by Z (Z depth) (but opaque and alpha mask stored). That is why you most often see braking in games (fog, dust, windows, etc.).
In addition, there are two methods of lighting:
- Unlit: no particles are lit at all. All lighting needs to be baked into a texture or performed through a shader (and this is not a very accurate way).
- Illuminated (Lit): particles receive illumination, similar to the lighting of the environment and props. This method is trivial for particles with no transparency / alpha mask, because they store information about the depth in Z. However, by default, the translucent particles do not store this information, so the engine does not know where these particles are in the world. Adding translucent particles of light adds another level of complexity to the rendering of each particle.
Adding illumination to the translucent particles allows translucent particles to store information about the Z depth. In itself, this is very expensive, but modern graphics cards can handle this with careful use of the method.
Recommendations:
- Use texture space wisely. If possible, avoid too many transparent pixels in the texture, placing the opaque pixels as close to the edges as possible.
- Use particles with alpha mask if possible.
- Use clipping or hexagonal shapes if the engine supports them.
- Be careful with the amount of particles created (spawnrate) and make compromises.
- VFX Optimization Guide
Example:
When working on multiplayer Gears of War cards, we needed to be especially attentive to the performance impact of our work. Our goal was 60 fps in 1080p resolution, so we had to approach the quality wisely so that the gameplay always remained smooth.
We had a level with a grass field, and after the profiling stage, a team of technical artists determined that grass is the most expensive element of the map. After discussions with the departments of artists on the environment, technical artists and visual effects artists, we decided to try a new technique. I had the task to make the farther the grass sprites were from the camera, the fewer transparent pixels there were. I created a diffuse texture covered with blades of grass, but the opacity was created as follows: I had groups of blades of grass with different gray values. At the same time, the shader increased the gray value when moving away from the camera so that the grass blades could be seen. Since the shader worked in the alpha mask mode, these grass blades were visible only with the alpha value of 1. Thus, we saved a lot of redrawing cycles over long distances.
Another example of optimization and “deception” of the player was the removal of particles in the vicinity of the camera. In fact, particles are not removed, but they shrink and become invisible. We also did this trick in Gears 4 with particles of smoke, light rays (lightshaft), etc. In the shader, we made the particles gradually become transparent when they are at a distance X from the camera (specified in the shader), and when they become completely transparent, we cut the vertices. The last stage was performed because Unreal was not smart enough not to render a completely transparent texture, and we had problems with redrawing.
Tips
I do not know any visual effects artist unfamiliar with imbueFX. Don't worry that the content is “out of date”, it’s still invaluable for us that these guys helped us with the video .
There are also various guides that are easy to follow if you are interested in this area and have a basic knowledge of 3D editors. In addition, the Unreal Engine 4 official website is a good place to learn:
Unreal 4 particle systems
A few years ago, I was invited to a group on Facebook called Real Time VFX. I had no idea how much knowledge I could get in this platform. Recently, someone decided to create a separate domain for it, and although we are still sharing information on Facebook, you can now explore more structured content.
Real Time VFX
There you will find the best visual effects artists in the industry, people from Naughty Dog, Epic, Infinity Ward, etc. They all share their tricks and tips and are always ready to help.
about the author
My name is Francesco García-Obledo Ordóñez , I am the leading visual effects artist King Barcelona, in the city where I was born 34 years ago. I started working in the industry as a 3D artist in 2005 in a small company here in Barcelona. At that time, the creation of video games was not such a huge business as it is now, so the artist had to deal with many different tasks: modeling, uv-sweep, rigging, texturing, lighting, etc.
My transformation into a visual effects artist began in my second company, the Barcelona studio of the Swedish company Grin, which created Bionic Commando. One of my projects was Wanted: Weapons of Fate. Then for the first time I moved away from artistic tasks and took up the technical side. I helped the environmental / props team of artists export resources and worked with programmers to introduce new features (shaders, gameplay, tools, etc.). When I joined Mercury Steam in 2011, I officially became a visual effects artist. I worked on Castlevania Lords of Shadow 2 and did almost all the work of creating visual effects: bonuses, magic, character effects, gameplay effects, etc. From this experience, I learned a lot, and it allowed me to dive deeper into the community of visual effects creators, learn terminology, plugins, software and, most importantly, meet other visual effects artists in the industry.
When we finished the game, I decided to leave the comfort zone and join the team of four visual effects artists in another country. In 2014, Splash Damage (London) hired me and I participated in the development of Gears of War Ultimate Edition. This was my first experience with the commercial engine (Unreal Engine) from the beginning to the end of the project and it gave me a different perspective on how to create visual effects. I dealt with such tasks as Unreal Script, creating shaders, etc. Working on such a meaningful game imposed a huge responsibility, but I think it was worth it, because after creating Gears of War 4, I decided to go to Rockstar North (Edinburgh) to work on such a large-scale game as Red Dead Redemption 2. I was part teams of 10-12 people (special effects artists and graphics / gameplay programmers). It was very difficult and pleasant to return to work on a proprietary engine and implement new features, shaders, etc.
For personal reasons, I moved to King’s Barcelona office and now I’m working as a visual effects specialist on projects under development. I occupy a new position in a company that is committed to greater specialization in the development of mobile games, because in this industry usually employees of a more general profile work.
Source: https://habr.com/ru/post/331604/
All Articles