How to create a compact and efficient javascript using RollupJS
Recently, more and more often, along with other javascript collectors, I began to meet rollupJS. And even began to use it for writing modules used in the company's main project. Therefore, I want to share with you a translation of becoming about this compact and convenient collector.
Style - author.
Learn how to use Rollup as a more compact and efficient alternative to webpack and Browserify for combining JavaScript files.
')
At the end of this tutorial, we will configure Rollup to:
- combining our script
- remove unused code
- transplaying it to work with old browsers,
- support for the use of Node modules in the browser,
- work with environment variables and
- optimizing our code to reduce the size of the output file
Prerequisites
- Initial knowledge in javascript.
- An initial introduction to ES2015 modules also does not hurt.
- You must have
npminstalled on your computer. (You don't have it? Install Node.js here .)
What is a Rollup?
As the developers themselves describe:
Rollup is the next generation tool for batch processing JavaScript modules. Build your application or library using ES2015 modules, then merge them into one file for efficient use in browsers and Node.js. This is similar to using Browserify and webpack. You can also call the Rollup a construction tool, which is on a par with tools like Grunt and Gulp. However, it is important to note that, although you can use Grunt and Gulp to solve JavaScript batch processing tasks, these tools will use similar Rollup, Browserify, or webpack functionality.
Why can Rollup help you?
What a Rollup can do exactly, duck, to form truly truly optimized files. And if without boring and tedious formalities, then you can summarize it like this: compared to other tools for batch processing of JavaScript, Rollup will almost always create a smaller package, and do it faster.
This is because Rollup is based on ES2015 modules that are more efficient than CommonJS modules used in Browserify and webpack. In addition, Rollup is much easier to remove unused code from modules using tree-shaking , which ultimately means that only the code that we really need will be included in the final package.
Tree-shaking becomes very effective when we use third-party libraries or frameworks that have dozens of available functions and methods. If we use only one or two methods - for example, lodash or jQuery - then loading the library completely incurs a lot of extra overhead.
Currently, Browserify and webpack include a lot of unused code when building. But the Rollup does not do this - only what we actually use is included in the assembly.
UPDATE (2016-08-22)
To clarify: Rollup can use tree-shaking only on ES modules. CommonJS modules, which, at the time of writing, are both lodash and jQuery, cannot be applied tree-shaking. Nevertheless, tree-shaking is one of the advantages of the Rollup along with the main one in the form of a speed / performance ratio. See also Richard Harris’s explanation and additional information by Nolan Lawson .
Note
Partly due to the effectiveness of Rollup, webpack 2 will have tree-shaking support.
How to use Rollup to process and build javascript files?
To show how effective Rollup is, let's take a look at creating an extremely simple project that uses Rollup to build JavaScript.
STEP 0: CREATING A PROJECT WITH JAVASCRIPT AND CSS.
First we need to have a code to work with. In this tutorial, we’ll work with a small application available on GitHub .
The folder structure looks like this:
learn-rollup/
├── build/
│ └── index.html
├── src/
│ ├── scripts/
│ │ ├── modules/
│ │ │ ├── mod1.js
│ │ │ └── mod2.js
│ │ └── main.js
│ └── styles/
│ └── main.css
└── package.json
You can install the application that we will work with during this tutorial by executing the following command in your terminal.
# Move to the folder where you keep your dev projects. cd /path/to/your/projects # Clone the starter branch of the app from GitHub. git clone -b step-0 --single-branch https://github.com/jlengstorf/learn-rollup.git # The files are downloaded to /path/to/your/projects/learn-rollup/ Note
If you do not clone repo, be sure to copy the contents of
build/index.html into your own code. HTML is not covered in this manual.STEP 1: INSTALL ROLLUP AND CREATE A CONFIGURATION FILE.
To get started, install the Rollup with the following command:
npm install --save-dev rollup Then create a new file with the name
rollup.config.js in the learn-rollup folder. Add the following to it. export default { entry: 'src/scripts/main.js', dest: 'build/js/main.min.js', format: 'iife', sourceMap: 'inline', }; Let's talk about each option in this configuration:
- Entry is the file we want Rollup to process. In most applications, this will be the main JavaScript file that initializes everything and is the entry point.
- Dest is the place where the processed scripts will be saved.
- Format - Rollup supports multiple output formats. Since we work in a browser, we want to use immediately called functions (IIFE)FootnoteThis is a rather difficult concept to understand, but if in a nutshell, we want our code to be within its own scope, which prevents conflicts with other scripts. IIFE is a closure that contains all of our code in its own scope.
- SourceMap is very useful for debugging to provide a source code map. This option adds a map to the generated file, which simplifies this task.
Note
ROLLUP CONFIGURATION CHECK
After we have created the configuration file, we can verify that everything works by running the following command in our terminal:
./node_modules/.bin/rollup -c This will create a new folder called
build in your project with a js subfolder that will contain our generated main.min.js file.We will see that the package was created correctly by opening
build/index.html in our browser: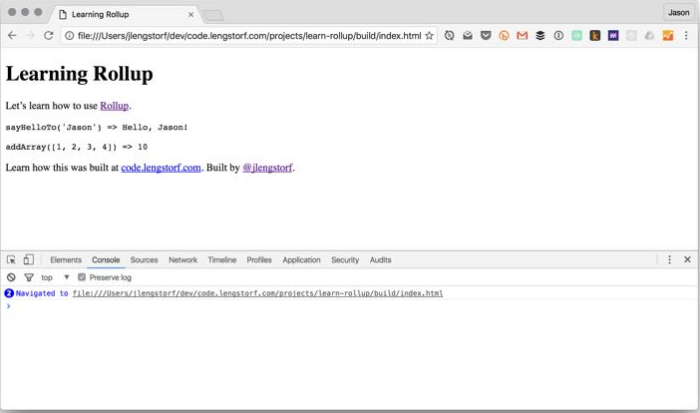
Note
At this stage, only modern browsers will work without errors. In order for this code to work with old browsers that do not support ES2015 / ES6, we need to add some plugins.
PASSING THE GENERATED PACKAGE
Using tree-shaking makes Rollup a powerful tool, and so there is no unused code from the modules we refer to in the output file. For example, in
src/scripts/modules/mod1.js there is a function sayGoodbyeTo () , which is not used in our application - and since it is never used, Rollup does not include it in the final package:Code
(function () { 'use strict'; /** * Says hello. * @param {String} name a name * @return {String} a greeting for `name` */ function sayHelloTo( name ) { const toSay = `Hello, ${name}!`; return toSay; } /** * Adds all the values in an array. * @param {Array} arr an array of numbers * @return {Number} the sum of all the array values */ const addArray = arr => { const result = arr.reduce((a, b) => a + b, 0); return result; }; <habracut/> // Import a couple modules for testing. // Run some functions from our imported modules. const result1 = sayHelloTo('Jason'); const result2 = addArray([1, 2, 3, 4]); // Print the results on the page. const printTarget = document.getElementsByClassName('debug__output')[0]; printTarget.innerText = `sayHelloTo('Jason') => ${result1}\n\n` printTarget.innerText += `addArray([1, 2, 3, 4]) => ${result2}`; }()); //# sourceMappingURL=data:application/json;charset=utf-8;base64,... In other build tools, this is not always the case, and the generated packages can be really large if we include a large library, such as lodash , to refer to one or two functions.
For example, using the webpack , the
sayGoodbyeTo () function is sayGoodbyeTo () , and the resulting packet is more than twice the size that the Rollup generates.Footnote
However, it is important to remember that when we deal with such small test applications, doubling the file size does not take much time. For comparison, at the moment this size is ~ 3KB vs. ~ 8KB
STEP 2: INSTALL BABEL, THAT WOULD USE NEW FEATURES OF JAVASCRIPT NOW
At the moment we have code that will only work in modern browsers, and will not work in some browsers, the version of which lags behind several versions - and this is not ideal.
Fortunately, Babel can help us. This project allows you to translate new JavaScript features ( ES6 / ES2015, etc. ) into ES5, and this code will work in almost any browser that can still be used today.
If you have never used Babel, your developer life will change forever. Access to new JavaScript features makes language easier, cleaner and more enjoyable overall.
So let's make it part of our build process so that we don’t think about it anymore.
INSTALLATION OF NECESSARY MODULES
First, we need to install the Babel Rollup plugin and the corresponding Babel presets .
# Install Rollup's Babel plugin. npm install --save-dev rollup-plugin-babel # Install the Babel preset for transpiling ES2015. npm install --save-dev babel-preset-es2015 # Install Babel's external helpers for module support. npm install --save-dev babel-plugin-external-helpers Note
Babel presets are a collection of Babel plugins that indicate to Babel that we actually want to translate
CREATING
.babelrc .Then create a new file called
.babelrc in the project root directory (learn-rollup/ ). Inside, add the following JSON: { "presets": [ [ "es2015", { "modules": false } ] ], "plugins": [ "external-helpers" ] } This tells Babel which preset he should use during the transfer.
Note
In earlier versions of npm (<v
2.15.11 ) you may see an error with the es2015-rollup preset. If you cannot upgrade npm , see this problem for an alternative .babelrc configuration.UPDATE (2016-11-13)
The
.babelrc video uses outdated configuration. See this pull request for configuration changes , and this for changes to package.json .UPDATE
rollup.config.js . To add Babel to the Rollup, you need to update rollup.config.js. Inside, we import the Babel plug-in, and then add it to a new configuration property called plugins, which will contain an array of plug-ins.
// Rollup plugins import babel from 'rollup-plugin-babel'; export default { entry: 'src/scripts/main.js', dest: 'build/js/main.min.js', format: 'iife', sourceMap: 'inline', plugins: [ babel({ exclude: 'node_modules/**', }), ], }; To avoid third-party scripting, we set the
exclude property to ignore the node_modules directory.CHECK OUTPUT PACKAGE
With everything installed and configured, we can do a rebuild package:
./node_modules/.bin/rollup -c When we look at the result, it looks about the same. But there are a few key differences: for example, look at the
addArray () function: var addArray = function addArray(arr) { var result = arr.reduce(function (a, b) { return a + b; }, 0); return result; }; See how Babel transformed the “fat” arrow for the function
(arr.reduce ((a, b) => a + b, 0)) into a regular function.This is a transpilation in action: the result is the same, but the code is now supported in IE9.
Important
Babel also offers babel-polyfill , which makes things like
Array.prototype.reduce () available in IE8 and earlier versions.STEP 3: ADDING THE ESLINT TO JAVASCRIPT CHECK FOR ERROR
It is always useful to use linter for your code, since it provides a consistent coding practice and helps to find complex errors, such as missing operator or parentheses.
For this project we will use ESLint .
INSTALLING THE MODULE
To use ESLint, we need to install the ESLint Rollup plugin :
npm install --save-dev rollup-plugin-eslint GENERATION
.eslintrc.json .To make sure that we get only the errors that we need, we must first configure ESLint. Fortunately, we can automatically create most of this configuration by running the following command:
Terminal
$ ./node_modules/.bin/eslint --init ? How would you like to configure ESLint? Answer questions about your style ? Are you using ECMAScript 6 features? Yes ? Are you using ES6 modules? Yes ? Where will your code run? Browser ? Do you use CommonJS? No ? Do you use JSX? No ? What style of indentation do you use? Spaces ? What quotes do you use for strings? Single ? What line endings do you use? Unix ? Do you require semicolons? Yes ? What format do you want your config file to be in? JSON Successfully created .eslintrc.json file in /Users/jlengstorf/dev/code.lengstorf.com/projects/learn-rollup If you answer the questions as shown above, you will get the following result in
.eslintrc.json :.eslintrc.json
{ "env": { "browser": true, "es6": true }, "extends": "eslint:recommended", "parserOptions": { "sourceType": "module" }, "rules": { "indent": [ "error", 4 ], "linebreak-style": [ "error", "unix" ], "quotes": [ "error", "single" ], "semi": [ "error", "always" ] } } TWEAK
.eslintrc.jsonHowever, we have to make several adjustments to avoid errors for our project:
- We use 2 spaces instead of 4.
- Later we will use a global variable called
ENV, so we need to whitelist it.
Make the following changes to your
.eslintrc.json setting - the globals property and the indent property setting:.eslintrc.json
{ "env": { "browser": true, "es6": true }, "globals": { "ENV": true }, "extends": "eslint:recommended", "parserOptions": { "sourceType": "module" }, "rules": { "indent": [ "error", 2 ], "linebreak-style": [ "error", "unix" ], "quotes": [ "error", "single" ], "semi": [ "error", "always" ] } } UPDATE
rollup.config.jsThen import the ESLint plugin and add it to the Rollup configuration:
// Rollup plugins import babel from 'rollup-plugin-babel'; import eslint from 'rollup-plugin-eslint'; export default { entry: 'src/scripts/main.js', dest: 'build/js/main.min.js', format: 'iife', sourceMap: 'inline', plugins: [ eslint({ exclude: [ 'src/styles/**', ] }), babel({ exclude: 'node_modules/**', }), ], }; CHECK RESULTS IN CONSOLES
When we run
./node_modules/.bin/rollup -c , nothing seems to happen. The fact is that the application code in its current form passes linter without problems.But if we introduce a problem, such as deleting a semicolon, we will see how ESLint helps:
$ ./node_modules/.bin/rollup -c /Users/jlengstorf/dev/code.lengstorf.com/projects/learn-rollup/src/scripts/main.js 12:64 error Missing semicolon semi 1 problem (1 error, 0 warnings) Potentially, what may contain a hidden error is now immediately visible, including the file, row and column where the problem was found.
Although this does not save us from all our errors when debugging, but it greatly speeds up this process, eliminating errors caused by obvious typos.
Footnote
Probably many of us spent numerous hours, catching mistakes, which in the end turned out to be something as stupid as the name with an error, it is difficult to exaggerate the increase in work efficiency from the use of the linter.
STEP 4: ADDING A PLUG FOR TREATING NON-ES MODULES
This is important if you use Node-style modules in your build. Without using this plugin, you will receive an error message when connecting this library using
require .ADDING NODE-MODULES AS A DEPENDENCE
It would be easy to crack this sample project without reference to a third-party module, but it is not going to cut it in real projects. Therefore, to make our Rollup setup really useful, let's make sure that we can also refer to third-party modules in our code.
For simplicity, we will add a simple logger to our code using the
debug package. Start by installing it: npm install --save debug Note
Since this will be indicated in the main project, it is important to use --save, which will avoid an error in production where devDependencies will be ignored.
Then, inside
src/scripts/main.js , let's add simple logging:main.js
// Import a couple modules for testing. import { sayHelloTo } from './modules/mod1'; import addArray from './modules/mod2'; // Import a logger for easier debugging. import debug from 'debug'; const log = debug('app:log'); // Enable the logger. debug.enable('*'); log('Logging is enabled!'); // Run some functions from our imported modules. const result1 = sayHelloTo('Jason'); const result2 = addArray([1, 2, 3, 4]); // Print the results on the page. const printTarget = document.getElementsByClassName('debug__output')[0]; printTarget.innerText = `sayHelloTo('Jason') => ${result1}\n\n`; printTarget.innerText += `addArray([1, 2, 3, 4]) => ${result2}`; When you start rollup, we get a warning:
$ ./node_modules/.bin/rollup -c Treating 'debug' as external dependency No name was provided for external module 'debug' in options.globals – guessing 'debug' And if we run our index.html again, we will see that the console has an Error ReferenceError:
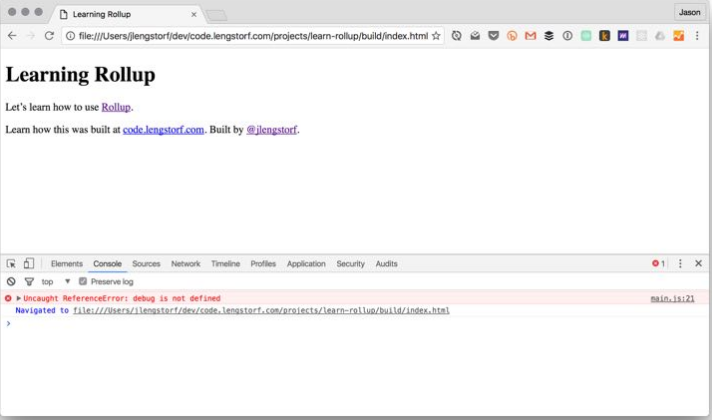
Here, rubbish. It did not work.
This is due to the fact that CommonJS is used in the node Node modules, which is incompatible with Rollup. To solve this problem, we need to add a couple of plugins to handle dependencies of Node and CommonJS modules.
INSTALLING THESE MODULES
To get around this problem, we need to add two plugins:
rollup-plugin-node-resolve, which allows you to load third-party modules fromnode_modules.rollup-plugin-commonjs, which provides support for connecting CommonJS modules.
Install both plugins with the following command:
npm install --save-dev rollup-plugin-node-resolve rollup-plugin-commonjs UPDATE
rollup.config.jsThen import it into the Rollup configuration:
rollup.config.js
// Rollup plugins import babel from 'rollup-plugin-babel'; import eslint from 'rollup-plugin-eslint'; import resolve from 'rollup-plugin-node-resolve'; import commonjs from 'rollup-plugin-commonjs'; export default { entry: 'src/scripts/main.js', dest: 'build/js/main.min.js', format: 'iife', sourceMap: 'inline', plugins: [ resolve({ jsnext: true, main: true, browser: true, }), commonjs(), eslint({ exclude: [ 'src/styles/**', ] }), babel({ exclude: 'node_modules/**', }), ], }; Note
The
jsnext property provides simple migration of ES2015 modules for Node packages . The main and browser properties help the plugin decide which files to use for the package.CHECK RESULTS IN CONSOLES
Run the rebuild with the command
./node_modules/.bin/rollup -c , then check the browser again to see the result: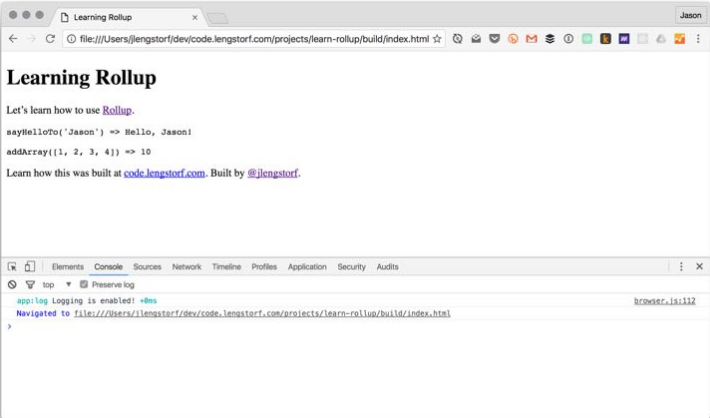
STEP 5: ADDING A PLUGIN TO ENABLE THE REPLACEMENT OF A VARIABLE ENVIRONMENT
Environment variables add a lot of additional "chips" in the development and give us the opportunity to do such things as turning off / turning on logging, implementing only dev scripts and much more.
So let's make sure that Rollup allows us to use them.
ADDING TERMS FOR
ENV IN main.jsLet's use the environment variable and turn on logging only if we are not in production mode. In
src/scripts/main.js , change the way we initialize our log() : // Import a logger for easier debugging. import debug from 'debug'; const log = debug('app:log'); // The logger should only be disabled if we're not in production. if (ENV !== 'production') { // Enable the logger. debug.enable('*'); log('Logging is enabled!'); } else { debug.disable(); } However, after we rebuild our project
(./node_modules/.bin/rollup -c) and see the browser, we will see that this gives us a ReferenceError for ENV .This should not be surprising, because we have not defined it anywhere. But if we try something like
ENV = production ./node_modules/.bin/rollup -c , it will not work anyway. This is due to the fact that setting the variable environment in this way makes it available only to the Rollup, and not to the package created using the Rollup.We need to use a plugin to transfer our environment variables to the package.
INSTALLING THESE MODULES
Start by installing
rollup-plugin-replace , which is essentially just a find-and-replace utility. It can do many things, but for our purposes we will simply find the appearance of the environment variable and replace it with the actual value (for example, all occurrences of ENV will be replaced with “production” in the assembly). npm install --save-dev rollup-plugin-replace UPDATE rollup.config.js
Let's import it into
rollup.config.js and add it to our list of plugins.The configuration is quite simple: we can simply add a list of key-value pairs, where the key is the string to replace, and the value is what it should replace.
rollup.config.js
// Rollup plugins import babel from 'rollup-plugin-babel'; import eslint from 'rollup-plugin-eslint'; import resolve from 'rollup-plugin-node-resolve'; import commonjs from 'rollup-plugin-commonjs'; import replace from 'rollup-plugin-replace'; export default { entry: 'src/scripts/main.js', dest: 'build/js/main.min.js', format: 'iife', sourceMap: 'inline', plugins: [ resolve({ jsnext: true, main: true, browser: true, }), commonjs(), eslint({ exclude: [ 'src/styles/**', ] }), babel({ exclude: 'node_modules/**', }), replace({ exclude: 'node_modules/**', ENV: JSON.stringify(process.env.NODE_ENV || 'development'), }), ], }; In our configuration, we describe ENV as process.env.NODE_ENV — the usual way to set environment variables in Node applications — or “development”. We use JSON.stringify () to get the value enclosed in double quotes.
To eliminate problems with third-party code, we also set the exclude property to ignore our node_modules directory and all the packages it contains. (Thanks to @wesleycoder for that matter ).
CHECK RESULTS
Make a build rebuild and check the browser. Log in the console should not differ from what was previously. This is good - it means that we used the default value.
To make sure that the setting works, run the rebuild in production mode:
NODE_ENV=production ./node_modules/.bin/rollup -c Note
On Windows, use
SET NODE_ENV = production ./node_modules/.bin/rollup -c to avoid errors when working with environment variables. If you have problems with this command, see this problem for more information.Make sure that after reloading the page nothing is written to the console:

STEP 6: ADDING UGLIFYJS, FOR COMPRESSION AND MINIFICATION OF GENERATED SCRIPT
, , UglifyJS . , , , «» — , .
UglifyJS ,
rollup-plugin-uglify .:
npm install --save-dev rollup-plugin-uglify rollup.config.jsUglify Rollup. , uglification :
rollup.config.js
// Rollup plugins import babel from 'rollup-plugin-babel'; import eslint from 'rollup-plugin-eslint'; import resolve from 'rollup-plugin-node-resolve'; import commonjs from 'rollup-plugin-commonjs'; import replace from 'rollup-plugin-replace'; import uglify from 'rollup-plugin-uglify'; export default { entry: 'src/scripts/main.js', dest: 'build/js/main.min.js', format: 'iife', sourceMap: 'inline', plugins: [ resolve({ jsnext: true, main: true, browser: true, }), commonjs(), eslint({ exclude: [ 'src/styles/**', ] }), babel({ exclude: 'node_modules/**', }), replace({ ENV: JSON.stringify(process.env.NODE_ENV || 'development'), }), (process.env.NODE_ENV === 'production' && uglify()), ], }; uglify () , NODE_ENV «production»., Rollup :
NODE_ENV=production ./node_modules/.bin/rollup -c , . ,
build/js/main.min.js :
~ 42 . UglifyJS, ~ 29 — 30% .
→ Source
:
rollup , webpack( ), , , . , , , (tree-shaking) . , , , .
Source: https://habr.com/ru/post/331412/
All Articles