Translation of the Appium Essentials book. Chapter 2
Hey. We continue to translate the book on Appium. Ahead, in my opinion, the most tedious, but still, necessary chapter - it tells how to deploy all the necessary surroundings on your car. From installing the JDK to creating a JAVA project in the IDE.
If you missed: Chapter 1 , and here - Chapter 3
Go
Today, there are a lot of things happening in the world of mobile development and we need testing to meet user expectations. Progress in mobile development contributes to the progress in automating the testing of mobile applications. Dan Cuellar came up with the ingenious idea of integrating tools with Selenium. After that, he created Appium. Appium is a good and widely used tool for automating mobile applications. The best part is the open source project.
')
In this chapter:
Appium is an open source project for the automation of mobile applications: native, web-based applications and hybrid, developed for Android, iOS and Firefox OS.
Before we talk about the benefits of Appium, let's look at its disadvantages:
Now, let's discuss the benefits of Appium, based on its philosophy. The Appium philosophy is different from the competitors philosophy. Officially, the philosophy is as follows:
Appium uses the existing infrastructure provided by the supplier [iOS, Android], which satisfies the first requirement, so we do not need to embed third-party code into the application under test. This allows us to test the same application [even the same assembly], which we will place in the marketplace.
If we talk about the second requirement, Appium extends WebDriver client libraries, which are already written in popular programming languages. So we are free to choose a language for test development.
Appium extends existing WebDriver JSONWP with additional API methods that are suitable for mobile automation. So Appium has the same standard as WebDriver and there is no need to revise the approach to automation, which, in turn, meets the third requirement.
Last but not least, Appium is an open source project.
The tool provides a cross-platform solution for native and hybrid applications. This means that the same test cases will work on multiple platforms. If you are already familiar with Selenium WebDriver, then Appium will seem familiar to you, otherwise, it is recommended that you first study WebDriver for a better understanding. Appium uses the same scripts as WebDriver. Also, testing is available in the cloud; You can run your tests on cloud services such as Sauce Labs and Testdroid. They provide services for running tests on real devices and simulators.
All these advantages make Appium superior compared to other automation tools. The following table shows the advantages of Appium over competitors, based on the philosophy described above:
We read about Appium; it's time to find out the system requirements for Android / iOS.
In the next section, we will look at how to install different software mentioned above.
To get started with Appium, we need to install some software.
The requirements are as follows:
To install the JDK, you need to follow the link . After installing the JDK, you need to set the environment variables:
[Further in the book it is told how to register JAVA_HOME ].
You also need to add the value "% JAVA_HOME% \ bin" to the PATH variable. [You can check that everything worked out by writing a command to cmd:
Android SDK can be downloaded on the official website for your OS.
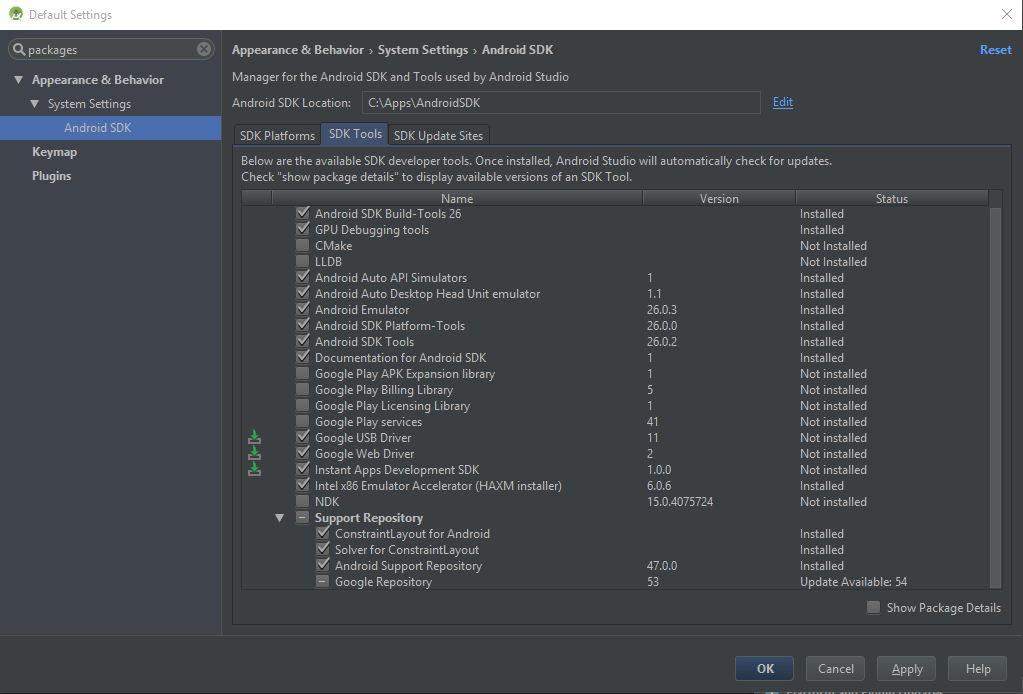
[The variable ANDROID_HOME is set in the same way as JAVA_HOME. As a value, the path to the directory where the Android SDK was installed is passed. In the PATH variable, add the values "% ANDROID_HOME% \ tools;% ANDROID_HOME% \ platform-tools". Next you need to run Android Studio. In the menu go to Tools → Android → SDk Manager. Download platforms of interest (SDK Platforms tab) and tools (SDK Tools tab)].
[I suspect that readers have less Mac user experience than Windows. Like mine, for example. Therefore, here, perhaps, I will describe in detail].
If you set variables for the first time, you need to create
Now, we have a bash_profile file. To specify the paths to the Java and Android SDK, you need to set the variables JAVA_HOME and ANDROID_HOME and bash_profile. In the file we write:
The contents of the file must be saved.
After these steps are completed, you can write
We will need:
To launch Xcode, you can go to the Applications folder and then double-click on the Xcode icon.
Homebrew is a package manager for Mac that is used to install various packages that Apple did not install. With Homebrew, you can install sets of open source tools. To install Homebrew, do the following:
npm is the Node.js package manager, the online repository of open source Node.js projects. A command line utility for installing packages. Appium-server is written on NodeJS; that is why we need npm - to download Appium. There are other ways to download Appium, which will be discussed later.
Let's set Node using the brew commands:
You can download Appium from the official site , or download from the repository: github.com/appium/appium.git .
To make sure everything is installed and configured correctly, run the following on the command line:
You do not even need to download NodeJS - it comes in a package with Appium. If the node command is not recognized, set the path to the NodeJS directory in the PATH variable (for example, C: \ AppiumForWindows \ node_modules \ appium \ bin).
You can download from the site, or you can - using npm. Run the following command in the terminal:
After installation, run the appium-doctor [ibid, in the terminal] to make sure everything is configured correctly.
You need to download some libraries to work with Appium:
Now let's see how emulators and simulators are created. Let's start with the iOS simulator, and then move on to the Android emulator.
On a Mac, we don’t need to create a simulator: we’ve already installed it by installing Xcode. When you launch the Appium server for the first time, it will prompt you to authorize the use of the tools. Or, if you run through npm, run
Virtual device [hereinafter AVD] can be created in two ways:
Let's create an AVD via the command line:
You can customize AVD using different command line parameters; more information on the site . Link may be out of date. If out of date, google "avds command line".
Now let's try to create AVD using AVD Manager (it can be found in the Android SDK folder):
After completing these steps, you will see your emulator in the list of available.
To write test scripts, we need an IDE. There are a lot of open source IDE on the market today, such as Eclipse, NetBeans, IntelliJ IDEA and others. We will use the Eclipse IDE [well, that's it! Below I will describe the project setup in IntelliJ IDEA]. If you downloaded Android ADT, then you already have Eclipse. If anything, you can always download from the site.
Launch IDE by double clicking on the eclipse.exe icon. After that, to set up a Java project, you will need to perform the following steps:

We created the project and added all the necessary JAR files. We will also use TestNG. We need to install the TestNG plugin for Eclipse:
Now we are ready to write the first Appium test.
Here on this positive note, the author concludes the chapter.
PS:

In the next chapter, we will look at Appium GUI.
If you missed: Chapter 1 , and here - Chapter 3
Go
Today, there are a lot of things happening in the world of mobile development and we need testing to meet user expectations. Progress in mobile development contributes to the progress in automating the testing of mobile applications. Dan Cuellar came up with the ingenious idea of integrating tools with Selenium. After that, he created Appium. Appium is a good and widely used tool for automating mobile applications. The best part is the open source project.
')
In this chapter:
- Benefits of Appium
- System Requirements for Android / iOS
- Installing different software
- Creating emulators and simulators
- Setting up a Java project in Eclipse
Appium - Pros and Cons
Appium is an open source project for the automation of mobile applications: native, web-based applications and hybrid, developed for Android, iOS and Firefox OS.
Before we talk about the benefits of Appium, let's look at its disadvantages:
- There is no implementation of working with Android Alert: handling pop-up dialog boxes in native applications has not yet been implemented through the Alert API, but there is an alternative way to work with alerts, which we will discuss in Chapter 7 (Advanced Custom Actions). We hope that the work with dialog boxes will be implemented soon.
- Limited Android Version Support: Appium directly supports Android versions 17 and above, but if we want to work with older versions, we need to use integrated Selendroid.
- No image recognition: it is not possible to localize images on the page; in order to work with images, we will have to work with coordinates on the screen, which is not the best practice, but in the development plans the tool has the ability to work with images.
- Gesture support: support for some gestures has not yet been implemented, for example, the java-library is not double-click, but it is available in other libraries. We still hope that it will be implemented in the near future.
Now, let's discuss the benefits of Appium, based on its philosophy. The Appium philosophy is different from the competitors philosophy. Officially, the philosophy is as follows:
- No need to recompile or upgrade your application to automate it.
- The user should not be tied to a specific programming language for writing tests.
- The user does not have to reinvent the wheel when it comes to the framework [apparently, this refers to the practice of working with Selenium]
- The solution should be open source both in spirit and in practice.
Appium uses the existing infrastructure provided by the supplier [iOS, Android], which satisfies the first requirement, so we do not need to embed third-party code into the application under test. This allows us to test the same application [even the same assembly], which we will place in the marketplace.
If we talk about the second requirement, Appium extends WebDriver client libraries, which are already written in popular programming languages. So we are free to choose a language for test development.
Appium extends existing WebDriver JSONWP with additional API methods that are suitable for mobile automation. So Appium has the same standard as WebDriver and there is no need to revise the approach to automation, which, in turn, meets the third requirement.
Last but not least, Appium is an open source project.
The tool provides a cross-platform solution for native and hybrid applications. This means that the same test cases will work on multiple platforms. If you are already familiar with Selenium WebDriver, then Appium will seem familiar to you, otherwise, it is recommended that you first study WebDriver for a better understanding. Appium uses the same scripts as WebDriver. Also, testing is available in the cloud; You can run your tests on cloud services such as Sauce Labs and Testdroid. They provide services for running tests on real devices and simulators.
All these advantages make Appium superior compared to other automation tools. The following table shows the advantages of Appium over competitors, based on the philosophy described above:
| Tool | T1 | T2 | T3 | T4 |
| Calabash | - | - | - | + |
| iOS Driver | + | + | + | - |
| Robotium | - | - | + | - |
| Selendroid | - | + | + | - |
| Appium | + | + | + | + |
System Requirements for Android / iOS
We read about Appium; it's time to find out the system requirements for Android / iOS.
Requirements for testing Android on Windows and Mac
- Java (version 7 and up)
- Android SDK API (version 17 and higher)
- Android Virtual Device (AVD) [emulator is at least available after installing Android Studio] or a real device
Requirements for iOS:
- Mac OS X 10.7 and higher
- Xcode (4.6.3 and higher; 5.1 is recommended) with command-line build tools
- Java (version 7 and up)
- Homebrew
- NodeJS and npm
In the next section, we will look at how to install different software mentioned above.
Installing different software
To get started with Appium, we need to install some software.
Installing Appium for Android
The requirements are as follows:
- JDK (Java development kit)
- Android SDK (Software development kit)
- Appium for different operating systems
Installing JDK on Windows
To install the JDK, you need to follow the link . After installing the JDK, you need to set the environment variables:
[Further in the book it is told how to register JAVA_HOME ].
You also need to add the value "% JAVA_HOME% \ bin" to the PATH variable. [You can check that everything worked out by writing a command to cmd:
echo %JAVA_HOME% // echo %PATH% // %JAVA_HOME% + "\bin" ]Install Android SDK
Android SDK can be downloaded on the official website for your OS.
[The variable ANDROID_HOME is set in the same way as JAVA_HOME. As a value, the path to the directory where the Android SDK was installed is passed. In the PATH variable, add the values "% ANDROID_HOME% \ tools;% ANDROID_HOME% \ platform-tools". Next you need to run Android Studio. In the menu go to Tools → Android → SDk Manager. Download platforms of interest (SDK Platforms tab) and tools (SDK Tools tab)].
Setting Environment Variables for Mac
[I suspect that readers have less Mac user experience than Windows. Like mine, for example. Therefore, here, perhaps, I will describe in detail].
If you set variables for the first time, you need to create
.bash_profile file:- Open terminal
- Type
touch ~/.bash_profileand press Enter. - Type
open ~/.bash_profileand press Enter. The .bash_profile file opens.
Now, we have a bash_profile file. To specify the paths to the Java and Android SDK, you need to set the variables JAVA_HOME and ANDROID_HOME and bash_profile. In the file we write:
- export JAVA_HOME = path / to / the / java / home
- export ANDROID_HOME = path / to / the / android / sdk
- export PATH = $ PATH: $ ANDROID_HOME / tools: $ ANDROID_HOME / platform-tools
The contents of the file must be saved.
After these steps are completed, you can write
java –version in the terminal to verify the installation of the path to Java.Appium for iOS
We will need:
- Xcode
- Homebrew
- Node and npm
Install Xcode
- Go to the site . Click on the “View in Mac App Store” button.
- The system will launch the App Store automatically on your Mac and open the Xcode page.
- Click on the “Free” button and then on the “Install App” button.
To launch Xcode, you can go to the Applications folder and then double-click on the Xcode icon.
Install Homebrew
Homebrew is a package manager for Mac that is used to install various packages that Apple did not install. With Homebrew, you can install sets of open source tools. To install Homebrew, do the following:
- Open the terminal and write:
ruby -e "$(curl -fsSL https://raw.githubusercontent.com/Homebrew/install/master/install)" - Next, follow the instructions displayed in the terminal.
- After installing Homebrew, run the
brew doctorcommand. Should receive the message "Your system is ready to brew"; if not, try to fix the problems that brew doctor points to.
Node and npm
npm is the Node.js package manager, the online repository of open source Node.js projects. A command line utility for installing packages. Appium-server is written on NodeJS; that is why we need npm - to download Appium. There are other ways to download Appium, which will be discussed later.
Let's set Node using the brew commands:
brew install node Appium for Windows
You can download Appium from the official site , or download from the repository: github.com/appium/appium.git .
To make sure everything is installed and configured correctly, run the following on the command line:
node Appium-doctor [if something is node Appium-doctor , the utility will report it and give advice on how to correct the situation].You do not even need to download NodeJS - it comes in a package with Appium. If the node command is not recognized, set the path to the NodeJS directory in the PATH variable (for example, C: \ AppiumForWindows \ node_modules \ appium \ bin).
Appium for Mac
You can download from the site, or you can - using npm. Run the following command in the terminal:
npm install –g appium After installation, run the appium-doctor [ibid, in the terminal] to make sure everything is configured correctly.
Download the necessary JAR files
You need to download some libraries to work with Appium:
Creating emulators and simulators
Now let's see how emulators and simulators are created. Let's start with the iOS simulator, and then move on to the Android emulator.
IOS simulator
On a Mac, we don’t need to create a simulator: we’ve already installed it by installing Xcode. When you launch the Appium server for the first time, it will prompt you to authorize the use of the tools. Or, if you run through npm, run
sudo authorize_ios to work with the simulator.Android emulator
Virtual device [hereinafter AVD] can be created in two ways:
- Through the command line;
- Using AVD Manager.
Let's create an AVD via the command line:
- Open a command prompt and type
android list targets. A list of available platforms will be displayed. - The following command
android create avd –n <name of the AVD> -t <targetID which you can get from the first step> --abi <again you can get it from first step>.
You can customize AVD using different command line parameters; more information on the site . Link may be out of date. If out of date, google "avds command line".
Now let's try to create AVD using AVD Manager (it can be found in the Android SDK folder):
- Double-click on AVD Manager. press the New button {write as via Android Studio}
- Specify the name of the emulator [arbitrary] and set the necessary parameters
- Click Ok
After completing these steps, you will see your emulator in the list of available.
Setting up a Java project in Eclipse
To write test scripts, we need an IDE. There are a lot of open source IDE on the market today, such as Eclipse, NetBeans, IntelliJ IDEA and others. We will use the Eclipse IDE [well, that's it! Below I will describe the project setup in IntelliJ IDEA]. If you downloaded Android ADT, then you already have Eclipse. If anything, you can always download from the site.
Launch IDE by double clicking on the eclipse.exe icon. After that, to set up a Java project, you will need to perform the following steps:
- At startup, the IDE will ask you where the [Workspace location] folder will be located. Specify a convenient path and click Ok
- On the welcome screen, click the Workbench icon [in the upper right corner].
- Create a new project. This can be done through the menu File | New | Project
- In the window that opens, select the Java Project type of project in the Java folder and click Next
- Specify the project name [Project name], click on Use a project specific JRE and click Finish
- You have created a project. Now create a package: right-click on the src folder [in the project browser], in the context menu - New | Package. Specify the package name. For example, "com.example.appium". Then click Finish.
- In the created package we create a class: right-click on the com.example.appium package. In the context menu - New | Class and specify the class name, for example, FirstScript. Then click Finish.
- In the created package we create a class: right-click on the com.example.appium package. In the context menu - New | Class and specify the class name, for example, FirstScript. Then click Finish.
- Before writing a test, you need to add several JAR files. Right click on the project. In the context menu - Build Path | Configure Build Path. Eclipse will open a dialog box. Select the Libraries tab and click Add External JARs ...
- Select the JAR files shown in the screenshot and click Ok
We created the project and added all the necessary JAR files. We will also use TestNG. We need to install the TestNG plugin for Eclipse:
- Click the Help tab, then Install New Software
- In the Work field, enter the address beust.com/eclipse . Below appears TestNG; select TestNG and click Next. Then follow the instructions of the installer to install the TestNG plugin.
- TestNG plugin will be displayed in the Preferences section of the Window tab.
Now we are ready to write the first Appium test.
Here on this positive note, the author concludes the chapter.
PS:
How to create a Java project if you are working with IntelliJ IDEA
- Launch IntelliJ IDEA
- In the dialog that opens, click Create New Project.
- Type of project - Java. Ensure that the Project SDK is JDK. If not, specify the path through the New button ...
- Click Next. Next window is also Next
- Specify the project name. Click Finish
- This will create a project. Add packages and classes in the same way as in Eclipse (right click on the src package, etc.)
- To add JAR files, go to File | Project Structure
- In the left pane, select the Modules section.
- Select Dependencies tab
- Click "+" and select the necessary JAR files
- Click Ok
In the next chapter, we will look at Appium GUI.
Source: https://habr.com/ru/post/331248/
All Articles