Translation of the Appium Essentials book. Chapter 1
Hi Habr! I immediately took up the study of Appium. Among other things, I got the Appium Essentials book:
Below is a translation of the first chapter. Plans to publish the translation entirely. I will publish either by chapters or by intelligent logical blocks.
Places, in the book there will be comments from me [here in such brackets]. They will be small, just to clarify the context where necessary. And one more thing: sometimes, rarely, I will skip some very obvious things from the category of how to register JAVA_HOME . Missing pieces will denote.
')
At the moment there is a translation of chapter 1 (below)
Chapters 2
and chapters 3
But in general, I accept with pleasure instructions on inaccuracies in translation (with loss of meaning).
I hope the translation will be useful. Go!
In this chapter, we’ll talk about the Appium architecture, the JSON wire protocol, the Appium sessions, and also get an overview of the Desired capabilities for launching the Appium.
Appium is an HTTP server written in Nodes that creates and processes WebDriver sessions. Appium takes the same approach as Selenium WebDriver, which receives HTTP requests in JSON format from clients and converts them depending on the platform on which it runs.
Let's discuss how Appium works with iOS and Android.
On an iOS device, Appium uses the Apple's UIAutomation API to interact with UI elements. UIAutomation is a JavaScript library developed by Apple for writing test scripts. Appium uses the same libraries to automate iOS applications.
Let's look at the architecture that is presented below:

The executable script is delivered by HTTP request to the Appium server in the form of JSON. Appium-server sends command to tools (UIAutomation). The tools look for the
Similar architecture also works in the Appium-Android bundle.
On the Android device, Appium uses UIAutomator to automate the application. UIAutomator is a framework created by the Android development team for testing the user interface.
Let's look at the architecture that is presented below:
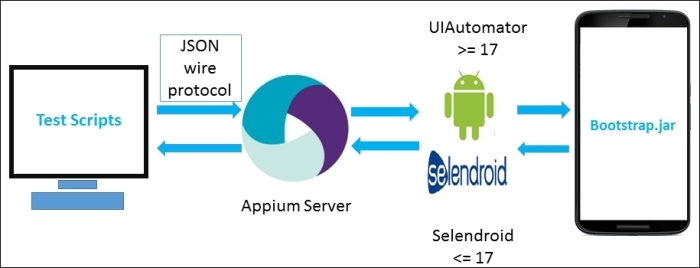
In the diagram above, we have UIAutomator / Selendroid instead of Apple tools and, instead of
JSON wire protocol (JSONWP) is a mechanism created by the WebDriver development team. This protocol is a collection of well-defined standardized endpoints opened through the RESTful API. The purpose of WebDriver and JSONWP is to automate website testing via a browser such as Firefox driver, IE driver, Chrome driver, etc.
Appium implements Mobile JSONWP — an extension of Selenium JSONWP — and controls various mobile device behaviors, such as installing / removing an application during a session.
Here are some examples of endpoints from APIs that are used to interact with mobile applications:
Appium provides client libraries similar to WebDriver libraries to interact with the REST API. In these libraries, functions look like this:
This method will trigger an HTTP request, and will receive a response from the endpoint [is it possible, will I continue to write endpoint? Forces are no longer] from the API. Specifically, in this example, the endpoint that processes the
The driver will execute a test script that comes in JSON-format from the AppiumDriver server to get the
Session is the environment in which commands are sent to a specific application; the command is always executed in the context of the current session. As we saw in the previous section, the client uses the session identifier — the
Desired capabilities [desired capabilities] is a JSON object (set of key-value pairs) sent by the client to the server. DC describes the features of the session being created.
Let's look at all the possibilities. First, we will see the possibilities for the Appium server:
You must import the
Appium-server is used to interact with different platforms (iOS and Android). It creates a session to interact with mobile applications. This is an HTTP server written in NodeJS and uses the same idea as Selenium Server, which identifies HTTP requests from client libraries and sends its requests to the appropriate platforms. To start the Appium server, you need to download the sources or install from npm. Appium also has a GUI version of the server. It can be downloaded from the official site http://appium.io . In the following chapters we will look at the GUI version in more detail.
One of the advantages of Appium is that it is just a REST API. And the code with which you interact with this API can be written in different languages, such as Java, C #, Ruby, Python, and others. Appium extends WebDriver library and adds commands for working with mobile devices. It provides client libraries that support Appium extensions for the WebDriver protocol. It is because of these extensions that it is important to use Appium-specific client libraries to write automated tests or procedures instead of WebDriver shared client libraries.
Appium has added some interesting features in working with mobile devices, such as multitouch or working with screen orientation. Later we will see their practical application.
By the end of the chapter, we should have an understanding of the architecture of Appium, the JSON wire protocol, the desired capabilities and how to use them. we also learned about the Appium server and client libraries in various programming languages.
We reviewed the JSONWP and Appium sessions, which are used to send additional commands to interact with the application. In the last section, we got some information about the Appium server and its language-specific client libraries.
In the next chapter, we will look at what is needed to get started with Appium, working with Appium
Below is a translation of the first chapter. Plans to publish the translation entirely. I will publish either by chapters or by intelligent logical blocks.
Places, in the book there will be comments from me [here in such brackets]. They will be small, just to clarify the context where necessary. And one more thing: sometimes, rarely, I will skip some very obvious things from the category of how to register JAVA_HOME . Missing pieces will denote.
')
At the moment there is a translation of chapter 1 (below)
Chapters 2
and chapters 3
But in general, I accept with pleasure instructions on inaccuracies in translation (with loss of meaning).
I hope the translation will be useful. Go!
Chapter 1. Important Concepts.
In this chapter, we’ll talk about the Appium architecture, the JSON wire protocol, the Appium sessions, and also get an overview of the Desired capabilities for launching the Appium.
- Appium architecture
- Selenium JSON wire protocol
- Sessions Appium
- Desired capabilities
- Appium server and client libraries
Appium architecture
Appium is an HTTP server written in Nodes that creates and processes WebDriver sessions. Appium takes the same approach as Selenium WebDriver, which receives HTTP requests in JSON format from clients and converts them depending on the platform on which it runs.
Let's discuss how Appium works with iOS and Android.
Appium and iOS
On an iOS device, Appium uses the Apple's UIAutomation API to interact with UI elements. UIAutomation is a JavaScript library developed by Apple for writing test scripts. Appium uses the same libraries to automate iOS applications.
Let's look at the architecture that is presented below:
The executable script is delivered by HTTP request to the Appium server in the form of JSON. Appium-server sends command to tools (UIAutomation). The tools look for the
bootstrap.js file that the Appium server passed to the iOS device. Then, the commands specified in the bootstrap.js file are executed by the iOS tools environment. Having executed the command, the client sends a report to the server with the details of the execution of this command.Similar architecture also works in the Appium-Android bundle.
Appium and Android
On the Android device, Appium uses UIAutomator to automate the application. UIAutomator is a framework created by the Android development team for testing the user interface.
Let's look at the architecture that is presented below:
In the diagram above, we have UIAutomator / Selendroid instead of Apple tools and, instead of
bootstrap.js is transmitted. Appium supports Android version 17 and higher. For earlier versions, use selendroid. During the test, Appium sends commands to UIAutomator or Selendroid, depending on the version of Android. Here, bootstrap.jar plays the role of a TCP server, which we can use to send commands. Commands, in turn, are executed on the Android device using the tools Selendroid or UIAutomator.Selenium JSON wire protocol
JSON wire protocol (JSONWP) is a mechanism created by the WebDriver development team. This protocol is a collection of well-defined standardized endpoints opened through the RESTful API. The purpose of WebDriver and JSONWP is to automate website testing via a browser such as Firefox driver, IE driver, Chrome driver, etc.
Appium implements Mobile JSONWP — an extension of Selenium JSONWP — and controls various mobile device behaviors, such as installing / removing an application during a session.
Here are some examples of endpoints from APIs that are used to interact with mobile applications:
/session/:sessionId/session/:sessionId/element/session/:sessionId/elements/session/:sessionId/element/:id/click/session/:sessionId/source/session/:sessionId/url/session/:sessionId/timeouts/implicit_wait
Appium provides client libraries similar to WebDriver libraries to interact with the REST API. In these libraries, functions look like this:
AppiumDriver.getPageSource(); This method will trigger an HTTP request, and will receive a response from the endpoint [is it possible, will I continue to write endpoint? Forces are no longer] from the API. Specifically, in this example, the endpoint that processes the
getPageSource method getPageSource like this: /session/:sessionId/source The driver will execute a test script that comes in JSON-format from the AppiumDriver server to get the
source page. Back will return page source in string format. In the case of non-HTML platforms (native applications), Appium returns an XML document representing the hierarchy of UI elements. The structure of the document may vary, depending on the platform.Sessions Appium
Session is the environment in which commands are sent to a specific application; the command is always executed in the context of the current session. As we saw in the previous section, the client uses the session identifier — the
sessionId parameter — before executing the command itself. The client library sends a request to the server to create a session. Then, the server returns sessionId , which is used in subsequent commands to interact with the application under test.Desired capabilities
Desired capabilities [desired capabilities] is a JSON object (set of key-value pairs) sent by the client to the server. DC describes the features of the session being created.
Let's look at all the possibilities. First, we will see the possibilities for the Appium server:
You must import the
org.openqa.Selenium.remote.DesiredCapabilities library [Java example] in order to work with DC.| Explanation | |
Used to determine the executor of commands. If you want to work with the Android SDK version below 17, you need to specify the value of Selendroid . Otherwise, the default will be set to Appium . Example: You can also define capabilities using the Appium library. You need to import the io.appium.java_client.remote.MobileCapabilityType library: If you are working with iOS, you do not need to use this feature. | |
Indicates the operating system on the mobile device. Valid values are iOS , Android and FirefoxOS . Example: Or using the Appium library: | |
Specifies the version of the operating system. Example: Or using the Appium library: | |
Sets the type of device or emulator, for example, iPhone Simulator , iPad Simulator , iPhone Retina 4-inch , Android Emulator , Moto x , Nexus 5 and so on. Example: Or using the Appium library: | |
Absolute path to a file or URL to download a file in .ipa , .apk , or .zip format. Appium will first install the application on the appropriate device. Note that if Android determines the capabilities of appPackage and appActivity (described below), then you do not need to specify an app . Example: Or using the Appium library: | |
Used when testing web applications on a mobile device. Defines a browser for testing. Example: Or using the Appium library: | |
Appium waits for a new command from the client for some time, after which [if no commands have been received], decides that the client is off and ends the session. The default value is 60 [seconds]. Example: Or using the Appium library: | |
Sets the autorun of the application under test. The default is true . Example: | |
Sets the language on the emulator. For example, fr , es and so on. Example: | |
Sets the locale on the emulator. For example, fr_CA , tr_TR and so on. Example: | |
The unique device identifier is typically used to identify a specific iOS device. Represents a string of 40 characters udid specified when automating applications on real iOS devices. Udid devices can be easily obtained through iTunes by clicking on the Serial Number in the device information. Example: | |
Sets the device orientation when working with an emulator. Valid values are LANDSCAPE and PORTRAIT . Example: | |
If you are testing a hybrid application and want to interact with Webview, you need to install this feature; the default is false . Example: | |
Reset the current state of the application before starting the session. Default: false . Example: | |
For iOS: will delete the entire simulator folder. For Android: instead of deleting everything from the application folder, you can delete the application itself to reset the state. Also, the application will be deleted at the end of the session. The default is false . Example: |
Android capabilities
| Explanation | |
Specifies which Java package to run. For example: com.android.calculator2 or com.android.settings Or using the Appium library: | |
Determines which Activity to run from the specified package. For example: MainActivity , .Settings , com.android.calculator2.Calculator Or using the Appium library: | |
Determines what activity, at startup, you need to wait. Or using the Appium library: | |
Determines which Android application package, at startup, you need to wait. | |
Determines the timeout (in seconds) during which the readiness of the device is expected. By default 5 . Or using the Appium library: | |
Activates Chrome driver performance logging. Only available when working with Chrome and WebView. false default | |
Sets the timeout in seconds, how long to wait until the device is ready after switching on. | |
Used to set the DevTools socket name. It is necessary only when the application is the Chromium-embedding browser. The browser opens the socket and the ChromeDriver connects to it as the DevTools client. For example, chrome_DevTools_remote | |
Specifies the name avd [Android virtual device] to run. | |
In milliseconds, sets the time to wait for the specified avd . The default is 120000 . | |
In milliseconds, sets the time to wait for the avd launch animations to avd . The default is 120000 . | |
Allows you to pass additional options when running avd [ startup options ]. | |
Specifies the timeout (in milliseconds) for the WebView context to wait for before switching to it. Default is 2000 | |
Intent action is usually used to start the activity. By default: android.intent.action.MAIN | |
Defines an Intent category for starting activity. By default: android.intent.category.LAUNCHER | |
Flags used when starting Activity. By default: 0x10200000 | |
Allows unicode entry. By default: false | |
Resets the keyboard to its original state. By default: false |
iOS capabilities
| Explanation | |
Sets the calendar format for an iOS simulator. Example: | |
Used to run the application on a real device. Example: | |
Specifies the timeout (in milliseconds) of the tools. At the end of time, Appium decides that everything is hanging there and the session is closed. | |
includes location services | |
Used in the simulator. If true , the application will not pop up a pop-up asking for access to location services. To use, you must explicitly specify the bundleId . By default: false | |
Automatically allowed access to the application to the photo, contacts, camera, etc. By default: false | |
Connects native instruments library | |
When working with Safari, imitates the tap event. By default: false . Doesn't work perfectly and depends on viewport's size / ratio | |
Used only on the simulator. Allows you to open new windows in Safari using JavaScript | |
Used only on the simulator. Prevents Safari from displaying messages that the site is fraudulent. | |
Used only on the simulator. Allows Safari to open new tabs. | |
Used only on the simulator. Allows you to store keychains when you start / disable the session. | |
Allows to transfer arguments when using instruments. | |
Specifies, in milliseconds, the duration of clicking on an item. |
Appium server and client libraries
Appium-server is used to interact with different platforms (iOS and Android). It creates a session to interact with mobile applications. This is an HTTP server written in NodeJS and uses the same idea as Selenium Server, which identifies HTTP requests from client libraries and sends its requests to the appropriate platforms. To start the Appium server, you need to download the sources or install from npm. Appium also has a GUI version of the server. It can be downloaded from the official site http://appium.io . In the following chapters we will look at the GUI version in more detail.
One of the advantages of Appium is that it is just a REST API. And the code with which you interact with this API can be written in different languages, such as Java, C #, Ruby, Python, and others. Appium extends WebDriver library and adds commands for working with mobile devices. It provides client libraries that support Appium extensions for the WebDriver protocol. It is because of these extensions that it is important to use Appium-specific client libraries to write automated tests or procedures instead of WebDriver shared client libraries.
Appium has added some interesting features in working with mobile devices, such as multitouch or working with screen orientation. Later we will see their practical application.
Conclusion
By the end of the chapter, we should have an understanding of the architecture of Appium, the JSON wire protocol, the desired capabilities and how to use them. we also learned about the Appium server and client libraries in various programming languages.
We reviewed the JSONWP and Appium sessions, which are used to send additional commands to interact with the application. In the last section, we got some information about the Appium server and its language-specific client libraries.
In the next chapter, we will look at what is needed to get started with Appium, working with Appium
Source: https://habr.com/ru/post/331224/
All Articles