SQL Server Integration Services (SSIS) for Beginners - Part 3

→ Part 1
→ Part 2
In this part I will talk about working with parameters and variables inside an SSIS package. We learn how to set and monitor the values of variables during the execution of a package.
We will also consider calling one package from another using the “Execute Package Task” and some additional components and solutions.
')
There will also be a lot of pictures.
Continuing with SSIS
Create in three demonstration bases a new table ProductResidues , which will contain information about the balances for each day:
USE DemoSSIS_SourceA GO CREATE TABLE ProductResidues( ResidueDate date NOT NULL, ProductID int NOT NULL, ResidueAmount decimal(10,2) NOT NULL, CONSTRAINT PK_ProductResidues PRIMARY KEY(ResidueDate,ProductID), CONSTRAINT FK_ProductResidues_ProductID FOREIGN KEY(ProductID) REFERENCES Products(ID) ) GO USE DemoSSIS_SourceB GO CREATE TABLE ProductResidues( ResidueDate date NOT NULL, ProductID int NOT NULL, ResidueAmount decimal(10,2) NOT NULL, CONSTRAINT PK_ProductResidues PRIMARY KEY(ResidueDate,ProductID), CONSTRAINT FK_ProductResidues_ProductID FOREIGN KEY(ProductID) REFERENCES Products(ID) ) GO USE DemoSSIS_Target GO CREATE TABLE ProductResidues( ResidueDate date NOT NULL, ProductID int NOT NULL, ResidueAmount decimal(10,2) NOT NULL, CONSTRAINT PK_ProductResidues PRIMARY KEY(ResidueDate,ProductID), CONSTRAINT FK_ProductResidues_ProductID FOREIGN KEY(ProductID) REFERENCES Products(ID) ) GO And we will fill the tables in the sources with test data, alternately running the following script on the DemoSSIS_SourceA and DemoSSIS_SourceB databases:
USE DemoSSIS_SourceA --USE DemoSSIS_SourceB GO DECLARE @MinDate date=DATEADD(MONTH,-2,GETDATE()) DECLARE @MaxDate date=GETDATE() ;WITH dayCTE AS( SELECT CAST(@MinDate AS date) ResidueDate,10000 ResidueAmount UNION ALL SELECT DATEADD(DAY,1,ResidueDate),ResidueAmount-1 FROM dayCTE WHERE ResidueDate<@MaxDate ) INSERT ProductResidues(ResidueDate,ProductID,ResidueAmount) SELECT d.ResidueDate, p.ID, d.ResidueAmount FROM dayCTE d CROSS JOIN Products p OPTION(MAXRECURSION 0) Suppose that there are a lot of rows in the ProductResidues table, and in order not to reload all the information and simplify the integration procedure each time, we will load the following logic into the ProductResidues table in the DemoSSIS_Target database:
- If there are no records in the receiving database, then we will load all the data;
- If there is data in the host database, we will delete the data for the week (last 7 days) from the last loaded date and load the data from the source starting from this date again.
The inconvenience of integrating tables of the ProductResidues type is that there are no fields in it that could be used to uniquely identify when a record appeared, there is no ID type identifier in it, there is no UpdateOn type field that contains the date / time of the last record update ( i.e., there’s nothing particularly to catch on), otherwise we, for example, could calculate for each source, according to the DemoSSIS_Target database, the last ID or the last UpdatedOn and download data from sources starting from these starting values. In addition, it is not always possible to make changes in the structure of sources, adjusting them for themselves, because these may be other people's bases to which we do not have full access.
In our case, let’s still assume that users can change data retroactively and can even delete some lines previously loaded into the DemoSSIS_Target database from sources. Therefore, the update is done here as if overlapped, the data of the last week is completely overwritten. Here, the week is taken conditionally, about this minimum period, for example, we could agree with the customer (he could confirm that the data usually change maximum within a week). Of course, this is not the most reliable way, and sometimes there may be discrepancies, for example, in the case when the user changed the data a month ago and it is worthwhile to provide for the possibility of reloading the data from an earlier date, we will do it with the help of a parameter that specifies us a number of days ago.
Create a new SSIS package and name it " LoadResidues.dtsx ".
Using the context menu, we will display the input area for package variables (this can also be done using the “SSIS → Variables” menu):

In this package, by clicking on the “Add Variable” button, we will create a DateFime variable LoadFromDate:

By default, the variable is assigned the current date / time value, since we will redefine the value inside the package, it does not matter to us.
You should also pay attention to Expression - if you write an expression in this field, then the variable will work as a formula and we will not be able to change its value using the assignment. Each time a variable is accessed, its value will be calculated according to the specified expression.
Variable values can be set using the “Expression Task” component. Let's look at how this is done. Create an “Expression Task” element:

Double-click to open the editor of this element:

Let's write the following expression:
@[User::LoadFromDate] = (DT_DATE) (DT_DBDATE) GETDATE() A double type conversion was also applied here to get rid of the time component and leave only the date.
Let's also see how to track the value of a variable during the execution of a package.
Create a breakpoint on the Expression Task element:
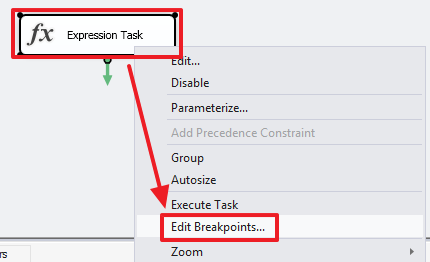
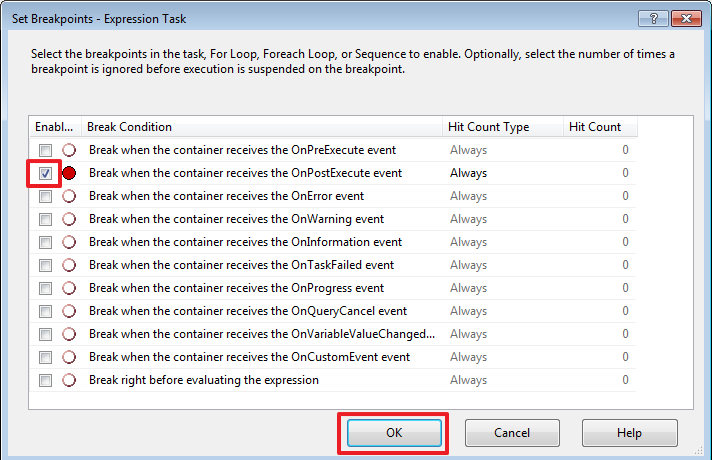
We point out that the point should trigger at the end of the execution of this block:
Run the package for execution ( F5 ) and after stopping at our point, go to the “ Locals ” tab:

Open the Variables list and find our variable in it:

For interest, we can change the expression of the “Expression Task” element to the following:
@[User::LoadFromDate] = (DT_DATE) (DT_DBDATE) DATEADD("DAY", -7, GETDATE()) and also experiment:

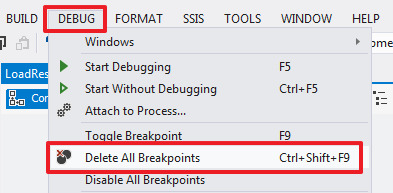
The breakpoint is removed in the same way it was set. Or you can delete all the breakpoints at once, if there were several:
Create a parameter that will be responsible for the number of days ago.
The parameter can be created as global for the whole project:

And local, within a specific package:

The parameter may be mandatory for the task - the Required flag is responsible for this. If this flag is set, then when creating a task or when calling a package from another package, it will be necessary to determine the input value of the parameter (we will look at this later).
Unlike variables, the value of parameters cannot be changed using the “Expression Task”.
Save the settings and go back to the Expression Task editor:
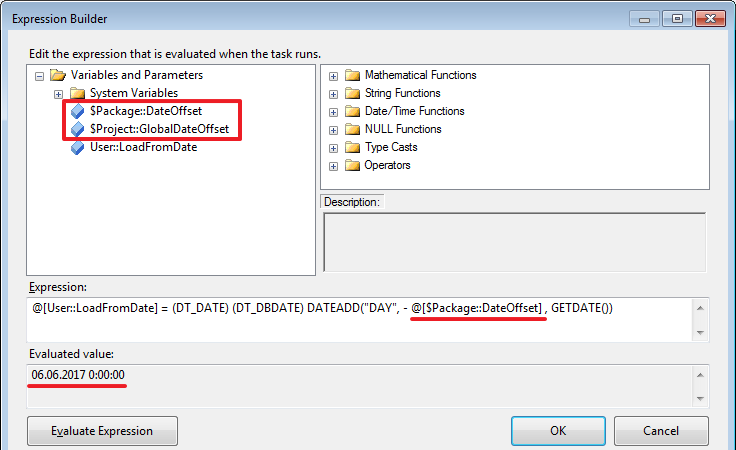
For example, I changed the expression to the following:
@[User::LoadFromDate] = (DT_DATE) (DT_DBDATE) DATEADD("DAY", - @[$Package::DateOffset] , GETDATE()) I think this is the essence of the parameters and variables is clear, and we can continue.
After we play around with the “Expression Task” we will remove it.
Create the "Execute SQL Task":

Configure it as follows:

Let's write the following query in SQLStatement:
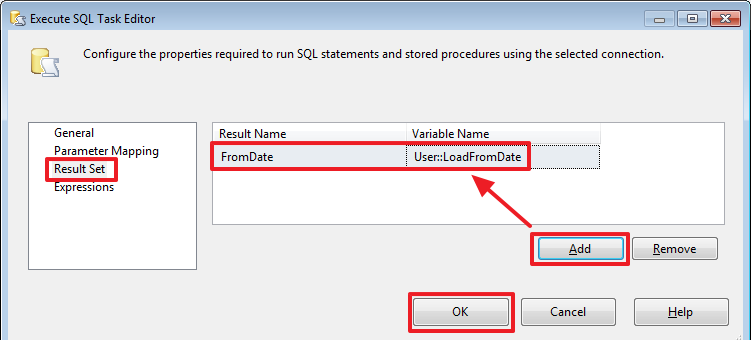
SELECT ISNULL(DATEADD(DAY,-?,MAX(ResidueDate)),'19000101') FromDate FROM ProductResidues Since This query returns one row, set ResultSet = “Single Row” and below, on the “ Result Set ” tab, save the result to the value of the LoadFromDate variable.
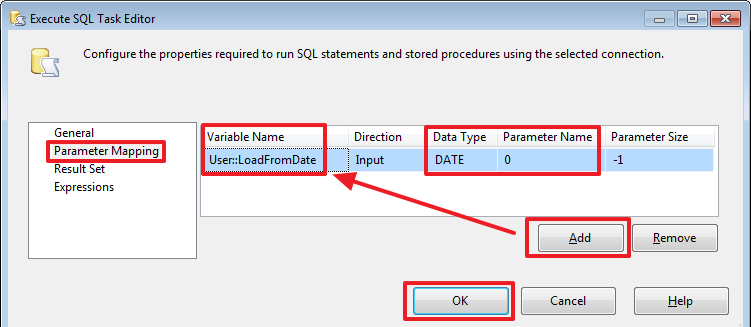
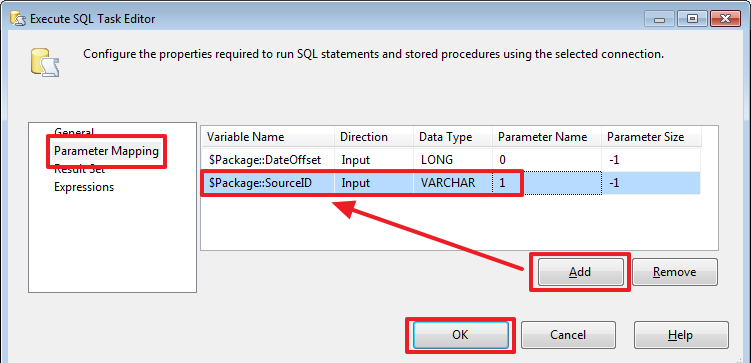
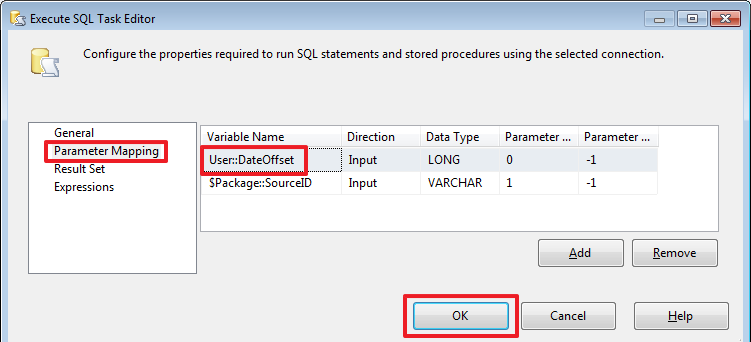
On the “ Parameter Mapping ” tab, we will set the parameter values that are indicated in the request with a question mark ( ? ):

Parameters are numbered starting from zero.
It is worth noting that if you create a connection using a different type of provider, for example, “ADO” or “ADO.Net”, then instead of questions we can use named parameters like @ParamName and as “Parameter Name” we could also specify @ParamName, not his number. But alas, we will not be able to use the type of connection with another provider in all cases.
Now on the tab “Result Set” we indicate in which variable to write the result of the query:
Here we can also set a breakpoint on this component to “ Break when the container receives the OnPostExecute event ” and run the package for execution:

Here, for the convenience of monitoring the variable value, I registered the name of the variable in “ Watch ” in order not to look for it in the “Locals” block.
As you can see, everything is correct in the LoadFromDate variable, the date “01/01/1900” was recorded, because There are no rows in the ProductResidues table on Target yet.
Rename for clarity, "Execute SQL Task" in "Set LoadFromDate".
Create another “Execute SQL Task” element and call it “Delete Old Rows”:

Configure it as follows:

SQLStatement contains the following query:
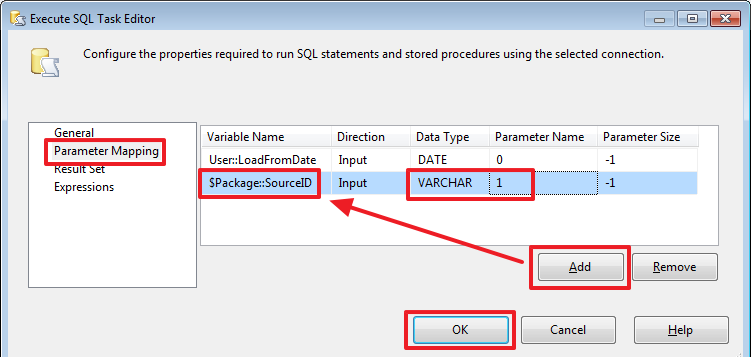
DELETE ProductResidues WHERE ResidueDate>=? And set the value of the parameter on the “Parameters Mapping” tab:
All, the removal of old data for the specified end period we have implemented.
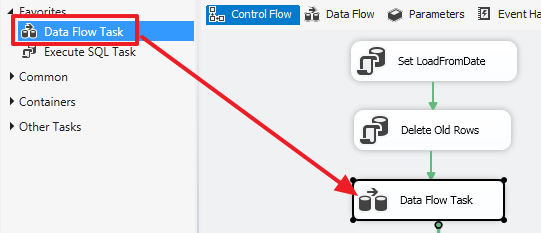
Now we will do part of the corresponding download of fresh data. To do this, use the “Data Flow Task” component:
Go to the area of this component and create the “Source Assistant”:

Configure it as follows:

Clicking on the button "Parameters ..." we will set the value of the parameter:

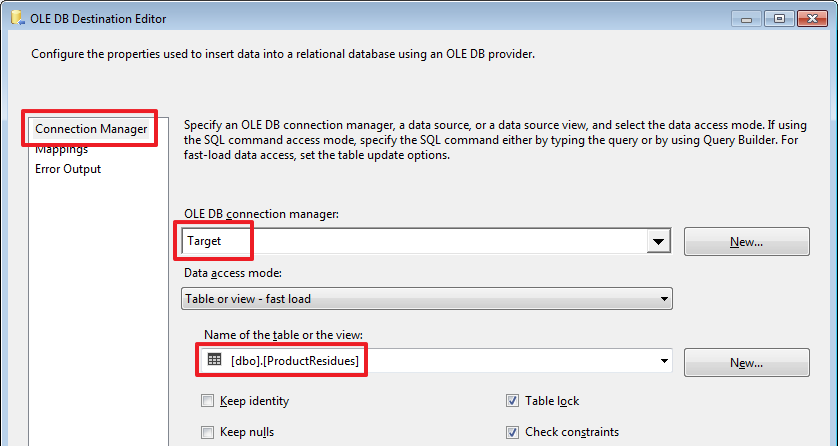
To record new data, use the familiar component “Destination Assistant”:

Stretch the arrow from the Source Assistant and configure it:


All, the package for transferring data from the SourceA source is ready, we can run it for execution:

Run again:

As you can see, when you restart, the data for the specified period is deleted and filled. Well, everything seems to work as we wanted. Just in case, check that the recipient's data are equal in number to the source:

Reaching here, I realized that I made a mistake. Who understood what was happening, well done!
But maybe this is good, because The example turned out not so overloaded.
The mistake is that I forgot to take into account that when integrating the data of the Products table, we have formed our own identifiers in the Target (the ID field with the IDENTITY flag)!
Let's redo everything to be correct. It's okay to repeat, but better remember.
Let's go a little ahead and add another parameter to the package, which we will call SourceID:

Migrate "Set LoadFromDate":

In SQLStatement we will write a new query, taking into account the SourceID:
SELECT ISNULL(DATEADD(DAY,-?,MAX(res.ResidueDate)),'19000101') FromDate FROM ProductResidues res JOIN Products prod ON res.ProductID=prod.ID WHERE prod.SourceID=? Set the second parameter:
Now, reconfigure the “Delete Old Rows” in the same way that SourceID is taken into account:

In SQLStatement we will write a new query from the SourceID accounts:
DELETE res FROM ProductResidues res JOIN Products prod ON res.ProductID=prod.ID WHERE ResidueDate>=? AND prod.SourceID=? Set the second parameter:
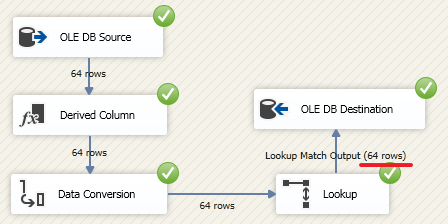
Now go to the “Data Flow Task”, delete the chain and add “Derived Column”:

Configure it as follows:

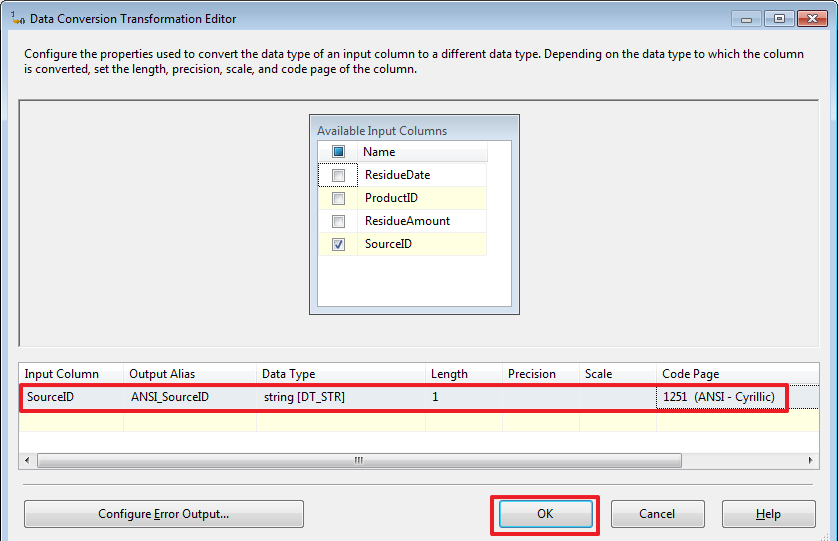
Here I deliberately left the “Unicode string” type, and did not do the conversion as in the first part. Let's take a look at the “Data Conversion” component:

Configure it:
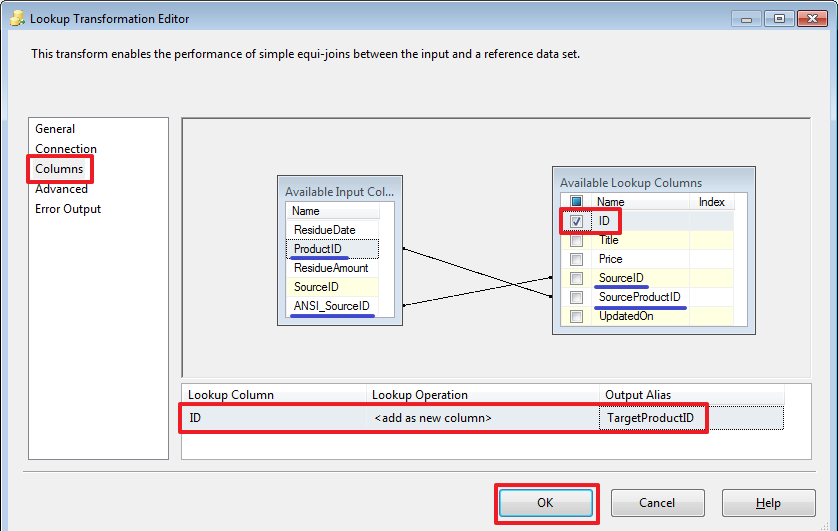
Now, using Lookup, we will make a comparison and obtain the product identifiers we need:

Configure it:


Now we will stretch the blue arrow from Lookup to “OLE DB Destination”:
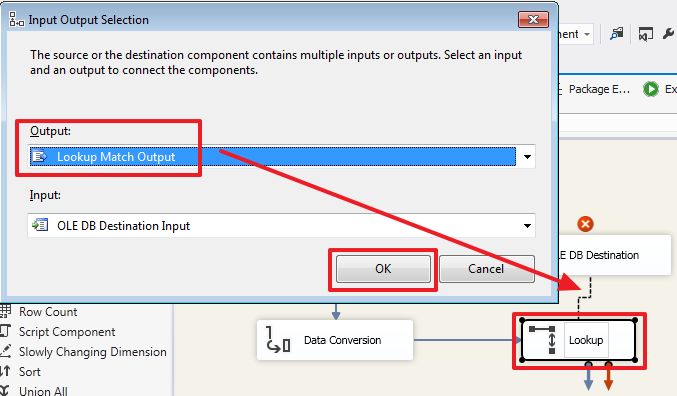
Choose the stream "Lookup Match Output":

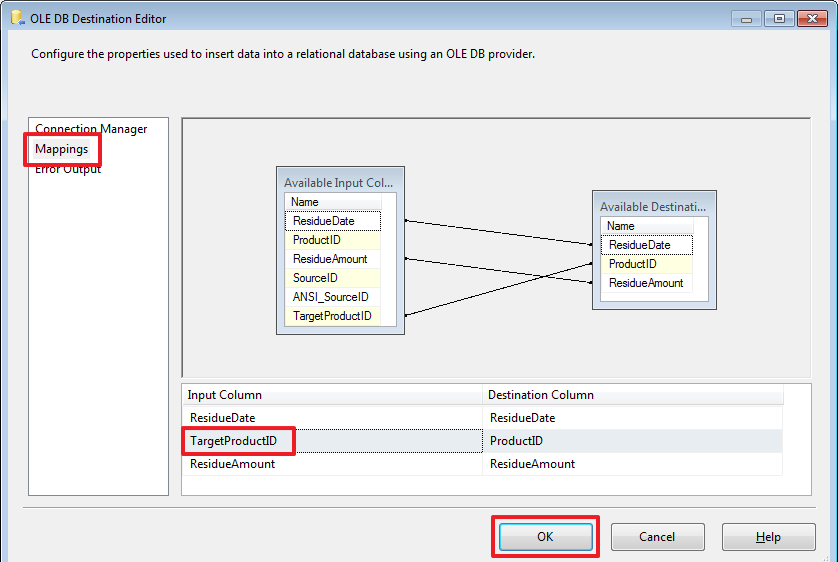
Set up "OLE DB Destination", you need to rebuild the Mappings:
Everything, let's clean the table from incorrectly loaded data:
TRUNCATE TABLE DemoSSIS_Target.dbo.ProductResidues And run the package for execution:

Once again:

It looks like the truth. You can independently check whether product IDs are correct.
Since the structure of DemoSSIS_SourceA and DemoSSIS_SourceB is the same and we need to do for DemoSSIS_SourceB, the same is true, we can create two steps for the LoadResidues.dtsx package when creating a task, in the first step, configure the connection to the DemoSSIS_SourceA database, and in the second step DemoSSIS_SourceB.
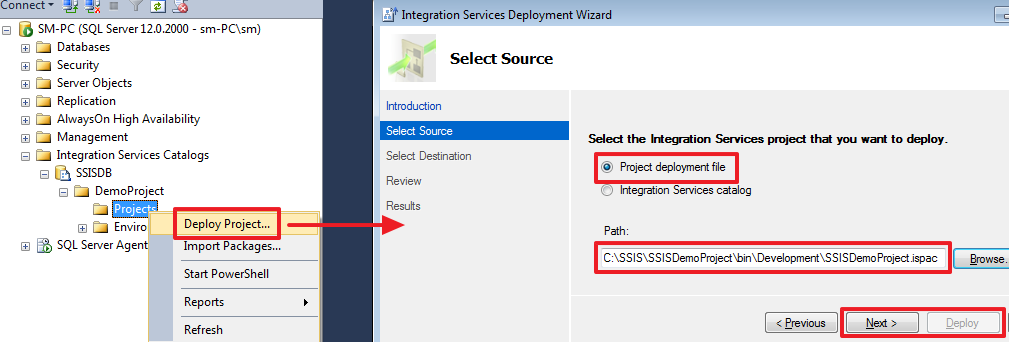
Compile and redesign the SSIS project:


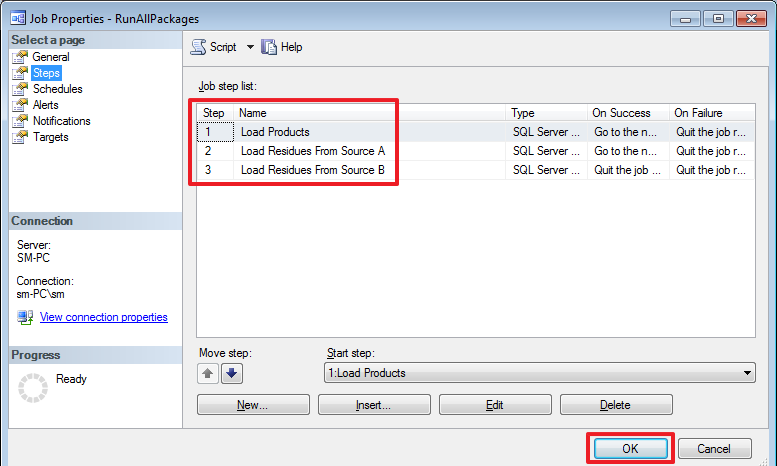
Let's now create a new task in SQL Agent:

On the Steps tab, create step 1 to load products:

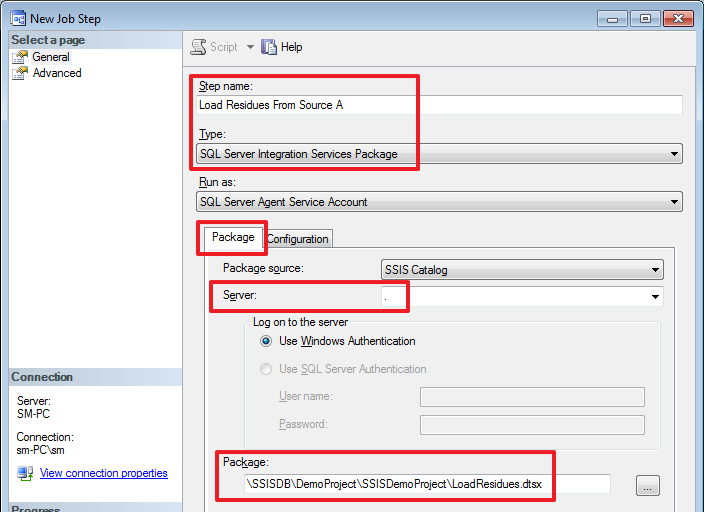
Create step 2 to load the residues from SourceA:
On the Configuration tab we can see our parameters:

Here we are required to enter SourceID, because we specified it as Required. Let's set it:

The “Connection Managers” tab data will not be changed for this step.
Create step 3 to load the balances from SourceB:

Set the SourceID parameter:

And we will modify the data of SourceA so that it refers to the base DemoSSIS_SourceB:

In this case, it was enough for me to change the ConnectionString and InitialCatalog, now they point to DemoSSIS_SourceB.
As a result, we should get the following - three steps:
Run this task for execution:

Run the query:
USE DemoSSIS_Target GO SELECT prod.SourceID,COUNT(*) FROM ProductResidues res JOIN Products prod ON res.ProductID=prod.ID GROUP BY prod.SourceID And make sure that everything worked as it should:

Now let's assume that the bases DemoSSIS_SourceA and DemoSSIS_SourceB are located on the same instance of SQL Server. Let's redo the “OLE DB Source”:


Command text:
DECLARE @SourceID char(1)=? IF(@SourceID='A') USE DemoSSIS_SourceA ELSE USE DemoSSIS_SourceB SELECT ResidueDate, ProductID, ResidueAmount FROM ProductResidues WHERE ResidueDate>=? Set the parameters:

Now, our package, depending on the value of the SourceID parameter, will take data either from SourceA or from SourceB.
For the test, you can change the value of the SourceB parameter to “B” and run the project for execution:

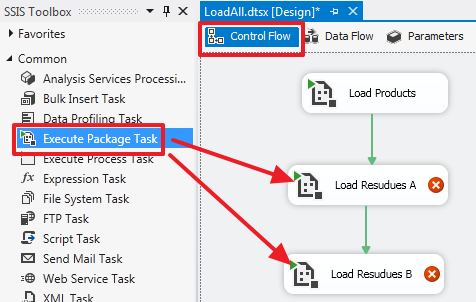
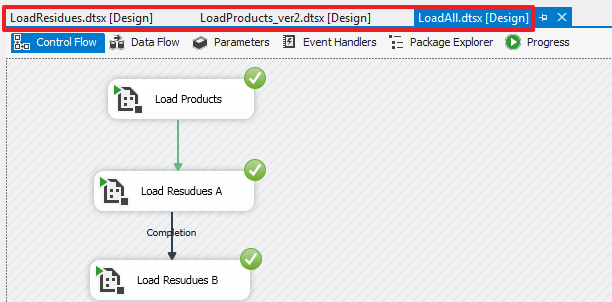
Let's now create a new package “ LoadAll.dtsx ” and create in it the “Execute Package Task” (rename it to “Load Products”):

Set up "Load Products":
Create in the new package 2 parameters:

In the “Control Flow” area we will create 2 more components of the “Execute Package Task” which we will call “Load Resudues A” and “Load Resudues B”:
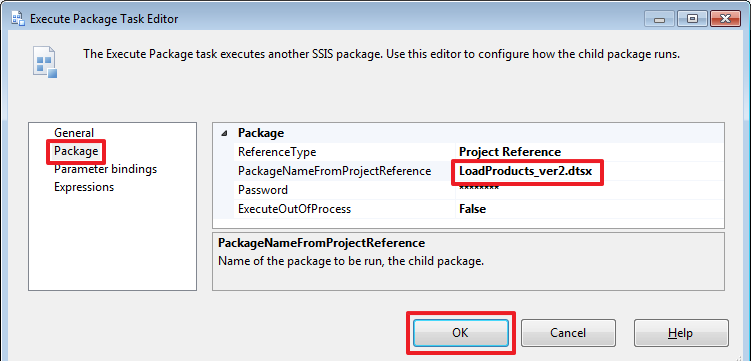
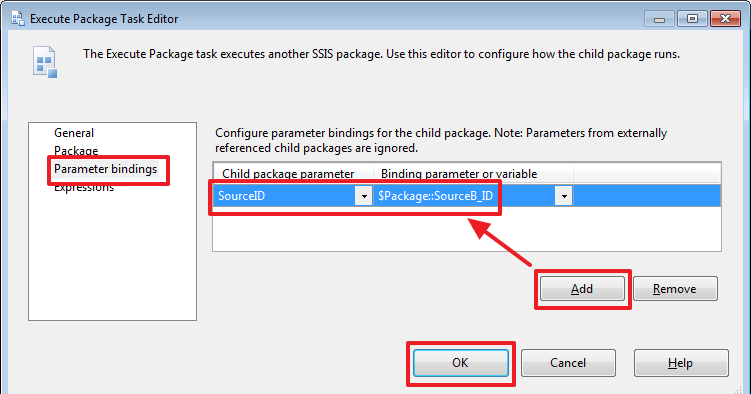
Configure them by setting the name of the package “LoadResidues.dtsx” for both:

Set the required SourceID parameter for "Load Resudues A":

Set the required SourceID parameter for "Load Resudues B":
Please note that the arrows also have their own properties, for example, we can change the Value property to Completion, which means that the next step will be performed even if an error occurs at the “Load Resudues A” step:

Everything, we can run the package for execution:
I think that explaining what happened here makes no sense.
Sometimes parameters for a particular package are conveniently stored in an auxiliary table and read them from there into package variables, for example, using the global search variable System :: PackageName for searching. To demonstrate, let's redo our package this way.
Create a table with parameters:
USE DemoSSIS_Target GO CREATE TABLE IntegrationPackageParams( PackageName nvarchar(128) NOT NULL, DateOffset int NOT NULL, CONSTRAINT PK_IntegrationPackageParams PRIMARY KEY(PackageName) ) GO INSERT IntegrationPackageParams(PackageName,DateOffset)VALUES (N'LoadResidues',7) GO Remove the DateOffset parameter from the LoadResidues.dtsx package:

Create a DateOffset variable in the package:

In the “Control Flow” area, add another “Execute SQL Task” element and rename it “Load Params”:

Configure it:

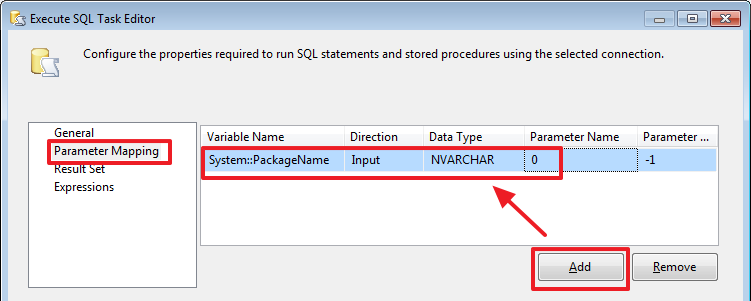
We will write the following query in SQLStatement:
SELECT DateOffset FROM IntegrationPackageParams WHERE PackageName=? Set the request parameter using the system variable "System :: PackageName":
It remains to reset the result of the query to a variable:
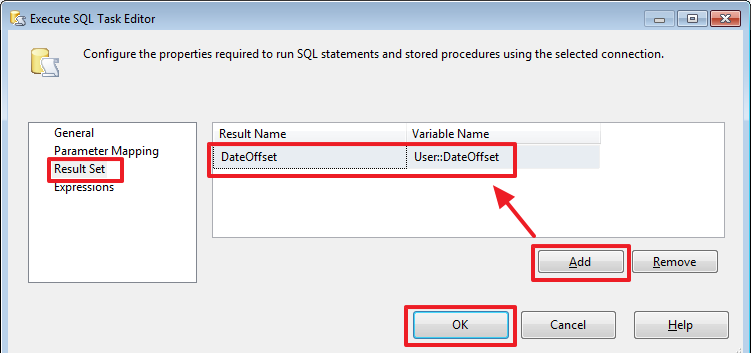
It now remains to reconfigure Set LoadFromDate so that it now uses the variable:

Everything, we can test the new version of the package.
So we got to the finish. My congratulations!
Conclusion on the third part
Dear readers, this part will be final.
In this series of articles, I have tried to think over examples in such a way as to make them as short as possible and, in turn, cover as many useful and important details as possible.
I think, having mastered this, then you can easily master the work with the other components of SSIS. In these articles I reviewed only the most important components (most often used in my practice), but knowing only this you can do a lot. If necessary, study other components yourself, first of all, I would recommend to see the following:
- container components (Sequence Container, For Loop Container, Foreach Loop Container);
- “Merge Join”, which allows you to perform JOIN, LEFT JOIN, FULL JOIN operations on the SSIS side (this requires pre-sorting two sets with “Sort”);
- "Conditional Split", which allows you to split one stream into several, depending on the conditions;
- Also consider the “Event Handlers” tab, which allows you to create additional areas for a specific kind of package event.
There is a lot of material available on this topic, use MSDN, Youtube and other sources.
I did not try to make a detailed tutorial (I think all this is already there), but I tried to make such material that will allow beginners to create everything from scratch step by step and do everything with their own hands to see the whole picture, and then having the basis to go further on their own. I really hope that I did it and the material will be useful in this particular way.
I am very glad that I had the strength to carry out my plans and describe everything as I wanted, even it turned out to do more, because of the mistakes made in this part, unexpected plot twists occurred, but this way I think it became even more interesting. ;)
Thanks for attention! Good luck!
And maybe see you in new articles ...
Source: https://habr.com/ru/post/330840/
All Articles