SQL Server Integration Services (SSIS) for Beginners - Part 2

→ Part 1
→ Part 3
In this part, we will change the loading logic of the Products directory:
- With the help of the “Union All” component we combine two incoming flows into one;
- For new records we will do an insert, and for records that have already been added we will do an update. To separate the records to be added and updated, we use the Lookup component;
- To update the records, use the component "OLE DB Command".
At the end of this part, we consider the Multicast component in order to parallelize the outgoing set.
')
Total in this part we will get acquainted with four new components: Union All, Lookup, OLE DB Command and Multicast.
Further, there will also be a lot of pictures.
Continuing with SSIS
Create a new package:
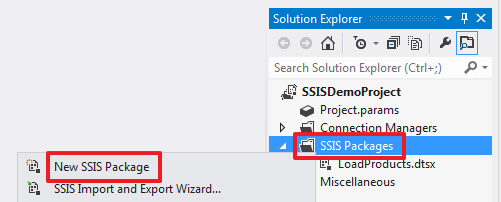
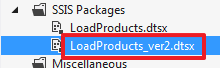
And rename it to " LoadProducts_ver2.dtsx ":
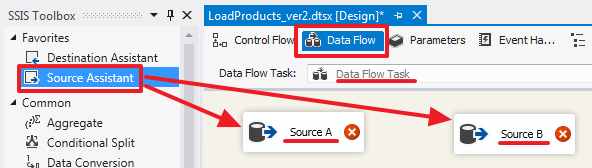
In the “Control Flow” area, create a “Data Flow Task”:

Double click on the element “Data Flow Task” we will go to its “Data Flow” area. Create two Source Assistant elements for the SourceA and SourceB connections. Rename these elements to “Source A” and “Source B”, respectively:
“Source A” is set up as follows:

Request text:
SELECT ID SourceProductID, Title, Price FROM Products In order to demonstrate great features at a time, here I deliberately released SourceID.
“Source B” is set up as follows:

Request text:
SELECT ID SourceProductID, 'B' SourceID, Title, Price FROM Products As a result, set A will have 3 columns [SourceProductID, Title, Price], and set B will have 4 columns [SourceProductID, SourceID, Title, Price].
Use the “ Union All ” element to combine data from 2 sets into one. Let's send blue arrows from Source A and Source B to it:

How the mapping of the columns of two incoming sets is done can be seen by double clicking on the “Union All” element:
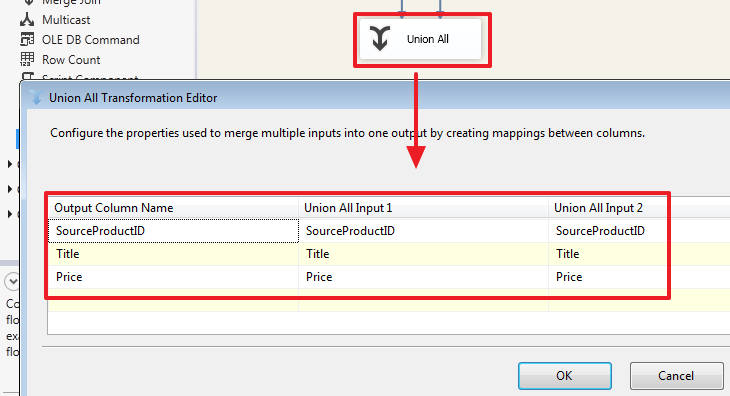
As we can see, automatic matching of columns has been made here whose names are the same. If necessary, we can make our own mapping, for example, add a SourceID column from the second set:

In this case, the SourceID of the Source A set will be NULL.
The union of the two sets in this case is done on the SSIS side. Here you should pay attention to the fact that the source databases and the host database can be located on different servers / instances of SQL Server, for this reason we cannot always write a SQL query using tables from different databases using SQL-operation UNION or JOIN (which could be used instead of the Lookup described below).
In order to replace the NULL values with “A”, we will use the “Derived Column” component to which we will direct the flow from “Union All”:

Double-click into the editor "Derived Column" and configure it as follows:

Let's do the following (mouse to help):
- We indicate in “Derived Column” the value of “Replace 'SourceID'” - this will mean that we replace the old SourceID column with a new one;
- Drag the REPLACENULL function to the Expression area;
- Drag the SourceID column to the first argument of the REPLACENULL function;
- As a second argument, write the constant “A”.
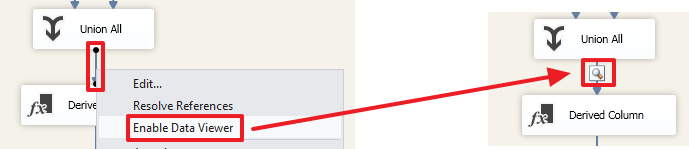
In order to understand what happened to the data after passing through “Union All”, make “Enable Data Viewer” for the arrow going from “Union All” to “Derived Column”:
Now when you run the package for execution, you can see the set that resulted from:

Here you can see that at this stage (before Derived Column) in the SourceID column for the rows of the first set are NULL values.
In order to determine whether an entry has been added to the DemoSSIS_Target database, we will use the Lookup component:

Double-click on it to configure this item:

Here we will say that those lines for which no match was found, we will redirect to the stream “no match output”. In this case, the output we get 2 sets of “ Lookup Match Output ” and “ Lookup No Match Output ”.
For example, if you set the value “Ignore failure”, then in the rows for which there was no match in the TargetID field (see below) the value NULL will be written and all the rows will be returned through one set of “ Match Match ”.
“Full cache” says that the set that will be used as a reference by one SQL query (see the next tab) will be fully loaded into memory and the strings will be mapped to the cache without repeated calls to SQL Server.
If you select “Partial cache” or “No cache”, then on the Advanced tab you can write a query with parameters that will be executed to match each row of the incoming set. For interest, you can play around with this property and through SQL Server Profiler to see which queries will be formed when the package is executed.
On the next tab, we need to define a set that will act as a directory:

I have registered a request here:
SELECT SourceID, SourceProductID, ID TargetID FROM Products On the next tab, you need to specify by what fields a search is performed in the directory and which columns from the directory should be added to the output set (if necessary):

To define the connection, use the mouse to drag the SourceProductID field to SourceProductID and the SourceID field to SourceID.
Add the “Destination Assistant” component to insert records from the “Lookup No Match Output” stream:

Drag the blue arrow from “Lookup” to “OLE DB Destination” and in the dialog box select the stream “Lookup No Match Output”:

As a result, we get the following:

Double-clicking on "OLE DB Destination" will configure it:


We have done the insertion processing for new records.
Now, to update previously inserted records, we will use the “OLE DB Command” component and transfer the blue arrow from the Lookup to it:

The “Lookup Match Output” stream will be automatically sent to this component since we already chose the “Lookup No Match Output” stream:

Double click on “OLE DB Command” and configure it:

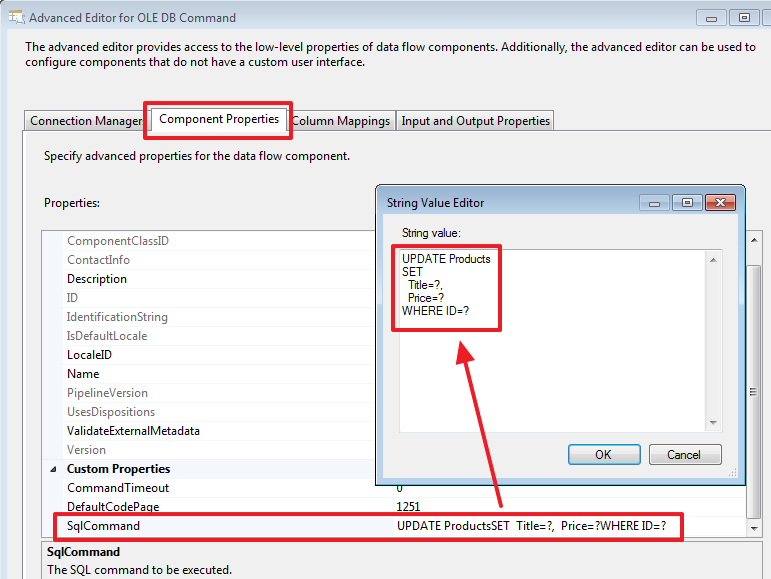
Let's write the following update request:
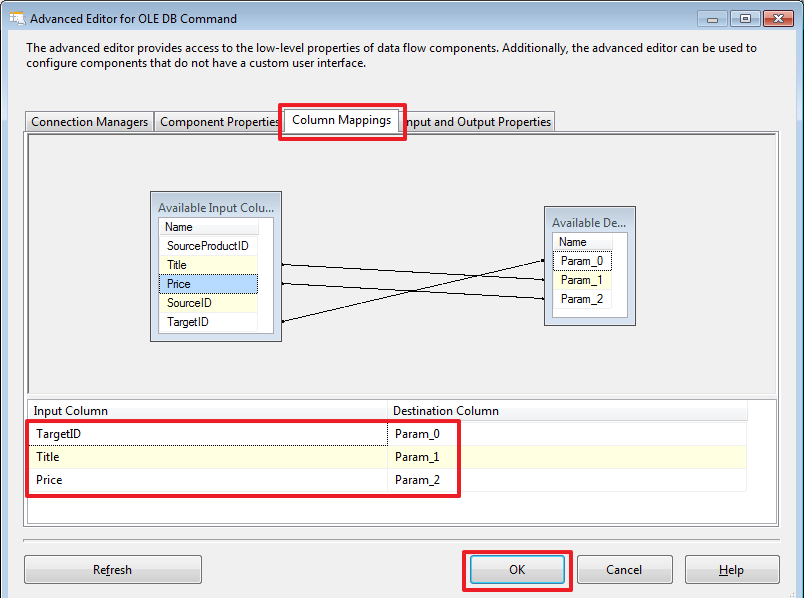
UPDATE Products SET Title=?, Price=? WHERE ID=? On the next tab, we will indicate how the parameters will be set based on the data of the rows of the incoming “Lookup Match Output” set:

Through SSMS we will add new products to the base DemoSSIS_SourceB:
USE DemoSSIS_SourceB GO -- SET IDENTITY_INSERT Products ON INSERT Products(ID,Title,Price)VALUES (6,N'',NULL), (7,N'',NULL), (8,N' ',NULL) SET IDENTITY_INSERT Products OFF GO In order to track how the data has changed, you can, in order to launch the package for execution, in the necessary places, make the “Enable Data Viewer”:

Run the package for execution:

As a result, we should see that 3 lines were inserted using the “OLE DB Destination” component and 10 lines were updated using the “OLE DB Command” component.
The query specified in the “OLE DB Command” was executed for each row of the incoming set, i.e. in this example 10 times.
In "OLE DB Command" you can write more complex logic in TSQL, for example, to check whether the Title or Price have been changed, and to update the corresponding line only if one of the values is different.
For clarity, we will add a new column to the Products table in the DemoSSIS_Target database:
USE DemoSSIS_Target GO ALTER TABLE Products ADD UpdatedOn datetime GO Let's now write the following command:

Command text:
DECLARE @TargetID int=? DECLARE @Title nvarchar(50)=? DECLARE @Price money=? IF(EXISTS( SELECT Title,Price FROM Products WHERE ID=@TargetID EXCEPT SELECT @Title,@Price ) ) BEGIN UPDATE Products SET Title=@Title, Price=@Price, UpdatedOn=GETDATE() WHERE ID=@TargetID END It would also be possible to arrange all of this in the form of a stored procedure, and here you can register it through the “EXEC ProcName?,?,?” Call. Here, I think, as it is more convenient for someone, it is sometimes more convenient for me that everything is written in one place, i.e. in the SSIS project. But if we use the procedure, we also get our convenience, in this case it is possible, it would be easy to change the procedure and avoid reworking and redeploying the SSIS project.
After that, we will redefine the binding of parameters according to their order in the command text:
Let's make an update in the DemoSSIS_SourceA database:
USE DemoSSIS_SourceA GO UPDATE Products SET Price=30 WHERE ID=2 -- And again we will start the project on performance. As a result, after the next launch of the package for execution, UPDATE should be executed only once, only for this record.

After executing the package, check it with the query:
USE DemoSSIS_Target GO SELECT * FROM Products ORDER BY UpdatedOn DESC 
Within this part, we will also consider the Multicast component. This component allows you to get several from one stream. This can be useful when the same data needs to be recorded in two or more different places - i.e. One set comes in, and we get as many copies as we need, and with each copy of this set we can do what we want.
For example, let's create another LastAddedProducts table in the DemoSSIS_Target database:
USE DemoSSIS_Target GO CREATE TABLE LastAddedProducts( SourceID char(1) NOT NULL, -- SourceProductID int NOT NULL, -- ID Title nvarchar(50) NOT NULL, Price money, CONSTRAINT PK_LastAddedProducts PRIMARY KEY(SourceID,SourceProductID), CONSTRAINT CK_LastAddedProducts_SourceID CHECK(SourceID IN('A','B')) ) GO To clear this table, add the “Execute SQL Task” component to the “Control Flow” area and write the “TRUNCATE TABLE LastAddedProducts” command in it:


Go to the “Data Flow” area of the “Data Flow Task” component and add the component as follows:
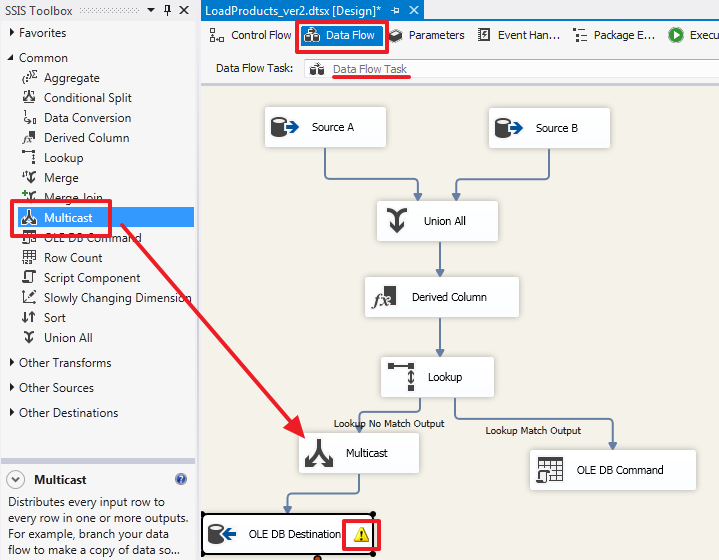
Pay attention to the yellow exclamation mark - this was due to the fact that we added a column of UpdatedOn and did not attach it. Go to the item “OLE DB Destination”, go to the Mappings tab and leave it on the UpdatedOn column as the incoming Ignore field and click OK:

Create another “OLE DB Destination” element and drag the second blue arrow from the Multicast element onto it:

Rename for clarity:
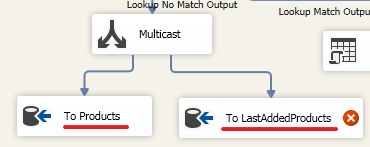
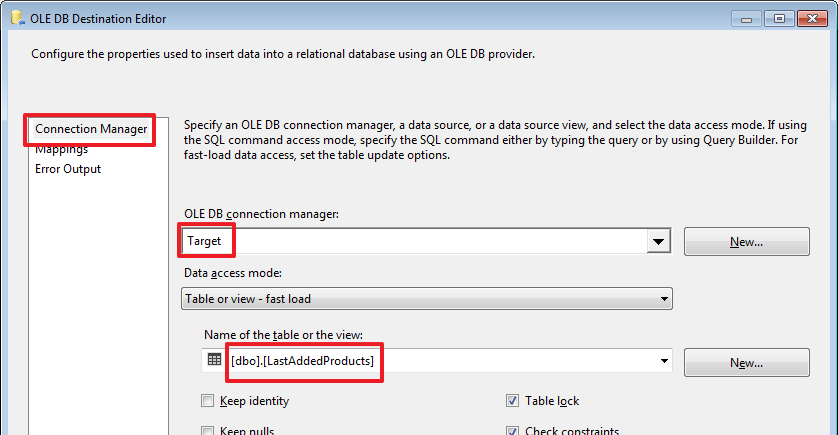
Set up "To LastAddedProducts":

Delete the last three records inserted via SSMS:
USE DemoSSIS_Target GO DELETE Products WHERE SourceID='B' AND SourceProductID>=6 And run the package for execution:

As a result, the addition occurred in 2 tables - Products and LastAddedProducts.
The conclusion of the second part
In this part, we looked at how to synchronize small directories. Here, of course, the moment is not taken into account that the data in the sources can still be deleted, but if necessary, you can try to do it yourself, because when deleting, sometimes additional factors need to be taken into account, for example, references from other tables can be deleted (in the next part we plan to do this).
In order not to violate referential integrity, sometimes an entry in the receiving table is logically deleted. For this purpose, for example, you can add a bit bit field (logical deletion flag) or a datetime string (date / time logical deletion) to this table.
Sometimes, on the server on which the Target base is located, an auxiliary intermediate base is made (usually called Staging) and first of all the “raw” data from Source is loaded into it. Since now Target and Staging are on the same server, the second step is to easily write a SQL query (for example, using the MERGE SQL construct or a query using the JOIN construct), which operates on sets of both these databases.
SSIS is quite an interesting tool, which in my opinion does not hurt to have in its arsenal, since in some cases it can greatly simplify the integration process. But of course there are situations when weighing everything, it is wiser to write integration using other methods, for example, use Linked Servers and write procedures in pure TSQL or write your utility in some other programming language using all the power of OOP, etc.
While studying the material, show more curiosity, for example, click on the tabs that I did not show, look and analyze information on them, click on the arrows, they also have their own properties and settings. Experiment, with all that you find interesting, do not be lazy to make your own small test examples. Change the scheme so that it leads to exceptions, choose more suitable parameters for the components trying to find the most suitable way out of the current situation.
Thanks for attention! Good luck!
→ Part 3
Source: https://habr.com/ru/post/330702/
All Articles