Tutorial: Creating a simple 2D game on Android
This tutorial is intended primarily for beginners in the development of an android, but may be useful to more experienced developers. Here it is told how to create the simplest 2D game on an anroid without using any game engines. For this, I used Android Studio, but you can use any other appropriate customized development environment.
Step 1. Come up with the idea of the game.
For example, take a fairly simple idea:
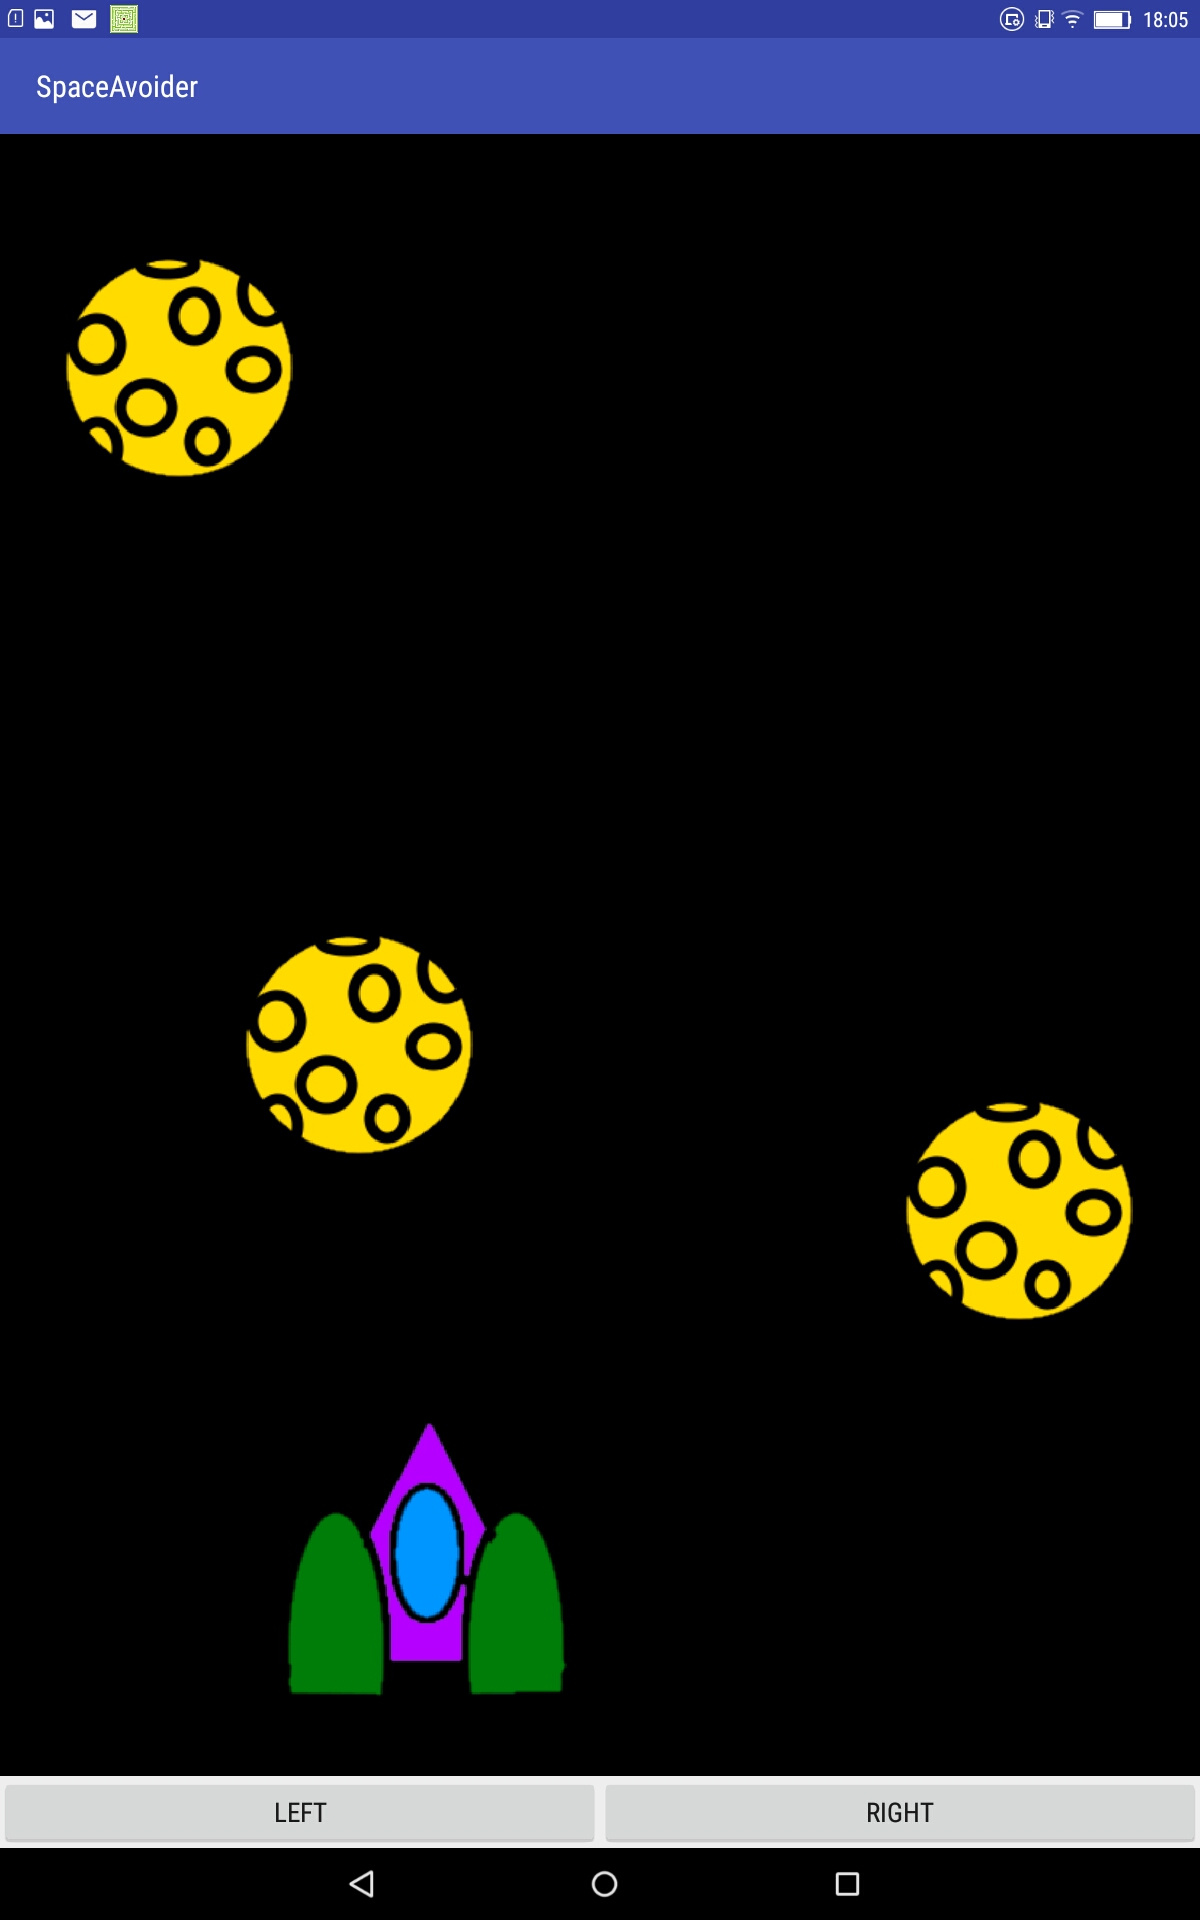
At the bottom of the screen - the spacecraft. He can move left and right by pressing the corresponding buttons. Asteroids move vertically down from above. They appear across the entire width of the screen and move at different speeds. The ship must dodge meteorites as long as possible. If a meteorite hits it - the game is over.
')
Step 2. Create a project
In Android Studio, in the top menu, select File → New → New Project.
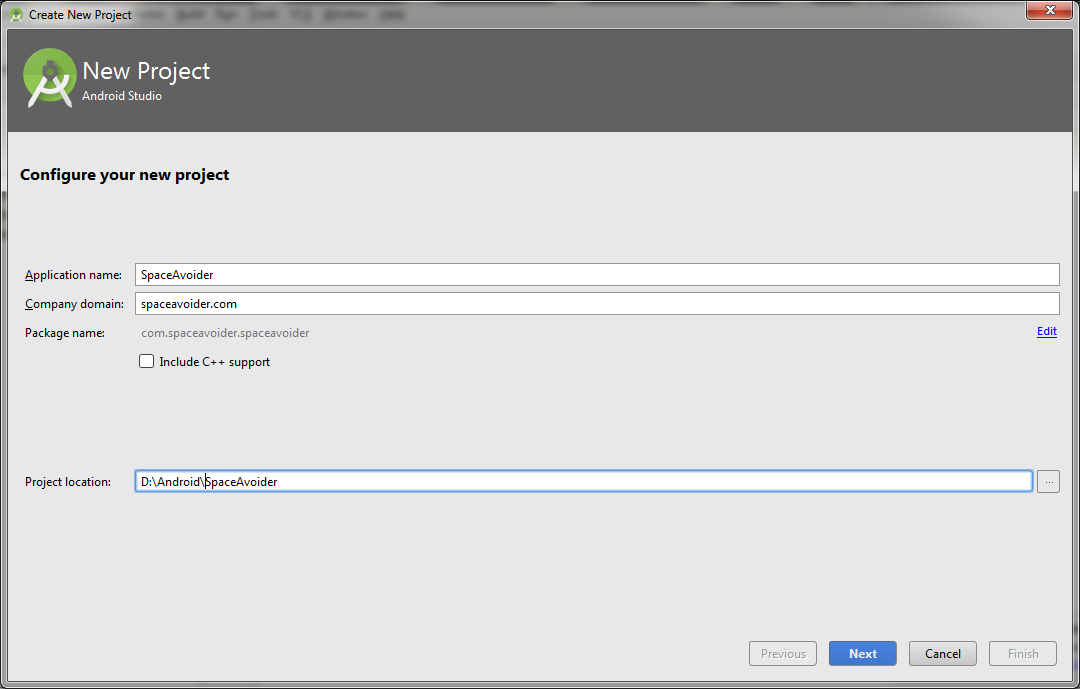
Here we enter the application name, domain and path. Click Next.
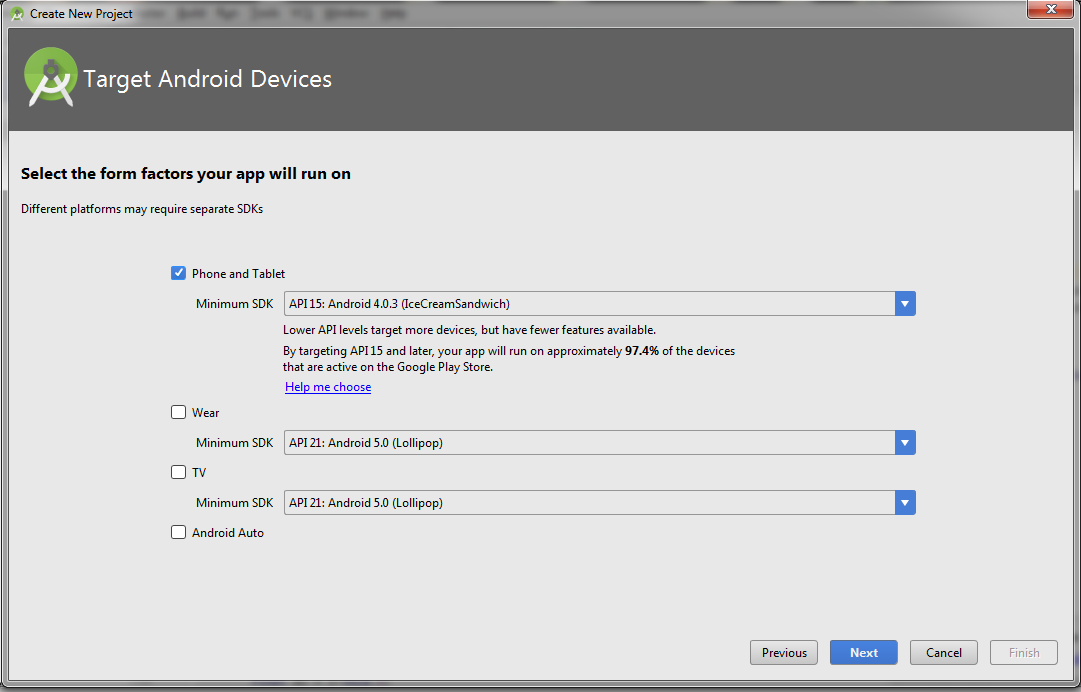
Here you can enter the version of android. You can also choose an Android watch and a TV. But I'm not sure that our application will work on all this. So it is better to enter everything as in the screenshot. Click Next.
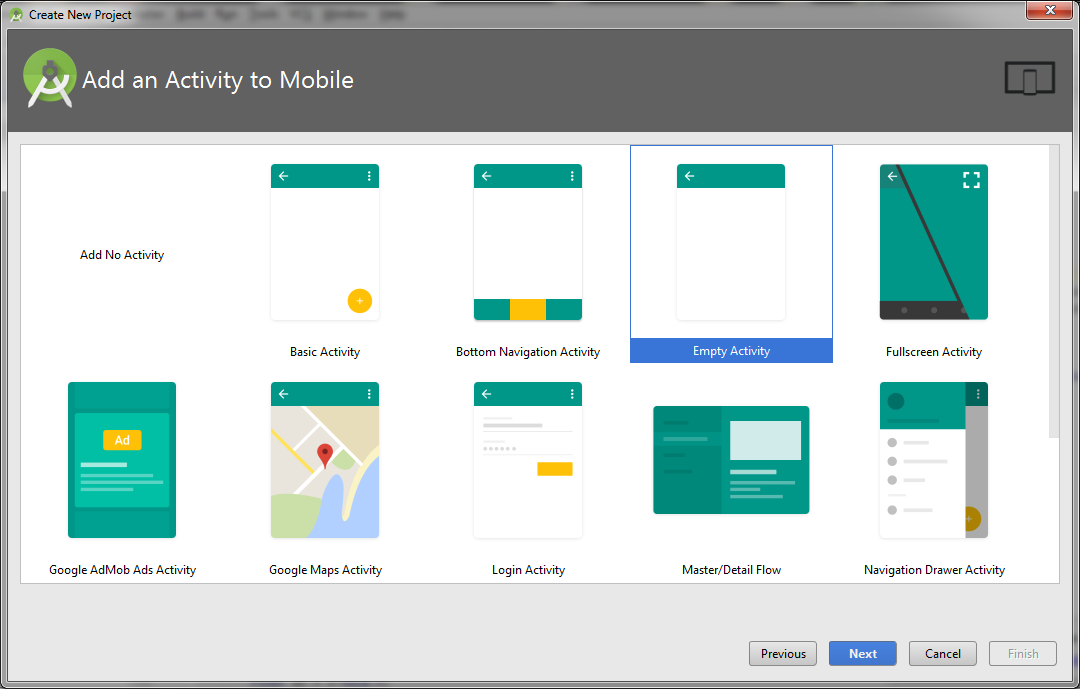
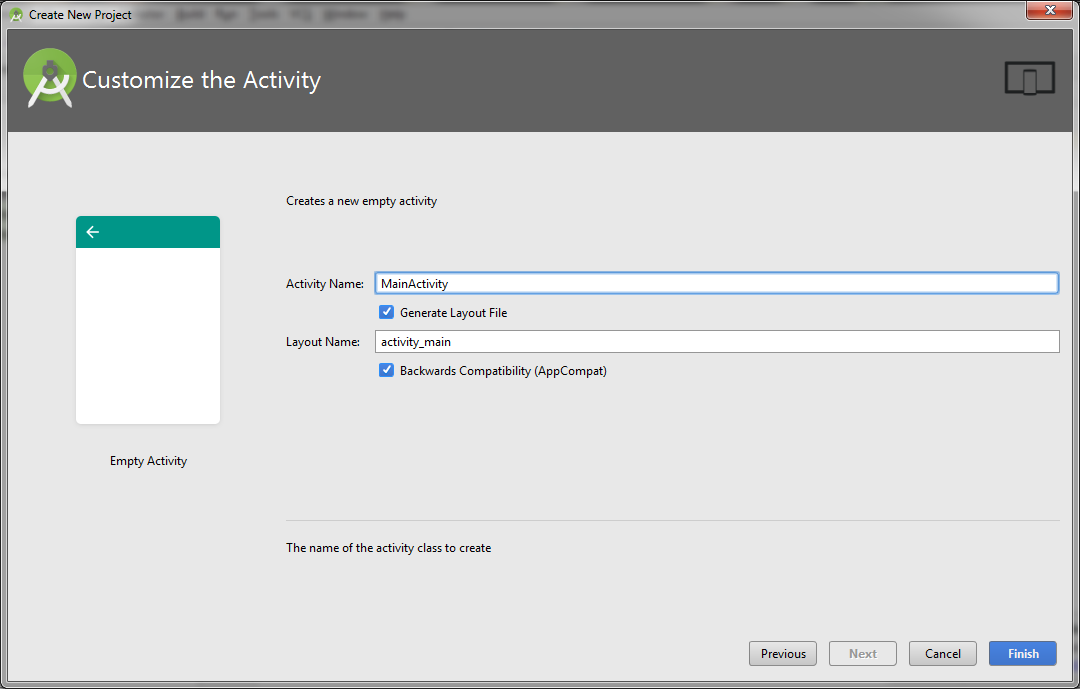
Here we must choose Empty Activity. And click Next.
Here we leave everything as it is and click Finish. So the project is created. Go to the third step.
Step 3. Add pictures
Download the archive with pictures and unpack it.
Find the drawable folder and copy the pictures there.

Later we will need them.
Step 4. Create layout
Find activity_main.xml, open the Text tab and paste it there:
On the Design tab you can see how our layout will look.

At the top there is a field in which the game itself will be, and at the bottom are the Left and Right control buttons. About the layout, you can write a separate article, and not one. I will not dwell on this in detail. About this you can read here .
Step 5. Edit the MainActivity class
First of all, we add implements View.OnTouchListener to the class definition. The class definition will now be:
Add to the class we need static variables (class variables):
To procedure protected void onCreate (Bundle savedInstanceState) {
add lines:
Classes LinearLayout, Button, etc. are highlighted in red because they have not yet been added to Import.
To add to Import and remove the red highlight, you need to press Alt + Enter for everyone.
GameView will be highlighted in red because this class is not yet. We will create it later.
Now add the procedure:
If someone gets confused - this is how the MainActivity class should look like as a result:
So, the MainActivity class is ready! It has initiated a not yet created GameView class. And when the left button is pressed - the static variable isLeftPressed = true, and when the right button isRightPressed = true. In general, this is all that he does.
To begin with, we will do so that the spacecraft is displayed on the screen, and that it moves by pressing the control buttons. Asteroids leave for later.
Step 6. Create a GameView Class
Now finally create the same missing class GameView. So let's get started. In the class definition, add extends SurfaceView implements Runnable. Mobile devices have different screen resolutions. This may be an old small phone with a resolution of 480x800, or a large tablet 1800x2560. In order for the game to look the same on all devices, I divided the screen into 20 parts horizontally and 28 vertically. I called the obtained unit of measure unit. You can select other numbers. The main thing is that the relationship between them is approximately preserved, otherwise the image will be stretched or compressed.
unitW and unitW we will calculate later. We will also need other variables:
The constructor will be:
The run () method will contain an infinite loop. At the beginning of the loop, the update () method is executed.
which will calculate the new coordinates of the ship. Then the draw () method draws the ship on the screen. And at the end the control () method will pause for 17 milliseconds. After 17 milliseconds, run () will start again. And so on until the gameRunning variable == true. These methods are:
Pay attention to initialization when you first start. There we calculate the number of pixels in a unit and add the ship. The ship we have not created. But before we create its parent class.
Step 7. Create a SpaceBody class
It will be the parent for the class Ship (spacecraft) and Asteroid (asteroid). It will contain all the variables and methods common to these two classes. Adding variables:
and methods
Step 8. Create the Ship class
Now create a class Ship (spacecraft). It inherits the SpaceBody class, so add the extends SpaceBody to the class definition.
Let's write a constructor:
and override the update () method
On this space ship is ready! All compile and run. A spacecraft should appear on the screen. When you press the buttons, it should move to the right and left. Now add the asteroids flowing above. When confronted with a ship, the game ends.
Step 9. Create the Asteroid class
Add the class Asteroid (asteroid). It also inherits the SpaceBody class, so add the extends SpaceBody to the class definition.
Add the variables we need:
The asteroid should appear at a random point at the top of the screen and fly down at a random speed. To do this, x and speed are set using a random number generator in its constructor.
The asteroid must move with a certain speed vertically downwards. Therefore, in the update () method, we add velocity to the x coordinate.
We also need a method that determines whether the asteroid collided with the ship.
Consider it in more detail. For simplicity, we consider the ship and the asteroid squares. Here I went from the opposite. That is, I determine when the squares do NOT intersect.
((x + size) <shipX) - the ship to the left of the asteroid.
(x> (shipX + shipSize)) - the ship to the right of the asteroid.
((y + size) <shipY) - the ship on top of the asteroid.
(y> (shipY + shipSize)) - the ship from the bottom of the asteroid.
Between these four expressions is || (or). That is, if at least one expression is true (and this means that the squares do NOT intersect) - the resulting ones are also true.
I invert all this expression with a sign !. As a result, the method returns true when the squares intersect. What we need.
About the definition of the intersection of more complex shapes can be read here .
Step 10. Add asteroids to GameView
Add variables to GameView:
also add 2 methods:
And in the run () method, we add calls to these methods before the control () call.
Next, in the update () method, we add a loop that goes through all the asteroids and calls the update () method on them.
The same loop is added to the draw () method.
That's all! The simplest 2D game is ready. Compile, run and see what happened!
If someone is confused or something does not work, you can download the source .
The game, of course, is primitive. But it can be improved by adding new features. The first step is to implement the removal of asteroids that have flown off the screen. You can make the ship could shoot asteroids, so that the game gradually accelerated, add a timer, a table of records and so on. If this is interesting to you, I will write a sequel, where I will describe all this.
That's all. Write reviews, questions, topics that interest you to continue.
Step 1. Come up with the idea of the game.
For example, take a fairly simple idea:
At the bottom of the screen - the spacecraft. He can move left and right by pressing the corresponding buttons. Asteroids move vertically down from above. They appear across the entire width of the screen and move at different speeds. The ship must dodge meteorites as long as possible. If a meteorite hits it - the game is over.
')
Step 2. Create a project
In Android Studio, in the top menu, select File → New → New Project.
Here we enter the application name, domain and path. Click Next.
Here you can enter the version of android. You can also choose an Android watch and a TV. But I'm not sure that our application will work on all this. So it is better to enter everything as in the screenshot. Click Next.
Here we must choose Empty Activity. And click Next.
Here we leave everything as it is and click Finish. So the project is created. Go to the third step.
Step 3. Add pictures
Download the archive with pictures and unpack it.
Find the drawable folder and copy the pictures there.
Later we will need them.
Step 4. Create layout
Find activity_main.xml, open the Text tab and paste it there:
<?xml version="1.0" encoding="utf-8"?> <LinearLayout xmlns:android="http://schemas.android.com/apk/res/android" xmlns:tools="http://schemas.android.com/tools" android:layout_width="match_parent" android:layout_height="match_parent" android:orientation="vertical" tools:context="com.spaceavoider.spaceavoider.MainActivity"> <LinearLayout android:id="@+id/gameLayout" android:layout_width="match_parent" android:layout_height="match_parent" android:orientation="vertical" android:layout_weight="100"/> <LinearLayout android:layout_width="match_parent" android:layout_height="wrap_content" android:orientation="horizontal"> <Button android:id="@+id/leftButton" android:layout_width="match_parent" android:layout_height="wrap_content" android:layout_weight="50" android:text="Left" /> <Button android:id="@+id/rightButton" android:layout_width="match_parent" android:layout_height="wrap_content" android:layout_weight="50" android:text="Right" /> </LinearLayout> </LinearLayout> On the Design tab you can see how our layout will look.
At the top there is a field in which the game itself will be, and at the bottom are the Left and Right control buttons. About the layout, you can write a separate article, and not one. I will not dwell on this in detail. About this you can read here .
Step 5. Edit the MainActivity class
First of all, we add implements View.OnTouchListener to the class definition. The class definition will now be:
public class MainActivity extends AppCompatActivity implements View.OnTouchListener { Add to the class we need static variables (class variables):
public static boolean isLeftPressed = false; // public static boolean isRightPressed = false; // To procedure protected void onCreate (Bundle savedInstanceState) {
add lines:
GameView gameView = new GameView(this); // gameView LinearLayout gameLayout = (LinearLayout) findViewById(R.id.gameLayout); // gameLayout gameLayout.addView(gameView); // gameView Button leftButton = (Button) findViewById(R.id.leftButton); // Button rightButton = (Button) findViewById(R.id.rightButton); leftButton.setOnTouchListener(this); // ( onTouch) rightButton.setOnTouchListener(this); Classes LinearLayout, Button, etc. are highlighted in red because they have not yet been added to Import.
To add to Import and remove the red highlight, you need to press Alt + Enter for everyone.
GameView will be highlighted in red because this class is not yet. We will create it later.
Now add the procedure:
public boolean onTouch(View button, MotionEvent motion) { switch(button.getId()) { // case R.id.leftButton: switch (motion.getAction()) { // case MotionEvent.ACTION_DOWN: isLeftPressed = true; break; case MotionEvent.ACTION_UP: isLeftPressed = false; break; } break; case R.id.rightButton: switch (motion.getAction()) { // case MotionEvent.ACTION_DOWN: isRightPressed = true; break; case MotionEvent.ACTION_UP: isRightPressed = false; break; } break; } return true; } If someone gets confused - this is how the MainActivity class should look like as a result:
package com.spaceavoider.spaceavoider; import android.support.v7.app.AppCompatActivity; import android.os.Bundle; import android.view.MotionEvent; import android.view.View; import android.widget.Button; import android.widget.LinearLayout; public class MainActivity extends AppCompatActivity implements View.OnTouchListener { public static boolean isLeftPressed = false; // public static boolean isRightPressed = false; // @Override protected void onCreate(Bundle savedInstanceState) { super.onCreate(savedInstanceState); setContentView(R.layout.activity_main); GameView gameView = new GameView(this); // gameView LinearLayout gameLayout = (LinearLayout) findViewById(R.id.gameLayout); // gameLayout gameLayout.addView(gameView); // gameView Button leftButton = (Button) findViewById(R.id.leftButton); // Button rightButton = (Button) findViewById(R.id.rightButton); leftButton.setOnTouchListener(this); // ( onTouch) rightButton.setOnTouchListener(this); } public boolean onTouch(View button, MotionEvent motion) { switch(button.getId()) { // case R.id.leftButton: switch (motion.getAction()) { // case MotionEvent.ACTION_DOWN: isLeftPressed = true; break; case MotionEvent.ACTION_UP: isLeftPressed = false; break; } break; case R.id.rightButton: switch (motion.getAction()) { // case MotionEvent.ACTION_DOWN: isRightPressed = true; break; case MotionEvent.ACTION_UP: isRightPressed = false; break; } break; } return true; } } So, the MainActivity class is ready! It has initiated a not yet created GameView class. And when the left button is pressed - the static variable isLeftPressed = true, and when the right button isRightPressed = true. In general, this is all that he does.
To begin with, we will do so that the spacecraft is displayed on the screen, and that it moves by pressing the control buttons. Asteroids leave for later.
Step 6. Create a GameView Class
Now finally create the same missing class GameView. So let's get started. In the class definition, add extends SurfaceView implements Runnable. Mobile devices have different screen resolutions. This may be an old small phone with a resolution of 480x800, or a large tablet 1800x2560. In order for the game to look the same on all devices, I divided the screen into 20 parts horizontally and 28 vertically. I called the obtained unit of measure unit. You can select other numbers. The main thing is that the relationship between them is approximately preserved, otherwise the image will be stretched or compressed.
public static int maxX = 20; // public static int maxY = 28; // public static float unitW = 0; // public static float unitH = 0; // unitW and unitW we will calculate later. We will also need other variables:
private boolean firstTime = true; private boolean gameRunning = true; private Ship ship; private Thread gameThread = null; private Paint paint; private Canvas canvas; private SurfaceHolder surfaceHolder; The constructor will be:
public GameView(Context context) { super(context); // surfaceHolder = getHolder(); paint = new Paint(); // gameThread = new Thread(this); gameThread.start(); } The run () method will contain an infinite loop. At the beginning of the loop, the update () method is executed.
which will calculate the new coordinates of the ship. Then the draw () method draws the ship on the screen. And at the end the control () method will pause for 17 milliseconds. After 17 milliseconds, run () will start again. And so on until the gameRunning variable == true. These methods are:
@Override public void run() { while (gameRunning) { update(); draw(); control(); } } private void update() { if(!firstTime) { ship.update(); } } private void draw() { if (surfaceHolder.getSurface().isValid()) { // surface if(firstTime){ // firstTime = false; unitW = surfaceHolder.getSurfaceFrame().width()/maxX; // unitH = surfaceHolder.getSurfaceFrame().height()/maxY; ship = new Ship(getContext()); // } canvas = surfaceHolder.lockCanvas(); // canvas canvas.drawColor(Color.BLACK); // ship.drow(paint, canvas); // surfaceHolder.unlockCanvasAndPost(canvas); // canvas } } private void control() { // 17 try { gameThread.sleep(17); } catch (InterruptedException e) { e.printStackTrace(); } } Pay attention to initialization when you first start. There we calculate the number of pixels in a unit and add the ship. The ship we have not created. But before we create its parent class.
Step 7. Create a SpaceBody class
It will be the parent for the class Ship (spacecraft) and Asteroid (asteroid). It will contain all the variables and methods common to these two classes. Adding variables:
protected float x; // protected float y; protected float size; // protected float speed; // protected int bitmapId; // id protected Bitmap bitmap; // and methods
void init(Context context) { // Bitmap cBitmap = BitmapFactory.decodeResource(context.getResources(), bitmapId); bitmap = Bitmap.createScaledBitmap( cBitmap, (int)(size * GameView.unitW), (int)(size * GameView.unitH), false); cBitmap.recycle(); } void update(){ // } void drow(Paint paint, Canvas canvas){ // canvas.drawBitmap(bitmap, x*GameView.unitW, y*GameView.unitH, paint); } Step 8. Create the Ship class
Now create a class Ship (spacecraft). It inherits the SpaceBody class, so add the extends SpaceBody to the class definition.
Let's write a constructor:
public Ship(Context context) { bitmapId = R.drawable.ship; // size = 5; x=7; y=GameView.maxY - size - 1; speed = (float) 0.2; init(context); // } and override the update () method
@Override public void update() { // if(MainActivity.isLeftPressed && x >= 0){ x -= speed; } if(MainActivity.isRightPressed && x <= GameView.maxX - 5){ x += speed; } } On this space ship is ready! All compile and run. A spacecraft should appear on the screen. When you press the buttons, it should move to the right and left. Now add the asteroids flowing above. When confronted with a ship, the game ends.
Step 9. Create the Asteroid class
Add the class Asteroid (asteroid). It also inherits the SpaceBody class, so add the extends SpaceBody to the class definition.
Add the variables we need:
private int radius = 2; // private float minSpeed = (float) 0.1; // private float maxSpeed = (float) 0.5; // The asteroid should appear at a random point at the top of the screen and fly down at a random speed. To do this, x and speed are set using a random number generator in its constructor.
public Asteroid(Context context) { Random random = new Random(); bitmapId = R.drawable.asteroid; y=0; x = random.nextInt(GameView.maxX) - radius; size = radius*2; speed = minSpeed + (maxSpeed - minSpeed) * random.nextFloat(); init(context); } The asteroid must move with a certain speed vertically downwards. Therefore, in the update () method, we add velocity to the x coordinate.
@Override public void update() { y += speed; } We also need a method that determines whether the asteroid collided with the ship.
public boolean isCollision(float shipX, float shipY, float shipSize) { return !(((x+size) < shipX)||(x > (shipX+shipSize))||((y+size) < shipY)||(y > (shipY+shipSize))); } Consider it in more detail. For simplicity, we consider the ship and the asteroid squares. Here I went from the opposite. That is, I determine when the squares do NOT intersect.
((x + size) <shipX) - the ship to the left of the asteroid.
(x> (shipX + shipSize)) - the ship to the right of the asteroid.
((y + size) <shipY) - the ship on top of the asteroid.
(y> (shipY + shipSize)) - the ship from the bottom of the asteroid.
Between these four expressions is || (or). That is, if at least one expression is true (and this means that the squares do NOT intersect) - the resulting ones are also true.
I invert all this expression with a sign !. As a result, the method returns true when the squares intersect. What we need.
About the definition of the intersection of more complex shapes can be read here .
Step 10. Add asteroids to GameView
Add variables to GameView:
private ArrayList<Asteroid> asteroids = new ArrayList<>(); // private final int ASTEROID_INTERVAL = 50; // ( ) private int currentTime = 0; also add 2 methods:
private void checkCollision(){ // for (Asteroid asteroid : asteroids) { if(asteroid.isCollision(ship.x, ship.y, ship.size)){ // gameRunning = false; // // TODO } } } private void checkIfNewAsteroid(){ // 50 if(currentTime >= ASTEROID_INTERVAL){ Asteroid asteroid = new Asteroid(getContext()); asteroids.add(asteroid); currentTime = 0; }else{ currentTime ++; } } And in the run () method, we add calls to these methods before the control () call.
@Override public void run() { while (gameRunning) { update(); draw(); checkCollision(); checkIfNewAsteroid(); control(); } } Next, in the update () method, we add a loop that goes through all the asteroids and calls the update () method on them.
private void update() { if(!firstTime) { ship.update(); for (Asteroid asteroid : asteroids) { asteroid.update(); } } } The same loop is added to the draw () method.
private void draw() { if (surfaceHolder.getSurface().isValid()) { // surface if(firstTime){ // firstTime = false; unitW = surfaceHolder.getSurfaceFrame().width()/maxX; // unitH = surfaceHolder.getSurfaceFrame().height()/maxY; ship = new Ship(getContext()); // } canvas = surfaceHolder.lockCanvas(); // canvas canvas.drawColor(Color.BLACK); // ship.drow(paint, canvas); // for(Asteroid asteroid: asteroids){ // asteroid.drow(paint, canvas); } surfaceHolder.unlockCanvasAndPost(canvas); // canvas } } That's all! The simplest 2D game is ready. Compile, run and see what happened!
If someone is confused or something does not work, you can download the source .
The game, of course, is primitive. But it can be improved by adding new features. The first step is to implement the removal of asteroids that have flown off the screen. You can make the ship could shoot asteroids, so that the game gradually accelerated, add a timer, a table of records and so on. If this is interesting to you, I will write a sequel, where I will describe all this.
That's all. Write reviews, questions, topics that interest you to continue.
Source: https://habr.com/ru/post/330686/
All Articles