SQL Server Integration Services (SSIS) for Beginners - Part 1

→ Part 2
→ Part 3
SSIS is a tool that allows you to integrate in a convenient way, i.e. implement the process of transferring data from one source to another. This process is sometimes called ETL (from the English. Extract, Transform, Load - literally "extraction, transformation, loading").
I think this practical course will be useful for those who want to study SSIS and do not know where to start. Here in the Step By Step mode we will start from the very beginning, i.e. installation of all necessary.
')
Next will be a lot of pictures!
Required tools for learning SSIS
In this article, SSIS will be discussed using the example of SQL Server 2014 Developer Edition . Integration Services is available in SQL Server 2014 starting with Standard.
Additionally, you will need to download and install the SQL Server Data Tools (SSDT) developer tool.
SSDT is an extension for Visual Studio that allows you to create projects of the type we need.
To facilitate the installation process, I will use SSDT for Visual Studio 2012 (VS2012), it can be downloaded from the link (the file " SSDTBI_VS2012_x86_ENU.exe "):
www.microsoft.com/en-US/download/details.aspx?id=36843
By description, this version of SSDT supports the following versions of SQL Server: SQL Server 2014, SQL Server 2012, SQL Server 2008 and 2008 R2.
If VS of this version is not installed on your computer, then the SSDT installer will install a minimal version of the shell that will allow you to create projects of the type you need.
Installing SQL Server and SSDT
First, install SQL Server with all the necessary components.
I installed everything on a clean Windows 7 SP 1 (x64), I don’t have to install anything extra except the one specified below.
Since the course is designed for beginners, then sign for the entire installation process in detail.
Run the SQL Server 2014 installation file:

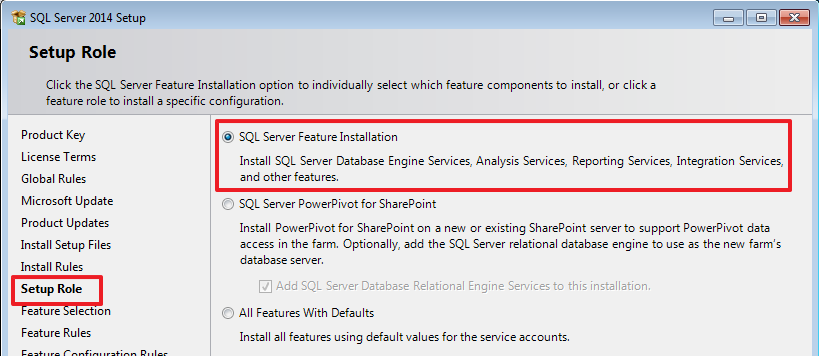
For SSIS to work, it’s enough to select the following components:
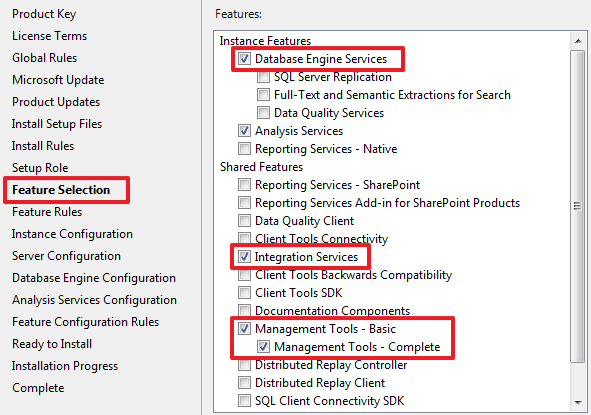
Since I will need Analysis Services (SSAS) in the future, then I’ve noted it, if you don’t need it, you can choose this component.
I have no other installed SQL Server, and I will make this instance the default:

Let the SQL Agent run automatically:

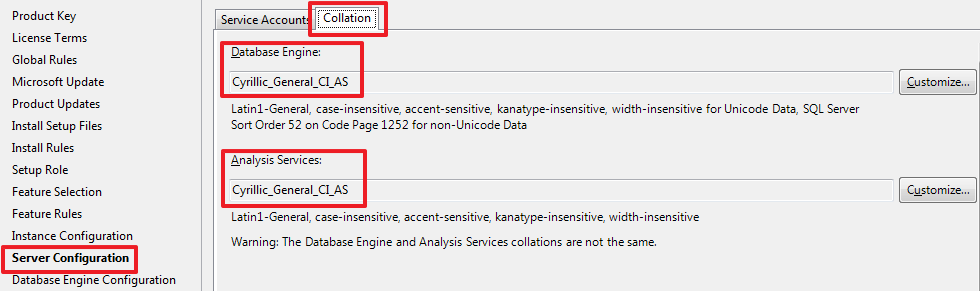
If necessary, you can change the default Collation:
I will set a mixed authentication mode, specifying my password for the sa user:

Since I also chose Analysis Services, then I make settings for it:

Click Next and Install to start the installation of SQL Server and its components.
Since I have only one disk on my computer, I left all the directories by default, if necessary, you can change them to more convenient ones.
The next step is to install SSDT - this is an extension for Visual Studio, which will enable us to create SSIS projects. The SSDT installer installs the minimum version of the VS shell, so there is no need to preinstall VS separately.
Run " SSDTBI_VS2012_x86_ENU.exe ", and when we get to the next step, select the following item:

Click Next to start the installation.
After the installation is complete, just in case, we restart the computer.
This is all we need to study SSIS.
Creating demo databases
Run SQL Server Management Studio (SSMS) and create three databases with the help of the script - the first two (DemoSSIS_SourceA and DemoSSIS_SourceB) act as data sources, and the third (DemoSSIS_Target) as data recipient:
-- CREATE DATABASE DemoSSIS_SourceA GO ALTER DATABASE DemoSSIS_SourceA SET RECOVERY SIMPLE GO -- CREATE DATABASE DemoSSIS_SourceB GO ALTER DATABASE DemoSSIS_SourceB SET RECOVERY SIMPLE GO -- CREATE DATABASE DemoSSIS_Target GO ALTER DATABASE DemoSSIS_Target SET RECOVERY SIMPLE GO In the source databases, we will create test tables and fill them with test data:
USE DemoSSIS_SourceA GO -- A CREATE TABLE Products( ID int NOT NULL IDENTITY, Title nvarchar(50) NOT NULL, Price money, CONSTRAINT PK_Products PRIMARY KEY(ID) ) GO -- SET IDENTITY_INSERT Products ON INSERT Products(ID,Title,Price)VALUES (1,N'',20), (2,N'',NULL), (3,N'',100), (4,N'',80), (5,N'',25) SET IDENTITY_INSERT Products OFF GO USE DemoSSIS_SourceB GO -- B CREATE TABLE Products( ID int NOT NULL IDENTITY, Title nvarchar(50) NOT NULL, Price money, CONSTRAINT PK_Products PRIMARY KEY(ID) ) GO -- SET IDENTITY_INSERT Products ON INSERT Products(ID,Title,Price)VALUES (1,N'',200), (2,N' ',70), (3,N'',220), (4,N'',150), (5,N' ',15) SET IDENTITY_INSERT Products OFF GO Create a table in the host database:
USE DemoSSIS_Target GO -- CREATE TABLE Products( ID int NOT NULL IDENTITY, Title nvarchar(50) NOT NULL, Price money, SourceID char(1) NOT NULL, -- SourceProductID int NOT NULL, -- ID CONSTRAINT PK_Products PRIMARY KEY(ID), CONSTRAINT UK_Products UNIQUE(SourceID,SourceProductID), CONSTRAINT CK_Products_SourceID CHECK(SourceID IN('A','B')) ) GO Creating an SSIS project
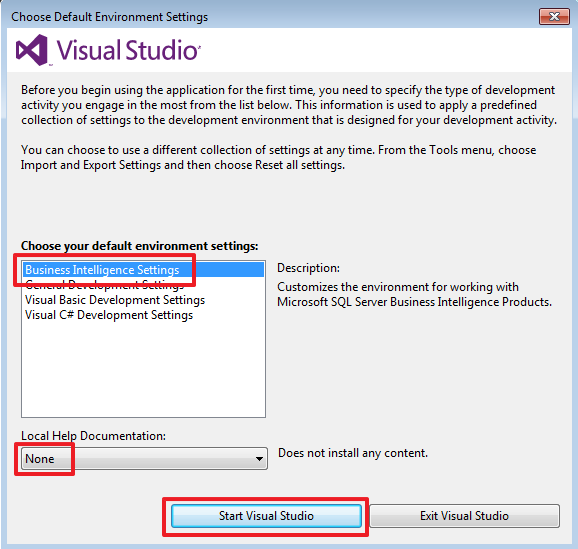
Let's start Visual Studio 2012 and select one of the types of environment settings offered to us, so here I’ll reject the local documentation:
Create a new project ( File -> New -> Project ... ):

To further facilitate deployment, go to the project properties and change the ProtectionLevel option to DontSaveSensitive :

Do the same in the properties of the package that was created by default:
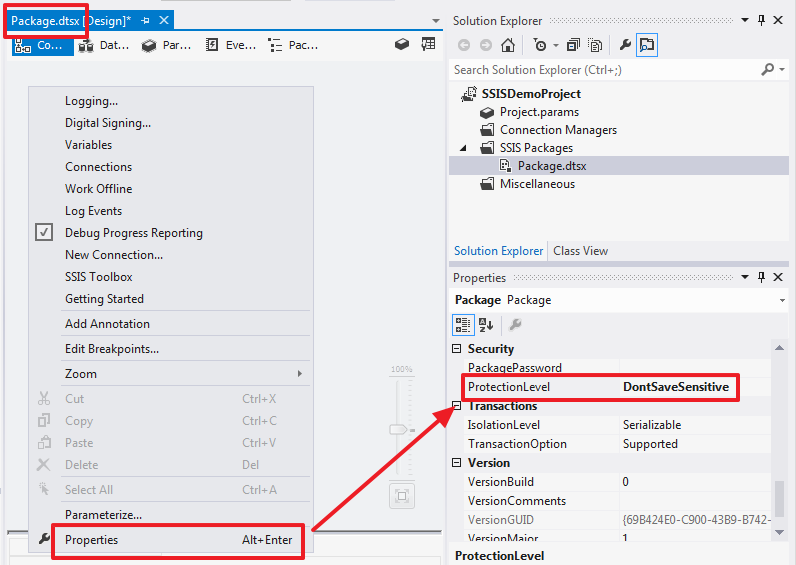
For all new packages, this property will be populated with a value from the project property.
Create connections:


Fill in the parameters of the connection with the database:

The combat parameters of the connection can be further configured when creating the SQL Server Agent task.

For convenience, I will rename the connection name to SourceA :

In the same way, we will create and rename connections for the DemoSSIS_SourceB and DemoSSIS_Target databases :

Rename the default package to “ LoadProducts.dtsx ”:

First, we write simple logic that will completely clear the Products table in the DemoSSIS_Target database and load data from the two databases DemoSSIS_SourceA and DemoSSIS_SourceB into it again.
To clean up, we will use the “Execute SQL Task” component, which we will create using the mouse in the “Control Flow” area:

For clarity, you can rename the name of the component. Give it the name "Delete All Products From Target":

For this purpose, the Name property is used.
Double click on this item and write the following properties:

Since TSQL command "TRUNCATE TABLE Products" does not return anything, leaving the ResultSet property is None.
In the future, we will look at how to use the parameters and how we can use the result of executing the command written in the SQLStatement, but for now let's try to see the whole picture of how it works as a whole.
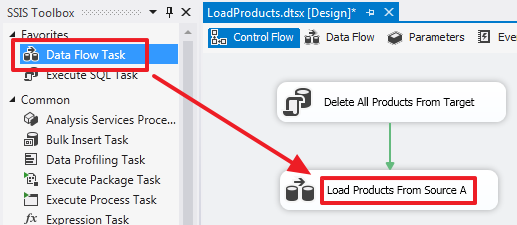
Now let's drop the Data Flow Task component into the Control Flow area and rename it to Load Products From Source A, and drag the green arrow from Delete All Products From Target to this component:
Thus, we have created a chain that will be executed sequentially.
Clicking twice on "Load Products From Source A" we find ourselves in the "Data Flow" area of this element.
Data Flow Task is a complex component that has its own area in which nested elements are created for working with data flow.
Drop the Source Assistant component into this area:


This component is responsible for receiving data from the source. By double clicking on it, we can configure it:

For now let's use the “Data access mode” equal to “Table or view”. This will result in all rows from the Products table. You can view the data by clicking on "Preview ...".
On the Columns tab, we can select only the columns we need and, if necessary, rename them by writing a new name in the “Output Columns” column:

For the recipient you need another additional SourceID column, add it to the output set using the “Derived Column” component, which we will rename to “Add SourceID”, also stretch the blue arrow to this element from “OLE DB Source”:

Double click on the element “Add SourceID” and write the value “A” in the form of a constant:

Here I used the type conversion function (DT_STR, 1.1251) to turn the Unicode string into ANSI.
Now create the “Destination Assistant” component:

Let's send a stream from “Add SourceID” to it:

Double click on “OLE DB Destination” and make the settings:
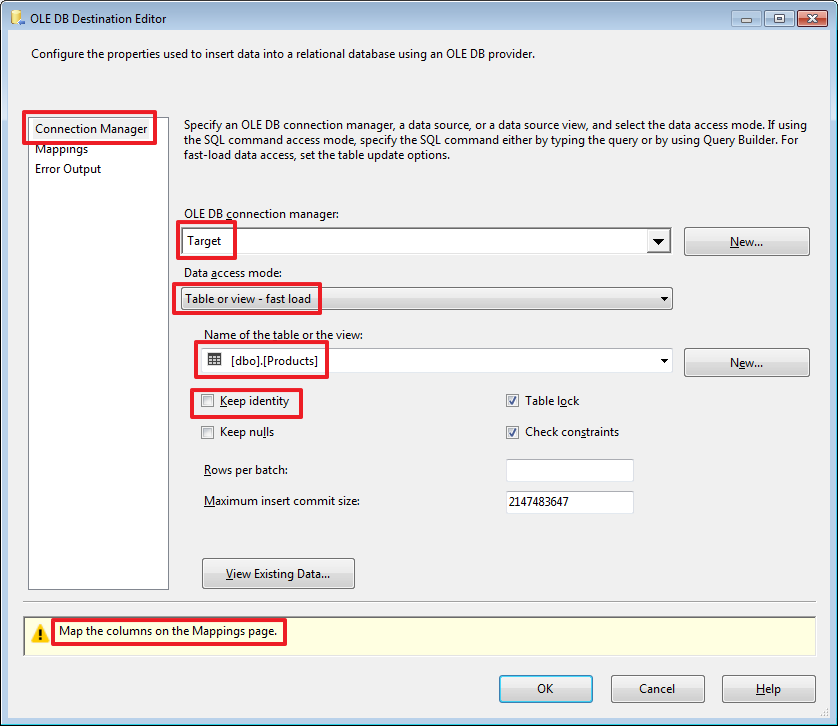
Here we show in which table the resulting set will be recorded.
“ Keep identity ” is used if there is a field in the receiving table with the IDENTITY flag and we want the values to be written to it from the source too (this is similar to the inclusion of the SET IDENTITY_INSERT Products ON option).
Clicking on the Mappings tab lets you link the source fields with the recipient fields:

Since we have the same source and receiver fields, the binding is carried out automatically.
We can test the package and make sure that the data is filled in the Products table of the DemoSSIS_Target database.
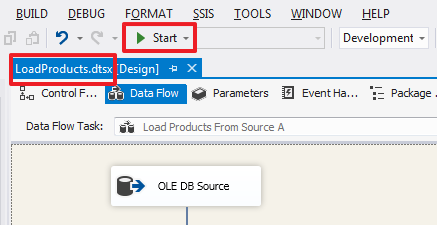
Run the package for execution from Visual Studio by pressing Start or pressing F5 :
The same package can be executed using the command from the context menu:
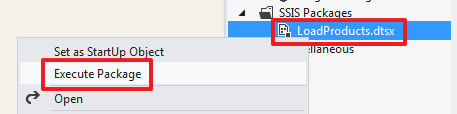
With the help of “ Set as StartUp Object ” you can set a package that will be launched by pressing Start (F5) .
Which package will run when you click on Start (F5) can be overridden in the project properties:
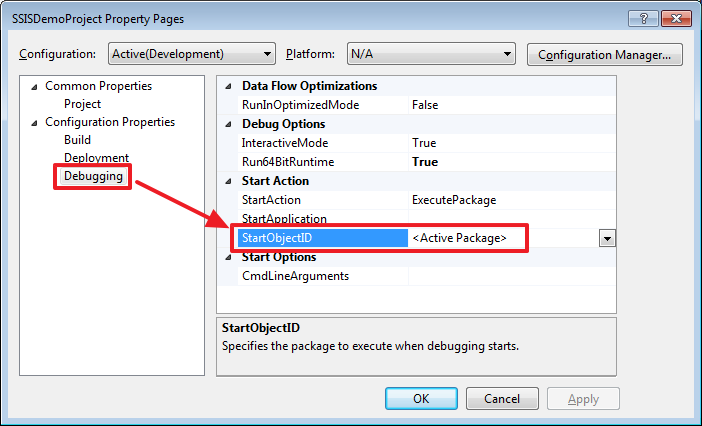
By default, the package that is currently open will be launched, this is indicated by the StartObjectID value <Active Package>.
Running the project, we should see the following picture:

The package ran without errors, as indicated by the green icon and the text at the bottom.
In case of errors, you can see them in the Progress tab.
Click the “Package execution completed ...” link or the “Stop Debugging” button located on the toolbar to stop the package execution.

Run the query:
USE DemoSSIS_Target GO SELECT * FROM Products And make sure that the data were recorded in the host table.
Let's go to the Control Flow area and create another Data Task Flow component, which we call Load Products From Source B, and drag the green arrow from Load Products From Source A to it:

Double-click into the “Data Flow” area of this item and create a “Source Assistant”:
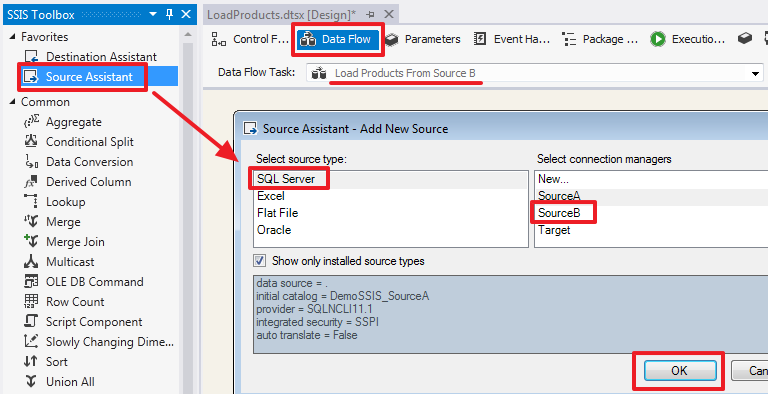
Double-clicking this item will configure it differently:

Select the “SQL command” mode and write the following query:
SELECT ID SourceProductID, 'B' SourceID, Title, Price FROM Products Next, we will immediately create the “Destination Assistant” component and drag the blue arrow from the “OLE DB Source” onto it:


Double click into the reducer of this element and configure it:


Run the project and make sure that the data from two sources hit the table in the Target database:
USE DemoSSIS_Target GO SELECT * FROM Products 
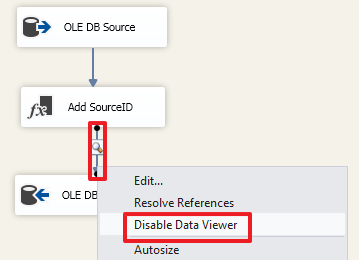
Additionally, in the context menu of the arrow, you can activate the "Data Viewer":
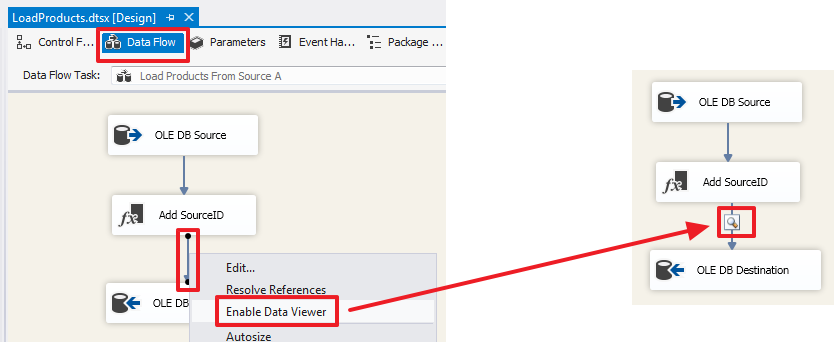
Now when the package is launched for execution at this point a stop will be made and the data of this stream will be shown to us:

To continue the execution of the package, click the arrow button or simply close the data view window.
To disable this function in the context menu of the arrow, select “Disable Date Viewer”:
For the first part I think this will be enough.
Build the build:
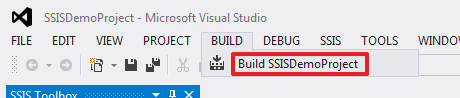
As a result, we get the file "C: \ SSIS \ SSISDemoProject \ bin \ Development \ SSISDemoProject.ispac ".
Consider how this project is deployed to SQL Server.
SSIS Deployment
All subsequent actions will be done in SSMS.
Creating an SSISDB directory:

Here we enter any password.
Now we create a folder in which our project will be located:

We develop the project itself:


In conclusion, we should see the following picture:

After the update (F5), we will see our project:

Creating a task in SQL Server Agent
Create a task in SQL Agent to execute the package on a schedule:

Create a new step:
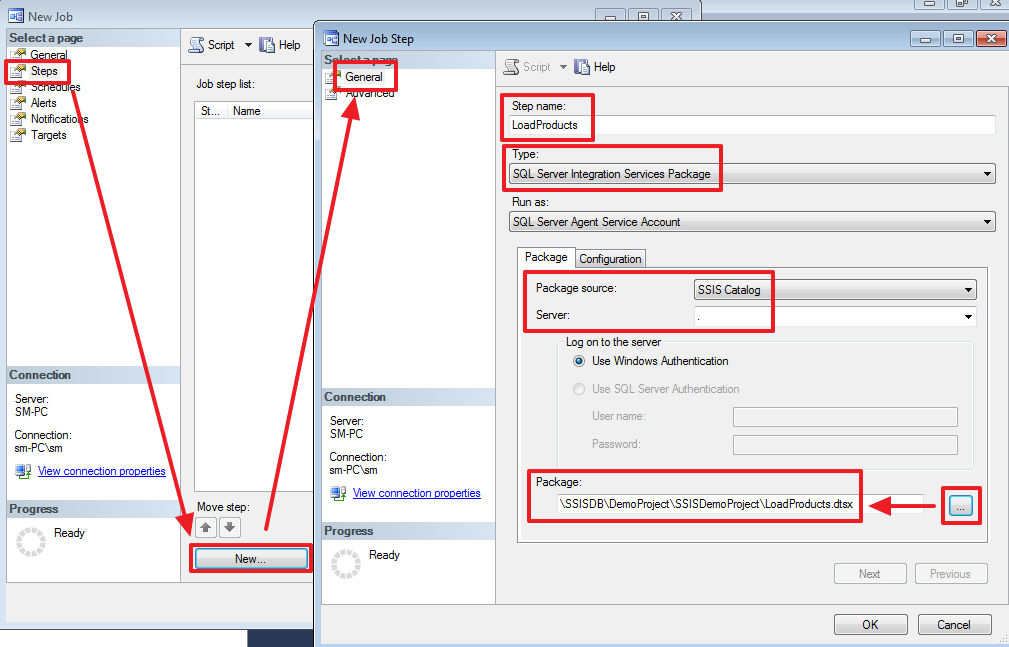
On the “ Configuration → Parameters ” tab you can set the package parameters (we will discuss them in the following sections).
In the “ Configuration → Connection Manager ” tab, we can change the connection parameters for each connection we created in the project:

On the Advanced tab, you can change the logic that will be used when the step is completed successfully or unsuccessfully:

Step created:

It remains to create a schedule for this task:

Schedule can be set in a variety of ways. I think everything here should be intuitive:

Everything, the task is created.
Making a test run:

Since we have only one step, the task will start immediately, otherwise it would be necessary to specify from which step to start the execution.
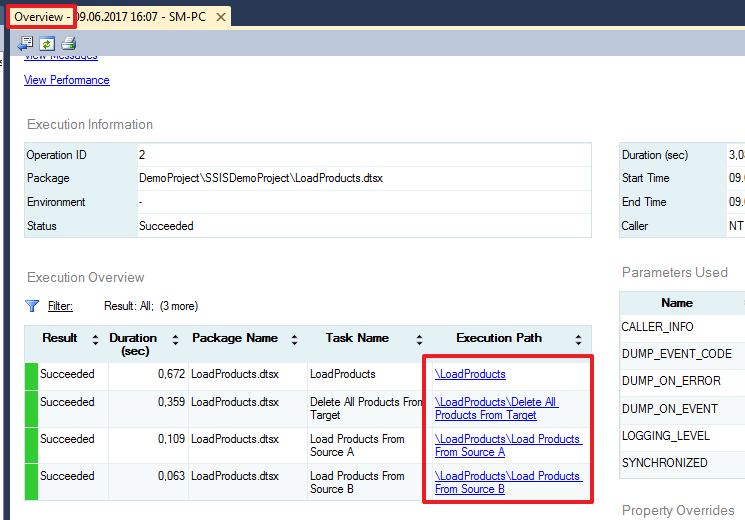
The result of the task can be seen in the following log:

In this log you can see the success of the completion of each step, as well as the execution time and other parameters.
A more detailed report on the implementation of the package can be viewed using the following report:


Conclusion on the first part
In this part, I tried to give an overview picture so that the reader would immediately have a complete picture of how it all looks and works.
I tried to describe everything in as much detail as possible, so that the student could independently install all the necessary tools and work through the material step by step in practice, since self-study to have a working environment is a very important aspect.
In my opinion, SSIS is a very convenient and intuitive tool and much of it can be understood by understanding on your own. I say this based on my experience, since I myself, for the most part, had to deal with SSIS myself, and here I share with you my experience in this field.
I hope this material will help many to take the first steps in studying this tool and to further apply their knowledge in the work.
Have a good weekend! Good luck!
→ Part 2
Source: https://habr.com/ru/post/330618/
All Articles