HexRaysPyTools: decompile with pleasure

In this article, I'm going to talk about the plugin for IDA Pro, which I wrote last summer, while still being on an internship at our company. As a result, the plugin was introduced at ZeroNights 2016 (Slides) , and since then it has fixed several bugs and added new features. Although on GitHub I tried to describe it in as much detail as possible, usually colleagues and acquaintances start using it only after a small workshop. In addition, some details of the internal work are omitted, which would allow a better understanding and use of the plugin's features. Therefore, I would like to try to explain with an example how to work with it, as well as talk about some of the problems and subtleties.
HexRaysPyTools, as the name suggests, is intended to improve the performance of the Hex-Rays Decompiler decompiler. The decompiler, creating a pseudo-C code, greatly facilitates the work of the reserver. Its main advantage, which makes the tool stand out from the rest, is the ability to transform the code, leading it to a convenient and understandable mind, unlike the assembler code, which, even with the best support, requires a certain amount of attention and concentration to understand its work. Hex-Rays Decompiler, like IDA Pro itself, has an API that allows you to write extensions and go beyond the standard functionality. And although the API is very wide, and in theory it allows to satisfy the most sophisticated needs of an add-on developer, it has several significant drawbacks, namely:
- Weak documentation. In order to find suitable functions or classes, the most effective way is to search regular expressions on files, guessing keywords.
- Arbitrary names of functions and structures - often their name does not mean anything
- Deprecated methods for which no replacement is suggested.
- The overall complexity of the work. For example, to change the type of the argument of a function, you need to write 8 lines of code and use 3 classes. And this is not the strangest example.
- The Python API is not exactly the same as for C ++.
idaapicontains new methods that stumbled upon by chance - There are no obvious things: for example, IDA Pro will fall if you do not disable Garbage Collector for objects added using
idaapito an abstract syntax tree (it is always built when decompiling occurs, and you can change objects or insert your own).
To understand all this, working examples collected on the Internet helped (something interesting was found even in the Chinese segment). So now, if someone wants to create something of their own for the decompiler, you can also refer to the source codes of my plugin.
Let us turn to the description of the plugin. In HexRaysPyTools, two separate categories can be distinguished: this is help in transforming the default output of Hex-Rays Decompiler to a convenient form and reconstruction of structures and classes.
Work with code
Initially, after starting the decompiler with the F5 key, IDA Pro produces a not very clear code, consisting mainly of standard types and variable names. And despite the fact that sometimes it tries to guess the types, create arrays, or name these variables (which are lucky to be the arguments of standard functions), this is not very good. In general, the task of the reviser is to bring the decompiled code into an adequate form. Unfortunately, there are things that are impossible to do without resorting to the IDA SDK. For example, negative references to the fields of structures, which always look ugly (sometimes turning into arrays with negative indices), as well as long conditional investments stretching from the upper left corner to the lower right. In addition, there are not enough hot keys and options for faster code transformation. As information is obtained during the program analysis, it is necessary to change function signatures, rename variables, and change types. All this requires a large number of mouse manipulations and copy-inserts. Let us turn to the description of what the plugin offers to solve these problems.
Negative offsets
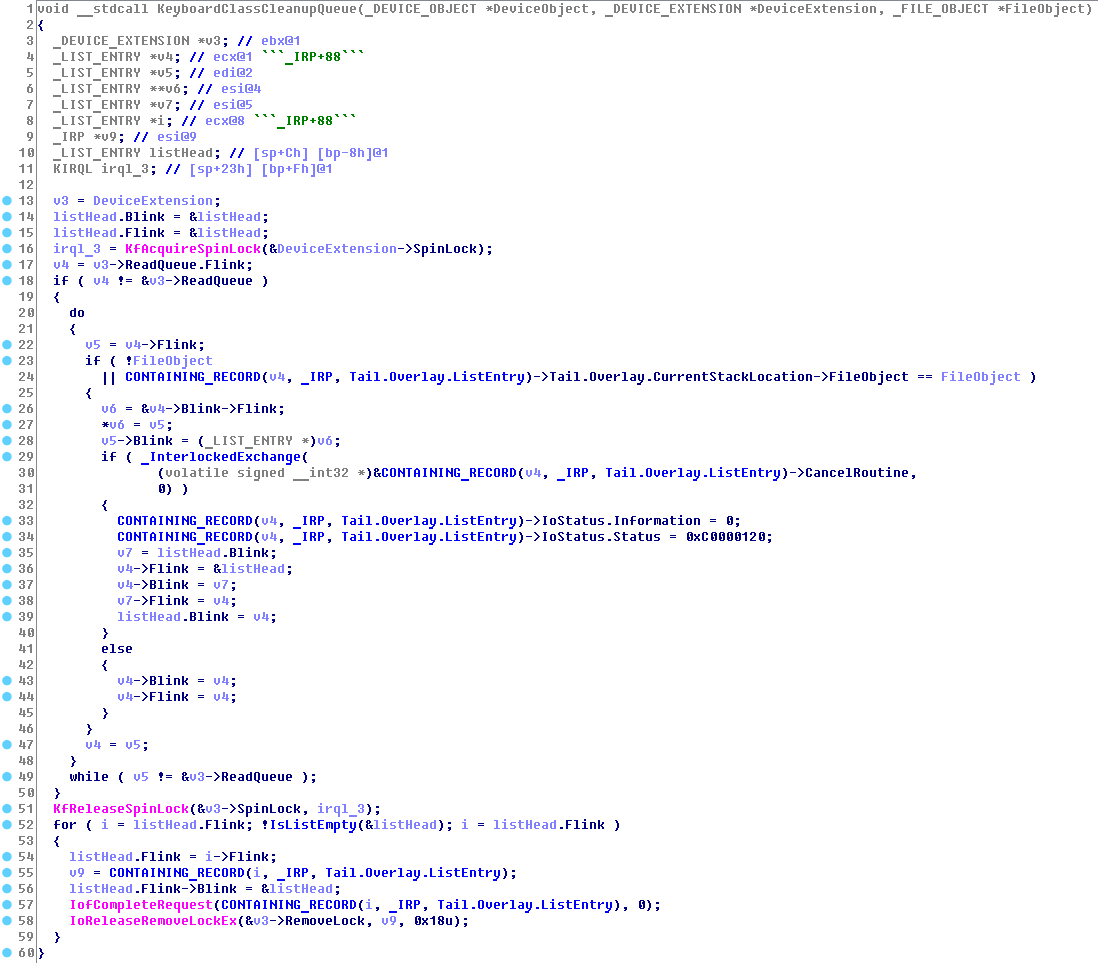
Very often found when reversing drivers or the Windows kernel or modules of the Linux kernel. For example, several different structures can be located in a doubly linked list using the LIST_ENTRY structure. In this case, for each structure, a double-linked list can be accessed from an arbitrary field.
As a result, when we look at what happens in IDA Pro, we see the following picture:

This output will be whenever the CONTIAINING_RECORD (windows) and container_of (linux) macros are used in the source code of the programs. These macros return a pointer to the beginning of the structure by its type, address, and field name. And it is their plugin allows you to insert into the disassembler. Here is how the example looks after its application:
Even with negative displacements can be encountered with multiple inheritance, but this is a rather refined example, it is rarely found in practice.
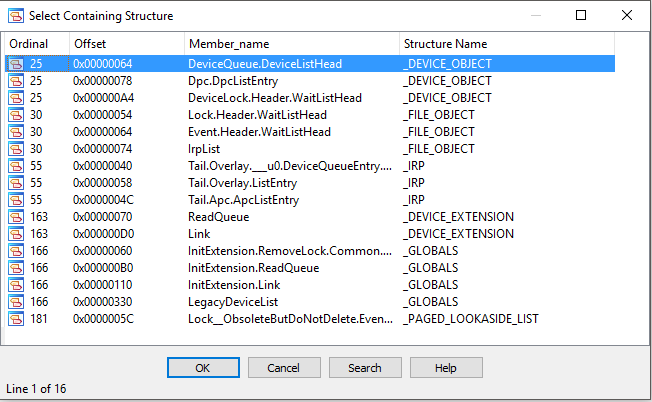
In order to insert a macro into a disassembler, it is necessary that the appropriate structure in this context exists in Local Types or in one of the libraries in the Types Library (there may be several of them). We click on the nested structure with the right button and select Select Containing Structure. Next, we determine where to look for the structure, either in Local Types or in the Types Library, and the plugin makes a list of suitable structures. To do this, it analyzes how the specified variable is used in the code and determines the minimum and maximum limits in which the type field of this variable can be located. Then, using this information, passes through all the structures containing the field, which have everything in order with the border. When searching, the plugin looks at nested structures and associations at any depth.
In the example above, the exe-file has characters, so the list of suitable structures turned out to be rather large:
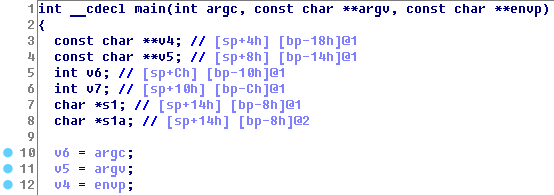
In addition, there is a situation where a plugin can automatically insert a macro. The fact is that if there is an explicit assignment of a pointer, IDA Pro guesses (sometimes incorrectly) to insert it, but does not distribute it further in the code.
No plugin:

With plugin:

Strong nesting
Perhaps the best way to show an artificial example. No plugin:

With plugin:

Such a change will be made automatically if the plugin is installed. I would like to be able to impose manually, but, alas, what the decompiler produces is very unstable in terms of saving changes to the syntax tree.
Rename
The idea is to call a variable or argument no more than once, and then all the renaming was done with hot keys or two clicks.
Often, IDA Pro creates duplicate variables. It would be possible, using the standard "map to another variable" option, to get rid of them. But this is not always convenient when debugging, it may be wrong and besides it is impossible to roll back without recreating the function again.
You can transfer the name from one variable to another, while adding the symbol "_":
Before:
After:

You can rename the argument of the function, forcing it to take the name of the variable (in this case, the extra underscores will be removed). Or, conversely, to assign a variable the name of the function argument.
Recasts
There are many situations where there is an interaction between two certain entities with different types, and we need to transfer the type of one entity to another. Entities are local, global variables, arguments, functions, structure fields (with reference to and without reference) and return values of the function. The plugin allows you to quickly produce it. It is difficult to show a picture, I recommend in case you need to transfer the type of one entity to another, right-click on it and look at the options. Surely there will appear "Recast ..." (and if it does not, then you can write to me, and I will try to add it).
Other
In addition, the following options are added:
- Search structures by size and replace the number with
sizeof(Structure)). Convenient for finding a structure of suitable size by the number of bytes specified by thenewoperator or themallocfunction. - Quickly change the function signature. By right clicking on its declaration, you can add / remove the return value, delete the argument, reset the calling agreement to __stdcall.
- Double click on virtual methods.
Structure restoration
One of the most difficult and energy-intensive tasks of reverse engineering is the understanding of the work and the reconstruction of structures and classes. HexRaysPyTools acts as an assistant in this process. What is the problem? By default, you can only fill in the already declared structure declaration, so you have to “crawl” along the code, trying to gather information about the fields, manually calculate the offsets and write down all the information somewhere (for example, in a notebook). But, if we have class sizes in the hundreds of bytes and, in addition, have many methods and several virtual tables, everything becomes much more complicated.
Consider an example of how a plugin helps in this case. Once (only for the sake of self-education: D) I created a bot for an online toy. In the process, I stumbled upon a protection encrypting packets that did not allow modifying the code in memory and preventing the call of the encryption function (which was strictly obfuscated) from interfering with the hook. In order to bypass it, it was necessary to parse the class responsible for the exchange of data between the client and the server and learn, using it, call sending packets and read received, decrypted packets for several calls from the protection functions. Then it was a difficult task, but with the plugin everything is pretty simple.
Here is the method that accepts packets. this and v1 are pointers to a class object, gepard_1 is a function replacing recv

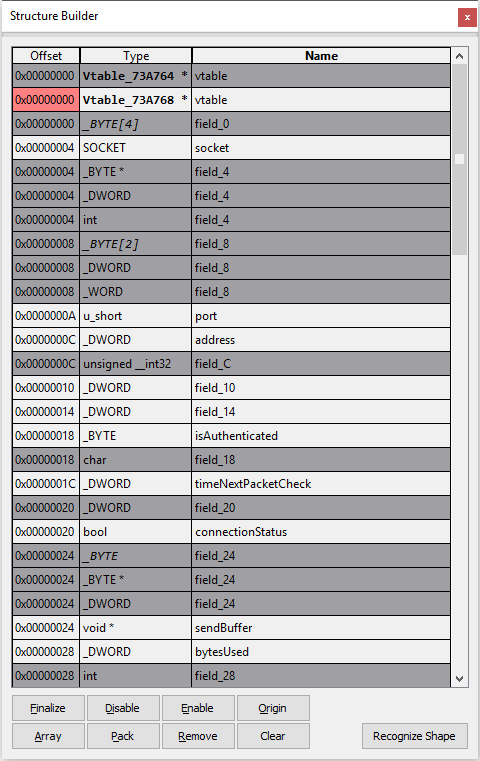
If you look inside the functions sub_41AF50 and sub_41AFF0 , you can see quite a lot of code that accesses different fields. And even this is only part of the functional responsible for creating and sending packets, so it may be difficult to understand the purpose of the fields. The plugin helps to automatically analyze a large amount of code, and from the collected information to create a certain framework structure, which in the further analysis can be changed by the researcher and used to automatically create a new type. First you need to open the Structure Builder via Edit-> Plugins-> HexRaysPyTools. This window will contain the collected information, provide the ability to edit field names and resolve conflicts, as well as view virtual tables and scan virtual functions.
There are 3 possible ways to collect field information:
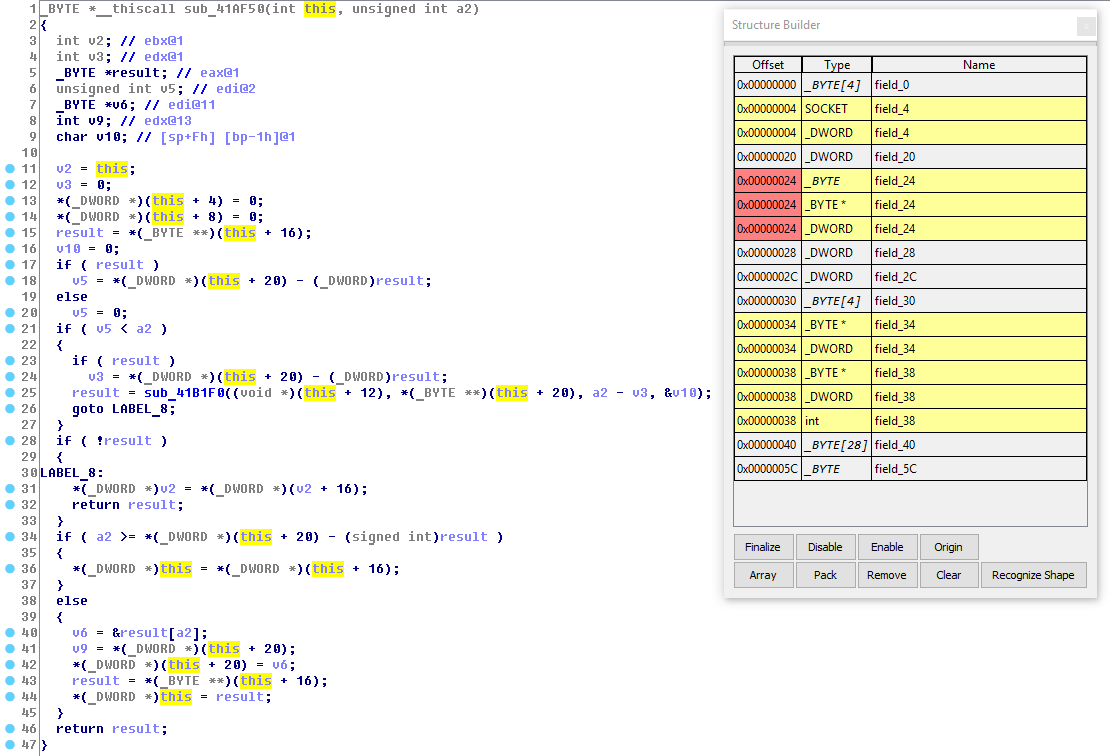
1) You can right-click on a variable and, by clicking Scan Variable, start a scan within one function. When scanning, it will be considered how the variable is accessed and, if it falls under the field reference pattern, such information will be stored. If another variable is assigned the value of the first (and their types do not have to be the same), it also connects to the scan (and turns off if a new value is assigned to it). Here is the result if you apply this method to the this variable in the function above:

Although we ran a scan for this variable, information about v1 also collected.
All kinds of calls to the fields are marked yellow, and you need to choose which option is best for you, turning off all the others. As long as there are conflicts, it will be impossible to create the final structure. Red is the offset from which the scan is made. It can be shifted using the Origin button in order to scan a potential substructure. For example, you can enter the sub_41AF50 function and, moving the pointer, collect some new information:
If you double-click on the Offset column of the field of interest, you can see a list of all calls to this field and quickly move to the destination in the disassembler. Therefore, it makes sense to cover as many places as possible using the restored structure as much as possible. More information about the fields - it's easier to figure out what's needed. Scanning each variable can be quite tedious, because a pointer to a structure can travel through a large number of functions, so there is another way to collect information.
2) By right-clicking on a variable, you can select the "Deep Scan Variable" option. The main scanning process will be the same as that of the first method, only now, if the pointer to the structure is passed as an argument to the function, a recursive scan of this argument will be launched. Warning! There is one problem here - the decompiler does not always recognize correctly the arguments of a function that it has not yet decompiled, so you have to recursively enter and decompile every function that can potentially contain a pointer to our structure as an argument. This process starts automatically and occurs only once per session for each function. Therefore, the first deep scan processes may take some time (on the order of a couple of minutes).
Moving up the challenge chain several times, you can find the place where the structure is created:

Running a scan here, we get the following:

3) It is best to start scanning where the structure first appears, in order to maximize its use in the code. The plugin provides the ability to scan all the variables that are assigned the result returned by the constructor.
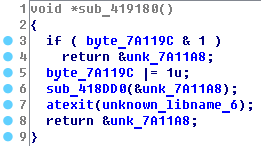
If you enter the sub_419890 function, which for the first time returns a pointer to a structure, you can see that the lone pattern is used:
The number of calls to this function is very large:

Scanning each variable would be tedious, so it is possible to start the scanner for everyone at once by clicking on the function header and selecting the "Deep Scan Returned Variables" option.
Here is the result of using the example:

You may notice that there was information about accessing the fields 0x8 - 0x14. There were also virtual tables - they are displayed in bold and by double-clicking on them, you can see a list of virtual functions (and at the same time scan them one at a time, and all at once).
Now you can deal with the device structure. Recall that by clicking on the offset, you can see all the calls to the fields.
Here is what happened after a brief analysis:
Preparing to create the structure is complete. Now you can click "Finalize" and, having made recent changes, finish its creation:

Further, everywhere where the scanner has reached, the variables that were a pointer to this structure will be applied to its newly created type. Here is how the packet sending function will change:

In addition to the presented, in the Structure Builder, you can create or try to guess the substructures by selecting the required number of fields and clicking Pack or Recognize Shape, respectively. When searching for a suitable structure, field types are taken into account - they must match exactly, with the exception of the basic types ( char - BYTE , int - DWORD - int * ), which are considered to be the same.
For already created classes (structures with virtual tables), the plugin has the opportunity to more conveniently work with them. On the way View-> Open Subviews-> Classes, you can open the following window:

Here you can:
- Rename methods, as a result of which changes will be made immediately in the code and virtual tables (done to avoid desynchronization)
- Modify method declaration
- Quickly convert the first argument to this
- Move to function in disassembler window
- Filter information by regular expressions
And further. I would like to remind once again that when working with classes it is very convenient to use the ClassInformer plugin. If there is RTTI-information in the file, it will help to restore the class hierarchy, and the plugin will take the names of the virtual tables, which will help to get the class names close to the original.
We hope that this article will help you figure out how to use the plugin. You can find it and report bugs at https://github.com/igogo-x86/HexRaysPyTools . We are also waiting for feature requests.
')
Source: https://habr.com/ru/post/329788/
All Articles