A comprehensive guide to using HTTP / 2 Server Push

Hello! My name is Alexander, and I am a front-end developer at Badoo. Perhaps one of the most debated topics in the world frontend in the past few years is the HTTP / 2 protocol. And for good reason - because the transition to it opens up many opportunities for developers to accelerate and optimize sites. This post is dedicated to just one of these features - Server Push. Jeremy Wagner's article seemed interesting to me, and therefore I am sharing useful information with you.
Not so long ago, performance-oriented developer capabilities have noticeably changed. And the emergence of HTTP / 2 was perhaps the most significant change. HTTP / 2 is no longer a feature we are looking forward to - it already exists (and successfully helps to cope with problems like blocking the beginning of the queue and uncompressed headers that exist in HTTP / 1), and “complete” with it goes Server Push !
This technology allows you to send site resources to users before they ask them. This is an elegant way to achieve performance benefits for HTTP / 1 optimization methods, such as embedding, for example, and to avoid the disadvantages associated with this practice.
From this article, you will learn everything about Server Push - from the principle of its work to the problems it solves: how to use it, how to determine if it works and what its effect on performance, and much more.
What is Server Push?
Web sites are always accessed using the “Request - Answer” template: a user sends a request to a remote server, which with a certain delay sends a response with the requested content.
In the initial request to the web server, an HTML document is usually requested. The server responds with the requested HTML resource. The resulting HTML document is analyzed by the browser, as a result of which links to other resources, such as style sheets, scripts and images, are extracted from it. After they are detected, the browser sends a separate request for each resource and receives the appropriate responses.
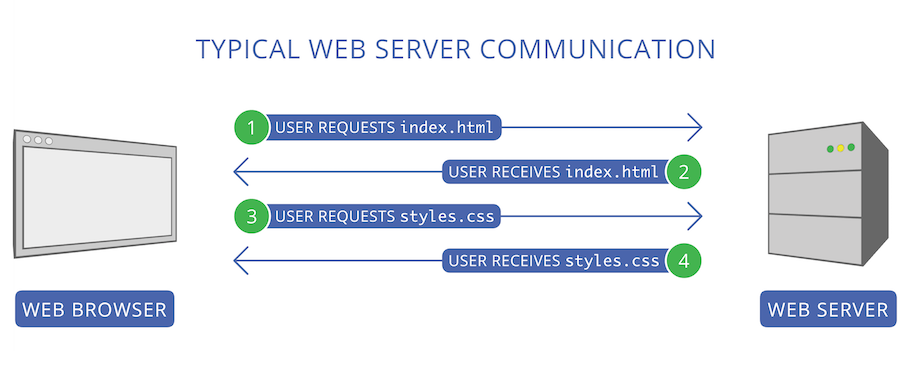
The problem with this mechanism is that it forces the user to wait until the browser detects and extracts the necessary resources after the HTML document is loaded. This delays rendering and increases download time.
We have a solution to this problem. Server Push allows the server to proactively push web site resources to the client before the user requests them explicitly. That is, we can send in advance what the user needs for the requested page.
Suppose you have a website where all pages rely on styles defined in an external style sheet called styles.css . When a user requests index.html from the server, we can send styles.css right after we start sending a response for index.html .

Instead of waiting for the server to send index.html , and then - until the browser requests and receives the styles.css , the user only needs to wait for an answer to his initial request. This response will contain both files: both index.html and styles.css . This means that the browser can start rendering the page faster than if it had to wait.
As you can see, using Server Push allows you to reduce the page rendering time. And also - to solve some other problems, especially with regard to front-end development.
What problems does Server Push solve?
Reducing the number of requests to the server to receive critical content is only one of the problems solved by Server Push, but not the only one.
For example, Server Push is a suitable alternative to a number of anti-pattern HTTP / 1 optimizations, such as embedding CSS and JavaScript directly in HTML or using the data URI scheme to embed binary data in CSS and HTML. These methods have value in optimizing HTTP / 1, since they reduce the subjective page load time. This means that although the total page load time cannot be reduced, the page will load faster for the user.
Of course, it makes sense. If you embed CSS in an HTML document in <style> tags, the browser can immediately apply the styles to the HTML, without waiting for them to be extracted from an external source. This concept works for both embedded scripts and binary data when using the data URI scheme.
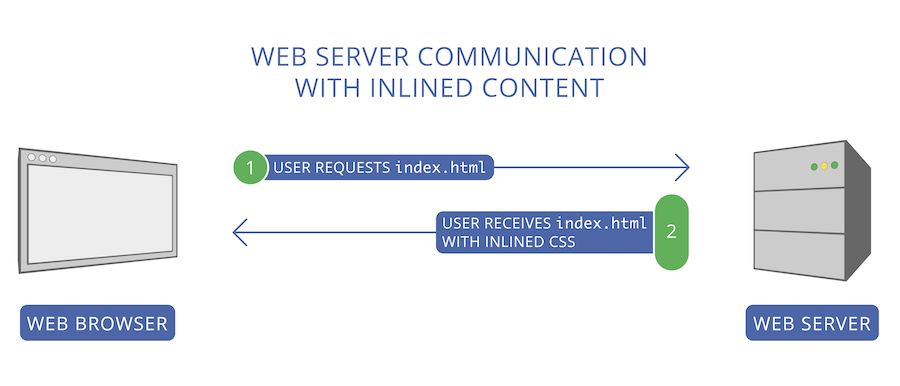
This seems like a good way to solve the problem, isn't it? For HTTP / 1, where you have no other choice, of course! But the flip side of the coin is that inline content cannot be effectively cached. If a resource (for example, a stylesheet or a JavaScript file) remains external and modular, it can be cached much more efficiently. And when the user goes to the next page, which requires the same resource, it can be pulled out of the cache, eliminating the need for additional requests to the server.
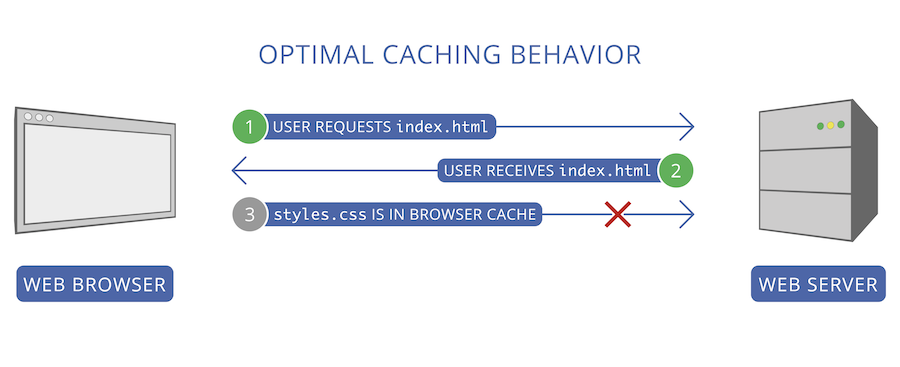
However, when we embed content, it does not have its own caching context — its caching context is the same as the resource in which it is embedded. Take, for example, an HTML document with inline CSS. If an HTML document caching policy always forces a fresh copy of the markup from the server, then the embedded CSS will never be cached by itself. Of course, the document in which it is embedded can be cached, but other pages that contain the same duplicate CSS will be reloaded. And even if the caching policy is less restrictive, HTML documents usually have a limited shelf life. However, this is a compromise, which we are ready to make when optimizing HTTP / 1. It really works, and it is quite effective for visiting the site for the first time. But the first impression is often decisive.
These are the problems that Server Push deals with. When you push through resources, you get the same practical advantages as when embedding, but still save your resources in external files that have their own caching policy. However, in this process there is one nuance that will be discussed at the end of the article. In the meantime, let's continue.
I explained in some detail why you should consider using Server Push, and also outlined a range of problems that this technology solves for both the user and the developer. Now let's talk about how it is used.
How to use Server Push?
Using Server Push usually involves using the HTTP Link header in the following format:
Link: </css/styles.css>; rel=preload; as=style Notice, I said "usually." What you see above is actually a preload resource hint . This is a separate optimization other than Server Push, but most (not all) HTTP / 2 implementations will push the object specified in the Link header, which contains a hint of the preload resource. If the server or client refuses to accept the pushed resource, the client will still be able to initiate early retrieval of the specified resource.
The as=style portion of the header is optional. It informs the browser about the type of content of the resource being pushed. In this case, we use the style value to indicate that the object is a style sheet (you can specify other types of content ). It is important to note that omitting the as value may cause the browser to load the push resource twice. So do not forget about it!
Now that you know how the pushing starts, consider how we can set the Link header. This can be done in two ways:
- Web server settings (for example,
httpd.confor.htaccessfor Apache); - backend language function (for example, PHP
headerfunction).
Link header setting in web server settings
Here is an example of setting up an Apache server (via httpd.conf or .htaccess ) to push the style sheet whenever an HTML file is requested:
<FilesMatch "\.html$"> Header set Link "</css/styles.css>; rel=preload; as=style" <FilesMatch> Here we use the FilesMatch directive to select requests for files ending in .html . When a request is received that meets this criterion, we add the Link header to the response, which instructs the server to push the resource /css/styles.css .
Note: Apache HTTP / 2 module can also initiate resource pushing using the H2PushResource directive. The documentation for this directive states that this method can trigger pushing earlier than using the Link header. Depending on your particular installation, you may not have access to this feature. Performance testing, shown later in this article, uses the Link header method.
Currently Nginx does not support HTTP / 2 Server Push, and so far the software change list does not indicate that its support has been added. This may change as the Nginx HTTP / 2 implementation evolves.
Setting the Link header in the backend code
Another way to set the Link header is to use the server language. This will help if you cannot change the settings of the web server. Below is an example of using the PHP header function to set the Link header:
header("Link: </css/styles.css>; rel=preload; as=style"); If your application is on a shared hosting, where there is no possibility to change the server settings, then this method is what you need. You should be able to set this header in any server language. Just be sure to do this before sending the response body, in order to avoid possible run-time errors.
Pushing multiple resources
All our examples illustrate pushing through a single resource. But what if you want to push a few? It would be wise to do that, right? In the end, the network consists not only of style sheets. Here's how to do it:
Link: </css/styles.css>; rel=preload; as=style, </js/scripts.js>; rel=preload; as=script, </img/logo.png>; rel=preload; as=image To push multiple resources through, simply separate each push directive with a comma. Since resource hints are also added via the Link tag using this syntax, you can mix your push directives with other resource hints. Here is an example of mixing with the preconnect hint:
Link: </css/styles.css>; rel=preload; as=style, <https://fonts.gstatic.com>; rel=preconnect Multiple Link headers are also allowed. Here is how you can configure Apache to set up several Link headers for querying HTML documents:
<FilesMatch "\.html$"> Header add Link "</css/styles.css>; rel=preload; as=style" Header add Link "</js/scripts.js>; rel=preload; as=script" <FilesMatch> This syntax is more convenient than combining multiple values separated by commas, but it works just as well. The only drawback is its lack of compactness, but the convenience is worth a few extra bytes transmitted over the network.
Now that you know how to push through resources, let's see how to determine if it works.
How to determine if Server Push works?
So you added a Link header to tell the server to push something through. The question remains: how to find out if it works at all?
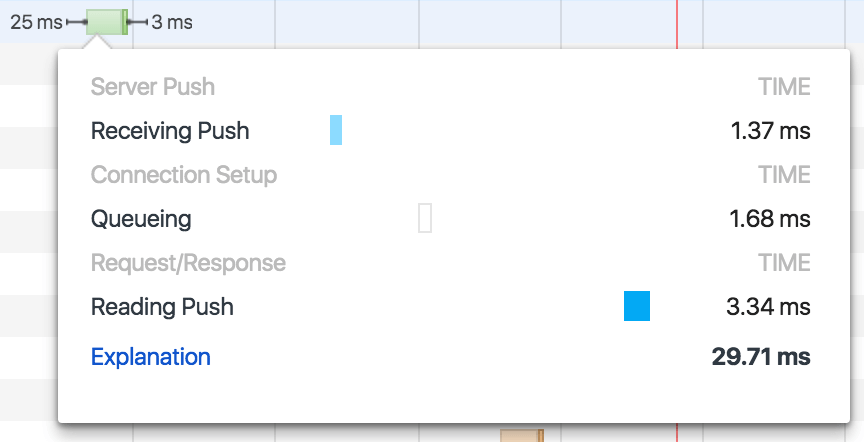
It depends on the browser. In recent versions of Google Chrome, a pushable resource can be identified by the Initiator column in the Network tab of the Developer Tools window.

In addition, if you hover the mouse over the Waterfall column on the same tab, we will get detailed information about the resource pushing time:
Mozilla Firefox tools are less obvious in determining pushable resources. The status of such resources in the network tool of the browser’s developer tools is indicated by a gray dot.

If you are looking for an exact way to determine if a resource was pushed through by the server, you can use the nghttp command line nghttp to verify the response from the HTTP / 2 server, for example:
nghttp -ans https://jeremywagner.me In this way, you will receive brief information about the resources involved in the transaction. Pushed resources will be marked with an asterisk, for example:
id responseEnd requestStart process code size request path 13 +50.28ms +1.07ms 49.21ms 200 3K / 2 +50.47ms * +42.10ms 8.37ms 200 2K /css/global.css 4 +50.56ms * +42.15ms 8.41ms 200 157 /css/fonts-loaded.css 6 +50.59ms * +42.16ms 8.43ms 200 279 /js/ga.js 8 +50.62ms * +42.17ms 8.44ms 200 243 /js/load-fonts.js 10 +74.29ms * +42.18ms 32.11ms 200 5K /img/global/jeremy.png 17 +87.17ms +50.65ms 36.51ms 200 668 /js/lazyload.js 15 +87.21ms +50.65ms 36.56ms 200 2K /img/global/book-1x.png 19 +87.23ms +50.65ms 36.58ms 200 138 /js/debounce.js 21 +87.25ms +50.65ms 36.60ms 200 240 /js/nav.js 23 +87.27ms +50.65ms 36.62ms 200 302 /js/attach-nav.js Here I used nghttp on my own website, which (at least at the time of writing) pushed five resources. The resources we are interested in are marked with an asterisk on the left side of the requestStart column.
Now that we can determine when resources are being pushed through, let's see how Server Push affects the performance of a real website.
Server Push Performance Measurement
Measuring the effect of any performance improvement requires a good testing tool. Sitespeed.io is a great tool available through npm ; It automates page testing and collects valuable performance indicators.
So, we have chosen a suitable tool - go to the testing methodology.
Testing Methodology
I wanted to measure the impact of Server Push on the performance of a website. For the results to be relevant, I needed to establish comparison points for six separate scenarios. These scripts are divided into two aspects: HTTP / 2 or HTTP / 1 is used. On HTTP / 2 servers we measure the impact of Server Push by a number of indicators; on HTTP / 1 servers - we want to see how the embedding of resources affects the performance by the same indicators, since the embedding should have approximately the same advantages that Server Push provides.
Considered scenarios:
- HTTP / 2 - No Enhancements
In this state, the site operates under the HTTP / 2 protocol, but absolutely nothing is pushed.- HTTP / 2 - Push CSS
Server Push is used, but only for the CSS site. CSS site is very small, weighing just over 2 KB, compressed using the Brotli algorithm . - HTTP / 2 - Push Everything
All resources that are used on the pages of the site are pushed. This includes CSS, as well as 1.4 KB of JavaScript code scattered across six files, and 5.9 KB of SVG images scattered across five files. All file sizes are indicated after compression (also using Brotli). - HTTP / 1 - No Enhancements
The website works using the HTTP / 1 protocol, and no resources were added to reduce the number of requests or increase the rendering speed. - HTTP / 1 - Inline CSS
All CSS site embedded. - HTTP / 1 - Inline Everything
All resources used on the pages of the website are embedded. CSS and scripts are embedded, and SVG images are base64 encoded and embedded directly in the markup. It should be noted that the data encoded in base64 format is about 1.37 times more than their uncoded equivalents.
- HTTP / 2 - Push CSS
For each scenario, I initiated testing with the following command:
sitespeed.io -d 1 -m 1 -n 25 -c cable -b chrome –v https://jeremywagner.me If you want to know what this command does, you can see the documentation . In short, she checks the home page of my site at https://jeremywagner.me with the following conditions:
- links on the page are not scanned, only the specified page is tested;
page tested 25 times; - a network profile is used that corresponds to 28 milliseconds of the signal travel time back and forth, the incoming speed is 5000 kbps, the outgoing speed is 1000 kbps;
- The test is run using Google Chrome.
For each test, three indicators were collected and displayed:
First Paint Time
This is the point in time when the page began to appear in the browser. To make it seem that the page loads quickly, this indicator should be reduced as much as possible.DOMContentLoaded Time
This is the time when the HTML document was fully loaded and parsed. Synchronous JavaScript code blocks the parser and increases this index. Using theasyncattribute in<script>tags can help prevent parser blocking.- Page load time
This is the time required to fully load the page and its resources.
Having determined the parameters of the test, let's look at the results.
Test results
The tests were conducted according to the six scenarios indicated above, with the construction of graphs of the results. Let's start by looking at how each script affects the start time of the page display:
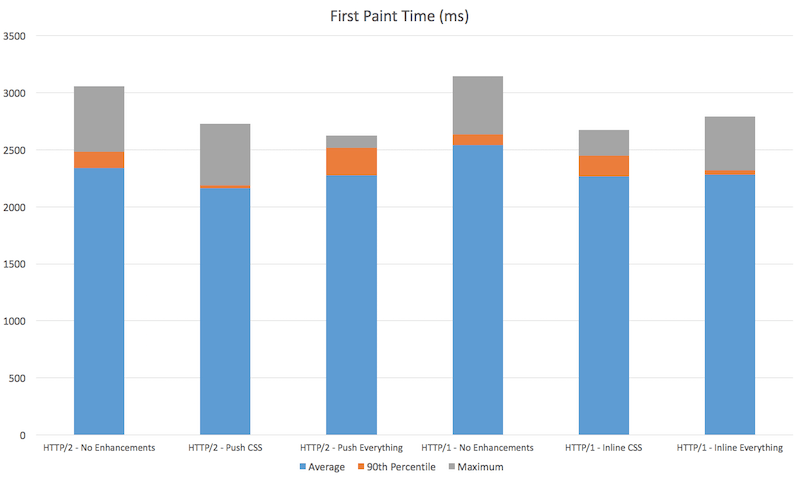
First, a few words about how the schedule is set up. Part of the graph in blue corresponds to the average time. The orange part is the 90% level. The gray part shows the maximum time.
We now turn to what we see. The slowest scenarios are websites with HTTP / 2 and HTTP / 1 support without any improvements. We see that using Server Push for CSS helps to make a page on average about 8% faster than if this technology was not used, and even about 5% faster than embedding CSS on an HTTP / 1 server.
However, when we push through all possible resources, the picture changes somewhat: the start time of the page display slightly increases. On the HTTP / 1 server, where we embed everything possible, we achieve slightly lower performance.
The conclusion is obvious: with Server Push, you can achieve slightly better results than with HTTP / 1 with embedding. However, when we push through or embed a lot of resources, we see a decrease in returns.
It is worth noting that for visiting the site for the first time, using Server Push or embedded resources is better than no improvement. It is also necessary to mention that tests are conducted on a website with little resources, so this test case may not fully reflect what is achievable for your site.
We proceed to consider the influence of each script on the DOMContentLoaded time:
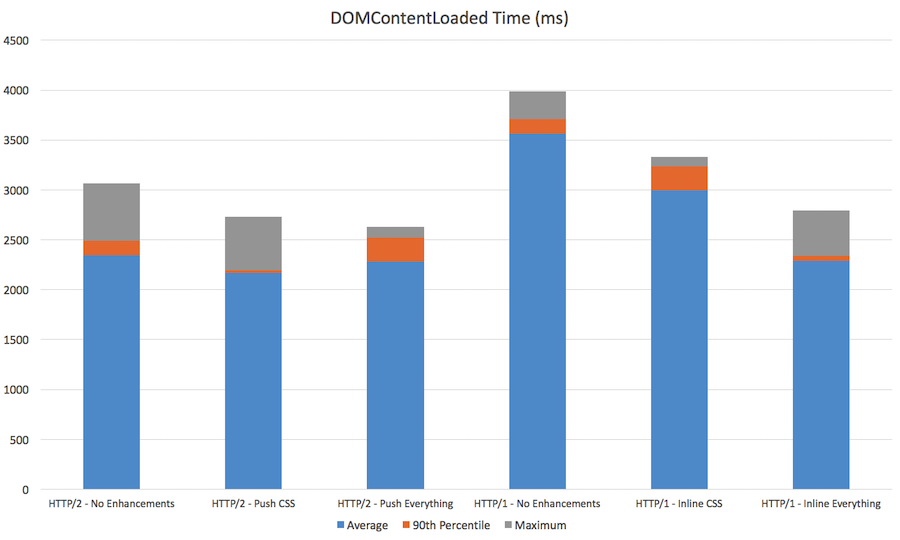
The trends here are not very different from what we saw in the previous chart, with the exception of one noticeable deviation: an example in which we embed all possible resources on HTTP / 1 gives a rather low DOMContentLoaded time. This is probably due to the fact that embedding reduces the amount of resources required for loading, which allows the parser to continue its work without interruptions.
Finally, let's see how the full page load time changes in each scenario:

The trends of the previous graphs that we found are generally preserved here. I found that pushing only CSS gave the best page load time. Pushing too many resources in some cases can make the web server a little "lethargic", but it was still better than not pushing anything. Compared to embedding Server Push, it gave results.
Cautions when using Server Push
Server Push is not a panacea for the inefficient operation of your site. To achieve good results, this technology must be used correctly. And here are some important points.
You may push too many resources.
In one of the scenarios above, I push a lot of resources, but they all make up a small part of the total data. Pushing through a large amount of very large resources could immediately delay the display of your page, because the browser needs to load not only HTML, but also all other resources that are loaded in parallel. It is best to be selective in what you are pushing. Style sheets (as long as they are not very massive) are a good choice to start with. Then appreciate what else it makes sense to push.
You can push resources other than the current page.
This is not always bad, especially if you have a visitor analyst. A good example is the multipage registration form in which you push resources for the next page while the registration process is in progress. However, let's agree: if you don’t know if you need to force resources for a page that visitors haven’t seen yet, don’t. Some users may use a tariff with a limited amount of traffic, and your strategy may cost them real money.
Configure your HTTP / 2 server correctly
Some servers have many configuration options associated with Server Push. So, mod_http2 in Apache has several parameters to configure pushing resources. The H2PushPriority parameter is of particular interest, although in the case of my server I left it by default. Some experiments may give an additional performance gain. Each web server has a whole set of switches and settings that you can experiment with, so read the manual carefully to find out what is available to you.
Pushed resources can remain without caching
, Server Push - , . , . mod_http2 Apache, , H2PushDiarySize , H2O , cookie .
H2O-, - -, cookie. , , , CSS-Tricks . , RST_STREAM , , . .
HTTP/2? , Server Push.
- , . : , - . CSS . , , . , , .
Server Push , H2O, , cookies. , . , , .
Server Push , :
- Server Push , Hypertext Transfer Protocol Version 2 (HTTP/2), Internet Engineering Task Force
- Modernizing Our Progressive Enhancement Delivery , Scott Jehl, Filament Group
- Innovating with HTTP 2.0 Server Push , Ilya Grigorik
From the translator. Yoav Weiss , as ( , ), . , preload – , Server Push.
HTTP/2 Server Push. «- » .
')
Source: https://habr.com/ru/post/329722/
All Articles