Development for Sailfish OS: Work with calendar and list of contacts
Hello! This article is a continuation of a series of articles devoted to the development of applications for the Sailfish OS mobile platform. This article focuses on managing contacts and device calendar events.
All common mobile operating systems provide an API for managing contacts stored on the device. And Sailfish OS is no exception. Sailfsh OS provides the ability to store and manage contact data, as well as the ability to transfer contacts between devices.
As developers, we can access contact data using the Nemo QML Plugin Contacts plugin . This plugin allows you to receive data about contacts and edit them. It is worth noting that the plugin does not have textual documentation, so it was necessary to deal with how it works, directly from the source code.
Nemo plugins provide access to various Sailfish OS services. We have already talked about such plugins as Nemo QML Plugin Notification and Nemo QML Plugin D-Bus in our previous articles on working with notifications and the D-Bus system .
')
Nemo QML Plugin Contacts provides four QML components:
The first three components from the list are models that can be used to display contact lists using SilicaListView , for example.
PeopleModel contains information about each contact: name, surname, phone number, e-mail, date of birth, or any other data specified by the user when adding a contact to the device's notebook. PeopleNameGroupModel contains information only about contact names and how many contacts with this name are contained in the address book. And every object in PeopleVCardModel is a kind of “calling card” of vCard format.
The Person component simply contains information about the contact.
Let's take a closer look at what data can be retrieved using PeopleModel and Person . The PeopleNameGroupModel and PeopleVCardModel components do not provide as much useful information, so we will not consider them further. But you can always familiarize yourself with them.
Each PeopleModel model object provides the following contact information:
You may have noticed that PeopleModel does not contain all the fields that a contact in the device’s notebook may contain. Often, the contact can specify the date of birth, address and other data. The full set of such fields contains the Person component:
Now let's take a closer look at how to use the Nemo QML Plugin Contacts plugin directly in the project.
The first thing you need to do is add a plugin depending on the project. To do this, you need to add the nemo-qml-plugin-contacts-qt5 plugin to the Requires section in the Yaml file as follows:
Recall that the yaml file is located in the rpm / directory in the project root.
To use the plugin inside the QML code, you must import the org.nemomobile.contacts module.
And now we can declare and use the components described above.
This example demonstrates how to create the PeopleModel component and use it as a model for the SilicaListView list. For PeopleModel, we set the requiredProperty property where we indicate that we need to get information about phone numbers. Also requiredProperty can be set to EmailAddressRequired for receiving information about the contact's email addresses. Using the FilterAll value passed to the filterType property, we retrieve a list of all contacts. The filterType property can also take FilterF Favorites and FilterOnline to retrieve only “select” contacts or only those that are online now.
Within the delegate of the list, we can use the model fields in the manner shown above, such as firstName , lastName, and phoneNumbers . The phoneNumbers field is a list of strings, so the join () method is used here to combine all phone numbers into one string.
To edit a contact, you need to make changes in the person field of type Person of the PeopleModel model element element. Then, call the savePerson (Person person) method on the model object, where the modified contact person must be passed as an argument. As a result, changes in contact data will be made to the device database. A new contact will not be created. To add a new contact to the device’s notebook, you need to create a new object of type Person and save its data in the same way.
In addition to working with contacts, Sailfish OS provides developers with the ability to create and view calendar events, share them with friends, set reminders for events.
To work with calendar events, the Nemo QML Plugin Calendar plugin is used. It allows you to receive data about calendar events and edit them within your applications. This plugin, as well as Nemo QML Plugin Contacts, does not have any textual documentation, and you will also have to understand how it works based on the source code.
It is worth noting that the examples from this part must be run with privileges. About how to do this is written in this article .
The Nemo QML Plugin Calendar plugin provides several components. In this article we will talk about the main ones, those that allow you to access calendar events, as well as edit them:
AgendaModel is a component for presenting calendar event data. It is usually used as a model for the SilicaListView list. AgendaModel has only two properties: startDate and endDate . They serve to select events from a specific time range, i.e. when setting these properties, the model will contain data for the specified period.
The model created in the example above will contain information about calendar events, starting from the current day and ending on January 1, 2018.
The elements of the AgendaModel model are CalendarEvent objects, each of which contains information about one particular event. CalendarEvent contains the following properties:
All listed properties are read only properties. To change an event, use the CalendarEventModification component. It contains exactly the same properties as CalendarEvent , but here all properties can be edited. Also, CalendarEventModification has a save () method that saves changes to the database.
Calendar is a singleton component that allows you to create, edit and delete calendar events. Calendar has three functions:
The createNewEvent () function creates a new object of type CalendarEventModification , allowing you to populate calendar event data. After calling the save () method on the created object, a new entry will be added to the device database. Thus, a new calendar event can be added.
The createModification () function allows you to create a CalendarEventModification object based on an existing calendar event - a CalendarEvent object. As we wrote above, an object of type CalendarEvent cannot be edited because all its properties are read only. That is why the createModification () function is applied to it in order to be able to edit the event. After calling the save () method, the event changes will be saved in the device database. The new event will not be created, but the one from which the modification was made will be changed.
The remove () function allows you to remove an existing calendar event from the database using its unique id.
Since Calendar is a singleton, there is no need to create an object. You can call methods directly using only the component name.
To add a Nemo QML Plugin Calendar plug-in depending on the project, you need to register it in the yaml file, as well as the plug-in for working with contacts.
To use the plugin inside the QML code, you must import the org.nemomobile.calendar module.
We now consider an example of the implementation of displaying a list of calendar events.
This example is similar to the one described above with a list of contacts. It also creates a model object and describes the SilicaListView list. Each item in the list displays the time and date of the calendar event, its name, and the location of the event. To format and correctly display the date and time, a JavaScript function, eventDateToToString () , is created here that accepts a CalendarEvent event object and uses the formatTime () and formatDate () functions to form a string for display.

Display a list of calendar events we have learned. But besides this, you must be able to add new events and edit existing ones. To do this, create a dialog for adding and editing events.
The eventModification property is an object of type CalendarEventModification . This will be an absolutely empty object if we create a new event, or it will be an object with the data of an already existing event. A dialog will be used to change the properties of this object. Next, we describe the components for editing event information. Here we use the three ValueButton components to edit the date, start time and end time of the event, as well as the two TextField components to edit the name of the event and its location. In the onAccepted signal handler, we call the save () method, which saves all changes to the event in the device database. Thus, we have created a dialog box that allows you to edit events and create new ones.

Now you need to add the ability to open our dialogue. We will open the dialog for creating a new event using the PullDownMenu component, and for editing using the context menu.
The PullDownMenu component is a pull-down menu and more about it was discussed in one of our previous articles . The menu will, of course, be placed on the screen with a list of events and will contain only one item “Add new event”, by clicking on which our dialogue will open.
When you click on a menu item, the onClicked signal handler is called , which describes a call that opens the dialog for editing the event, where the new object created using Calendar.createNewEvent () is passed as the eventModification property. As a result, a new event will be created and transferred to the dialogue, where it will be edited.

To edit events, use the context menu of the SilicaListView list items . Create a ContextMenu component and add the “Edit” item to it.
Clicking on the item “Edit” will open a dialog for editing the event. As the eventModification property, the CalendarEventModifiation object created using the Calendar object's createModification () method is passed . As a parameter of the createModification () function, the event object obtained from the AgendaModel model is used here and all its data will be contained in the new object for editing, which is passed to the dialog.
Also add the ability to delete a calendar event. To do this, you need to create another menu item.
By clicking on the “Delete” menu item, we delete the event record from the database using the Calendar.remove () call, where the unique event identifier contained in the uniqueId field is passed as a parameter . Thus, we have implemented the ability to create, edit and delete calendar events.

That's all. This article shows an example of working with contacts and calendar events in Sailfish OS. Despite the fact that for the above-described plug-ins and components there is no textual documentation, it’s easy to figure out how to use them. During the writing of the article, two ready-made examples were available on GitHub: an example of managing contacts and an example of managing calendar events .
Technical issues can also be discussed on the Sailfish OS Russian-speaking community channel in a Telegram or VKontakte group .
The author: Ivan Shchitov
UPD: Thanks chuvilin for comments on launching the project with privileges.
Contact management
All common mobile operating systems provide an API for managing contacts stored on the device. And Sailfish OS is no exception. Sailfsh OS provides the ability to store and manage contact data, as well as the ability to transfer contacts between devices.
As developers, we can access contact data using the Nemo QML Plugin Contacts plugin . This plugin allows you to receive data about contacts and edit them. It is worth noting that the plugin does not have textual documentation, so it was necessary to deal with how it works, directly from the source code.
Nemo plugins provide access to various Sailfish OS services. We have already talked about such plugins as Nemo QML Plugin Notification and Nemo QML Plugin D-Bus in our previous articles on working with notifications and the D-Bus system .
')
Nemo QML Plugin Contacts provides four QML components:
- PeopleModel ;
- PeopleNameGroupModel ;
- PeopleVCardModel ;
- Person .
The first three components from the list are models that can be used to display contact lists using SilicaListView , for example.
PeopleModel contains information about each contact: name, surname, phone number, e-mail, date of birth, or any other data specified by the user when adding a contact to the device's notebook. PeopleNameGroupModel contains information only about contact names and how many contacts with this name are contained in the address book. And every object in PeopleVCardModel is a kind of “calling card” of vCard format.
The Person component simply contains information about the contact.
Let's take a closer look at what data can be retrieved using PeopleModel and Person . The PeopleNameGroupModel and PeopleVCardModel components do not provide as much useful information, so we will not consider them further. But you can always familiarize yourself with them.
Each PeopleModel model object provides the following contact information:
- firstName - contact name;
- lastName — the last name of the contact;
- favorite - true if the contact is marked as “favorite”, false otherwise;
- avatar - the path to the image with the contact avatar on the device;
- contactId - contact identifier in the device database;
- phoneNumbers - a list of phone numbers of the contact;
- emailDetails - information about email addresses;
- person is an object of type Person containing more information about the contact.
You may have noticed that PeopleModel does not contain all the fields that a contact in the device’s notebook may contain. Often, the contact can specify the date of birth, address and other data. The full set of such fields contains the Person component:
- id - identifier of the record in the database;
- firstName - contact name;
- lastName — the last name of the contact;
- middleName - the middle name of the contact;
- companyName - the name of the company where the contact works;
- role - contact position in the company;
- department - the department of the company where the contact works;
- favorite - true if the contact is marked as “favorite”, false otherwise;
- avatar - the path to the image with the contact avatar on the device;
- phoneNumbers - a list of phone numbers of the contact;
- emailDetails - information about email addresses;
- addressDetails - information about the address of residence;
- birthday - the date of birth of the contact.
Now let's take a closer look at how to use the Nemo QML Plugin Contacts plugin directly in the project.
The first thing you need to do is add a plugin depending on the project. To do this, you need to add the nemo-qml-plugin-contacts-qt5 plugin to the Requires section in the Yaml file as follows:
... # Runtime dependencies which are not automatically detected Requires: - sailfishsilica-qt5 >= 0.10.9 - nemo-qml-plugin-contacts-qt5 ... Recall that the yaml file is located in the rpm / directory in the project root.
To use the plugin inside the QML code, you must import the org.nemomobile.contacts module.
import org.nemomobile.contacts 1.0 And now we can declare and use the components described above.
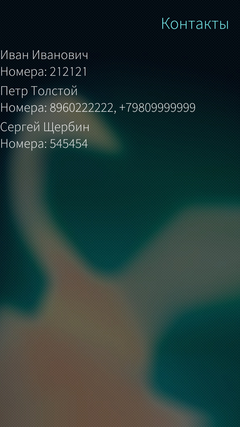
PeopleModel { id: peopleModel filterType: PeopleModel.FilterAll requiredProperty: PeopleModel.PhoneNumberRequired } SilicaListView { anchors.fill: parent header: PageHeader {title: qsTr("Contacts")} model: peopleModel delegate: ListItem { width: parent.width Column { width: parent.width Label {text: firstName + " " + lastName} Label {text: qsTr("Phone numbers: ") + phoneNumbers.join(", ")} } } } This example demonstrates how to create the PeopleModel component and use it as a model for the SilicaListView list. For PeopleModel, we set the requiredProperty property where we indicate that we need to get information about phone numbers. Also requiredProperty can be set to EmailAddressRequired for receiving information about the contact's email addresses. Using the FilterAll value passed to the filterType property, we retrieve a list of all contacts. The filterType property can also take FilterF Favorites and FilterOnline to retrieve only “select” contacts or only those that are online now.
Within the delegate of the list, we can use the model fields in the manner shown above, such as firstName , lastName, and phoneNumbers . The phoneNumbers field is a list of strings, so the join () method is used here to combine all phone numbers into one string.
To edit a contact, you need to make changes in the person field of type Person of the PeopleModel model element element. Then, call the savePerson (Person person) method on the model object, where the modified contact person must be passed as an argument. As a result, changes in contact data will be made to the device database. A new contact will not be created. To add a new contact to the device’s notebook, you need to create a new object of type Person and save its data in the same way.
Manage calendar events
In addition to working with contacts, Sailfish OS provides developers with the ability to create and view calendar events, share them with friends, set reminders for events.
To work with calendar events, the Nemo QML Plugin Calendar plugin is used. It allows you to receive data about calendar events and edit them within your applications. This plugin, as well as Nemo QML Plugin Contacts, does not have any textual documentation, and you will also have to understand how it works based on the source code.
It is worth noting that the examples from this part must be run with privileges. About how to do this is written in this article .
The Nemo QML Plugin Calendar plugin provides several components. In this article we will talk about the main ones, those that allow you to access calendar events, as well as edit them:
- AgendaModel ;
- CalendarEvent ;
- CalendarEventModification ;
- Calendar .
AgendaModel is a component for presenting calendar event data. It is usually used as a model for the SilicaListView list. AgendaModel has only two properties: startDate and endDate . They serve to select events from a specific time range, i.e. when setting these properties, the model will contain data for the specified period.
AgendaModel { id: agendaModel startDate: new Date() endDate: new Date(2018, 0) } The model created in the example above will contain information about calendar events, starting from the current day and ending on January 1, 2018.
The elements of the AgendaModel model are CalendarEvent objects, each of which contains information about one particular event. CalendarEvent contains the following properties:
- displayLabel - the name of the event;
- description - description of the event;
- startTime - start time of the event;
- endTime - the end time of the event;
- allDay - true if the event is marked as an event for "all day";
- location - the venue of the event;
- color - the color that marks the event in the calendar;
- uniqueId - unique event identifier in the database.
All listed properties are read only properties. To change an event, use the CalendarEventModification component. It contains exactly the same properties as CalendarEvent , but here all properties can be edited. Also, CalendarEventModification has a save () method that saves changes to the database.
Calendar is a singleton component that allows you to create, edit and delete calendar events. Calendar has three functions:
- CalendarEventModification createNewEvent () ;
- CalendarEventModification createModification (CalendarEvent event) ;
- void remove (string uniqueId).
The createNewEvent () function creates a new object of type CalendarEventModification , allowing you to populate calendar event data. After calling the save () method on the created object, a new entry will be added to the device database. Thus, a new calendar event can be added.
The createModification () function allows you to create a CalendarEventModification object based on an existing calendar event - a CalendarEvent object. As we wrote above, an object of type CalendarEvent cannot be edited because all its properties are read only. That is why the createModification () function is applied to it in order to be able to edit the event. After calling the save () method, the event changes will be saved in the device database. The new event will not be created, but the one from which the modification was made will be changed.
The remove () function allows you to remove an existing calendar event from the database using its unique id.
Since Calendar is a singleton, there is no need to create an object. You can call methods directly using only the component name.
Calendar.createNewEvent(); Calendar.createModification(event); Calendar.remove(event.uniqueId); To add a Nemo QML Plugin Calendar plug-in depending on the project, you need to register it in the yaml file, as well as the plug-in for working with contacts.
... # Runtime dependencies which are not automatically detected Requires: - sailfishsilica-qt5 >= 0.10.9 - nemo-qml-plugin-calendar-qt5 ... To use the plugin inside the QML code, you must import the org.nemomobile.calendar module.
import org.nemomobile.calendar 1.0 We now consider an example of the implementation of displaying a list of calendar events.
AgendaModel { id: agendaModel startDate: new Date() endDate: new Date(2018, 0) } SilicaListView { anchors.fill: parent header: PageHeader { title: qsTr("Calendar events") } model: agendaModel delegate: ListItem { width: parent.width contentHeight: column.height Column { id: column; width: parent.width Label { text: eventDateTimeToString(event) } Label { text: event.displayLabel } Label { text: qsTr("Location: ") + event.location } } } } function eventDateTimeToString(event) { return Qt.formatTime(event.startTime, "HH:mm") + " – " + Qt.formatTime(event.endTime, "HH:mm") + "\t" + Qt.formatDate(event.startTime, Qt.SystemLocaleShortDate); } This example is similar to the one described above with a list of contacts. It also creates a model object and describes the SilicaListView list. Each item in the list displays the time and date of the calendar event, its name, and the location of the event. To format and correctly display the date and time, a JavaScript function, eventDateToToString () , is created here that accepts a CalendarEvent event object and uses the formatTime () and formatDate () functions to form a string for display.
Display a list of calendar events we have learned. But besides this, you must be able to add new events and edit existing ones. To do this, create a dialog for adding and editing events.
Dialog { property var eventModification SilicaFlickable { // ValueButton , . TextField { id: eventLabelTextField label: qsTr("Event") text: eventModification.displayLabel } // TextField id=locationTextField . } onAccepted: { eventModification.displayLabel = eventLabelTextField.text; eventModification.location = locationTextField.text; eventModification.save(); } } The eventModification property is an object of type CalendarEventModification . This will be an absolutely empty object if we create a new event, or it will be an object with the data of an already existing event. A dialog will be used to change the properties of this object. Next, we describe the components for editing event information. Here we use the three ValueButton components to edit the date, start time and end time of the event, as well as the two TextField components to edit the name of the event and its location. In the onAccepted signal handler, we call the save () method, which saves all changes to the event in the device database. Thus, we have created a dialog box that allows you to edit events and create new ones.
Now you need to add the ability to open our dialogue. We will open the dialog for creating a new event using the PullDownMenu component, and for editing using the context menu.
The PullDownMenu component is a pull-down menu and more about it was discussed in one of our previous articles . The menu will, of course, be placed on the screen with a list of events and will contain only one item “Add new event”, by clicking on which our dialogue will open.
PullDownMenu { MenuItem { text: "Add new event" onClicked: pageStack.push(Qt.resolvedUrl("EditEventDialog.qml"), {eventModification: Calendar.createNewEvent()}) } } When you click on a menu item, the onClicked signal handler is called , which describes a call that opens the dialog for editing the event, where the new object created using Calendar.createNewEvent () is passed as the eventModification property. As a result, a new event will be created and transferred to the dialogue, where it will be edited.
To edit events, use the context menu of the SilicaListView list items . Create a ContextMenu component and add the “Edit” item to it.
SilicaListView { // ... model: agendaModel delegate: ListItem { // ... menu: ContextMenu { MenuItem { text: "Edit" onClicked: pageStack.push(Qt.resolvedUrl("EditEventDialog.qml"), {eventMod: Calendar.createModification(event)}) } } } } Clicking on the item “Edit” will open a dialog for editing the event. As the eventModification property, the CalendarEventModifiation object created using the Calendar object's createModification () method is passed . As a parameter of the createModification () function, the event object obtained from the AgendaModel model is used here and all its data will be contained in the new object for editing, which is passed to the dialog.
Also add the ability to delete a calendar event. To do this, you need to create another menu item.
MenuItem { text: qsTr("Delete") onClicked: Calendar.remove(event.uniqueId) } By clicking on the “Delete” menu item, we delete the event record from the database using the Calendar.remove () call, where the unique event identifier contained in the uniqueId field is passed as a parameter . Thus, we have implemented the ability to create, edit and delete calendar events.
Conclusion
That's all. This article shows an example of working with contacts and calendar events in Sailfish OS. Despite the fact that for the above-described plug-ins and components there is no textual documentation, it’s easy to figure out how to use them. During the writing of the article, two ready-made examples were available on GitHub: an example of managing contacts and an example of managing calendar events .
Technical issues can also be discussed on the Sailfish OS Russian-speaking community channel in a Telegram or VKontakte group .
The author: Ivan Shchitov
UPD: Thanks chuvilin for comments on launching the project with privileges.
Source: https://habr.com/ru/post/329692/
All Articles