Check Point Security CheckUP - R80.10. Part 2
We continue a series of articles on network security auditing with Check Point Security CheckUP. In the first article we discussed the main features, and the second part will be devoted to the preparation of a platform for CheckUP. In addition, the official release of the new R80.10 platform recently took place, and that is what we will consider.
As mentioned earlier, the CheckUP operation scheme is approximately as follows:
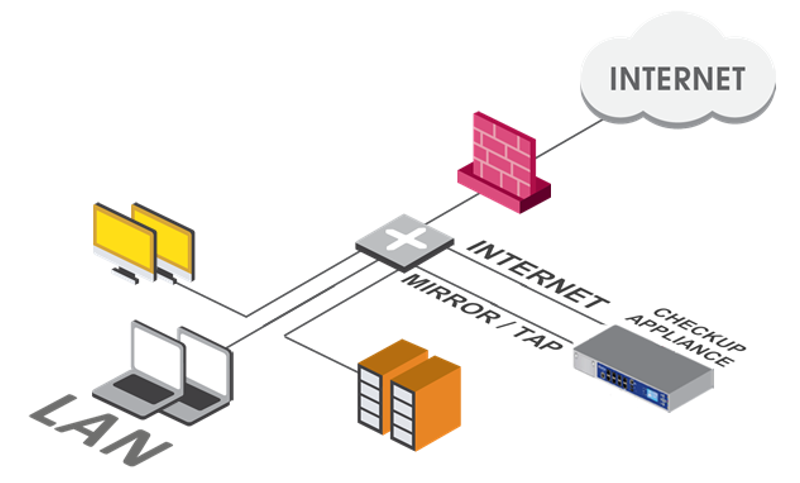
Those. we need to monitor a copy of the traffic (connection to the SPAN port). In the figure, traffic is mirrored on the Check Point Appliance, but it is not always possible (or willing) to get such a piece of metal. In this case, we can use a virtual machine. It is much faster and sufficient in 95% of cases. VMware ESXi (as well as VMware Workstation), KVM, and Hyper-V are supported as a hypervisor. But our subjective view on VMware is getting faster and faster.
Next will be a lot of pictures ...
Options for CheckUP
')
There are three main ways to deploy a virtual machine:
1) Deploy to an existing virtualization server using a physical ethernet adapter.
This is probably the easiest option. The scheme looks something like this:

If you already have a virtualization server, then all you need is to create a new virtual machine and a new virtual switch, which is tied to a free Ethernet adapter, to which we will mirror traffic. Thus, one Check Point interface is defined to a new virtual switch (in our case, it is vSwitch1), and the second interface to an existing one (vSwitch0). The second connection to the network (with IP address allocation) is mandatory. It serves to manage and to access CheckPoint on the Internet (downloading updates, etc.).
2) Deploy to an existing virtualization server using a virtual ethernet adapter.

It often happens that there is a server, but there is no free Ethernet adapter. In this case, you can use the VLAN interfaces. This option is undesirable because not every switch supports traffic mirroring to a specific VLAN. Of course, you can enable promiscuous mode (promiscuous) and “pour” a copy of the traffic to the shared ethernet adapter of the new virtual switchboard. However, if the traffic is too large, then problems may arise with the availability of corporate resources that are located on this virtualization server (in our case, it is MS AD, Exchange, FileServer).
3) Deploy on a computer with two network adapters (either two ethernet or ethernet + wifi adapter).
To do this, you need VMware Workstation. It is also quite a popular method, however, it is suitable only for the test of small networks (small traffic). The computer must have at least 2 cores (at least Core i5) and at least 8GB of RAM. HDD speed is also important (at 5400 rpm everything will be slow). If you still decide to deploy Check Point on a regular computer, you can use this instruction .
We will consider the first option in detail.
Network configuration
To begin, prepare the network. As you can see at the moment I only have vSwitch0 involved, which is tied to vmnic0.

Create vSwitch1 and tie it to the adapter vmnic1. To do this, select Add Networking and Virtual Machine as Connection Types:

Choose a free ethernet adapter:

VM Network 2 can be left as default:

As a result, you should get something like the following:

Now it is very important to go into the properties of the newly created vSwitch1 and enable Promiscuous mode (Accept). Otherwise we will not be able to see the traffic being mirrored.

Network preparation is complete.
Create a virtual machine
Now we can start creating a new virtual machine. You must first download the R80.10 image and upload it to your server's datastore. You can specify CheckUP as the name:

The disc is better to choose the fastest. In my case, this is an SSD:

Operating system choose Other (64-bit):

We configure two network adapters:

The disk size is at least 300GB (you need a place under the logs):

At the output we get about the following:

Immediately open the properties of the newly created virtual machine and indicate to use 4 cores and at least 6GB of RAM (preferably 8).

Now go to the CDROM and "slip" our image. The main thing is not to forget to tick "Connect at power on":

Finish the setup and start the car. Next is the simple installation process, but I still show every step.
Check Point Installation
Select the item "Install Gaia on this system"

We agree and continue the installation:

Language is left by default (US)

And here you need to increase the size of the disk under the logs. Backups are not so important to us:

We set the password (it will be used for further initialization and if anything, it can be changed):

Here it is important to configure exactly the interface that is used for management. In my case, this is eth0, which corresponds to the VM Network (aka vSwitch0):

Specifying the IP address, mask and default gateway will begin the process of formatting the disk, followed by installation:

Upon completion, we will be prompted to restart the device:

After the reboot, we will see the following prompt:

This completes the installation process and the initial initialization procedure, which is performed through the browser, must follow.
Check Point Initialization
After installation, we need to connect via https to our Check Point. A window appears to enter the login password. Login - admin:

Logging in begins the initialization process:

Choose "Continue with R80.10 configuration"

Check the settings of the control interface:

We leave the default settings of the second adapter and simply click Next:

Here we set the basic parameters - the name, the domain of your network, your DNS server (you can also specify a backup one):

We check the relevance of time, or configure NTP, if you have:

Here we select “Security Gateway and / or Security Management”:
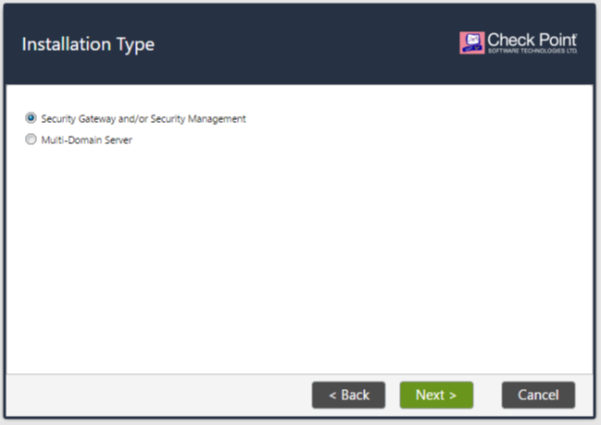
Further settings should correspond to the slide below. It is very important to have both items - Security Gateway and Security Managment, since we have standalone configuration.

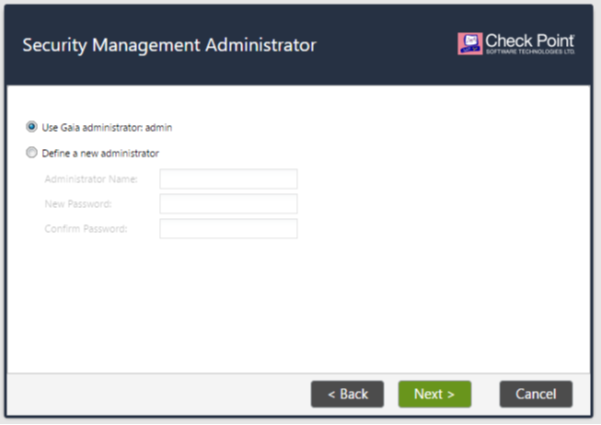
Here we can create a new user, but it is better to use an existing one:
We indicate that access to Check Point is possible from any IP address (or not from any, it all depends on your desires):

Click Finish and confirm the beginning of the configuration:

A long initialization process will begin. The process can stall by 90% and it may seem to you that everything is stuck. But it is not, you just need to wait a little more.

At the end of the initialization, we get to the checkpoint web interface. This is where settings such as interfaces, DHCP, routes, updates, and so on (in general, system parameters) are configured. You also immediately see the offer to download SmartConsole - Download Now! . Download, because using Smart Console, we will configure all security features.

We need to go to Network Interfaces - eth1 . Here we enable the interface itself, set the description (SPAN) and enable monitor mode in the Ethernet tab. This setting allows you to "listen" to traffic on the SPAN port. Important! No need to register an IP address for this interface!

If you go to Upgrades - Status and Actions , you will see a warning that the update is not possible, because no license. In this case, you can either request a DEMO license (contact sales@tssolution.ru), or simply leave it as it is (there are no significant updates for R80.10 yet).

This completes the configuration via the web interface. You can install the downloaded SmartConsole. The installation process is elementary, so I will not describe it. Having launched SmartConsole, we will see a suggestion to enter a login and password:

Logging in we will see the main menu:

At the bottom you can see the License Status - Not Activated . You can click for more details:

As you can see, from this moment you have exactly 15 days for testing. In this case, you can update IPS, Antivirus, Anti-Bot and so on. If you need more time, then again, you need to request a demo-license (sales@tssolution.ru).
At this point we will finish the second part (it turned out to be so huge already). In the next article we will describe the process of setting up CheckUP.
As mentioned earlier, the CheckUP operation scheme is approximately as follows:
Those. we need to monitor a copy of the traffic (connection to the SPAN port). In the figure, traffic is mirrored on the Check Point Appliance, but it is not always possible (or willing) to get such a piece of metal. In this case, we can use a virtual machine. It is much faster and sufficient in 95% of cases. VMware ESXi (as well as VMware Workstation), KVM, and Hyper-V are supported as a hypervisor. But our subjective view on VMware is getting faster and faster.
Next will be a lot of pictures ...
Options for CheckUP
')
There are three main ways to deploy a virtual machine:
1) Deploy to an existing virtualization server using a physical ethernet adapter.
This is probably the easiest option. The scheme looks something like this:
If you already have a virtualization server, then all you need is to create a new virtual machine and a new virtual switch, which is tied to a free Ethernet adapter, to which we will mirror traffic. Thus, one Check Point interface is defined to a new virtual switch (in our case, it is vSwitch1), and the second interface to an existing one (vSwitch0). The second connection to the network (with IP address allocation) is mandatory. It serves to manage and to access CheckPoint on the Internet (downloading updates, etc.).
2) Deploy to an existing virtualization server using a virtual ethernet adapter.
It often happens that there is a server, but there is no free Ethernet adapter. In this case, you can use the VLAN interfaces. This option is undesirable because not every switch supports traffic mirroring to a specific VLAN. Of course, you can enable promiscuous mode (promiscuous) and “pour” a copy of the traffic to the shared ethernet adapter of the new virtual switchboard. However, if the traffic is too large, then problems may arise with the availability of corporate resources that are located on this virtualization server (in our case, it is MS AD, Exchange, FileServer).
3) Deploy on a computer with two network adapters (either two ethernet or ethernet + wifi adapter).
To do this, you need VMware Workstation. It is also quite a popular method, however, it is suitable only for the test of small networks (small traffic). The computer must have at least 2 cores (at least Core i5) and at least 8GB of RAM. HDD speed is also important (at 5400 rpm everything will be slow). If you still decide to deploy Check Point on a regular computer, you can use this instruction .
We will consider the first option in detail.
Network configuration
To begin, prepare the network. As you can see at the moment I only have vSwitch0 involved, which is tied to vmnic0.
Create vSwitch1 and tie it to the adapter vmnic1. To do this, select Add Networking and Virtual Machine as Connection Types:
Choose a free ethernet adapter:
VM Network 2 can be left as default:
As a result, you should get something like the following:
Now it is very important to go into the properties of the newly created vSwitch1 and enable Promiscuous mode (Accept). Otherwise we will not be able to see the traffic being mirrored.
Network preparation is complete.
Create a virtual machine
Now we can start creating a new virtual machine. You must first download the R80.10 image and upload it to your server's datastore. You can specify CheckUP as the name:
The disc is better to choose the fastest. In my case, this is an SSD:
Operating system choose Other (64-bit):
We configure two network adapters:
The disk size is at least 300GB (you need a place under the logs):
At the output we get about the following:
Immediately open the properties of the newly created virtual machine and indicate to use 4 cores and at least 6GB of RAM (preferably 8).
Now go to the CDROM and "slip" our image. The main thing is not to forget to tick "Connect at power on":
Finish the setup and start the car. Next is the simple installation process, but I still show every step.
Check Point Installation
Select the item "Install Gaia on this system"
We agree and continue the installation:
Language is left by default (US)
And here you need to increase the size of the disk under the logs. Backups are not so important to us:
We set the password (it will be used for further initialization and if anything, it can be changed):
Here it is important to configure exactly the interface that is used for management. In my case, this is eth0, which corresponds to the VM Network (aka vSwitch0):
Specifying the IP address, mask and default gateway will begin the process of formatting the disk, followed by installation:
Upon completion, we will be prompted to restart the device:
After the reboot, we will see the following prompt:
This completes the installation process and the initial initialization procedure, which is performed through the browser, must follow.
Check Point Initialization
After installation, we need to connect via https to our Check Point. A window appears to enter the login password. Login - admin:
Logging in begins the initialization process:
Choose "Continue with R80.10 configuration"
Check the settings of the control interface:
We leave the default settings of the second adapter and simply click Next:
Here we set the basic parameters - the name, the domain of your network, your DNS server (you can also specify a backup one):
We check the relevance of time, or configure NTP, if you have:
Here we select “Security Gateway and / or Security Management”:
Further settings should correspond to the slide below. It is very important to have both items - Security Gateway and Security Managment, since we have standalone configuration.
Here we can create a new user, but it is better to use an existing one:
We indicate that access to Check Point is possible from any IP address (or not from any, it all depends on your desires):
Click Finish and confirm the beginning of the configuration:
A long initialization process will begin. The process can stall by 90% and it may seem to you that everything is stuck. But it is not, you just need to wait a little more.
At the end of the initialization, we get to the checkpoint web interface. This is where settings such as interfaces, DHCP, routes, updates, and so on (in general, system parameters) are configured. You also immediately see the offer to download SmartConsole - Download Now! . Download, because using Smart Console, we will configure all security features.
We need to go to Network Interfaces - eth1 . Here we enable the interface itself, set the description (SPAN) and enable monitor mode in the Ethernet tab. This setting allows you to "listen" to traffic on the SPAN port. Important! No need to register an IP address for this interface!
If you go to Upgrades - Status and Actions , you will see a warning that the update is not possible, because no license. In this case, you can either request a DEMO license (contact sales@tssolution.ru), or simply leave it as it is (there are no significant updates for R80.10 yet).
This completes the configuration via the web interface. You can install the downloaded SmartConsole. The installation process is elementary, so I will not describe it. Having launched SmartConsole, we will see a suggestion to enter a login and password:
Logging in we will see the main menu:
At the bottom you can see the License Status - Not Activated . You can click for more details:
As you can see, from this moment you have exactly 15 days for testing. In this case, you can update IPS, Antivirus, Anti-Bot and so on. If you need more time, then again, you need to request a demo-license (sales@tssolution.ru).
At this point we will finish the second part (it turned out to be so huge already). In the next article we will describe the process of setting up CheckUP.
Source: https://habr.com/ru/post/329438/
All Articles