We write an analogue of Paint on Objective-C
In this article, we would like to offer our readers a step-by-step algorithm for creating a simple photo editor, which can be useful for applications involving user interaction with images. It will include the most basic functions, making it possible to make small adjustments: wipe a certain area (for example, nickname), highlight important text (phone, address or just a quote), circle some area on the map, or “draw a word”. From a technical point of view, the topic is rather trite, but we have found a way to modify the process, making it faster and easier — perhaps someone will take a note.

Any curve can be decomposed into a sequence of interrelated lines. Then the curve can be drawn by the following simple algorithm:
To implement this algorithm, you need to create a class PaintLine, which will contain the starting and ending points. The line is drawn using the UIBezierPath component.
')
To implement the drawing algorithm, you must create and add a custom view. This component will intercept touch events and fill the image.
The first touch of the finger to the screen sets the starting point for the first line:
Changing the position of the finger leads to the chain creating lines and adding each created line to the sequence to display:
When the user removes his finger from the screen, the curve is transferred from the preview directly to the image itself:
The result of the algorithm has one small drawback. If you select a thick line, the ends of the segment are perpendicular to the direction of the beginning and end of the curve, respectively. It looks not quite nice and reliable, considering that a round-shaped tool is chosen for drawing.
You can draw circles instead of lines. If you smoothly swipe your finger across the screen of the phone, you get a good result, but a sharp movement leads to the relief of the line or even the appearance of gaps.
To compensate for the shortcomings of both methods, you can use a filled shape to draw one line, as shown in the figure:

The result is a continuous curve with rounded ends.
Moving on to the image. It is implemented by changing the color of the pixel as follows:
To fill the area, you can use the quick method with the optimization of the number of calls on the stack or queue. But if you display the intermediate result of the slow fill method, you get a beautiful effect of pouring. To achieve it, you must perform the following steps:
1. Get the pixel color of the image and save it as a replacement color
2. Check if the replacement color matches the new pixel color. If not:
a) Put a pixel in a queue
b) Repaint the selected pixel to a new color.
c) Repeat until the queue is empty
d) Pull a pixel from the queue
3. Check the color value checking procedure for each of the adjacent pixels.
4. If the color of the adjacent pixel is equal to the color of the pixel to replace:
a) Replace pixel color with new color
b) Put a pixel at the end of the queue
Depending on how the neighboring pixels are selected, you can get different forms of the distribution of the fill:
1. Fill by 4 adjacent points
2. Fill by 8 adjacent points
3. The alternation of the fill in 4 and 8 adjacent points (2 - in four, 1 - in eight)

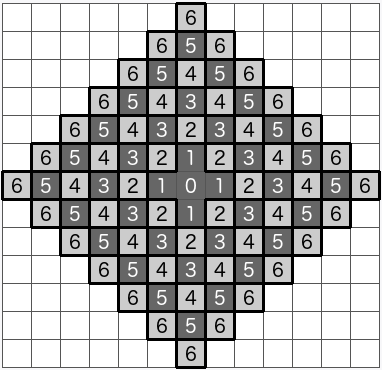
All these methods lead to polygonal spreading of the fill. At the same time, the presented variants do not correspond to the natural pattern of the spread of liquid on a flat surface. To obtain the effect of spreading the fill around the circumference, the algorithm must make the following changes:
1. Get the pixel color of the image and save it as a replacement color
2. If the color for the replacement does not match the new pixel color:
a) Put a pixel in a queue
b) Repaint the selected pixel to a new color.
c) Set the radius of the circle to 1
d) Set the number of pixels that must be processed to move to the next radius
d) Repeat until the queue is empty
f) Pull a pixel from the queue
g) Reduce by 1 the number of pixels that must be processed to move to the next radius.
3. Check the color value checking procedure for each of the adjacent pixels.
4. If the color of the adjacent pixel is equal to the color of the pixel to replace:
a) Replace pixel color with new color
b) Put a pixel at the end of the queue
5. If the number of pixels that must be processed to move to the next radius, decreased to 0:
a) Set as a new value a number equal to the current queue size
b) Increase by 1 the radius of the circle.
By changing the equality when comparing the color for the replacement and the new color for the range, you can get a smooth transition between the fill area and the fill border:
By starting the drawing process asynchronously, you can observe the following effect of the spreading fill:
So, we implemented the intended functionality and at the same time demonstrated how simple and sometimes seemingly inefficient algorithms can produce a very unexpected result. Thanks for attention!
Any curve can be decomposed into a sequence of interrelated lines. Then the curve can be drawn by the following simple algorithm:
- We divide the curve into a sequence of segments
- Put the pen at the beginning of the first segment
- Draw a line to the end point
- Go to the next segment
- Choose color, line thickness and other settings
- Display line on screen
- Repeat the listed actions for each segment of the sequence
To implement this algorithm, you need to create a class PaintLine, which will contain the starting and ending points. The line is drawn using the UIBezierPath component.
')
To implement the drawing algorithm, you must create and add a custom view. This component will intercept touch events and fill the image.
The first touch of the finger to the screen sets the starting point for the first line:
- (void)touchesBegan:(NSSet<UITouch *> *)touches withEvent:(UIEvent *)event { [super touchesBegan:touches withEvent:event]; NSSet *allTouches = [event allTouches]; if (allTouches.count != 1){ return; } UITouch *touch = [[allTouches allObjects] objectAtIndex:0]; pointTo = [touch locationInView:self]; } Changing the position of the finger leads to the chain creating lines and adding each created line to the sequence to display:
- (void)touchesMoved:(NSSet<UITouch *> *)touches withEvent:(UIEvent *)event { [super touchesMoved:touches withEvent:event]; NSSet *allTouches = [event allTouches]; if (allTouches.count != 1){ [linePaint removeAllObjects]; [self setNeedsDisplay]; return; } UITouch *touch = [[allTouches allObjects] objectAtIndex:0]; pointFrom = pointTo; pointTo = [touch locationInView:self]; if (pointTo.y < self.bounds.size.height && pointFrom.y < self.bounds.size.height) { [self addLineFrom:pointFrom to:pointTo]; } } When the user removes his finger from the screen, the curve is transferred from the preview directly to the image itself:
- (void)touchesEnded:(NSSet<UITouch *> *)touches withEvent:(UIEvent *)event { [super touchesEnded:touches withEvent:event]; NSSet *allTouches = [event allTouches]; if (allTouches.count != 1){ [linePaint removeAllObjects]; [self setNeedsDisplay]; return; } UITouch *touch = [[allTouches allObjects] objectAtIndex:0]; pointFrom = pointTo; pointTo = [touch locationInView:self]; if (pointTo.y < self.bounds.size.height && pointFrom.y < self.bounds.size.height) { [self addLineFrom:pointFrom to:pointTo]; } imgForPaint = [self getImage:imgForPaint]; dispatch_async(dispatch_get_main_queue(), ^{ if (_imageAfterEndPaint) { _imageAfterEndPaint(imgForPaint); } }); } The result of the algorithm has one small drawback. If you select a thick line, the ends of the segment are perpendicular to the direction of the beginning and end of the curve, respectively. It looks not quite nice and reliable, considering that a round-shaped tool is chosen for drawing.
You can draw circles instead of lines. If you smoothly swipe your finger across the screen of the phone, you get a good result, but a sharp movement leads to the relief of the line or even the appearance of gaps.
To compensate for the shortcomings of both methods, you can use a filled shape to draw one line, as shown in the figure:
The result is a continuous curve with rounded ends.
- (UIBezierPath*)getBezuerPathWith:(float)zoom { UIBezierPath *bezierPath = [[UIBezierPath alloc] init]; float width = zoom * _lineWidth / 2.; for (PaintLine *line in linePaint) { CGPoint point1 = CGPointApplyAffineTransform(line.point1, CGAffineTransformMakeScale(zoom, zoom)); CGPoint point2 = CGPointApplyAffineTransform(line.point2, CGAffineTransformMakeScale(zoom, zoom)); [bezierPath moveToPoint:point1]; float alf = atan2(point2.y - point1.y, point2.x - point1.x); [bezierPath addArcWithCenter:point1 radius:width startAngle:alf + M_PI_2 endAngle:alf - M_PI_2 clockwise:YES]; float alf0 = alf - M_PI_2; CGPoint point = CGPointMake(cos(alf0) * width + point2.x, sin(alf0) * width + point2.y); [bezierPath addLineToPoint:point]; [bezierPath addArcWithCenter:point2 radius:width startAngle:alf - M_PI_2 endAngle:alf + M_PI_2 clockwise:YES]; alf0 = alf + M_PI_2; point = CGPointMake(cos(alf0) * width + point1.x, sin(alf0) * width + point1.y); [bezierPath addLineToPoint:point]; } return bezierPath; } Moving on to the image. It is implemented by changing the color of the pixel as follows:
- Translate an image into an array of pixels
- Change text for all pixels that need it.
- Jump to the coordinate of the desired pixel and change 32 bits of color in ARGB format
- To collect the image from the converted array
To fill the area, you can use the quick method with the optimization of the number of calls on the stack or queue. But if you display the intermediate result of the slow fill method, you get a beautiful effect of pouring. To achieve it, you must perform the following steps:
1. Get the pixel color of the image and save it as a replacement color
2. Check if the replacement color matches the new pixel color. If not:
a) Put a pixel in a queue
b) Repaint the selected pixel to a new color.
c) Repeat until the queue is empty
d) Pull a pixel from the queue
3. Check the color value checking procedure for each of the adjacent pixels.
4. If the color of the adjacent pixel is equal to the color of the pixel to replace:
a) Replace pixel color with new color
b) Put a pixel at the end of the queue
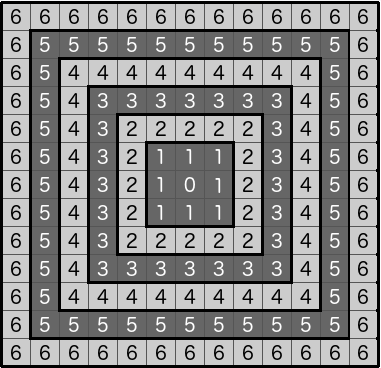
Depending on how the neighboring pixels are selected, you can get different forms of the distribution of the fill:
1. Fill by 4 adjacent points
2. Fill by 8 adjacent points
3. The alternation of the fill in 4 and 8 adjacent points (2 - in four, 1 - in eight)
All these methods lead to polygonal spreading of the fill. At the same time, the presented variants do not correspond to the natural pattern of the spread of liquid on a flat surface. To obtain the effect of spreading the fill around the circumference, the algorithm must make the following changes:
1. Get the pixel color of the image and save it as a replacement color
2. If the color for the replacement does not match the new pixel color:
a) Put a pixel in a queue
b) Repaint the selected pixel to a new color.
c) Set the radius of the circle to 1
d) Set the number of pixels that must be processed to move to the next radius
d) Repeat until the queue is empty
f) Pull a pixel from the queue
g) Reduce by 1 the number of pixels that must be processed to move to the next radius.
3. Check the color value checking procedure for each of the adjacent pixels.
4. If the color of the adjacent pixel is equal to the color of the pixel to replace:
a) Replace pixel color with new color
b) Put a pixel at the end of the queue
5. If the number of pixels that must be processed to move to the next radius, decreased to 0:
a) Set as a new value a number equal to the current queue size
b) Increase by 1 the radius of the circle.
By changing the equality when comparing the color for the replacement and the new color for the range, you can get a smooth transition between the fill area and the fill border:
[colorQueue addObject:[NSValue valueWithCGPoint:newStartPoint]]; int offset = 4*((w*round(newStartPoint.y))+round(newStartPoint.x)) + 1; memcpy(colorFroUpdate, &data[offset], 3); float limit = 10; isCanPaint = !(abs(newColorArray[0] - data[offset]) < limit && abs(newColorArray[1] - data[offset + 1]) < limit && abs(newColorArray[2] - data[offset + 2]) < limit); NSInteger countPixelICurrentIterrations = 1; int iterrationIndex = 1; while (isCanPaint && colorQueue.count > 0) { CGPoint point = [[colorQueue objectAtIndex:0] CGPointValue]; [colorQueue removeObjectAtIndex:0]; countPixelICurrentIterrations--; offset = 4*((w*round(point.y))+round(point.x)) + 1; memcpy(&data[offset], newColorArray, 3); CGPoint newPoint; int x0 = point.x - 1; int x1 = point.x + 1; int y0 = point.y - 1; int y1 = point.y + 1; for (int x = x0; x <= x1; x++) { for (int y = y0; y <= y1; y++) { float s = sqrtf((x - newStartPoint.x) * (x - newStartPoint.x) + (y - newStartPoint.y) * (y - newStartPoint.y)); if (s < iterrationIndex + 1) { newPoint = CGPointMake(x, y); if (newPoint.x >= 0 && newPoint.x < w && newPoint.y >= 0 && newPoint.y < h) { offset = 4*((w*round(newPoint.y))+round(newPoint.x)) + 1; if (abs(colorFroUpdate[0] - data[offset]) < limit && abs(colorFroUpdate[1] - data[offset + 1]) < limit && abs(colorFroUpdate[2] - data[offset + 2]) < limit) { memcpy(&data[offset], newColorArray, 3); [colorQueue addObject:[NSValue valueWithCGPoint:newPoint]]; } } } } } if (countPixelICurrentIterrations <= 0 && self.updateImageOn) { if (iterrationIndex % 5 == 0) @autoreleasepool { CGImageRef cgImage = CGBitmapContextCreateImage(cgctx); UIImage *resultUIImage = [UIImage imageWithCGImage:cgImage]; self.updateImageOn(resultUIImage); CGImageRelease(cgImage); } countPixelICurrentIterrations = [colorQueue count]; iterrationIndex++; } } } By starting the drawing process asynchronously, you can observe the following effect of the spreading fill:
So, we implemented the intended functionality and at the same time demonstrated how simple and sometimes seemingly inefficient algorithms can produce a very unexpected result. Thanks for attention!
Source: https://habr.com/ru/post/329180/
All Articles