Unreal engine 4. Sequencer instead of Matinee
For years, the main animator tool in the Unreal Engine was the Matinee tool. The UE is developing and almost a year ago the old man Matinee was declared retirement. Instead, we were presented with the Sequencer tool. This tool is intuitive, but, unfortunately, in attempts to search for documentation or animation lessons in UE4 - you will always stumble across Matinee. Lessons are few. I hasten to take part in the fight against this shortcoming.
In this article I will give a brief insight into the basics (including historical ones) of the Sequencer. And also I will tell about a couple of moments that are somehow missing in the documentation.
I will not repeat the official splints from Epic Games. You can view them on youtube .
')

Cut scenes are an integral part of modern games. The history of the development of cut-scenes at the moment can be divided into three stages, each of which to a greater extent corresponds to one of the types of cut scenes:
1) Live-action
2) Pre-rendered / Real time
3) Interactive
All three types of cut-scenes exist in parallel. But their popularity among developers and players changed depending on the technical capabilities of gaming computers.
The first stage began at a time when the memory available to developers for the distribution of games increased dramatically, while the power remained mediocre. This is due to the development of optical discs. The power of the computer was not enough to calculate in real time a more or less interesting picture. But the video could be shown if imitated a little. Live-action cut scenes from these times are often full-length short films with famous actors and professional film crews.
You can read more about this stage in the article Archaic video compression algorithms from the era of FMV games from yannmar .
The second stage is well known to all of us, because recently it was in trend. The computers were already coped with in order to draw good graphics at least in order to record it in a video file on the developer's computer. And recently, the power has become sufficient even to recreate the cut-scene in real time on the player's car. Cut scenes on game engines - this is what we are well accustomed to. What we live with the last decade. A good example of this is the introductory video of Company Of Heroes. When you start the game for the first time - it is very easy to miss the moment of transition from the Pre-rendered cut-scene to the game. It was to create the Pre-rendered / Real time cut-scenes and was originally created by Matinee. Over time, he has acquired the ability to create animation not only directly inside non-interactive scenes, but also for free animation of objects on the scene.
Modern players require, and technology allows you to get rid of non-interactive cut-scenes. And game designers have already realized that a non-interactive cut-scene breaks the immersion and is generally negatively perceived at a subconscious level. Therefore, the third stage marked the arrival of Interactive cut scenes or QTE (Quick Time Event). This is a cut-scene in which the player has the ability to influence events by pressing the specified buttons in time. Almost the entire Tomb Rider 2013 game can serve as an excellent example here, but QTE is remembered by many players due to the high emotional stress - at the very beginning of the game, when you have to kick back the pursuer in the dungeon. Just imagine that there is not QTE, but a non-interactive cut-scene ... Not that, not at all ... In fact, QTE did not become a full-fledged replacement of cut scenes, but I still think that they should be separated into a separate stage, since they marked themselves transition from fully non-interactive cut scenes to fully interactive directed events (it is no longer possible to call this cut scenes).
And here Matinee started having problems. If you want to make a cool, staged insertion into the game world, which in this case will not be a cut-scene - Matinee will cope, but he is not sharpened by it (I remind you, his task is a cut-scene). And Epic Games decided that it was necessary to create a new tool that would combine both the possibilities of Matinee and the possibilities of directing fully interactive animations. In essence, the Sequencer is a refactoring of Matinee, taking into account the new requirements for the animation tool.
Sequencer is a complex tool that allows you to set up a whole range of parameters: camera, light, sound etc ... In order not to be sprayed, let's start with animations - as a rule, we need them first of all.
Install SkeletalMeshActor on stage:

Now in the Content Browser, right-click and create a Level Sequence:

Place our Sequence on stage. Personally, I prefer to place it next to an animated object. Also in the list of objects I combine everything related to a specific Sequence: the Sequence itself, sounds, meshes, splines, effects.
Open the object placed on the stage for editing - this is done via the pop-up menu or by pressing Ctrl + E.
A floating Sequencer window opens. As a rule, on single-monitor systems it is more convenient to place it as a tab along with the Content Browser.
Click on the Add button:

and add our actor to the sequence:

And here is the first lyrical digression that a little brain can eat. An instance of a Sequence is generally inseparable from the prototype.
That is, if you have a prototype TestSequence in the Content Browser and you placed several TestSequence instances at the Level1 level, then you tied actor SK_Mannequin in the first instance ... You tied this actor not to the instance, but to the prototype, which means to all instances.
In the general case, it is impossible to make a single prototype, stamp samples from it at the level and bind them to different actor. Such functionality is now in the process of development and at the moment, if you want to animate using one Sequence of different actor and at different levels - you will have to duplicate the prototype for each actor. There is an alternative: you can configure the Sequencer to independently place objects on the scene with reference to the instance. But I will leave this topic for another article.
Do not forget that in many cases Transform does not need to animate (for example, if your goal is to superimpose a sequence of animations or to run an object on a spline). In this case, turn off the Transform:

Throw animations:

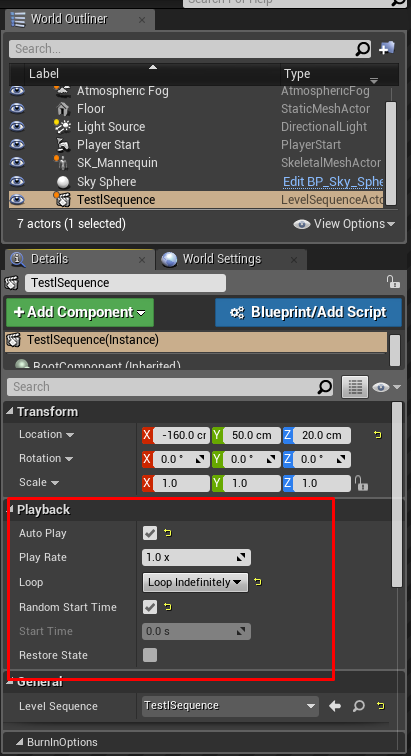
By default, the sequence instance is inactive. It is convenient to assign him autoplay, repeat and random start.
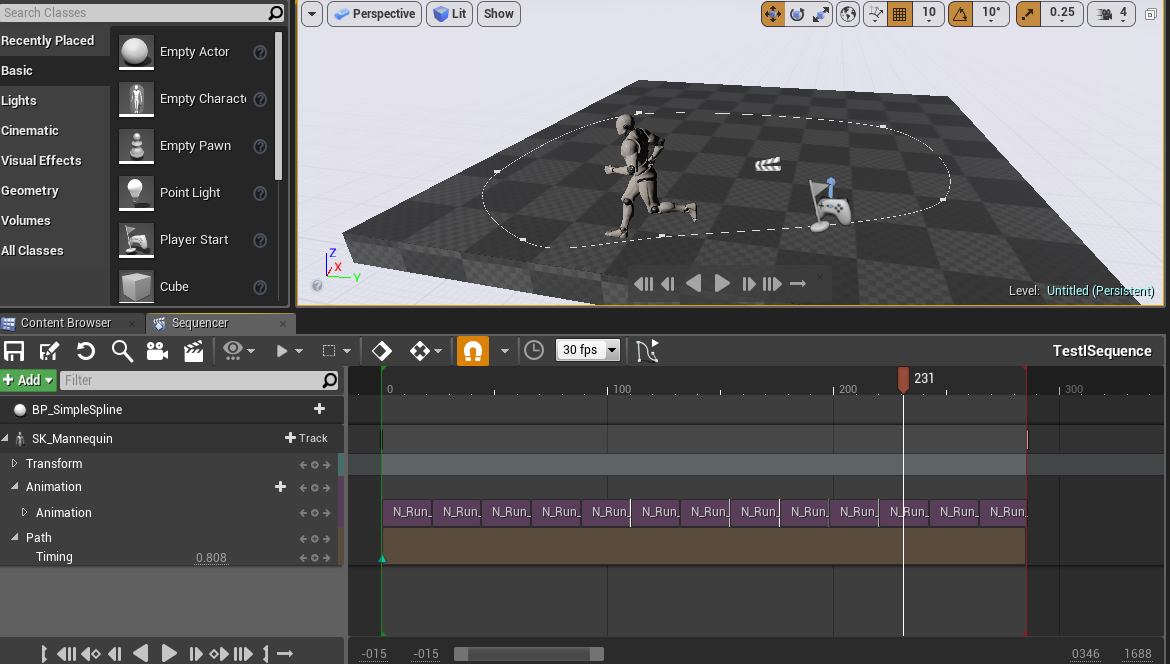
I assembled a sequence of three animations:

Result:
Starting an object on a spline is very simple. I will not explain how to make a spline - it is chewed a thousand times, and the article is already a large-scale one. Click on + Track and add our spline:

I remind you that, in general, in order for the spline to affect the object, you must turn off the Transform as I showed above.
It is also worth remembering that the speed of movement along the spline is not explicitly set. It depends on the time between keyframes and the length of the spline.
Fill the entire length of the run animation. The time of key frames sequence is chosen so that the speed of movement corresponds to the speed of the animation:
On the Path, the green arrows are keyframes for specifying the type of interpolation. By default, there are two of them, one has the value 0, and the second has one. Accordingly, a spline position interpolation occurs between them. Overcome half of the spline run, and the second - on foot.
For this, the second keyframe will replace the value from 1 to 0.5
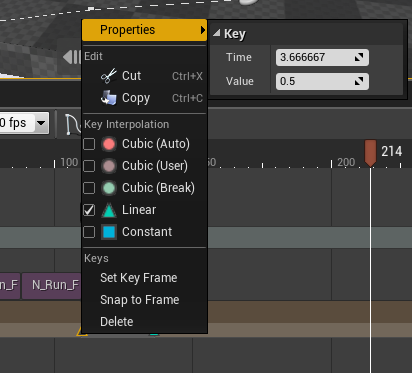
Drag the slider next and click on the circle to create a new keyframe:

By default, a keyframe is created with cubic interpolation (red circle), we also need linear interpolation (green triangle).
As a result, we should have four triangles that specify the movement along the spline with the values:
0, 0.5, 0.5, 1.0
Obviously, there will be no movement between keyframes 0.5 and 0.5. In this place we will stop the character, insert some kind of static animation and launch its rest of the way to go on foot.
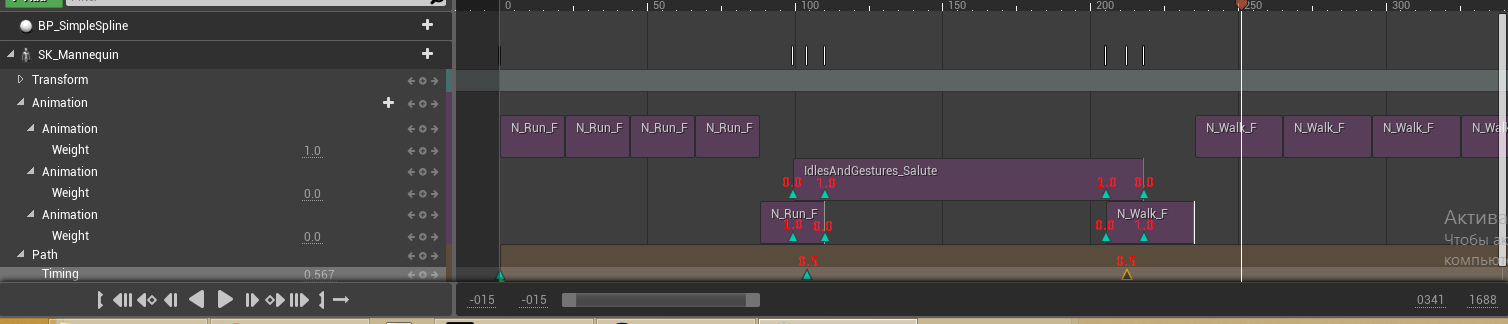
Now let's do some animations. We will have three time tracks with animations. Upper - main and two lower - for blending animations. We need blending to stop correctly and start walking correctly.
Multiple animation tracks are automatically mixed. But if you try to mix two animations on the forehead, without at the same time controlling the weights, you get porridge. A character will simultaneously stand, walk, wave his hands, and not wave ... In general, this is not an option.
Therefore, we also put keyframes on the animation, change the weight from 1 to 0 for the run and in the same interval for the standing animation - from 0 to 1. At the end of the standing animation - the same is true. At the exit we will get a smooth transition from running animation to standing animation and then smooth transition from standing to walking.
For some unknown reason (bug or feature?), It was not possible to manage the weights in the first track. Therefore, I transferred the animation to the third track and mixed not the first and the second, but the second and the third. The essence does not change, but everything works. It turned out like this (clickable):
This method is great if we want to make the transition from one animation to another.
But what if we want the character to keep going while doing something else?
Additive animations come to our rescue.
The meaning of these animations is that they are not complete. That is, they do not provide all the information about the animation, but only changes regarding the reference position. Thus, these animations can be applied on top of the currently playing. Of course, if you have a character while running, he is actively waving his arms, then applying over the animation of applying a hand to his head, you will not do well. Because the animation of the military salute does not replace waved hands, and overlaps. But, for example, you can already try to walk, because the movement of the hands is not so active and everything can turn out.
Unreal Engine already contains tools for getting additive animations from full ones. This is done with just a few clicks. I'll take the animation to stretch my arms to the left. Duplicate the animation and go into edit mode, then configure the Additive settings block:

Set the Additive Anim Type in Local Space, select the Selected animation frame as the Base Pos and select the original animation that was duplicated with, and the Ref Frame Index should be 0. That is, the first frame of the original animation is subtracted from all frames and everything what remains will be additive animation.
Such an animation can be simply put on the second track next to walking without any additional shamanism.
Total:
Honestly, I still want to tell a lot about the Sequencer. Really powerful and interesting tool. But the article is already huge. See you ... someday. Good luck to you UE!
In this article I will give a brief insight into the basics (including historical ones) of the Sequencer. And also I will tell about a couple of moments that are somehow missing in the documentation.
I will not repeat the official splints from Epic Games. You can view them on youtube .
')
History reference
Cut scenes are an integral part of modern games. The history of the development of cut-scenes at the moment can be divided into three stages, each of which to a greater extent corresponds to one of the types of cut scenes:
1) Live-action
2) Pre-rendered / Real time
3) Interactive
All three types of cut-scenes exist in parallel. But their popularity among developers and players changed depending on the technical capabilities of gaming computers.
The first stage began at a time when the memory available to developers for the distribution of games increased dramatically, while the power remained mediocre. This is due to the development of optical discs. The power of the computer was not enough to calculate in real time a more or less interesting picture. But the video could be shown if imitated a little. Live-action cut scenes from these times are often full-length short films with famous actors and professional film crews.
You can read more about this stage in the article Archaic video compression algorithms from the era of FMV games from yannmar .
The second stage is well known to all of us, because recently it was in trend. The computers were already coped with in order to draw good graphics at least in order to record it in a video file on the developer's computer. And recently, the power has become sufficient even to recreate the cut-scene in real time on the player's car. Cut scenes on game engines - this is what we are well accustomed to. What we live with the last decade. A good example of this is the introductory video of Company Of Heroes. When you start the game for the first time - it is very easy to miss the moment of transition from the Pre-rendered cut-scene to the game. It was to create the Pre-rendered / Real time cut-scenes and was originally created by Matinee. Over time, he has acquired the ability to create animation not only directly inside non-interactive scenes, but also for free animation of objects on the scene.
Modern players require, and technology allows you to get rid of non-interactive cut-scenes. And game designers have already realized that a non-interactive cut-scene breaks the immersion and is generally negatively perceived at a subconscious level. Therefore, the third stage marked the arrival of Interactive cut scenes or QTE (Quick Time Event). This is a cut-scene in which the player has the ability to influence events by pressing the specified buttons in time. Almost the entire Tomb Rider 2013 game can serve as an excellent example here, but QTE is remembered by many players due to the high emotional stress - at the very beginning of the game, when you have to kick back the pursuer in the dungeon. Just imagine that there is not QTE, but a non-interactive cut-scene ... Not that, not at all ... In fact, QTE did not become a full-fledged replacement of cut scenes, but I still think that they should be separated into a separate stage, since they marked themselves transition from fully non-interactive cut scenes to fully interactive directed events (it is no longer possible to call this cut scenes).
And here Matinee started having problems. If you want to make a cool, staged insertion into the game world, which in this case will not be a cut-scene - Matinee will cope, but he is not sharpened by it (I remind you, his task is a cut-scene). And Epic Games decided that it was necessary to create a new tool that would combine both the possibilities of Matinee and the possibilities of directing fully interactive animations. In essence, the Sequencer is a refactoring of Matinee, taking into account the new requirements for the animation tool.
Part 1. Introduction to the Sequencer and working with animations
Sequencer is a complex tool that allows you to set up a whole range of parameters: camera, light, sound etc ... In order not to be sprayed, let's start with animations - as a rule, we need them first of all.
Install SkeletalMeshActor on stage:
Now in the Content Browser, right-click and create a Level Sequence:
Place our Sequence on stage. Personally, I prefer to place it next to an animated object. Also in the list of objects I combine everything related to a specific Sequence: the Sequence itself, sounds, meshes, splines, effects.
Open the object placed on the stage for editing - this is done via the pop-up menu or by pressing Ctrl + E.
A floating Sequencer window opens. As a rule, on single-monitor systems it is more convenient to place it as a tab along with the Content Browser.
Click on the Add button:
and add our actor to the sequence:
And here is the first lyrical digression that a little brain can eat. An instance of a Sequence is generally inseparable from the prototype.
That is, if you have a prototype TestSequence in the Content Browser and you placed several TestSequence instances at the Level1 level, then you tied actor SK_Mannequin in the first instance ... You tied this actor not to the instance, but to the prototype, which means to all instances.
In the general case, it is impossible to make a single prototype, stamp samples from it at the level and bind them to different actor. Such functionality is now in the process of development and at the moment, if you want to animate using one Sequence of different actor and at different levels - you will have to duplicate the prototype for each actor. There is an alternative: you can configure the Sequencer to independently place objects on the scene with reference to the instance. But I will leave this topic for another article.
Do not forget that in many cases Transform does not need to animate (for example, if your goal is to superimpose a sequence of animations or to run an object on a spline). In this case, turn off the Transform:
Throw animations:
By default, the sequence instance is inactive. It is convenient to assign him autoplay, repeat and random start.
I assembled a sequence of three animations:
Result:
Part 2. Spread running and additive animations
Starting an object on a spline is very simple. I will not explain how to make a spline - it is chewed a thousand times, and the article is already a large-scale one. Click on + Track and add our spline:
I remind you that, in general, in order for the spline to affect the object, you must turn off the Transform as I showed above.
It is also worth remembering that the speed of movement along the spline is not explicitly set. It depends on the time between keyframes and the length of the spline.
Fill the entire length of the run animation. The time of key frames sequence is chosen so that the speed of movement corresponds to the speed of the animation:
On the Path, the green arrows are keyframes for specifying the type of interpolation. By default, there are two of them, one has the value 0, and the second has one. Accordingly, a spline position interpolation occurs between them. Overcome half of the spline run, and the second - on foot.
For this, the second keyframe will replace the value from 1 to 0.5
Drag the slider next and click on the circle to create a new keyframe:
By default, a keyframe is created with cubic interpolation (red circle), we also need linear interpolation (green triangle).
As a result, we should have four triangles that specify the movement along the spline with the values:
0, 0.5, 0.5, 1.0
Obviously, there will be no movement between keyframes 0.5 and 0.5. In this place we will stop the character, insert some kind of static animation and launch its rest of the way to go on foot.
Now let's do some animations. We will have three time tracks with animations. Upper - main and two lower - for blending animations. We need blending to stop correctly and start walking correctly.
Multiple animation tracks are automatically mixed. But if you try to mix two animations on the forehead, without at the same time controlling the weights, you get porridge. A character will simultaneously stand, walk, wave his hands, and not wave ... In general, this is not an option.
Therefore, we also put keyframes on the animation, change the weight from 1 to 0 for the run and in the same interval for the standing animation - from 0 to 1. At the end of the standing animation - the same is true. At the exit we will get a smooth transition from running animation to standing animation and then smooth transition from standing to walking.
For some unknown reason (bug or feature?), It was not possible to manage the weights in the first track. Therefore, I transferred the animation to the third track and mixed not the first and the second, but the second and the third. The essence does not change, but everything works. It turned out like this (clickable):
This method is great if we want to make the transition from one animation to another.
But what if we want the character to keep going while doing something else?
Additive animations come to our rescue.
The meaning of these animations is that they are not complete. That is, they do not provide all the information about the animation, but only changes regarding the reference position. Thus, these animations can be applied on top of the currently playing. Of course, if you have a character while running, he is actively waving his arms, then applying over the animation of applying a hand to his head, you will not do well. Because the animation of the military salute does not replace waved hands, and overlaps. But, for example, you can already try to walk, because the movement of the hands is not so active and everything can turn out.
Unreal Engine already contains tools for getting additive animations from full ones. This is done with just a few clicks. I'll take the animation to stretch my arms to the left. Duplicate the animation and go into edit mode, then configure the Additive settings block:
Set the Additive Anim Type in Local Space, select the Selected animation frame as the Base Pos and select the original animation that was duplicated with, and the Ref Frame Index should be 0. That is, the first frame of the original animation is subtracted from all frames and everything what remains will be additive animation.
Such an animation can be simply put on the second track next to walking without any additional shamanism.
Total:
Honestly, I still want to tell a lot about the Sequencer. Really powerful and interesting tool. But the article is already huge. See you ... someday. Good luck to you UE!
Source: https://habr.com/ru/post/329160/
All Articles