VMware vSphere 6 for technical writers
The article describes how to organize the work of technical writers and communicators, if the object for creating documents is virtual environments built on the basis of the VMware vSphere platform, as well as software operating in such environments. The article will also be useful to a wide range of technical specialists who, by the nature of their activities, have to deal with similar objects.
Overture
Why do you need it?
To the idea of this publication I was moved by the universal development of virtualization and cloud computing . The use of these technologies, on the one hand, allows enterprises to more efficiently use available hardware resources, on the other hand, it makes it possible to more conveniently organize access to applications, including for remote and mobile users. More and more enterprises provide their clients with cloud services.
It is clear that the software industry is also seeking to occupy this relatively new niche. And documentaries and other specialists should at least understand the structure of the respective platforms and be able to work with them if they want to keep up with the times. And here there is a problem. How to install the product for a virtual environment? How to take screenshots? How to “touch” a product when the cost of a license to use the platform itself and the described software can be tens of thousands of dollars?
')
In this article, I decided to talk about my own way, which removed most of these issues and allowed me to spend more than one hour (and even more than one week) pleasantly communicate with interesting programs, new technologies, smart algorithms and write, I hope, useful reviews. During the work, there were bumps, problems, pleasant seconds to find a solution, constant repetitions of the same actions to create test benches, as a result of which I had some rules for optimizing work.
This article does not explain the basics of data networks. To study this issue, there are many individual courses, including free There will also be no basics of administration and standard software installation questions. We will also not consider the use of VMware Workstation desktop virtualization tools — you can learn a lot about this product on the manufacturer’s website .
We will focus on the deployment of the test bench with the installed VMware vSphere platform, in fact, on a regular user computer, but with some limitations on the hardware and software requirements. We will go through the stages of planning, preparing, installing and using a test bench, focusing on important and not always obvious points along the way.
This series of publications does not pretend to be complete information on the topic. Therefore, everyone can exchange their opinions and ask questions both in the comments to these articles and send emails directly to my email .
Well, after the preliminary words, you can get down to business. Let's start with two mandatory principles that must always be remembered.
Miser pays twice
Yes, many specialists for the “focus” described here will have to fork out slightly. So, what does your computer need to organize a test bench with VMware vSphere 6 on it?
The most critical parameter is RAM. It is recommended to have "on board" at least 16 GB of RAM. Ideal - 32 GB and more. My 24 GB is enough for me. When deploying vSphere, you will have to simultaneously run several virtual machines, some of which will use dual virtualization technology (one of the virtual machines will be the VMware ESXi hypervisor, under which the other virtual systems will run). Do not skimp on installing additional memory, because if all the virtual machines you start will not fit into it, and active use of the paging file will be enabled, you will not be able to work normally.
The previous requirement implies the need to use a 64-bit system as the main one on your work computer, since the address space of 32-bit systems is limited to 4 GB. Also, the current version of VMware Workstation 12 does not support 32-bit systems for its own installation. I am currently using Windows 10 (64 bits).
Dual virtualization also requires a processor that supports one of the hardware virtualization technologies . My rather old Intel Core i7-920 processor supports this technology, i.e. now this is not a problem either.
Of iron you also need not necessarily a fast, but preferably a large hard disk. A free terabyte is enough for the eyes, and today it can be achieved with ease.
In other words, you need a good gaming computer. And this is the case when you can justify it for work.
When working continuously with the VMware vSphere platform, it is recommended to purchase VMware Workstation, since you simply won't notice how the 30-day trial license expires.
For everything else that is needed for work, there are trials.
Occam's razor
This principle states: "One should not multiply things without necessity."
When applied to our topic, this means first of all the following things:
- run at the same time the minimum number of virtual machines;
- Give virtual machines a minimum amount of resources for your computer to function properly.
- do not install unnecessary components unnecessarily (for example, a DNS server, a VMware vCenter Server management server , do not create a cluster of ESXi hypervisors, extra network interfaces);
- wherever possible, use free trial software.
If you just - go on the path of least resistance.
Where to get free distributions:
- distributions related to the VMware vSphere platform can be obtained on the VMware website by registering in the My WMware section ;
- Current Windows and Windows Server distributions can be downloaded from the Microsoft website (we will also need them for further work).
Bolero
Moral attitude
Having spent more than one week with virtual girls, I came to the conclusion that work with the objects described here should be started with psychological preparation. Tune in for quite a long preliminary work. The result seems to be slipping farther away, becoming more and more ghostly. You just wallow in a lot of minor technical problems, and the keyboard threatens to fight with the monitor.
I advise you initially to allocate 3 times more time than you think. For example, take the preparation of the first stand for at least two weeks, if you have never done it before.
The process of preparing a stand with a virtual infrastructure of VMware vSphere is somewhat reminiscent of Ravel ’s “Bolero” . Therefore, I put it in the title of this part of the publication. You can include this work as a soundtrack while reading this part of the article.
Measuring seven times
Take the time to carefully plan exactly the test stand that you really need. With each subsequent stage you will be more difficult to make adjustments.
First, draw a diagram of the virtual machines you are going to install. Then pre-assign each virtual machine IP addresses from a private range. I usually use addresses from a range of 10.0.0.x.
Be sure to check the hardware and software requirements for all components used. As for VMware components, this can be done on the special VMware Compatibility Guide page. Moreover, when working with virtual environments, it is necessary to apply the principle of intersection of requirements. Those. if the software described by you supports Windows versions for guest systems up to 7, and ESXi-host version 6 supports this OS family up to Windows 10 Technical Preview, then Windows 7 will have to be limited to work. If VMware vSphere Client can be installed on client versions of Windows, then if you plan to install VMware vCenter Server in the same virtual system, the list of OS will be reduced only for server options starting from Windows Server 2008 R2.
Select the folder on the disk where you want to install all the virtual machines, and create inside subdirectories into which all virtual systems will be installed. So then it will be easier to organize the installation and more difficult to get confused. In the interface of VMware Workstation it is also recommended to make a separate folder for the stand.

Another important point. During installation, you will need to come up with a variety of logins and passwords for the various components of the virtual infrastructure, the operating system and the software being described. Since Requirements for logins and passwords are different everywhere, write them down so as not to waste time on meaningless resetting and restoring passwords, and in many cases recovery is simply impossible.
Installing ESXi-host
Actually, the installation takes place without any problems using the Easy Install technology integrated into VMware Workstation.
When installing, specify as much disk space as possible for this machine, because there is nothing “more interesting” than expanding the disk space of the virtual machine in which the ESXi-host is installed, and then creating a new data storage in the added space. This is possible, but leads to additional "pleasant" quests.
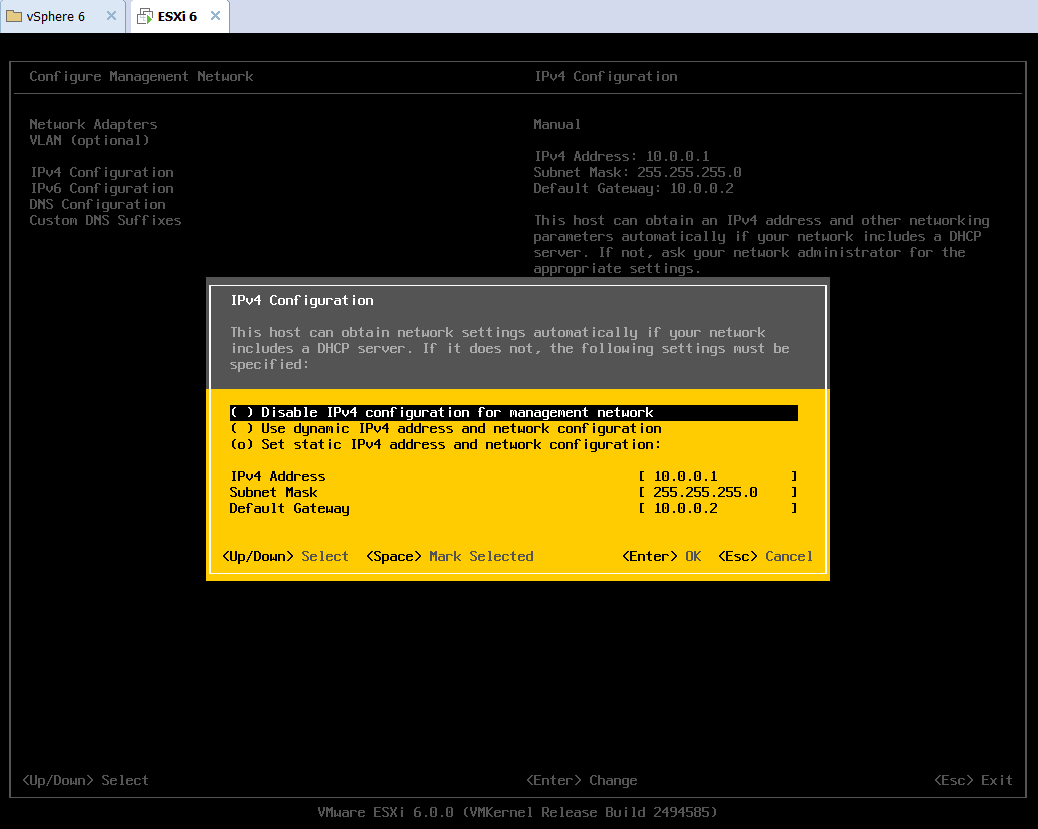
After a simple installation of ESXi, install a static network IPv4 interface and assign it, for example, the address 10.0.0.1. The IPv6 interface can be completely disabled if it is not needed. When installing or after it, I recommend setting the amount of RAM for this virtual machine to 8 GB. This is explained by the fact that, under the control of an ESXi-host, we will also run second-level virtual machines, and they also need resources. I think the use of the second level paging file is unlikely to be felt to you.
Installing the management server
The VMware vSphere platform is designed so that ESXi hosts and higher order structures created from them are managed remotely. Therefore, we need to install another virtual machine into which the appropriate VMware vSphere Client will be installed. I chose Windows Server 2012 R2 for this role.
I will not dwell on the rather standard task of installing this system, I’ll dwell only on a few important points.
When installing the Russian trial version of Windows Server 2012 R2 in WMware Workstation using Easy Install technology, an error may be displayed stating that the license agreement file was not found and the installation will be terminated. You can get out of this situation by installing this system manually and then installing the VMware Tools tools.
If you are using the Russian version of Windows Server 2012 R2, after installing the system, add a new account, the name of which will consist of English letters (for example, Admin). This is due to the fact that some components of the virtual infrastructure may not support Russian user names. Rid yourself of further problems with reinstalling many of the components under the new user. Get it immediately and give administrator rights.

After installing Windows Server, update it to its current state. Besides the fact that in this way you will lose the dubious pleasure of running into some kind of incompatibility or problem with the stability of our virtual infrastructure (we are still not playing in Minesweeper), this is also a requirement of VMware. Take this time.
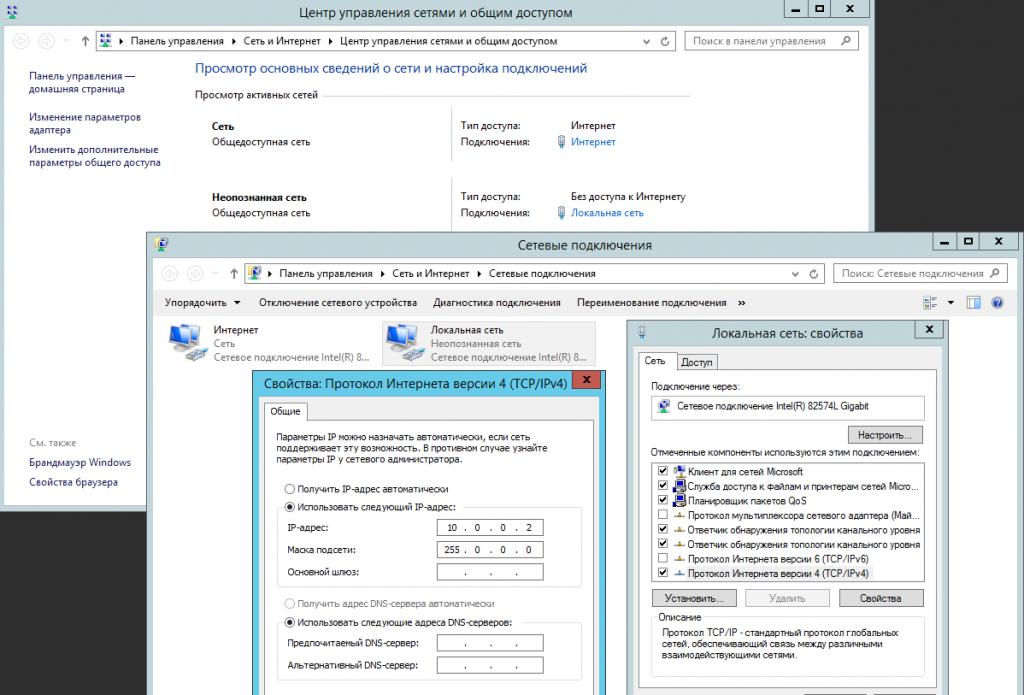
In order to connect the virtual system to the local network and to the Internet, it is easiest to add a second network card in the properties of this virtual machine. One will “look” on the Internet, the other on the local network.
It is recommended to install an Internet browser, different from Internet Explorer, it is too paranoid in the server versions of Windows. I, for example, use Mozilla Firefox. Do not forget to install Adobe Flash Player.
Install vSphere Client
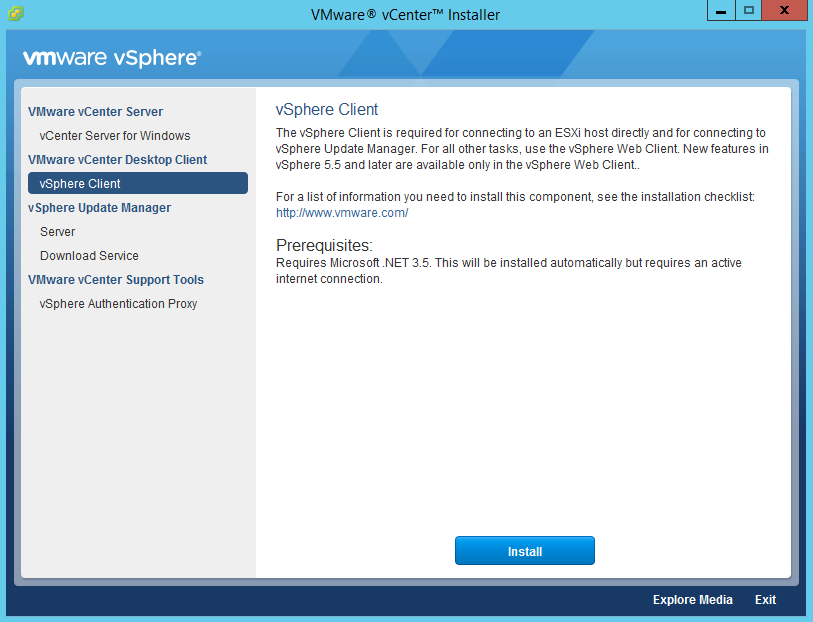
We select the vSphere Client menu, and its installation occurs in a quite standard way. All the necessary additional software is installed along the way, including Microsoft .NET 3.5.
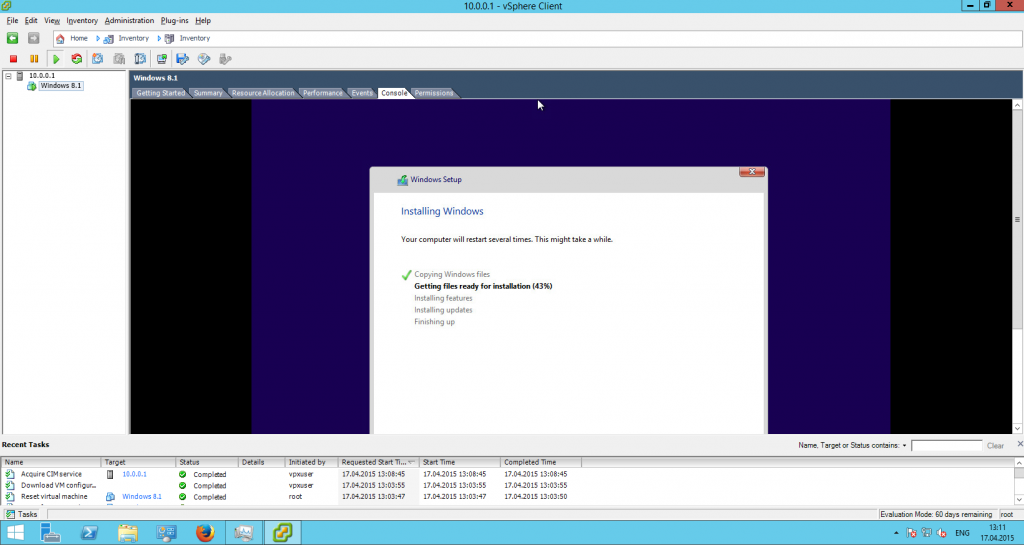
After the process is complete, all we have to do is login as an ESXi server account and proceed to install the test guest on the hypervisor, which I chose Windows 8.1 for.

Installing the guest system
The fastest installation method is to copy the ISO file with the Windows 8.1 distribution to the ESXi host's file storage. To do this, in the properties of the Windows Server virtual machine, share the folder with this ISO file on your work computer. And then in the VMware vSphere Client, open the file storage browser and upload an image of the required OS on it.
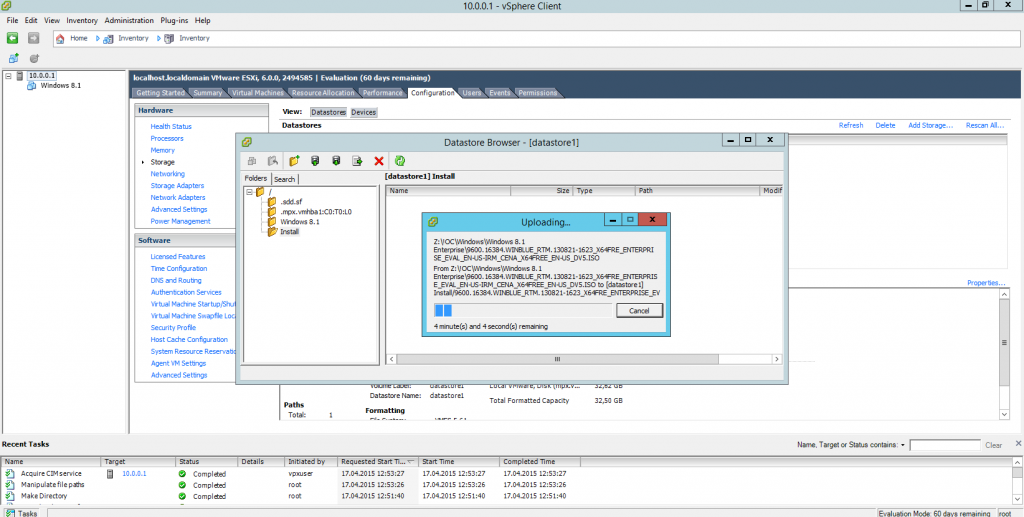
After that, you need to create a new virtual machine on the ESXi host in the vSphere client and specify the newly downloaded ISO file as the virtual disk for the drive of this machine, and check the boxes that the virtual disk will be connected and must be active at startup virtual system. Next, run the created virtual machine and make the standard installation of Windows 8.1.
Do not forget to specify another static IP address to this virtual system, for example, 10.0.0.3.
Voila! Our booth is ready.
We have installed the simplest test bench for experiments with the VMware vSphere 6 platform. In the next, final part of this series of publications, we will focus on some additional infrastructure components that may be needed in the work. Although our quasi-starship has already completely taken off.
Coda
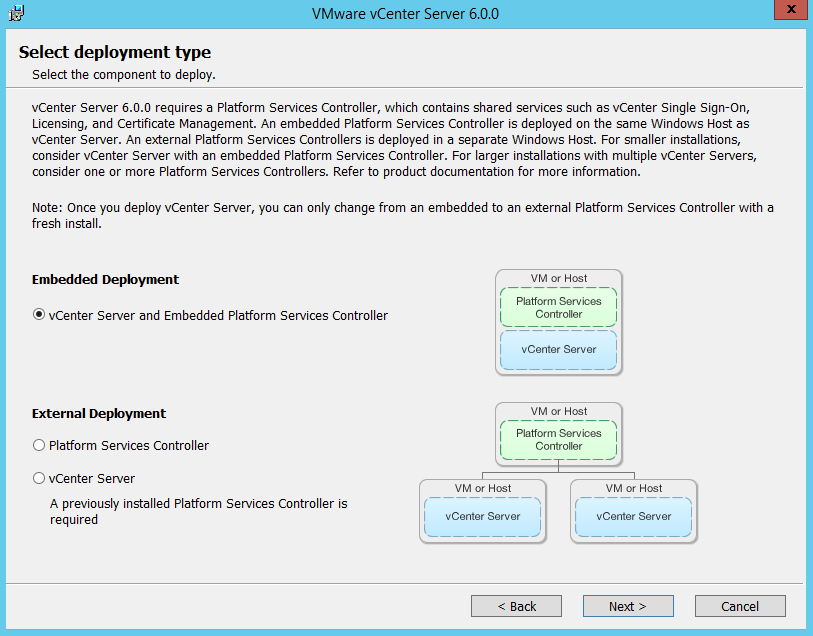
VMware vCenter Server Virtual Infrastructure Management Server
Quite often, software running in VMware vSphere virtual environments is integrated at the VMware vCenter Server server level, and therefore technical writers have to install this component. You can install it on the same Windows Server 2012 R2 virtual system where we installed the VMware client.
In this case, you will have to add virtual memory to this virtual machine - the minimum bracket is 8 GB. This may seem like an overstated requirement, but even with minimal environment after installing this component, the Task Manager shows that more than 5 GB of RAM is occupied.
VMware vCenter Server currently consists of two components - the Platform Services Controller and, in fact, the vCenter Server. These components can be distributed to different hosts (or virtual machines), but for the test bench it is recommended to choose the option when everything is installed in one system.
Included with the vCenter Server is the VMware vSphere Web Client web client, with which you can manage your virtual infrastructure. In version 6.0, this client has become even easier to use by first impressions, and in terms of functionality it is not inferior, and in many respects even surpasses the vCenter Client.

Additional components
Some products require the presence of at least one cluster of ESXi hosts in the virtual infrastructure. It is easy to create it in VMware Web Client using the context menu in the tree of elements of the created virtual infrastructure. By dragging and dropping, you can transfer our ESXi-host to the line of the new cluster, and thus the cluster will consist of our ESXi-host, which is enough for most work situations.

It makes sense to install the vSphere Update Manager component, which is responsible for receiving updates from VMware servers and installing them in your virtual environment on all components used. You can also upgrade components from one major version to another using it.
In this case, for the test bench, it is sufficient to use the Microsoft SQL Server 2012 Express DBMS included in the package.

You can manage updates through VMware web client. After installing the update manager, the corresponding settings will be located on the Update Manager tab of the Monitor menu item in the context of each of the elements of the virtual infrastructure selected in the tree of its elements.

To describe antiviruses, I often had to install VMware vShield Endpoint component on a test bench. This component was installed on an ESXi-host and was a link, an interface between non-agent antivirus (antivirus running at the hypervisor level without the need to install a full-fledged antivirus agent on each protected virtual machine) and virtual machines protected. This component has now become part of the VMware NSX product, the trial version of which is available only to the privileged VMware users, so in this case I will limit myself to a link to the description of the installation of this component in the NSX documentation . If your customer or employer asks you to describe programs that require vShield, ask for the NSX distribution. In most cases, you will not need a license, as for other components of the virtual infrastructure of VMware vSphere - vShield may also work for some time in test mode. The only thing - do not forget to first look at the hardware requirements for the NSX - they are quite high .
Go!
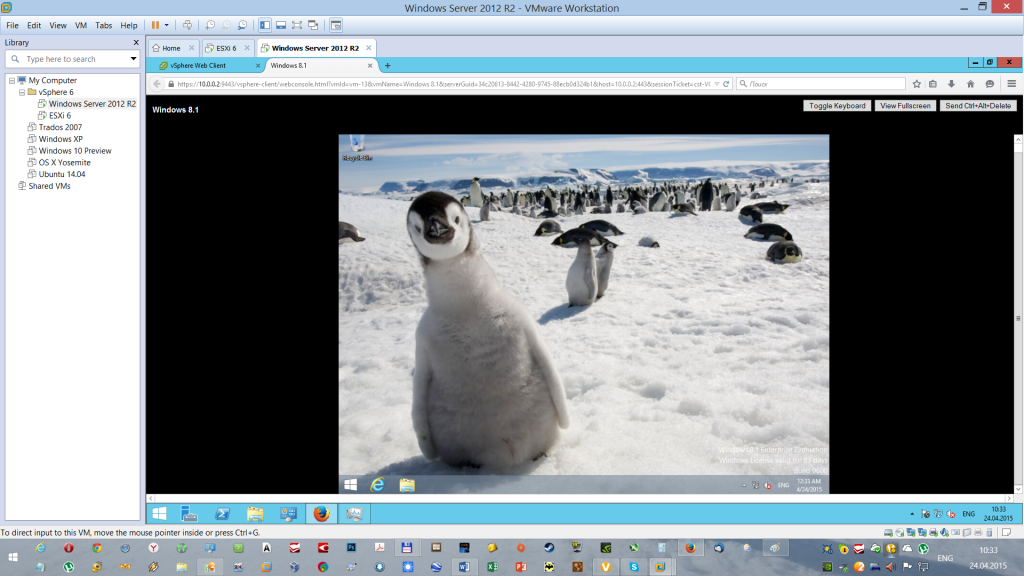
Nice to look at the completed work. Moreover, visually it looks quite impressive. The main working system is Windows 8.1. It has a personal VMware Workstation 11 virtual machine manager installed. Two virtual machines running ESXi 6 and Windows Server 2012 R2 were installed. A second-order virtual machine with Windows 8.1 was installed on the ESXi host. VMware vCenter Server with a web client and a virtual infrastructure update manager were installed in the virtual server with Windows Server. And in the Mozilla Firefox browser, we opened the console of the running Windows 8.1 virtual machine. And now it looks like a matryoshka of 3 Windows operating systems, nested into each other, although you and I already know that everything is arranged a little more logically. But it is quite accessible in order to understand the level required for documentation.
Application examples
Let us return once more to the question of why all this information is needed by technical writers. The best answer to this question is already written documents on the relevant products. I will give a few examples of the reviews I have written using the described test benches:
- Security Code vGate R2 Review (for this review, it was necessary to deploy two additional first-level virtual machines to install the server and the administration agent for the product being described, since this is a requirement of this product);
- Overview of Kaspersky Security for Virtual Environments (for this review it was necessary to deploy a Windows domain with a DNS server in addition to the main booth);
- Review of Trend Micro Deep Security 9.0 (standard test bench + VMware vShield);
- An overview of Wallix AdminBastion 3.1 (a simplified version of the stand in the form of an ESXi host without additional virtual machines and access to the web interface via an Internet browser from a working system).
Source: https://habr.com/ru/post/329036/
All Articles