AsyncDisplayKit 2.0 (Texture) Tutorial: Getting Started
“Art is all you can do well. Everything you can do qualitatively ”(Robert M. Pirsig).
From the translator :
With the advent of autoLayout, creating an interface for an iOS application has become much easier and faster. You no longer need to think about fitting the sizes for certain devices, autoLayout will do it for you. Calculation occurs on the basis of constraints relative to the nearest elements. The more such dependencies, the longer autoLayout will be built, and this is the main problem of all applications with a complex interface.
Using AsyncDisplayKit will allow you to reduce the amount of work performed in the main thread by an order of magnitude and implement complex interfaces with a minimal amount of code. The guys from Raywenderlich made a detailed and visual tutorial on working with him. I hope that the translation of the article will help you to master this framework even faster.
AsyncDisplayKit is a UI framework that was developed and applied by Facebook in the Paper application. He helped the Paper development team find the answer to one of the key questions: how to keep the main application stream as free as possible.
Now many applications are based on the user interface, which is largely dependent on continuous movements and animation based on physics. At least your UI is probably based on some type of Scroll View.
These types of user interfaces are completely dependent on the main thread and extremely sensitive to its brakes. Loaded mainstream means dropped frames and an unpleasant user experience.
The main factors of work flow include:
- Measurement and Layout : events such as calling the heightForRowAtIndexPath: method or sizeThatFits of the UILabel class, as well as the exponential cost of calculating the constraints.
- Image Decoding : Using a UIImage in image view mode means that image data must first be decoded.
- Drawing : complex text, as well as drawing gradients and shadows manually.
- Object Life Cycle : creating, managing, and destroying system objects (i.e. creating a UIView ).
When used correctly, AsyncDisplayKit allows you to perform all measurements, layout and rendering asynchronously by default. Without additional optimization, the application can reduce the amount of work performed in the main flow by about an order of magnitude.
In addition to these performance advantages, the modern AsyncDisplayKit offers an impressive array of amenities for developers, allowing you to implement complex interfaces with a minimal amount of code.
In this tutorial AsyncDisplayKit 2.0, consisting of two parts, you will learn everything you need to create a useful and dynamic application using ASDK.
Note : ASDK is incompatible with either Interface Builder or AutoLayout, so you will not use them. Although ASDK fully supports Swift (as opposed to ComponentKit), many of its users still write in Objective-C. At the time of creation of this tutorial, most of the top 100 free applications did not contain any Swift code at all (although 6 used ASDK). Therefore, the article focuses on Objective-C. But there is also a Swift version of the sample project in case you hate brackets .
Let's start
To get started, download your start project .
The project uses CocoaPods to connect AsyncDisplayKit. So, in the usual CocoaPods style, go and open the RainforestStarter.xcworkspace , but NOT the RainforestStarter.xcodeproj .
Note : An Internet connection is required to work with this tutorial.
Compile and run an application consisting of a single UITableView containing a list of animals. If you look at the code in AnimalTableController , you will see that this is the usual class UITableViewController , which you have probably seen many times.
Note : Make sure that the code is running on a real device, and not on the simulator.
Scroll through the table and note the number of frames that were skipped. You do not need to run the tools to see that this application needs to improve performance.

You can fix this using AsyncDisplayKit.
Introducing ASDisplayNode
ASDisplayNode is the ASDK base class and, in fact, just the “view” object in the MVC pattern, similar to UIView or CALayer . The best way to present ASDisplayNode is to think about the relationship between UIViews and CALayers , with which you should already be familiar.
Remember that on the screen in the iOS application everything is represented through the CALayer object. UIViews create and own CALayer support, to which they add touch processing and other functions. The UIView class itself is not a subclass of CALayer . Instead, it wraps the layer object, extending its functionality.

In the case of ASDisplayNode, this abstraction expands: you can think of them as wrapping the view in the same way that the view wraps the layer.
What the nodes bring to the table, besides the usual view, is that they can be created and configured in background queues and simultaneously presented by default.
Fortunately, the API for working with nodes should be incredibly familiar to anyone who has used UIViews or CALayers . All the view properties that you normally use are available in the equivalent node class. You can even get access to the view or leer itself, as well as to the .layer class of the UIView .
Node containers
Although the nodes themselves provide the opportunity for significant performance improvements, real magic happens when they are used in conjunction with one of four container classes.
These classes include:
- ASViewController : A subclass of UIViewController that allows you to provide the node that you want to manage.
- ASCollectionNode and ASTableNode : equivalents for the UICollectionView and UITableView nodes, a subclass of which is supported under the hood.
- ASPagerNode : ASCollectionNode subclass that provides high read performance over UIPageViewController from the UIKit framework.

To be honest, real magic comes from ASRangeController , which uses each of these classes to influence the behavior of the contained nodes. For now, just trust me and remember this for the future.
TableView conversion
The first thing you need to do is convert the current table view to a table node. It is quite simple.
Replacing tableView with tableNode
First go to AnimalTableController.m. Add the following line below the other imports in this class:
#import <AsyncDisplayKit/AsyncDisplayKit.h> So you import ASDK to use the framework.
Then go and replace the tableView property declaration :
@property (strong, nonatomic) UITableView *tableView; on tableNode :
@property (strong, nonatomic) ASTableNode *tableNode; This will cause most of the code in this class to break, but don’t panic!

Seriously, don't worry. These errors and warnings will serve as your guide when converting what you have now into what you want.
The errors in -viewDidLoad are , of course, related to the fact that the tableView no longer exists. I'm not going to force you to view the entire project and change all instances of tableView to tableNode (it is not so difficult to find and replace, so don’t be afraid), but if you did, you will see that:
- You must assign an ASTableNode property.
- The table node does not have a method named -registerClass: forCellReuseIdentifier:.
- You cannot add a node as a subview.
At this point, you should simply replace -viewDidLoad with the following:
- (void)viewDidLoad { [super viewDidLoad]; [self.view addSubnode:self.tableNode]; [self applyStyle]; } Interestingly, you call -addSubnode: for UIView . This method was added to all UIViews through a category and is exactly equivalent:
[self.view addSubview:self.tableNode.view]; Then correct -viewWillLayoutSubviews , replace the implementation of this method with the following:
- (void)viewWillLayoutSubviews { [super viewWillLayoutSubviews]; self.tableNode.frame = self.view.bounds; } All this replaces self.tableView with self.tableNode for setting the frame of the table.
Then find the -applyStyle method and replace the implementation with the following:
- (void)applyStyle { self.view.backgroundColor = [UIColor blackColor]; self.tableNode.view.separatorStyle = UITableViewCellSeparatorStyleNone; } The string that specifies the separatorStyle for the table is the only modified string. Notice how the view property of the table node is accessed to set the separatorStyle for the table. ASTableNode does not disclose all UITableView properties, so you need to access the UITableView instance of the base table node to change certain UITableView properties.
Then add the following line at the very beginning of -InitWithAnimals :
_tableNode = [[ASTableNode alloc] initWithStyle:UITableViewStylePlain]; And add this code to the end, before the initializer's return statement:
[self wireDelegation]; So you initialize AnimalTableController with a table node and call -wireDelegation to connect the delegates to the table node.
Configuring a data source and table node delegate
Like UITableView , ASTableNode uses a data source and delegate to get information about itself. The ASTableDataSource protocols Tables and ASTableDelegate are very similar to UITableViewDataSource and UITableViewDelegate . In fact, they define some of the same methods, such as -tableNode: numberOfRowsInSection:. The two sets of protocols do not completely match each other, because ASTableNode behaves slightly differently than UITableView .
Find -wireDelegation and replace tableView with tableNode in the implementation:
- (void)wireDelegation { self.tableNode.dataSource = self; self.tableNode.delegate = self; } Now you will receive a warning that AnimalTableController does not actually conform to the correct protocol. Now AnimalTableController corresponds to UITableViewDataSource and UITableViewDelegate . In the following sections, you will accept and implement each of these protocols so that the table node can function.
ASTableDataSource compliance
At the top of AnimalTableController.m, locate the following DataSource category interface declaration:
@interface AnimalTableController (DataSource)<UITableViewDataSource> @end And replace UITableViewDataSource with ASTableDataSource :
@interface AnimalTableController (DataSource)<ASTableDataSource> @end Now that the AnimalTableController declaration is an ASTableDataSource , it's time to do it.
Scroll to the bottom of AnimalTableController.m and look for the implementation of the DataSource category.
First, change the UITableViewDataSource method -tableView: numberOfRowsInSection: to the ASTableDataSource protocol method , replacing it with the following.
- (NSInteger)tableNode:(ASTableNode *)tableNode numberOfRowsInSection:(NSInteger)section { return self.animals.count; } Further, ASTableNodes expects its cells to be returned differently than UITableView cells. To adapt to the new paradigm, replace -tableView: cellForRowAtIndexPath: with the following method:
//1 - (ASCellNodeBlock)tableNode:(ASTableView *)tableView nodeBlockForRowAtIndexPath:(NSIndexPath *)indexPath { //2 RainforestCardInfo *animal = self.animals[indexPath.row]; //3 return ^{ //4 CardNode *cardNode = [[CardNode alloc] initWithAnimal:animal]; // - … return cardNode; }; } Consider this section:
- ASCellNode is ASDK equivalent to UITableViewCell or UICollectionViewCell . It is important to note that this method returns an ASCellNodeBlock . This is due to the fact that ASTableNode supports all its cells inside and provides a block for each index path, it can simultaneously initialize all its cells when it is ready.
- The first thing you do is take the link to the data model you need to fill this cell. This is a very important pattern. You capture the data, and then get it in the next block. IndexPath should not be used inside a block if the data changes before the block was called.
- Then you return the block whose return value should be ASCellNode .
- No need to worry about reusing the cell, relax and initialize it in the usual way. Notice that now you are returning CardNode instead of CardCell .
This brings me to an important point. As you may have already noticed, there is no reuse of cells when using ASDK. This has already been mentioned twice, but just keep that in mind. Do not be afraid to go to the beginning of the class and delete.
static NSString *kCellReuseIdentifier = @«CellReuseIdentifier»; You no longer need it. Just think. You never have to worry about -prepareForReuse again ...
ASTableDelegate compliance
Go to the beginning of AnimalTableController.m and locate the following delegate category interface declaration:
interface AnimalTableController (Delegate)@end and replace UITableViewDelegate with ASTableDelegate :
interface AnimalTableController (Delegate)@end Now that AnimalTableController accepts ASTableDelegate , it's time to move on to implementation. Navigate to the bottom of AnimalTableController.m and look for the implementation of this Delegate category.
Sure, you know that with UITableView you need to provide an implementation of -tableView: heightForRowAtIndexPath:. This is due to the fact that with UIKit , the height of each cell is calculated and returned by the table delegate.
ASTableDelegate does not need -tableView: heightForRowAtIndexPath:. In ASDK, all ASCellNodes are responsible for determining their own size. Instead of providing a static height, you can optionally define a minimum and maximum size for your cells. In this case, it is necessary that each cell be at least as high as 2/3 of the screen.
For now just replace -tableView: heightForRowAtIndexPath: with:
- (ASSizeRange)tableView:(ASTableView *)tableNode constrainedSizeForRowAtIndexPath:(NSIndexPath *)indexPath { CGFloat width = [UIScreen mainScreen].bounds.size.width; CGSize min = CGSizeMake(width, ([UIScreen mainScreen].bounds.size.height/3) * 2); CGSize max = CGSizeMake(width, INFINITY); return ASSizeRangeMake(min, max); } Compile and run the project to see what happened.
We have a smooth table! Once you have done this, prepare to do even better.
Infinite scroll with batch sampling
In most applications, the server has more data available than the number of cells you would like to show in the table. This means that every application you are working on will have a mechanism for downloading the next data packet from the server, because the user is nearing the end of the current data set.
Many times this was handled manually, remembering the content offset in the scrollView delegate in the -scrollViewDidScroll: method. With ASDK, there is a more declarative way to do this. You can tell in advance how many pages you need to download new data.
First uncomment the helper methods that were included. Go to the end of AnimalTableController.m and uncomment these two methods in the Helpers category. You can think of -retrieveNextPageWithCompletion: as a network call, while -insertNewRowsInTableNode is the standard method for adding new items to a table.
Then add the following line to -viewDidLoad:.
self.tableNode.view.leadingScreensForBatching = 1.0; // overriding default of 2.0 Setting leadingScreensForBatching to 1.0 means that you want the new packages to be loaded each time the user scrolls to the point where only 1 item remains to the end of the table.
Now add the following method to the implementation of the Delegate category:
- (BOOL)shouldBatchFetchForTableNode:(ASTableNode *)tableNode { return YES; } This method is needed to tell the table whether it should continue to execute queries in order to download new packages. If you know that there is nothing more to download, return NO .
If you really want this table to scroll endlessly, simply return YES to ensure that new packages will always be requested.
Then also add:
- (void)tableNode:(ASTableNode *)tableNode willBeginBatchFetchWithContext:(ASBatchContext *)context { //1 [self retrieveNextPageWithCompletion:^(NSArray *animals) { //2 [self insertNewRowsInTableNode:animals]; //3 [context completeBatchFetching:YES]; }]; } This method will be called when the user approaches the end of the table, and the table will receive YES from -shouldBatchFetchForTableNode:.
Let's take a look at this section:
- First, you must complete the query to display the next batch of animals. This is usually an array of objects returned by the API.
- After completion, refresh the table with the newly uploaded data.
- Finally, make sure to call -completeBatchFetching: with YES . Requests for new data will not be fulfilled until the previous one has been completed.
Compile, run and start scrolling. Do not stop until you see another bird. They are endless.
Smart preloading
Have you ever tried to load content in advance in an application using scrollView or PageViewController? Perhaps you worked on a full-screen photo gallery and wanted the next few images to be uploaded and waiting for, and users rarely saw the placeholder.

When you work on a system like this, you begin to realize that there are many things that are worth thinking about.
- How much memory do you occupy?
- How much information do you need to upload in advance?
- When do you decide to output an answer to users?
And the task becomes much more difficult when you have content of different sizes. Do you have a PageViewController with a CollectionView inside each controller? Now you need to think about how to dynamically load content in both directions ... And customize the display for each device you support.

In each of the container classes there is a concept of the interface state for each of the nodes. At any time, a node can be in any combination:

- Preload Range: Usually the far range from the visible. When content for each subnode in a cell, such as ASNetworkImageNode, must be loaded from an external source; from the API or local cache, for example. This contrasts with the batch sampling, which should be used to select model objects representing the cells themselves.
- Display Range: Text drawing and image decoding take place here.
- Visible Range: In this range, a node on the screen occupies at least one pixel.
These ranges also work with the screenfuls metric and can be easily configured using the ASRangeTuningParameters property.
For example, you use ASNetworkImageNode to display an image on each gallery page. Each node requests data from the network when it enters the preload range, and decodes the image that was extracted when it enters the display range.
In fact, you don’t have to constantly think about these bands if you don’t want to. Built-in components, such as ASNetworkImageNode and ASTextNode , make full use of them. This means that you will see the benefits by default.
Note : One thing that may not be obvious is that these ranges do not add up. Instead, they overlap and converge on the visible range. If you set the display and select both ranges on the same screen, they will appear at the same time. This data is usually needed for display on the screen, so usually the range of the prefetch must be slightly larger so that the nodes are ready to start the display process when they get to this range.
In general, the leading side of the range is larger than the end. When the user changes the direction of the scroll, the sizes of the ranges also change to prepare for the content to which the user is moving.
Node interface in callback state
Perhaps you wonder how these bands work correctly? Well, that was asked.
Each node in the system has an interfaceState property, which is a type of “bit field” (NS_OPTION) ASInterfaceState . As the ASCellNode moves through the scroll view, which is controlled by the ASRangeController , each subnode updates the interfaceState property. This means that even the deepest nodes in the tree can react to interfaceState changes.
Fortunately, you rarely have to tinker with the interfaceState node bits directly. Most often, you just want to respond to the transition of a node to a certain state or exit from it. This is where the interface status callbacks appear.
The name of the nodes
To see how a node goes from one state to another, it is helpful to give it a name. This way, you can observe how each node loads its data, displays its contents, appears on the screen, and then does it all the other way around when it disappears.
Go back to -tableNode: nodeBlockForRowAtIndexPath: and find the comment that says:
// - … Below, add the following line to give each cell a debugName .
cardNode.debugName = [NSString stringWithFormat:@«cell %zd», indexPath.row]; Now you can track the movement of cells across ranges.
Cell monitoring
Go to CardNode_InterfaceCallbacks.m . Here you will find six methods that you can use to track the progress of a node through various ranges. Uncomment them, then compile and run. Make sure your console is visible in Xcode, and then slowly scroll. See how different cells react to their changing states.

Note : In most cases, the only way to change the ASInterfaceState that you need is the -didEnterVisibleState or -didExitVisibleState method .
The main implementation is hidden from you. To check what you can do by integrating the Preload and Display states, look at the code in ASNetworkImageNode . All network image nodes will automatically extract and decode their contents, as well as free up memory, without the need to move a finger.
(Intelligent Preloading) 2
In version 2.0, the concept of intelligent preloading of content in several directions was introduced. Let's say you have a vertically scrollable table view, and at some point a cell appears on the screen containing a horizontal view of the collection.
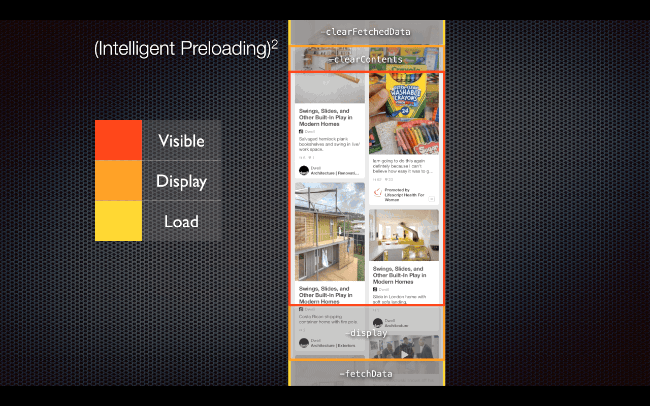
Although this collection is now technically in the visible area, you would not want to download the entire collection in advance. Instead, both scrolls have their own ASRangeController with separate adjustable range settings.
Enter the second dimension
Now that you have completed AnimalTableController , you can use it as a page in ASPagerNode .
The view controller that you will use to host this pager is already in the project, so the first thing you need to do is go to AppDelegate.m .
Find -installRootViewController and replace:
AnimalTableController *vc = [[AnimalTableController alloc] initWithAnimals:[RainforestCardInfo allAnimals]]; on:
AnimalPagerController *vc = [[AnimalPagerController alloc] init]; Then go to AnimalPagerController.m and add the following lines to the initializer, just before the return statement. All you need to do is create a new pager and set its dataSource as this view controller.
_pagerNode = [[ASPagerNode alloc] init]; _pagerNode.dataSource = self; The pager node is actually a subclass of ASCollectionNode , preconfigured for use in the same way as a UIPageViewController . Well, what to think about the API is actually a bit simpler than about the UIPageViewController .
The next thing you need to do is implement the methods of the pager data source. Navigate to the implementation of the ASPagerDataSource category at the end of this file.
First tell the pager that the number of its pages is equal to the number of animal arrays, in this case, three, replacing the existing -numberOfPagesInPagerNode:.
- (NSInteger)numberOfPagesInPagerNode:(ASPagerNode *)pagerNode { return self.animals.count; } Then you need to implement -pagerNode: nodeAtIndex: similar to the node's data source method that you previously implemented for ASTableNode .
- (ASCellNode *)pagerNode:(ASPagerNode *)pagerNode nodeAtIndex:(NSInteger)index { //1 CGSize pagerNodeSize = pagerNode.bounds.size; NSArray *animals = self.animals[index]; //2 ASCellNode *node = [[ASCellNode alloc] initWithViewControllerBlock:^{ return [[AnimalTableController alloc] initWithAnimals:animals]; } didLoadBlock:nil]; return node; } Let's take a look at this section:
- Although this version is not a block version, it is good practice to first capture your data model.
- This time you are using the powerful initializer -initWithViewControllerBlock:. All you need to do is return a block that returns the controller to the table node that you fixed earlier, and the managed view will automatically be used as the view for each page.
After adding this method, you will have a fully functioning pager whose cells will be generated from the previously created tableNodeController . It fully comes with a two-dimensional preload, based on the user’s vertical and horizontal scrolling!

Where to go next?
The full version of the project for this tutorial on AsyncDisplayKit 2.0 can be downloaded here . We also have an option on Swift.
Translation of part 2 of this project will be ready soon. It will let you know about the new, powerful layout system introduced in AsyncDisplayKit 2.0.
You can do a little research before moving on: open the AsyncDisplayKit home page and read some of the documentation. Scott Goodson (Scott Goodson, original author AsyncDisplayKit) also has a few lectures that may interest you, the newest of which give a good overview of several large image problems that the framework is trying to solve.
You might be interested in Building Paper . Although at the time all this was not an open source, and much had changed, it was rather interesting to see how it all began.
Finally, the AsyncDisplayKit community welcomes newcomers. There is a publicly accessible channel on Slack that anyone can join and ask questions.
We hope you enjoyed this tutorial, let us know if you have any questions or comments by joining the discussion on the forum.
From the translator:
In April, the developers renamed the framework. Now it is called Texture. Read more here .
PS Special thanks to BeataSunshine and evgen for their help in translating the article.
')
Source: https://habr.com/ru/post/329002/
All Articles