Creating a Web API application using. NET Core + MongoDB. NET Driver
As you already know, MongoDB is one of the most developed, open-source NoSQL solutions, which is a document-oriented database, is cross-platform, and also provides high performance, availability and ease of scaling.
In modern open-source web applications, the use of NoSQL solutions has gained popularity due to their non-relational behavior. In this article, step by step, we will implement a simple ASP.NET Core Web API “notebook” application that will support CRUD operations applicable to the collection in MongoDB.
The choice of DBMS depends primarily on which application you want to create. Those. The DB is chosen not by the developers, but by the product itself. MongoDB is an excellent choice for working with documents. A striking example of such an application would be a blog or social network, where each author can create entries, add images, videos and music to them. Other users can comment on these entries, as well as evaluate them using, for example, like or star ratings. But how will you store this data? If you are familiar with relational DBMS, you can imagine what a similar scheme will look like:
')
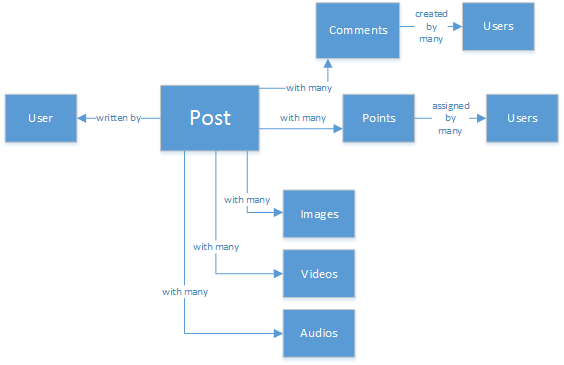
Let's imagine the structure of a separate record, as well as the way it is displayed. In order to get a record and its associated data (images, audio, video, comments, ratings, user information, etc.), we need to perform a query on about eight table joints. Now imagine what stream of records (dynamically loaded and transmitted to thousands of clients) to process, and you will understand that thousands of queries to a large number of table joints are needed to accomplish this task. Of course, we can use a relational database, such as SQL Server, for storing data. SQL supports dynamic JSON data . But there is an option that simplifies the approach in this particular scenario - this is the NoSQL database. When you use one document, as shown below, storing it in MongoDB, you can improve the performance of your application and get the entire record with a single query without joining tables. This is a simpler and more efficient way.
In addition, the use of MongoDB allows developers to reduce consistency by creating applications with high availability and low latency.
Please note that it is not entirely correct to call MongoDB a replacement for relational databases, this is rather an alternative. This tool can do the same thing that many others can do - something is better, but something is not.
The structureless collection architecture in MongoDB does not oblige developers to define and maintain schemas at the data level, providing fast iteration when developing a product. Do you need to save the object? Serialize it into BSON and send it to MongoDB. There is no mapping of properties or types.
This simplicity can definitely suit you as the ultimate developer.
Prior to version 1.8, MongoDB was considered unreliable in terms of storage, but this version added a journaling mechanism, which is already enabled by default, but it can be disabled in the configuration file. Despite a slight increase in performance, with the journaling mechanism disabled, there is a certain risk of data loss.
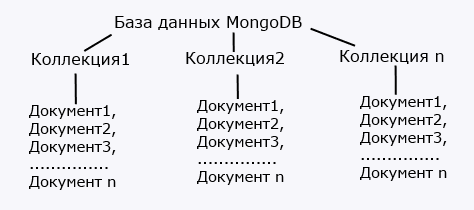
MongoDB uses BSON (Binary JavaScript Object Notation) documents and database schema for storing data, which is a superset of the JSON format, including optional regular expressions, binary data and dates. The schema in MongoDB is called a collection , and the entry in this schema is called a document .
ASP.NET Core Web API has a great advantage because it can be used as an HTTP service and can be used by any client application, starting from desktop computers, ending with mobile phones, and can also be installed on Windows, MacOS and Linux.
Note : Currently, MongoDB is not supported in EF Core. There is little chance that the upcoming EF Core versions will support MongoDB (based on comments from Rowan Miller), but this functionality can be implemented in the future.
Below are all the necessary components to work:
After we installed MongoDB , we need to configure access to the database, and also specify where the data is located. To do this, create the file mongod.cfg . This file will contain the path to the folder with the MongoDB server data, as well as the MongoDB log file, initially without any authentication.
Note: by default, MongoDB tries to initialize the database directory at the address
Then we run the following command on the command line (it is necessary to update the addresses according to the location of the configuration file and the location of the folder where MongoDB is installed).
This command will launch the MongoDB server, pointing to the configuration file already created.
Note: Specifying the absolute path to a binary file is not a very good tone. For intensive use of this address, it is proposed to add the path to the directory to the PATH system variable.
After the server is started (you can see the details in the log file), run the mongo.exe client from the command line:
Note: the client may issue a warning that access control is not configured (we will fix it later):
Create an administrator account by running the following commands in the console client:
Then we stop the server and update the mongod.cfg configuration file, including the security setting:
From now on, we connect to MongoDB using the admin user.
Note : It is recommended not to use the superuser role (in our case, the administrator) for normal operations, but in order to keep it simple, we will still use only one user.
The finished implementation can be downloaded from GitHub .
Launch Visual Studio, File → New Project → .Net Core → ASP.NET Core Web Application.
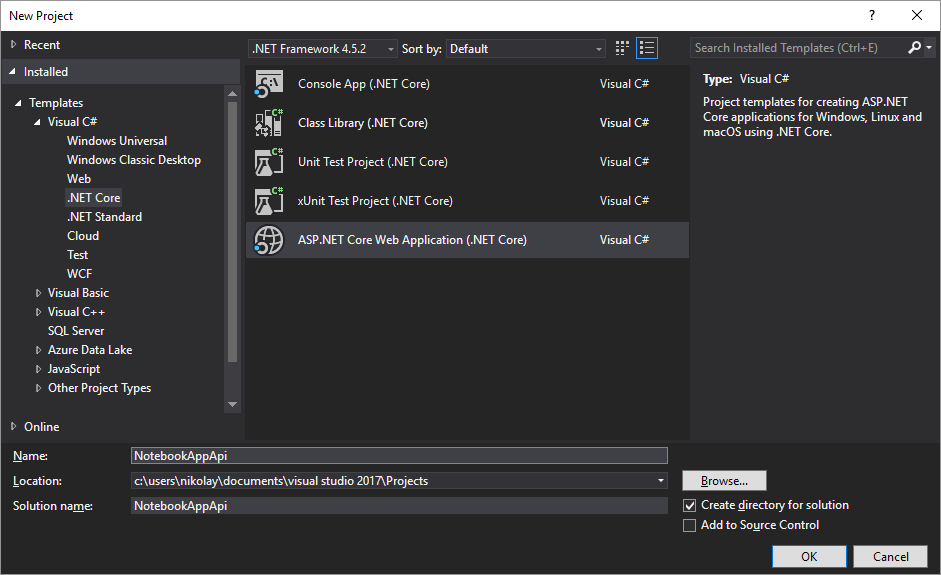
Then select the Web API template, OK.

There are several supported configuration file formats (JSON, XML or ini), and by default the Web API project template is deployed with a JSON format file. Update the file AppSettings.json, adding to it information about connecting to the database.
Implementing a constructor (Constructor Injection) is one of the most common approaches to implementing dependency (Dependency Injection). ASP.NET Core uses the constructor implementation in its solution, so we will also use it. To dump the database connection parameters, we will add a new class of settings.
We modify the ConfigureSettings method in the Startup.cs file to add our settings to the access model to the parameters. In the future, we will use the IOptions interface to access the settings.
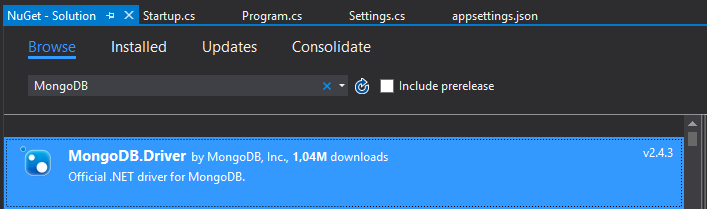
In order to connect to MongoDB, let's add a package called MongoDB.Driver to the Nuget project. This is the official .NET driver with full support for ASP.NET Core applications.
The class model (POCO) that describes each note in our address book is shown below.
Implement the Unit of Work pattern in the NoteContext class:
Using the repository interface, we implement the functionality necessary to manage our notes. They will also use dependency injection (DI) for easy access to the application (for example, a controller partition).
Access to the database will be asynchronous. We use a driver not lower than version 2.0, in which the full asynchronous stack was added. As an example: to get all the notes, we make an asynchronous request:
Below is the complete implementation for basic CRUD operations:
To access the NoteRepository using the DI model, add a line to the ConfigureServices:
Where:
Below is the code of the main controller of our Web API application, where all CRUD methods that are available to third-party applications are implemented.
Note : the Get method is marked with the NoCache attribute to ensure that web clients always make a request to the server.
In this part, we implement a controller designed to perform administrative tasks solely for the purpose of demonstration (we use it to initialize the database with some dummy data).
We implement one Init method, which will create and fill the database with all the necessary test data. The method will be available at http: // localhost: 5000 / api / system / init or http: // localhost: 53617 / api / system / init (in case we use IIS). In practice, such a controller could evolve into a full "admin".
In order to display the results of queries to the server when the project is launched, we will update the file LaunchSettings.json

The following is an example of a setting in which the default URL is run with all notes displayed (api / notes).
Before starting the project, make sure that MongoDB is running (as a Windows service, or from the command line, as was done above).
When you first start the application, we will be redirected to the page with all the records, but since we have not yet started the initialization process, this page will display an empty set.
Run the command to initialize the database and fill it with test data by going to the address .
Then, go back to the application's start page and see that the data has appeared:

Using Robomongo, you can check for database entries. Having connected to the database using credentials, we can see all 4 records.
In C # 5.0, the async and await keywords were introduced that simplify the use of the TPL (Task Parallel Library). We can simply use a try / catch block to catch exceptions. Public async Task <IEnumerable> GetAllNotes ()
So we can handle errors in asynchronous Task instances, and you can throw an exception above for further processing.
Initially, in the sample project, the update function worked on the principle of selective property update.
Using the ReplaceOneAsync method, we can update the document completely. The IsUpsert parameter indicates that if there is no document in the database, it must be created.
To work with applications running on different domains, our solution on the ASP.NET Web API needs to allow the processing of cross-domain requests (CORS). For example, Angular 2, before the main request, first performs a pre-check request, which checks whether cross-domain requests are allowed. First, let's register the CORS functionality in the Startup.cs file's ConfigureServices method:
Then enable the policy globally for each request in the application, by calling the app.useCors method in the Configure method:
A MongoDB document can also store binary files, but the maximum document size in MongoDB 2.x is 16 MB (in earlier versions, only 4 MB). Therefore, to store large amounts of information, in particular large files, MongoDB uses the GridFS system. GridFS is an arbitrary file storage agreement in MongoDB, supported by all official drivers. Files in the database are stored in two collections, commonly called “fs.files” and “fs.chunks”. Each downloaded file has one document in the “fs.files” collection, containing information about the file and many document pieces (chunks) in the “fs.chunks” collection, which stores the contents of the file in parts.
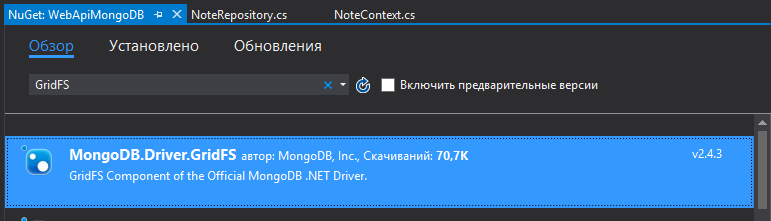
First we need to add GridFS components for the driver via NuGet.
Then we need to add an object of class GridFSBucket to our context. GridFSBucket is a key object for working with GridFS, which is a kind of combination of the fs.files and fs.chunks collections and is a “bucket” (Bucket) in which all our files can be stored.
You can also specify additional parameters. For example, the name of the collection (instead of the prefix “fs” will be your name) and the size of one chunk.
And add the ability to use our GridFSBucket instance:
Or you can use a shorter entry:
Now we will update our functionality. Add a method to add a file to the database in NoteRepository.cs
Note: You should always use the GridFSBucket object to interact with the GridFS collections ("fs.chunks" and "fs.files") instead of directly accessing these collections.
Add a method signature to INoteRepository.cs:
Update NotesController.cs to add the POST method itself:
Note: For correct processing of data transmitted with the header Content-Type: multipart / form-data (so we will transfer files) you need to add support for this type of data. To do this, we add the corresponding Consumes attribute for the NotesController controller class:
Obtaining information about the file, we consider the example of a simple method, which by file Id will return its name:
To test the Web API will use Postman . For example, check the receipt of the record by Id (api / notes / 2) Select the type of GET request, then enter the URL (http: // localhost: 53617 / api / notes / 2) and add a header (Content-Type: application / json). After sending the request, we get a response in the form of information about the record with Id = 2.
Change the contents of this record. To do this, change the type of the request to PUT, then go to the Body> Raw tab and set the new content of the record.

After that, go to RoboMongo and make sure that the value of the record is updated.
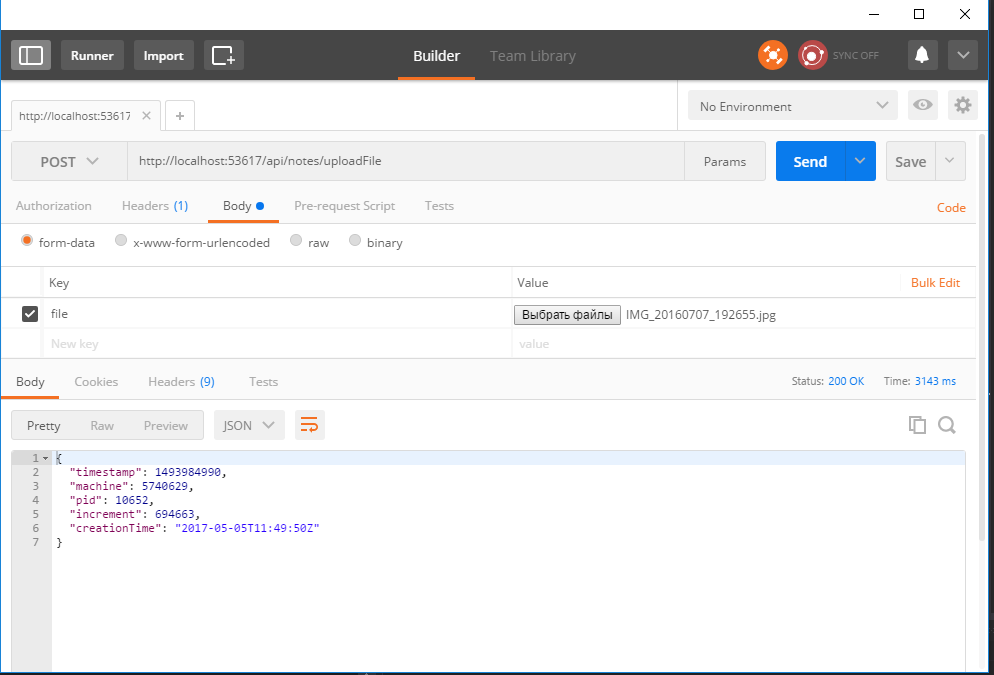
Check the operation of the GridFS mechanism. To do this, change the Content-Type to multipart / form-data, set the URL as localhost : 53617 / api / notes / uploadFile and in the Body> form-data section add and send the file. In response, we received information about this file:
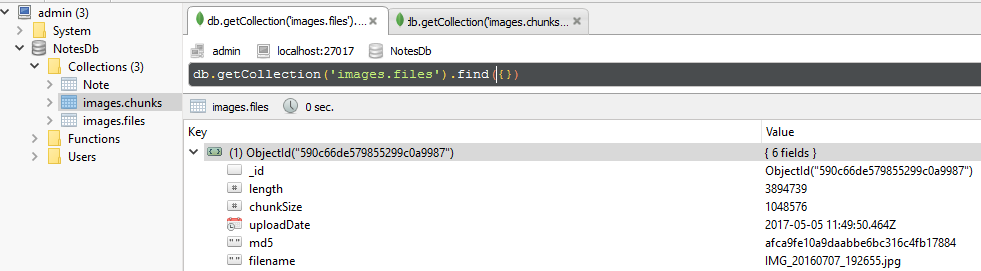
After that, the corresponding entries were created for this file in the collections “images.files” and “images.chunks”.
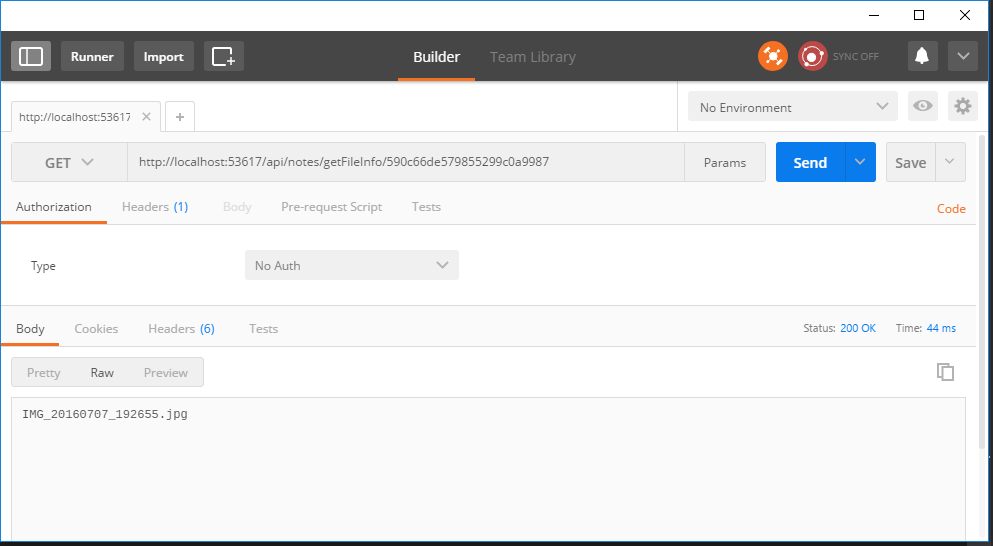
Let's check our simple method of getting the file name by its ID. To do this, we make an ordinary GET request with the transfer of the file ID in the address bar.
The fact that the MongoDB team pays enough attention to the convenience and usefulness of the developers, conducting training courses , taking an active interest in community opinion and promptly solving emerging problems (the project is written not only by volunteers, but also by a company of full-time people), makes it possible to say that MongoDB and will continue to maintain an excellent rate of introduction of new opportunities and improve.
And the fact that MongoDB can be deployed not only on Windows, together with a sufficient driver maturity and Microsoft’s course on .NET Core support on Linux and MacOS, is a tangible advantage, for example, if you want to deploy your solution completely on Linux. However, not to mention the open testing of SQL Server 2017, this solution can also be deployed on Linux. And the choice of the approach that you need to use when developing a project: NoSQL or RDBMS - depends mainly on the specifics of your application. MongoDB is ideal where all data manipulation scenarios fit in and will fit in the future with key samples and receiving the entire collection. If there is no such confidence, then it is better to take RDBMS immediately.
Sources:
In modern open-source web applications, the use of NoSQL solutions has gained popularity due to their non-relational behavior. In this article, step by step, we will implement a simple ASP.NET Core Web API “notebook” application that will support CRUD operations applicable to the collection in MongoDB.
Why MongoDB
The choice of DBMS depends primarily on which application you want to create. Those. The DB is chosen not by the developers, but by the product itself. MongoDB is an excellent choice for working with documents. A striking example of such an application would be a blog or social network, where each author can create entries, add images, videos and music to them. Other users can comment on these entries, as well as evaluate them using, for example, like or star ratings. But how will you store this data? If you are familiar with relational DBMS, you can imagine what a similar scheme will look like:
')
Let's imagine the structure of a separate record, as well as the way it is displayed. In order to get a record and its associated data (images, audio, video, comments, ratings, user information, etc.), we need to perform a query on about eight table joints. Now imagine what stream of records (dynamically loaded and transmitted to thousands of clients) to process, and you will understand that thousands of queries to a large number of table joints are needed to accomplish this task. Of course, we can use a relational database, such as SQL Server, for storing data. SQL supports dynamic JSON data . But there is an option that simplifies the approach in this particular scenario - this is the NoSQL database. When you use one document, as shown below, storing it in MongoDB, you can improve the performance of your application and get the entire record with a single query without joining tables. This is a simpler and more efficient way.
{ "id":"ew12-res2-234e-544f", "title":"post title", "date":"2016-01-01", "body":"this is an awesome post stored on NoSQL", "createdBy":"User", "images":["http://example.com/myfirstimage.png","http://example.com/mysecondimage.png"], "videos":[ {"url":"http://example.com/myfirstvideo.mp4", "title":"The first video"}, {"url":"http://example.com/mysecondvideo.mp4", "title":"The second video"} ], "audios":[ {"url":"http://example.com/myfirstaudio.mp3", "title":"The first audio"}, {"url":"http://example.com/mysecondaudio.mp3", "title":"The second audio"} ] } In addition, the use of MongoDB allows developers to reduce consistency by creating applications with high availability and low latency.
Please note that it is not entirely correct to call MongoDB a replacement for relational databases, this is rather an alternative. This tool can do the same thing that many others can do - something is better, but something is not.
The structureless collection architecture in MongoDB does not oblige developers to define and maintain schemas at the data level, providing fast iteration when developing a product. Do you need to save the object? Serialize it into BSON and send it to MongoDB. There is no mapping of properties or types.
This simplicity can definitely suit you as the ultimate developer.
Prior to version 1.8, MongoDB was considered unreliable in terms of storage, but this version added a journaling mechanism, which is already enabled by default, but it can be disabled in the configuration file. Despite a slight increase in performance, with the journaling mechanism disabled, there is a certain risk of data loss.
Technology stack
MongoDB uses BSON (Binary JavaScript Object Notation) documents and database schema for storing data, which is a superset of the JSON format, including optional regular expressions, binary data and dates. The schema in MongoDB is called a collection , and the entry in this schema is called a document .
ASP.NET Core Web API has a great advantage because it can be used as an HTTP service and can be used by any client application, starting from desktop computers, ending with mobile phones, and can also be installed on Windows, MacOS and Linux.
Note : Currently, MongoDB is not supported in EF Core. There is little chance that the upcoming EF Core versions will support MongoDB (based on comments from Rowan Miller), but this functionality can be implemented in the future.
Below are all the necessary components to work:
- Visual Studio Community 2017 , including .NET Core
- MongoDB , version 3.4
- Robomongo - MongoDB native control
- Postman - Web API Testing Tool
MongoDB configuration
After we installed MongoDB , we need to configure access to the database, and also specify where the data is located. To do this, create the file mongod.cfg . This file will contain the path to the folder with the MongoDB server data, as well as the MongoDB log file, initially without any authentication.
systemLog: destination: file path: "C:\\data\\db\\log\\mongo.log" logAppend: true storage: dbPath: "C:\\data\\db" Note: by default, MongoDB tries to initialize the database directory at the address
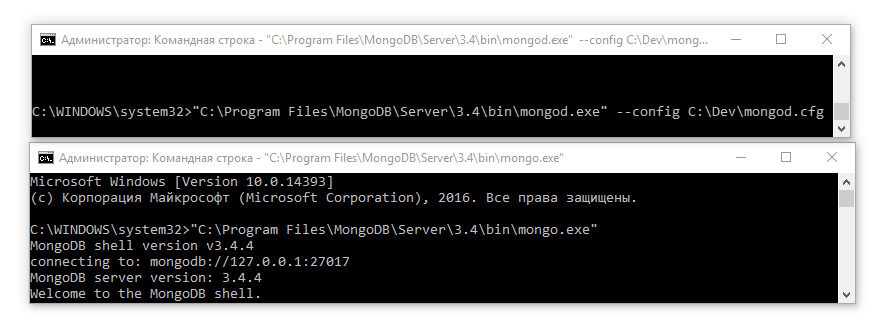
"C:\\data\\db" and gives an error if it cannot determine this address.Then we run the following command on the command line (it is necessary to update the addresses according to the location of the configuration file and the location of the folder where MongoDB is installed).
"C:\Program Files\MongoDB\Server\3.4\bin\mongod.exe" --config C:\Dev\mongod.cfgThis command will launch the MongoDB server, pointing to the configuration file already created.
Note: Specifying the absolute path to a binary file is not a very good tone. For intensive use of this address, it is proposed to add the path to the directory to the PATH system variable.
After the server is started (you can see the details in the log file), run the mongo.exe client from the command line:
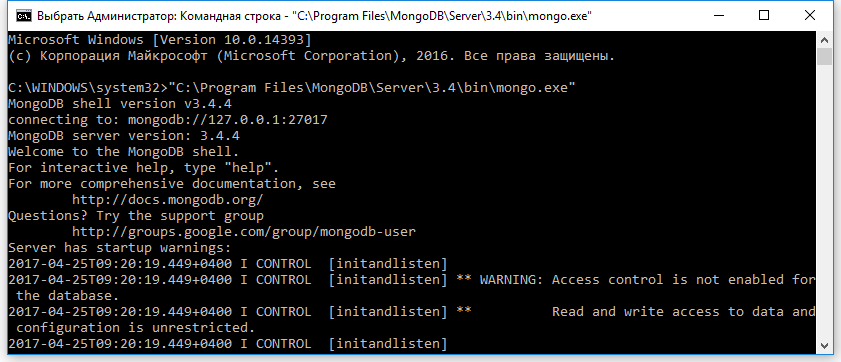
Note: the client may issue a warning that access control is not configured (we will fix it later):
Create an administrator account by running the following commands in the console client:
use admin db.createUser( { user: "admin", pwd: "abc123!", roles: [ { role: "root", db: "admin" } ] } ); exit; Then we stop the server and update the mongod.cfg configuration file, including the security setting:
systemLog: destination: file path: "C:\\data\\db\\log\\mongo.log" logAppend: true storage: dbPath: "C:\\data\\db" security: authorization: enabled From now on, we connect to MongoDB using the admin user.
Note : It is recommended not to use the superuser role (in our case, the administrator) for normal operations, but in order to keep it simple, we will still use only one user.
Creating an ASP.NET Web API Project
The finished implementation can be downloaded from GitHub .
Launch Visual Studio, File → New Project → .Net Core → ASP.NET Core Web Application.
Then select the Web API template, OK.
Project configuration
There are several supported configuration file formats (JSON, XML or ini), and by default the Web API project template is deployed with a JSON format file. Update the file AppSettings.json, adding to it information about connecting to the database.
{ "Logging": { "IncludeScopes": false, "LogLevel": { "Default": "Debug", "Microsoft": "Information", "System": "Information" } }, "MongoConnection": { "ConnectionString": "mongodb://admin:abc123!@localhost", "Database": "NotesDb" } } Dependency injection and parameter model
Implementing a constructor (Constructor Injection) is one of the most common approaches to implementing dependency (Dependency Injection). ASP.NET Core uses the constructor implementation in its solution, so we will also use it. To dump the database connection parameters, we will add a new class of settings.
namespace NotebookAppApi.Model { public class Settings { public string ConnectionString; public string Database; } } We modify the ConfigureSettings method in the Startup.cs file to add our settings to the access model to the parameters. In the future, we will use the IOptions interface to access the settings.
public void ConfigureServices(IServiceCollection services) { // Add framework services. services.AddMvc(); services.Configure<Settings>(options => { options.ConnectionString = Configuration.GetSection("MongoConnection:ConnectionString").Value; options.Database = Configuration.GetSection("MongoConnection:Database").Value; }); } MongoDB .NET Driver
In order to connect to MongoDB, let's add a package called MongoDB.Driver to the Nuget project. This is the official .NET driver with full support for ASP.NET Core applications.
Model
The class model (POCO) that describes each note in our address book is shown below.
using System; using MongoDB.Bson.Serialization.Attributes; namespace NotebookAppApi.Model { public class Note { [BsonId] public string Id { get; set; } public string Body { get; set; } = string.Empty; public DateTime UpdatedOn { get; set; } = DateTime.Now; public DateTime CreatedOn { get; set; } = DateTime.Now; public int UserId { get; set; } = 0; } } Database context
Implement the Unit of Work pattern in the NoteContext class:
public class NoteContext { private readonly IMongoDatabase _database = null; public NoteContext(IOptions settings) { var client = new MongoClient(settings.Value.ConnectionString); if (client != null) _database = client.GetDatabase(settings.Value.Database); } public IMongoCollection Notes { get { return _database.GetCollection("Note"); } } } Repository
Using the repository interface, we implement the functionality necessary to manage our notes. They will also use dependency injection (DI) for easy access to the application (for example, a controller partition).
public interface INoteRepository { Task<IEnumerable<Note>> GetAllNotes(); Task<Note> GetNote(string id); Task AddNote(Note item); Task<DeleteResult> RemoveNote(string id); // (body) Task<UpdateResult> UpdateNote(string id, string body); } Access to the database will be asynchronous. We use a driver not lower than version 2.0, in which the full asynchronous stack was added. As an example: to get all the notes, we make an asynchronous request:
public async Task<IEnumerable<Note>> GetAllNotes() { return await _context.Notes.Find(_ => true).ToListAsync(); } Below is the complete implementation for basic CRUD operations:
namespace NotebookAppApi.Data { public class NoteRepository : INoteRepository { private readonly NoteContext _context = null; public NoteRepository(IOptions<Settings> settings) { _context = new NoteContext(settings); } public async Task<IEnumerable<Note>> GetAllNotes() { return await _context.Notes.Find(_ => true).ToListAsync(); } public async Task<Note> GetNote(string id) { var filter = Builders<Note>.Filter.Eq("Id", id); return await _context.Notes .Find(filter) .FirstOrDefaultAsync(); } public async Task AddNote(Note item) { await _context.Notes.InsertOneAsync(item); } public async Task<DeleteResult> RemoveNote(string id) { return await _context.Notes.DeleteOneAsync( Builders<Note>.Filter.Eq("Id", id)); } public async Task<UpdateResult> UpdateNote(string id, string body) { var filter = Builders<Note>.Filter.Eq(s => s.Id, id); var update = Builders<Note>.Update .Set(s => s.Body, body) .CurrentDate(s => s.UpdatedOn); return await _context.Notes.UpdateOneAsync(filter, update); } } } To access the NoteRepository using the DI model, add a line to the ConfigureServices:
services.AddTransient<INoteRepository, NoteRepository>(); Where:
- AddTransient means that the repository is recreated every time.
- AddScoped - only once per request.
- AddSingleton - once at the first request. Each subsequent request uses an instance that was created for the first time.
Main controller
Below is the code of the main controller of our Web API application, where all CRUD methods that are available to third-party applications are implemented.
Note : the Get method is marked with the NoCache attribute to ensure that web clients always make a request to the server.
namespace NotebookAppApi.Controllers { [Produces("application/json")] [Route("api/[controller]")] public class NotesController : Controller { private readonly INoteRepository _noteRepository; public NotesController(INoteRepository noteRepository) { _noteRepository = noteRepository; } [NoCache] [HttpGet] public Task<IEnumerable<Note>> Get() { return GetNoteInternal(); } private async Task<IEnumerable<Note>> GetNoteInternal() { return await _noteRepository.GetAllNotes(); } // GET api/notes/5 [HttpGet("{id}")] public Task<Note> Get(string id) { return GetNoteByIdInternal(id); } private async Task<Note> GetNoteByIdInternal(string id) { return await _noteRepository.GetNote(id) ?? new Note(); } // POST api/notes [HttpPost] public void Post([FromBody]string value) { _noteRepository.AddNote(new Note() { Body = value, CreatedOn = DateTime.Now, UpdatedOn = DateTime.Now }); } // PUT api/notes/5 [HttpPut("{id}")] public void Put(string id, [FromBody]string value) { _noteRepository.UpdateNoteDocument(id, value); } // DELETE api/notes/23243423 [HttpDelete("{id}")] public void Delete(string id) { _noteRepository.RemoveNote(id); } } } Data initialization
In this part, we implement a controller designed to perform administrative tasks solely for the purpose of demonstration (we use it to initialize the database with some dummy data).
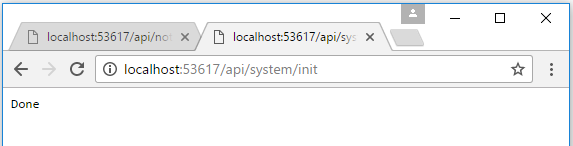
We implement one Init method, which will create and fill the database with all the necessary test data. The method will be available at http: // localhost: 5000 / api / system / init or http: // localhost: 53617 / api / system / init (in case we use IIS). In practice, such a controller could evolve into a full "admin".
[Route("api/[controller]")] public class SystemController : Controller { private readonly INoteRepository _noteRepository; public SystemController(INoteRepository noteRepository) { _noteRepository = noteRepository; } // Call an initialization - api/system/init [HttpGet("{setting}")] public string Get(string setting) { if (setting == "init") { _noteRepository.RemoveAllNotes(); _noteRepository.AddNote(new Note() { Id = "1", Body = "Test note 1", CreatedOn = DateTime.Now, UpdatedOn = DateTime.Now, UserId = 1 }); _noteRepository.AddNote(new Note() { Id = "2", Body = "Test note 2", CreatedOn = DateTime.Now, UpdatedOn = DateTime.Now, UserId = 1 }); _noteRepository.AddNote(new Note() { Id = "3", Body = "Test note 3", CreatedOn = DateTime.Now, UpdatedOn = DateTime.Now, UserId = 2 }); _noteRepository.AddNote(new Note() { Id = "4", Body = "Test note 4", CreatedOn = DateTime.Now, UpdatedOn = DateTime.Now, UserId = 2 }); return "Done"; } return "Unknown"; } } Launch settings
In order to display the results of queries to the server when the project is launched, we will update the file LaunchSettings.json
The following is an example of a setting in which the default URL is run with all notes displayed (api / notes).
{ "iisSettings": { "windowsAuthentication": false, "anonymousAuthentication": true, "iisExpress": { "applicationUrl": "http://localhost:53617/", "sslPort": 0 } }, "profiles": { "IIS Express": { "commandName": "IISExpress", "launchBrowser": true, "launchUrl": "api/notes", "environmentVariables": { "ASPNETCORE_ENVIRONMENT": "Development" } }, "NotebookAppApi": { "commandName": "Project", "launchBrowser": true, "launchUrl": "http://localhost:5000/api/notes", "environmentVariables": { "ASPNETCORE_ENVIRONMENT": "Development" } } } } Launch of the project
Before starting the project, make sure that MongoDB is running (as a Windows service, or from the command line, as was done above).
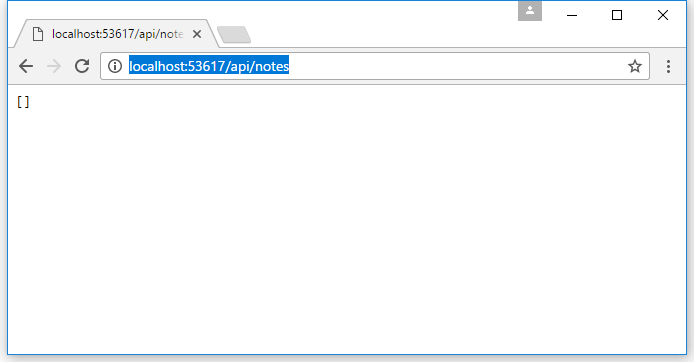
When you first start the application, we will be redirected to the page with all the records, but since we have not yet started the initialization process, this page will display an empty set.
Run the command to initialize the database and fill it with test data by going to the address .
Then, go back to the application's start page and see that the data has appeared:
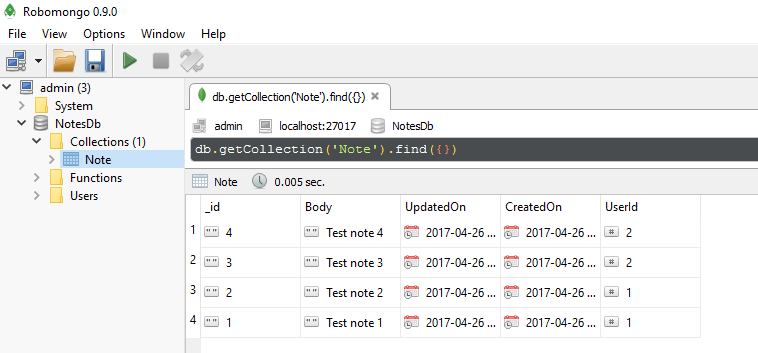
Using Robomongo
Using Robomongo, you can check for database entries. Having connected to the database using credentials, we can see all 4 records.
Exception Handling
In C # 5.0, the async and await keywords were introduced that simplify the use of the TPL (Task Parallel Library). We can simply use a try / catch block to catch exceptions. Public async Task <IEnumerable> GetAllNotes ()
{ try { return await _context.Notes.Find(_ => true).ToListAsync(); } catch (Exception ex) { // log or manage the exception throw; } } So we can handle errors in asynchronous Task instances, and you can throw an exception above for further processing.
Full MongoDB document update
Initially, in the sample project, the update function worked on the principle of selective property update.
Using the ReplaceOneAsync method, we can update the document completely. The IsUpsert parameter indicates that if there is no document in the database, it must be created.
public async Task<ReplaceOneResult> UpdateNote(string id, Note item) { return await _context.Notes .ReplaceOneAsync(n => n.Id.Equals(id) , item , new UpdateOptions { IsUpsert = true }); } Setting cross-domain queries (CORS)
To work with applications running on different domains, our solution on the ASP.NET Web API needs to allow the processing of cross-domain requests (CORS). For example, Angular 2, before the main request, first performs a pre-check request, which checks whether cross-domain requests are allowed. First, let's register the CORS functionality in the Startup.cs file's ConfigureServices method:
public void ConfigureServices(IServiceCollection services) { // Add service and create Policy with options services.AddCors(options => { options.AddPolicy("CorsPolicy", builder => builder.AllowAnyOrigin() .AllowAnyMethod() .AllowAnyHeader() .AllowCredentials()); }); // .... services.AddMvc(); } Then enable the policy globally for each request in the application, by calling the app.useCors method in the Configure method:
public void Configure(IApplicationBuilder app) { app.UseCors("CorsPolicy"); app.UseMvc(); } Work with files
A MongoDB document can also store binary files, but the maximum document size in MongoDB 2.x is 16 MB (in earlier versions, only 4 MB). Therefore, to store large amounts of information, in particular large files, MongoDB uses the GridFS system. GridFS is an arbitrary file storage agreement in MongoDB, supported by all official drivers. Files in the database are stored in two collections, commonly called “fs.files” and “fs.chunks”. Each downloaded file has one document in the “fs.files” collection, containing information about the file and many document pieces (chunks) in the “fs.chunks” collection, which stores the contents of the file in parts.
First we need to add GridFS components for the driver via NuGet.
Then we need to add an object of class GridFSBucket to our context. GridFSBucket is a key object for working with GridFS, which is a kind of combination of the fs.files and fs.chunks collections and is a “bucket” (Bucket) in which all our files can be stored.
_database = client.GetDatabase(settings.Value.Database); _bucket = new GridFSBucket(_database); You can also specify additional parameters. For example, the name of the collection (instead of the prefix “fs” will be your name) and the size of one chunk.
_database = client.GetDatabase(settings.Value.Database); var gridFSBucketOptions = new GridFSBucketOptions() { BucketName = "images", ChunkSizeBytes = 1048576, // 1 }; _bucket = new GridFSBucket(_database, gridFSBucketOptions); And add the ability to use our GridFSBucket instance:
public GridFSBucket Bucket { get { return _bucket; } } Or you can use a shorter entry:
public GridFSBucket Bucket => _bucket; Now we will update our functionality. Add a method to add a file to the database in NoteRepository.cs
public async Task<ObjectId> UploadFile(IFormFile file) { try { var stream = file.OpenReadStream(); var filename = file.FileName; return await _context.Bucket.UploadFromStreamAsync(filename, stream); } catch (Exception ex) { return new ObjectId(ex.ToString()); } } Note: You should always use the GridFSBucket object to interact with the GridFS collections ("fs.chunks" and "fs.files") instead of directly accessing these collections.
Add a method signature to INoteRepository.cs:
Task<ObjectId> UploadFile(IFormFile file); Update NotesController.cs to add the POST method itself:
// POST api/notes/uploadFile [HttpPost("uploadFile")] public async Task<ObjectId> UploadFile(IFormFile file) { return await _noteRepository.UploadFile(file); } Note: For correct processing of data transmitted with the header Content-Type: multipart / form-data (so we will transfer files) you need to add support for this type of data. To do this, we add the corresponding Consumes attribute for the NotesController controller class:
[Consumes("application/json", "multipart/form-data")] public class NotesController : Controller Obtaining information about the file, we consider the example of a simple method, which by file Id will return its name:
public async Task<String> GetFileInfo(string id) { GridFSFileInfo info = null; var objectId = new ObjectId(id); try { using (var stream = await _context.Bucket.OpenDownloadStreamAsync(objectId)) { info = stream.FileInfo; } return info.Filename; } catch (Exception) { return "Not Found"; } } Check our API
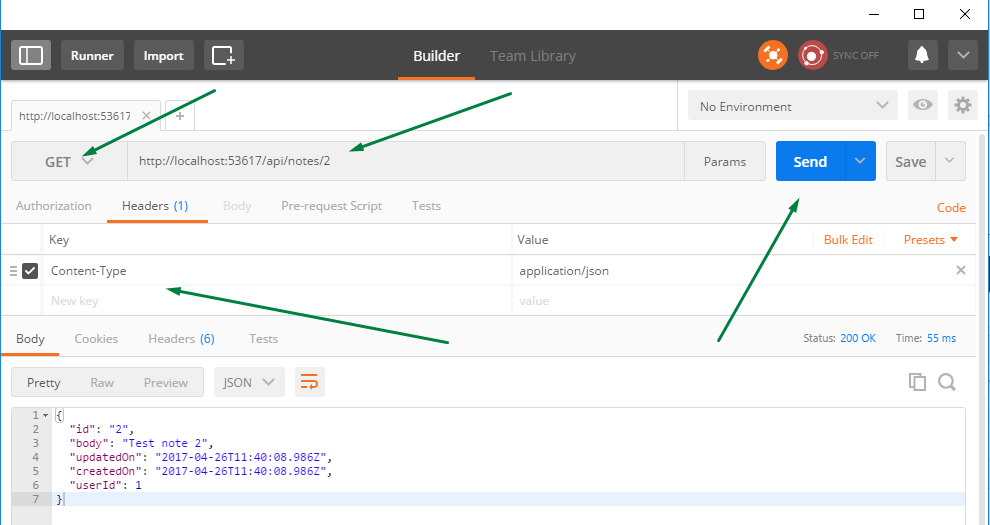
To test the Web API will use Postman . For example, check the receipt of the record by Id (api / notes / 2) Select the type of GET request, then enter the URL (http: // localhost: 53617 / api / notes / 2) and add a header (Content-Type: application / json). After sending the request, we get a response in the form of information about the record with Id = 2.
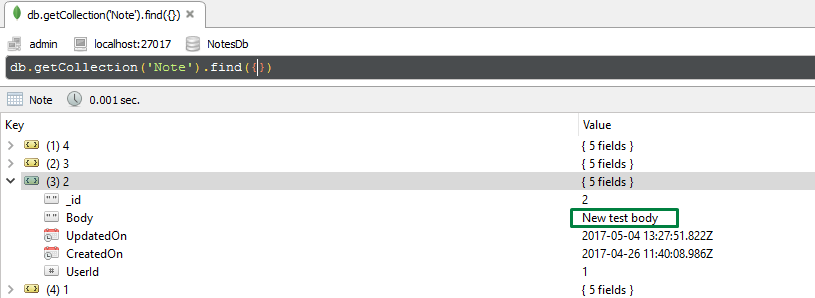
Change the contents of this record. To do this, change the type of the request to PUT, then go to the Body> Raw tab and set the new content of the record.
After that, go to RoboMongo and make sure that the value of the record is updated.
Check the operation of the GridFS mechanism. To do this, change the Content-Type to multipart / form-data, set the URL as localhost : 53617 / api / notes / uploadFile and in the Body> form-data section add and send the file. In response, we received information about this file:
After that, the corresponding entries were created for this file in the collections “images.files” and “images.chunks”.
Let's check our simple method of getting the file name by its ID. To do this, we make an ordinary GET request with the transfer of the file ID in the address bar.
Conclusion
The fact that the MongoDB team pays enough attention to the convenience and usefulness of the developers, conducting training courses , taking an active interest in community opinion and promptly solving emerging problems (the project is written not only by volunteers, but also by a company of full-time people), makes it possible to say that MongoDB and will continue to maintain an excellent rate of introduction of new opportunities and improve.
And the fact that MongoDB can be deployed not only on Windows, together with a sufficient driver maturity and Microsoft’s course on .NET Core support on Linux and MacOS, is a tangible advantage, for example, if you want to deploy your solution completely on Linux. However, not to mention the open testing of SQL Server 2017, this solution can also be deployed on Linux. And the choice of the approach that you need to use when developing a project: NoSQL or RDBMS - depends mainly on the specifics of your application. MongoDB is ideal where all data manipulation scenarios fit in and will fit in the future with key samples and receiving the entire collection. If there is no such confidence, then it is better to take RDBMS immediately.
Sources:
Source: https://habr.com/ru/post/328954/
All Articles