VoiceOver on iOS. How to make the application more convenient for people with visual impairment
Good day! My name is Ivan Smolin. I am an iOS developer in Touch Instinct.
Today I want to tell you what VoiceOver technology is in iOS. And how we made the football application more convenient for people who have visual impairment.
What is VoiceOver
This is a gesture-based way to read content on the screen of a mobile device. The technology allows users to control their mobile device without having to see the contents on the screen. It acts as an intermediary between the interface of the application and the user, pronounces aloud the details of the interface elements and actions in the application.
This feature is especially useful for people with visual impairment. VoiceOver makes it easy to use a mobile device for people with this type of problem. If this feature is activated, users can navigate the interface and understand what actions need to be done and what the results of these actions will be. [one]
How to use VoiceOver
When a user taps on any place on the screen, his mobile device (iPhone, iPad, Watch) pronounces aloud the element that is in that place.
- With double tapes on an element, it is selected;
- To scroll the content on the screen, you need to use three fingers instead of one;
- Dual tap with three fingers will enable or disable voice commands on the lock screen;
- Double tap with two fingers during the execution of an action will stop this action or launch it if it was not launched. For example, during a telephone conversation, a double tap with two fingers on the screen ends the call.
How to add voiceover support to your app
In most cases, your application will already work well with VoiceOver. You should pay tribute to Apple engineers - all standard components fully support VoiceOver technology. However, sometimes you still need to write some extra code to make your interface more convenient for people with visual impairments.
There are only two types of components for which you must implement VoiceOver support yourself:
- Graphic element: graph, chart, image.
- Difficult element, initially not adapted for people with visual impairments: for example, a table with abbreviated headings.
Since the first type is quite rare, we consider in detail the ways that will significantly improve the situation in the second case.
In other cases, you can only increase usability by using the additional features that VoiceOver provides us with.
Design
If the application initially provides support for assistive technologies, such as VoiceOver, then everything starts with design. There is a special guide on accessibility of web content and a guide on how to apply this standard for mobile platforms . These guides should at least be read before starting to draw a design.
After the layouts are drawn, additional information should be attached to them. It is not visible visually, but is of critical importance for people with visual impairment. In the case of VoiceOver, such information will be a text description of all elements of the screen with which the user can interact: see or click. It is important to describe their characteristics textually.
Example
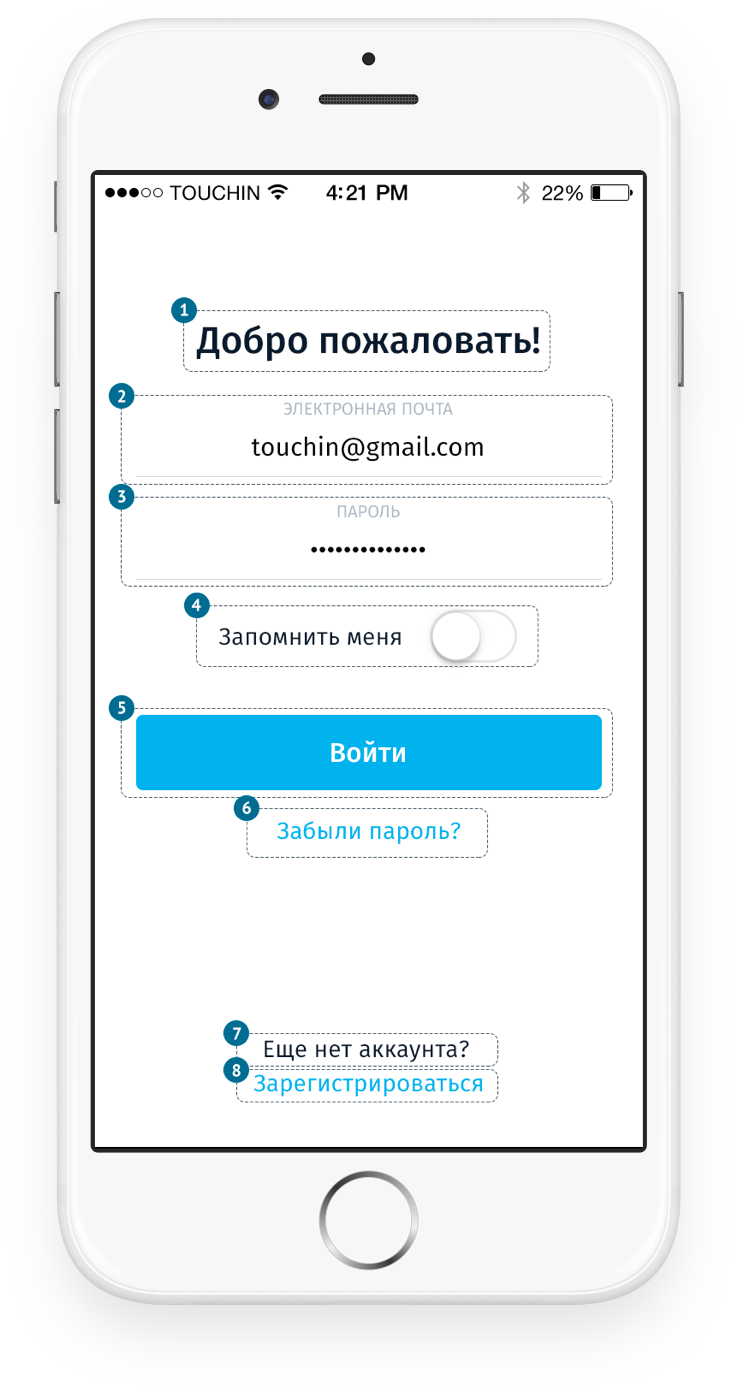
Toggle "remember me" (4) on the login page.
- Text to be read first: “Remember me”
- Item Type: "Switch"
- Current value: "Enable or Disable"
- Additional hint: “Double-click to remember login”
Development
After getting localized strings, you can begin development. First you need to read the special features programming guide . And then go deep into the UIAccessibility API.
UIAccessibility
This protocol contains a set of properties that describe user interface elements. Auxiliary applications use this information to help users with disabilities.
This protocol contains many properties that can be grouped by criteria:
Responsible for the item description:
- isAccessibilityElement - the property determines if this item will be available for selection and speaking through VoiceOver;
- accessibilityLabel - a brief description of the content in the element, such as the text on the button. This text will be read first;
accessibilityTraits is a combination (listing) of the characteristics possessed by an element. These characteristics help VoiceOver understand how to interact with an element. There are quite a lot of characteristics [ https://developer.apple.com/reference/objectivec/nsobject/1615202-accessibilitytraits ], we will list only some of them.
- Most commonly used:
- UIAccessibilityTraitButton - indicates that the element should be perceived as a button by VoiceOver;
- UIAccessibilityTraitLink - specifies that the element should be perceived as a link by VoiceOver;
- UIAccessibilityTraitImage - indicates that the element should be perceived by VoiceOver as an image;
- UIAccessibilityTraitSelected - indicates that the item is in the selected state.
- Rarely used, but interesting:
- UIAccessibilityTraitCausesPageTurn - indicates that the item should turn the page when VoiceOver finishes reading the text on it;
- UIAccessibilityTraitSummaryElement - indicates that the element provides a summary of what is displayed on the screen. For example, the current temperature in the Weather application;
- UIAccessibilityTraitStartsMediaSession - indicates that this element starts a media session when it is activated. For example, this silences the voice of VoiceOver when the user is recording audio.
- Most commonly used:
- accessibilityValue - the current value in the element. For example, it can be a value in a slider or text in a text field. This text will be read after the text assigned in accessibilityLabel;
- accessibilityHint is a brief description of what happens as soon as the user performs an action associated with this element. This text will be read after the text assigned in accessibilityValue, or after accessibilityLabel, if the value in accessibilityValue is not set;
- accessibilityLanguage is the language that should be used to pronounce text from the accessibilityLabel, accessibilityValue and accessibilityHint properties.
- Properties responsible for the spatial characteristics of the element:
- accessibilityActivationPoint - the activation point of the element on the screen;
- accessibilityFrame - the place on the screen where the item is located;
- accessibilityPath - the line of selection element instead of the usual rectangle.
- Layout properties:
- accessibilityElementsHidden - whether to hide the child "accessible" elements that are inside the parent.
- shouldGroupAccessibilityChildren - whether to group child "available" elements.
- accessibilityViewIsModal - whether to ignore other elements that are at the same hierarchy level with the current one.
- Properties responsible for navigation:
- accessibilityNavigationStyle - describes how to navigate through the child elements of the container.
If your application has accessibility issues for people with disabilities, then most often you only need to correctly override the first group of properties.
UIAccessibility example in FotMob
Now I will give an example of how, using the above described UIAccessibility properties, to solve quite specific problems in an application.
During testing, a number of shortcomings were identified related to the naming of buttons in the NavOr Navbar pane. We decided to refactor the button creation code to solve these problems and make the buttons reusable throughout the application.
To begin with, we created an enum with a list of all the buttons and the values that these buttons can store in them:
enum Button { case calendar(date: Date) case filter(isActive: Bool) case alert(isActive: Bool) case commentary case share case favorite(isSelected: Bool) case addToCalendar case edit case close } Next, an extension was created that created UIBarButton and UIButton ready-made instances from enum values:
extension Button { private var icon: UIImage? { switch self { case .calendar(let date): let icon = R.image.ic_calendar() let dayOfMonth = // * get day of month * // let iconWithDate = //* render icon with day of month number *// return iconWithDate case .filter(let isActive): return isActive ? R.image.filter_active() : R.image.filter_inactive() case .alert(let isActive): return isActive ? R.image.notification_bell_title_bar_active() : R.image.notification_bell_title_bar_inactive() case .commentary: return R.image.icon_audio_commentary_off() case .share: return R.image.icon_share() case .favorite(let isSelected): return (isSelected ? R.image.starOn() : R.image.starOff())?.withRenderingMode(.alwaysTemplate) case .addToCalendar: return R.image.icon_calendar() case .edit: return R.image.edit() case .close: return R.image.close() } } func buttonWith(target: Any, action: Selector, buttonSize: ButtonSize = .iconSize) -> UIButton { let button = UIButton() button.setImage(icon, for: .normal) button.addTarget(target, action: action, for: .touchUpInside) let size: CGSize switch buttonSize { case .custom(let customSize): size = customSize case .iconSize: size = icon?.size ?? .zero } button.frame = CGRect(.zero, size) return button } func barButtonWith(target: Any, action: Selector, buttonSize: ButtonSize = .iconSize) -> UIBarButtonItem { let item = UIBarButtonItem(customView: buttonWith(target: target, action: action, buttonSize: buttonSize)) switch self { case .calendar(let date): let dateFormatter = DateFormatter() dateFormatter.dateStyle = .medium item.accessibilityLabel = R.string.localizable.calendar() item.accessibilityValue = dateFormatter.string(from: date) item.accessibilityHint = R.string.localizable.select_date_to_filter_matches_hint() case .filter(let isActive): item.accessibilityLabel = R.string.localizable.filter() item.accessibilityValue = isActive ? R.string.localizable.active() : R.string.localizable.inactive() case .alert(let isActive): item.accessibilityLabel = R.string.localizable.set_alerts() item.accessibilityValue = isActive ? R.string.localizable.alerts_enabled() : R.string.localizable.alerts_disabled() item.accessibilityHint = R.string.localizable.edit_match_alerts() case .commentary: item.accessibilityLabel = R.string.localizable.commentary_window_title() case .share: item.accessibilityLabel = R.string.localizable.share() case .favorite(let isSelected): item.accessibilityLabel = R.string.localizable.toggle_favorite() item.accessibilityValue = isSelected ? R.string.localizable.in_favorites() : R.string.localizable.not_favorites() case .addToCalendar: item.accessibilityLabel = R.string.localizable.add_to_calendar() case .edit: item.accessibilityLabel = R.string.localizable.edit() case .close: item.accessibilityLabel = R.string.localizable.close() } return item } } Button creation in the end looked like this:
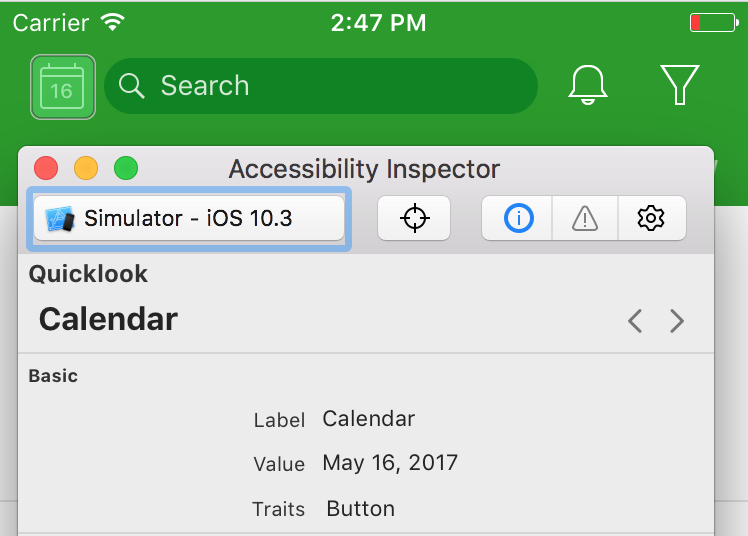
class SomeController { private let navBarButtons: [Button] = [.commentary, .share, .addToCalendar] private var navBarButtonItems: [UIBarButtonItem] { return navBarButtons.flatMap { switch $0 { case .commentary: return $0.barButtonWith(target: self, action: #selector(self.onBtnCommentaryClicked), buttonSize: .rightBarButtonSize) case .share: return $0.barButtonWith(target: self, action: #selector(self.onBtnShareMatchClicked), buttonSize: .rightBarButtonSize) case .addToCalendar: return $0.barButtonWith(target: self, action: #selector(self.onBtnAddMatchToCalendarClicked), buttonSize: .rightBarButtonSize) default: return nil } } } func updateBarButtons() { navItem.setRightBarButtonItems(navBarButtonItems, animated: false) } } After these changes, not only the correct names for VoiceOver appeared in the application, but additional information was added, which is very useful for people with visual impairments. For example, when you select a calendar button, not only its name is read, but also the selected date.
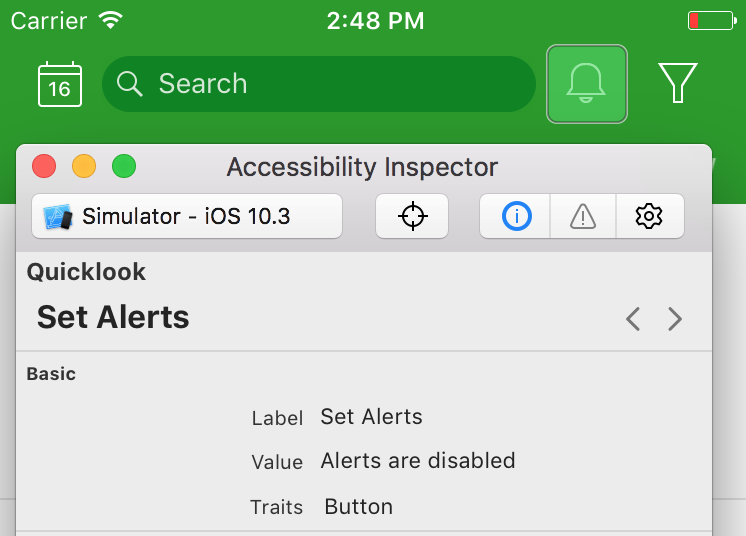
Similarly for the notification button. We inform the user whether the button is in the selected state (notifications are on) or not. We also inform the user what will happen if he taps on one or another button.
Such small improvements greatly simplify the use of the application.
Another problem case in the appendix was a table with team statistics. For VoiceOver, such a table is simply a set of abbreviations and numbers that are not related. If we try to launch an application with VoiceOver turned on, it will immediately become clear that it is simply impossible for blind people to figure out this set of meaningless words.
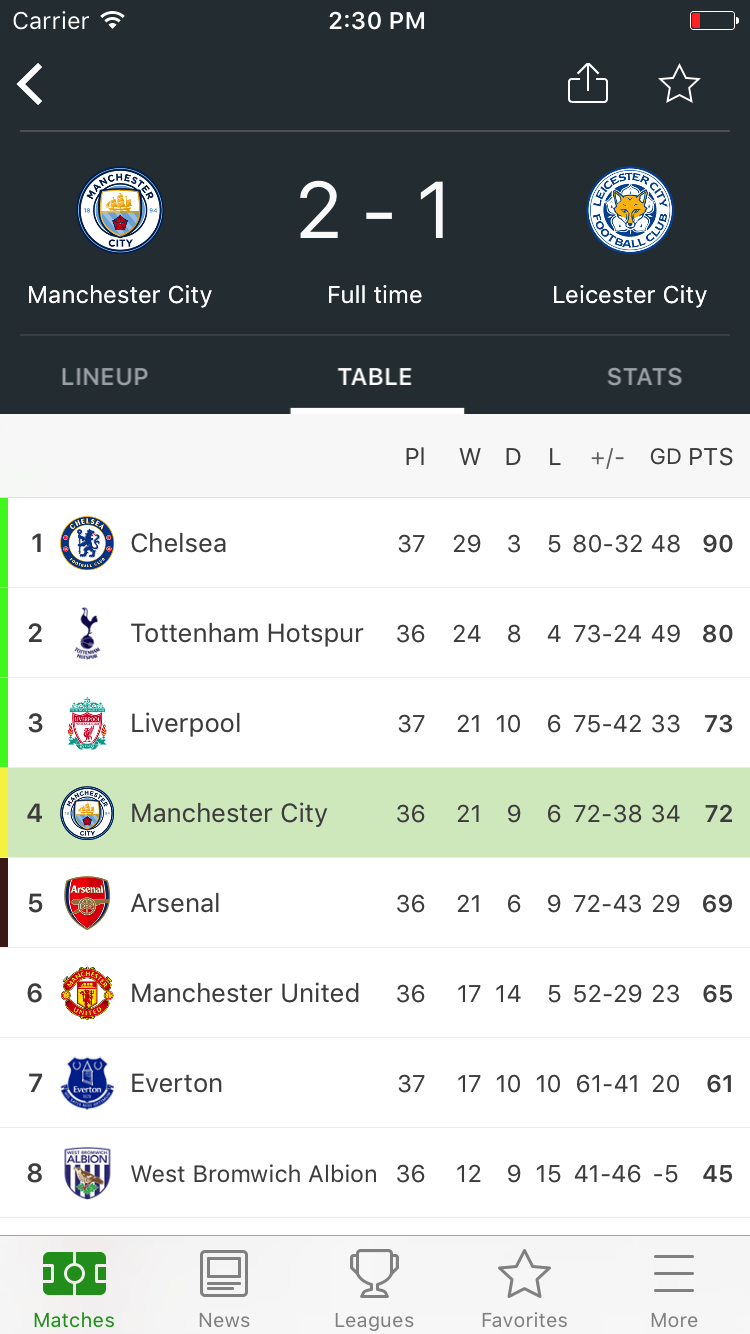
Here we used a grouping of elements and lines specially prepared for VoiceOver. For example, the table header is now read not as “PL WDL ± GD PTS”, but in expanded form: “Table header: Played, Won, Drawn, Lost, Goal difference, Goal difference value, Points”.
Each row of the table, like the heading, includes a full description of the fields: “Position: 4, Manchester United, Played: 36, Won: 21, Drawn: 9, Lost: 6, Goal difference: 72-38, Goal difference value: 34, Points: 72 "
Testing
If you have experienced testers who can test with closed eyes - you are lucky. However, it is often the responsibility of the programmer to check the functionality.
Simulator
Although VoiceOver is not supported in the simulator, you can test the application on it. The Accessibility Inspector utility, which is installed with Xcode, helps us in this.
In this utility you can:
- Find common problems with the availability of your application;
- See the accessibility attributes of each item in check mode;
- Change the general accessibility settings and check how they affect the application without restarting it.
From my own experience I can say that this utility is quite enough for development, but not enough for full testing. Since she does not pronounce the texts and we can miss the very important problems associated with punctuation marks.
Testers
Best of all, when you have a visually impaired person who can truly try the app with VoiceOver turned on. We were lucky, we had a caring user who walked through the entire application and compiled a detailed description of all the places where VoiceOver is not working well enough. We were able to fix all of these shortcomings. He further helped us improve the availability of the application, for which he thanks a lot.
Caring for users
VoiceOver is an advanced technology that allows you to make truly accessible applications for people with visual impairments.
It is built into all Apple operating systems and works virtually out of the box. Therefore, regardless of whether you use VoiceOver or develop an application with its support, VoiceOver will work in the same way and predictably everywhere.
High-quality applications with VoiceOver support can even be awarded the iOS Design Awards, as happened with Workflow in 2015.
There is a lot of difference in how it’s possible to use it. to those who are blind or low-vision. [2]
Probably, each team would like to receive the same feedback about their application. Try to do everything possible for your users to make it convenient for them to use the application regardless of their capabilities.
More on VoiceOver
')
Source: https://habr.com/ru/post/328894/
All Articles