Laravel more about Homestead
The official Laravel documentation has written a whole page about Homestead, but the problem is that there is little explanation of why this is needed at all. The documentation is rather an instruction for those who are already familiar with both VirtualBox and Vagrant and Linux (Ubuntu). If you are one of those, the article will not open something new, but if you read about Homestead in the documentation and did not understand why it was needed at all, or something didn’t work according to the instructions, everything will be chewed in detail in this article.
PHP has always been famous for its low entry threshold, and as a result - many newbies start learning frameworks without understanding how to properly organize this process. Sometimes they try to install the whole stack of used technologies on their OS and start creating and experimenting. They mistakenly assume that this is the easiest way to start writing in PHP or to learn some other technology (framework) .
Unfortunately, most textbooks do not teach how to organize the development process. Similarly, Laravel does not explain why we need a certain Vagrant- “box” and hardly explains how to use it. As a result, the student will simply skip the Homestead section and use his OS out of habit, turning it into a zoo of technologies, roles, services, and demons.
Homestead is the official pre-installedVagrant- “box” virtual machine (VirtualBox), which is a virtual computer (having its own memory, processor, hard disk, etc.) in which the Ubuntu Server operating system is installed (in theory, any OS could be installed). Access to this Ubuntu Server is through the SSH console. In order not to carry a huge image of a virtual machine (it can occupy gigabytes), we invented a Vagrant tool that can download the OS image itself, install the necessary software (web server, database, etc.) and run the virtual machine that is already configured and ready to work (development) . Homestead is a set of configs and scripts for Vagrant, in Homestead it is prescribed that we install, which version, what settings we make, etc., and Vagrant does it all on a virtual system. Vagrant can work not only with VirtualBox, but also with other virtualization systems.
')
This is necessary in order to facilitate the process of creating a working environment for your PHP creation. If you started writing in PHP, then you should know that in order to make it work, you need to install a web server, a database, PHP itself, and so on. The problem is that there are a huge number of web servers, databases, a huge number of versions, configuration options, and so on. Ie, before you perform the main installation step (composer install) or simply launch the installer of some CMS, you need to configure the computer (server) on which this will take place for a long time and carefully. And now think about conflicts, when for one script you need one version of php, a web server, a database, and another script refuses to work and requires other versions. Of course, you can try to push several versions of the same PHP, nginx, MySQL into one server, but then sooner or later this zoo will get out of control.
Another scenario: maybe you are faced with the team work on the project, or try to work in a company that develops projects to order. When you connect a new person to the project, they won’t bother with him explaining how to set up something just to run the project. Do not expect that you will be given access to the ready server on which the project will be fully deployed, and you will be able to make your own changes there. From the point of view of the company, this is a risk that the current sources and developments will simply be merged. Most likely Vagrant will give you the config, which is Homestead in Laravel in our case. It will configure the necessary software and tighten the minimum part of the project on which you will work.
By the way, I will immediately dispel fears that all this is loading the system. Not at all. Homestead with Ubuntu in VirtualBox flies easily on my Chinese tablet with Atom z8500 \ 4gb ram.
Setting up takes only minutes, it’s as easy as installing OpenServer.
The process of deploying Homestead is really well described in Russian documentation. I will also try to explain with my fingers some points concerning deployment and work in the develop environment.
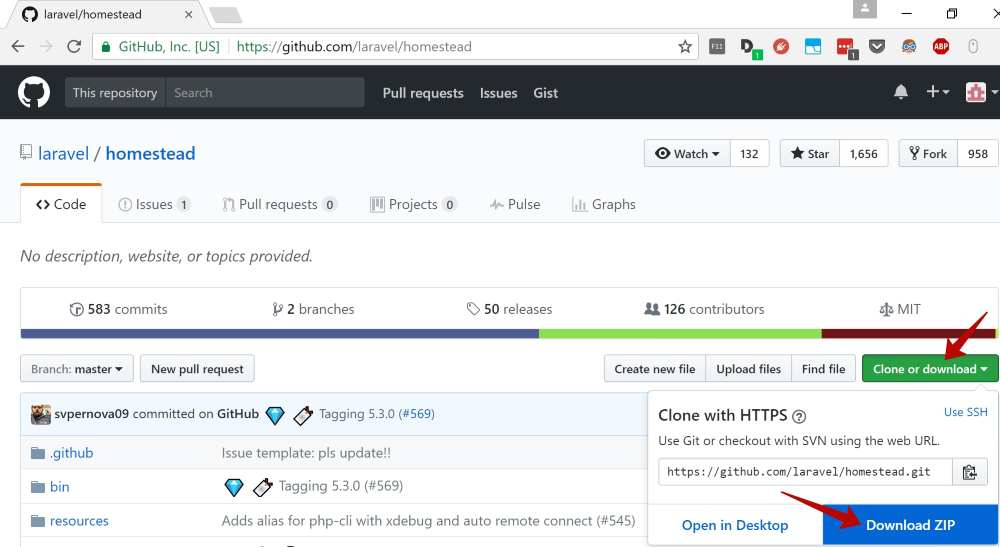
After you have installed VirtualBox and Vagrant on your computer, create the Homestead folder in it and download all the files from the repository there . Do not forget to unpack if download zip-archive.
Our working environment is almost ready to start, it remains to specify which folders to forward into the virtual system - as a rule, this is the folder with the project code itself.
So we create another folder on our (host) computer, for example laravel, it will later contain the source code of the framework itself and your project. We correct the file Homestead.yaml there some settings are registered. I give an example of my Homestead.yaml with my comments.
By the way, you can not generate or specify SSH keys (public.pub and private.ppk). Then, when connecting to a virtual server via Putty (or any other SSH client), simply use the vagrant \ vagrant login \ password.
I also recommend replacing in the config
on
If you leave the homestead.app address as the default in the documentation, my chrome said:
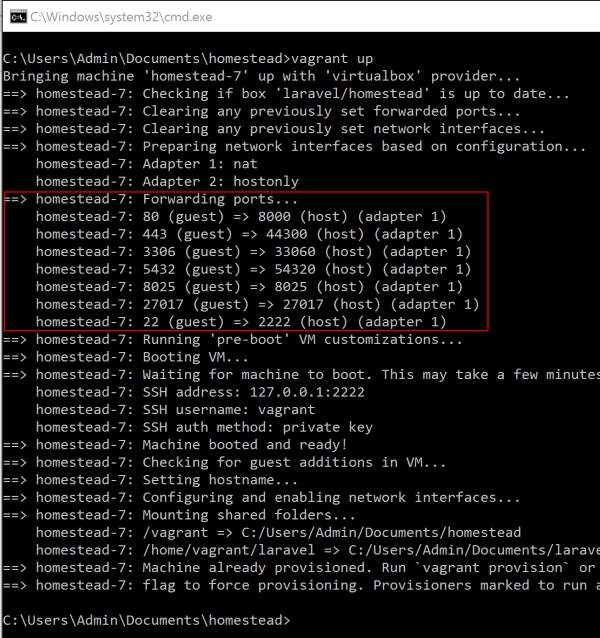
Please note that in your Homestead.yaml below there will be a commented ports section. So it is so easy to forward ports between your and the virtual system. The section is commented out, but in fact Homestead forwards some ports by default. You will see a message about this after you run the startup command.
To start, while in the Homestead folder, hold Shift and press the right mouse button, select the “Open command window” item, you will be taken to the console where you have already “moved” to the Homestead directory. Further, according to the instructions write vagrant up. If suddenly Vagrant gives an error, do not worry, most likely you do not have the latest version of VirtualBox or Vagrant. In any case, google on the description of the error, as a rule, the solution is reduced to editing some * .rb Vagrant files or reinstalling it. For example, one of the latest bugs "server_version.rb: 54: in` readpartial ': An established connection ... "is resolved here .
If everything is done correctly, after the vagrant up command from the Homestead directory, Vagrant will download the image of the virtual system with Ubuntu, then it will install a whole list of software in it, then correct the configs without forgetting the ones we wrote in the Homestead.yaml file. In the end, you will be pleased with “Machine booted and ready!” And which ports are forwarded.
Then you work as usual in your OS, in your favorite browser and editor. In principle, you do not need to keep any other software on your machine. All you need is already in our virtual environment. Let's connect to it using Putty (the connection address is 127.0.0.1, port 2222 as in the screenshot above).
Using the cd command, go to the project folder (which was listed in Homestead.yaml).

I already have the files here, but this folder will be empty. It's time to fill it. The folder on my host Windows machine is automatically and instantly synchronized with the virtual one, where Ubuntu is. Files can be read / written from both windows and ubuntu, ie two-way synchronization.
I beg you, just don’t try to install the composer or git console on Windows :) , and I highly recommend not using any builds like OpenServer, xamp, denver in Windows either.
Going to the right folder on your virtual server just follow the instructions in the documentation . In a virtual environment, you already have both git and composer installed .
Just do it, just take it and use it!
Perhaps in the future, I will talk about how to properly organize the process of developing a web project (taking into account PHP, Laravel), how to prepare an IDE to work with Laravel, organize work in Git, how to automate the deployment of the project from git. on the dev server using existing tools. A separate topic as a project from a dev server is smoothly developed on production servers.
These are all vast and interesting topics, but first, virtualize your development environment and finally stop installing php on Windows.
PHP has always been famous for its low entry threshold, and as a result - many newbies start learning frameworks without understanding how to properly organize this process. Sometimes they try to install the whole stack of used technologies on their OS and start creating and experimenting. They mistakenly assume that this is the easiest way to start writing in PHP or to learn some other technology (framework) .
Unfortunately, most textbooks do not teach how to organize the development process. Similarly, Laravel does not explain why we need a certain Vagrant- “box” and hardly explains how to use it. As a result, the student will simply skip the Homestead section and use his OS out of habit, turning it into a zoo of technologies, roles, services, and demons.
So, on the fingers:
Homestead is the official pre-installed
')
Why is this necessary?
This is necessary in order to facilitate the process of creating a working environment for your PHP creation. If you started writing in PHP, then you should know that in order to make it work, you need to install a web server, a database, PHP itself, and so on. The problem is that there are a huge number of web servers, databases, a huge number of versions, configuration options, and so on. Ie, before you perform the main installation step (composer install) or simply launch the installer of some CMS, you need to configure the computer (server) on which this will take place for a long time and carefully. And now think about conflicts, when for one script you need one version of php, a web server, a database, and another script refuses to work and requires other versions. Of course, you can try to push several versions of the same PHP, nginx, MySQL into one server, but then sooner or later this zoo will get out of control.
Another scenario: maybe you are faced with the team work on the project, or try to work in a company that develops projects to order. When you connect a new person to the project, they won’t bother with him explaining how to set up something just to run the project. Do not expect that you will be given access to the ready server on which the project will be fully deployed, and you will be able to make your own changes there. From the point of view of the company, this is a risk that the current sources and developments will simply be merged. Most likely Vagrant will give you the config, which is Homestead in Laravel in our case. It will configure the necessary software and tighten the minimum part of the project on which you will work.
By the way, I will immediately dispel fears that all this is loading the system. Not at all. Homestead with Ubuntu in VirtualBox flies easily on my Chinese tablet with Atom z8500 \ 4gb ram.
Setting up takes only minutes, it’s as easy as installing OpenServer.
The process of deploying Homestead is really well described in Russian documentation. I will also try to explain with my fingers some points concerning deployment and work in the develop environment.
After you have installed VirtualBox and Vagrant on your computer, create the Homestead folder in it and download all the files from the repository there . Do not forget to unpack if download zip-archive.
Our working environment is almost ready to start, it remains to specify which folders to forward into the virtual system - as a rule, this is the folder with the project code itself.
So we create another folder on our (host) computer, for example laravel, it will later contain the source code of the framework itself and your project. We correct the file Homestead.yaml there some settings are registered. I give an example of my Homestead.yaml with my comments.
--- ip: "192.168.10.10" memory: 1024 cpus: 1 provider: virtualbox #Generated SSH public key authorize: C:\Users\Admin\Documents\homestead\ssh\public.pub #Generated SSH private key keys: - C:\Users\Admin\Documents\homestead\ssh\private.ppk #Sync folder folders: - map: C:\Users\Admin\Documents\laravel #on host PC to: /home/vagrant/laravel #on virtual PC #Nginx on virtual PC sites: - map: laratest.dev #server_name for nginx on virtual PC to: /home/vagrant/laravel/public #document_root for nginx on virtual PC #Create MySQL Database on virtual PC databases: - homestead By the way, you can not generate or specify SSH keys (public.pub and private.ppk). Then, when connecting to a virtual server via Putty (or any other SSH client), simply use the vagrant \ vagrant login \ password.
I also recommend replacing in the config
sites: - map: homestead.app on
sites: - map: laratest.dev If you leave the homestead.app address as the default in the documentation, my chrome said:
This site on the intranet of the organization or school has the same URL as the site on the Internet.
Please note that in your Homestead.yaml below there will be a commented ports section. So it is so easy to forward ports between your and the virtual system. The section is commented out, but in fact Homestead forwards some ports by default. You will see a message about this after you run the startup command.
To start, while in the Homestead folder, hold Shift and press the right mouse button, select the “Open command window” item, you will be taken to the console where you have already “moved” to the Homestead directory. Further, according to the instructions write vagrant up. If suddenly Vagrant gives an error, do not worry, most likely you do not have the latest version of VirtualBox or Vagrant. In any case, google on the description of the error, as a rule, the solution is reduced to editing some * .rb Vagrant files or reinstalling it. For example, one of the latest bugs "server_version.rb: 54: in` readpartial ': An established connection ... "is resolved here .
If everything is done correctly, after the vagrant up command from the Homestead directory, Vagrant will download the image of the virtual system with Ubuntu, then it will install a whole list of software in it, then correct the configs without forgetting the ones we wrote in the Homestead.yaml file. In the end, you will be pleased with “Machine booted and ready!” And which ports are forwarded.
Then you work as usual in your OS, in your favorite browser and editor. In principle, you do not need to keep any other software on your machine. All you need is already in our virtual environment. Let's connect to it using Putty (the connection address is 127.0.0.1, port 2222 as in the screenshot above).
Using the cd command, go to the project folder (which was listed in Homestead.yaml).
I already have the files here, but this folder will be empty. It's time to fill it. The folder on my host Windows machine is automatically and instantly synchronized with the virtual one, where Ubuntu is. Files can be read / written from both windows and ubuntu, ie two-way synchronization.
I beg you, just don’t try to install the composer or git console on Windows :) , and I highly recommend not using any builds like OpenServer, xamp, denver in Windows either.
Going to the right folder on your virtual server just follow the instructions in the documentation . In a virtual environment, you already have both git and composer installed .
Just do it, just take it and use it!
Perhaps in the future, I will talk about how to properly organize the process of developing a web project (taking into account PHP, Laravel), how to prepare an IDE to work with Laravel, organize work in Git, how to automate the deployment of the project from git. on the dev server using existing tools. A separate topic as a project from a dev server is smoothly developed on production servers.
These are all vast and interesting topics, but first, virtualize your development environment and finally stop installing php on Windows.
Source: https://habr.com/ru/post/328880/
All Articles