Use Spring Groovy context to create a configurable, interactive graphical UI
In the late 90s, he worked in one organization that was engaged in the development of a contact electrical network and the operation of power supply units (traction substations), plus monitored and managed this farm using a specialized hardware and software complex from several control centers. The complex was operated by an automated process control system based on ancient Soviet iron. Then the task was to translate this complex under windows, including the development of a graphical interface, which would display the entire network and events occurring on it and substations as a map. And of course, would provide the ability to manage them.
Technically, the task was to get data (packet-message) over the network (IP), parse it (get data about the substation and changes on it) and finally display all this in our UI client (display the changes on the map / diagram, for example, change the color of the element and make it blink). Each substation had a specific set of sensors and counters, the data of which were contained in message packages. It was necessary t. to realize the possibility of a choice on the substation map and display it in a schematic form with interactive control elements, with the help of which the operator could send commands.
As you understand, the graphic elements were quite specific and, accordingly, the use of standard ones was not possible, moreover, in fact, it was necessary to implement animation. And then a solution was chosen using double buffering, when, with changes, the corresponding frame was drawn and they were changed with a certain frequency. The first implementation was performed on Delphi. But in the process of operation, we were faced with the fact that it was often necessary to change the display of the configuration of equipment and the network. Which, in turn, each time required intervention in the source code (then writing any Delphi configurator was lazy) and even then it didn't work out very nicely). And in 1999, I first met Java. Then I was hooked by the technology of reflection with which a simple scripting language was created (similar to Groovy, I really didn’t hear about it then, and I couldn’t, since Groovy appeared in 2003) to describe the scheme. It uses the same Java objects as Groovy.
')
Below is a fragment of the script where Tp, Bus, Lab, Led, Box is nothing but Java wrapper classes over graphic primitives allowing the implementation of the functionality described above in the task.
Root.txt
Here, for example, the method of recall , which refers to the first argument of define - the equivalent of evaluate in Groovy). Let's see what happens there:
src / 1.txt
src / 2.txt
These files describe the two uppermost devices (Fig. 1) and, as you can see, there is some kind of code repeatability. Accordingly, patterns for all complex blocks / devices are defined in this way and then re-used.
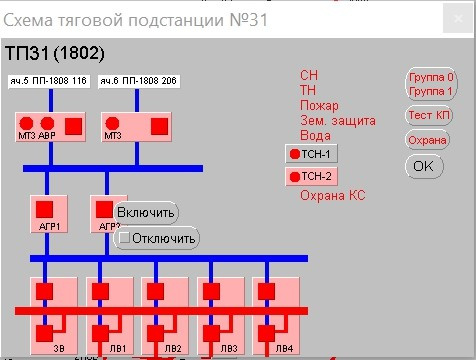
Fig. 1. The result of the script fragment
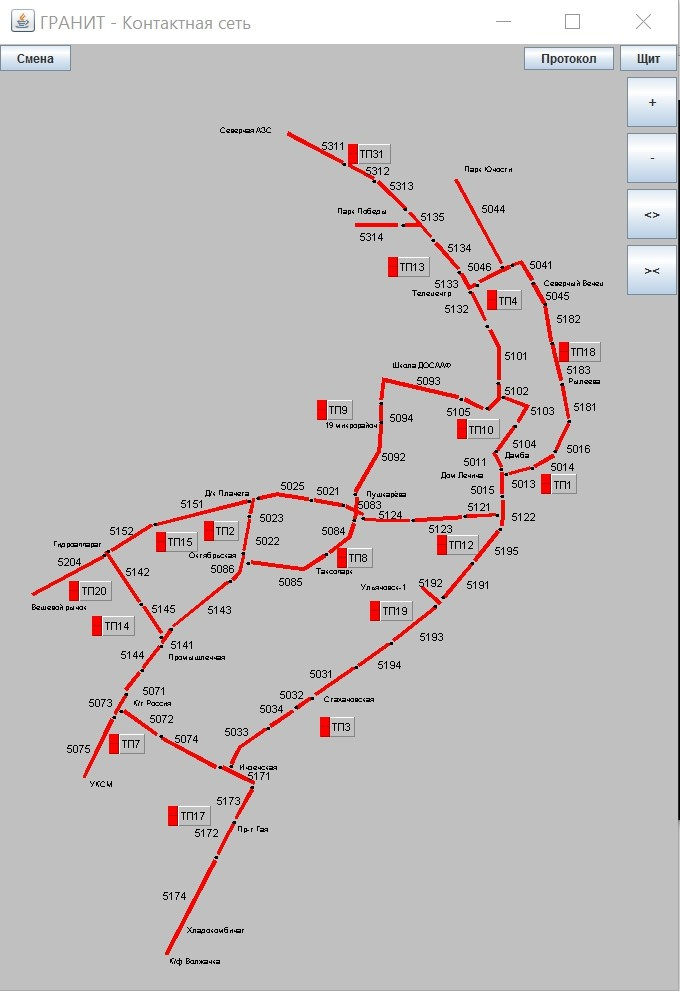
Fig. 2. Full contact network and substation map
The application in this form is still in use (although several generations of the backend changed during this time!) And the customer is completely satisfied, but all the time I unconsciously did not abandon the idea of getting rid of the existing “bicycle”, although I want to note that in 99th year it was not yet been. And so, with the advent of Spring 4 and the next context on Groovy, having smoked the manual, it seemed to me that I had already seen it somewhere)) (see above). It was decided Spring Boot, Groovy-config and JavaFx - a new stack for the new GUI client ...
Let's look at the architecture of the new solution. And let's start with the model, which is an abstract wrapper around the javafx graphics primitives and is essentially the core of the application. Includes a number of classes and interfaces. The abstract class Unit is the base for creating a custom graphic element from which the map and schemes are formed.
It implements the Render interface, which manages image changes.
where render () is the drawing after the state change;
next () - change frame.
Each Unit has a List Lays nested Unit , which allows you to draw and control the scene by layers. It also contains methods for capturing some mouse events.
In our case, the Unit has a FlashingUnit successor:
which implements the frame change (blinking of changed objects) in accordance with our task.
As an example, I cite the implementation of a text graphic element:
The state class is responsible for the state of graphic elements:
which stores information about the state and its change of all elements with a common code located in the List slaves and provides a thread-safe update of subordinate elements via the Render interface.
The Controller class extends Unit and is a container for all our graphic elements and states of objects belonging in this case to a separate substation with a unique
Finally, the Root class, which contains the mapping of all controllers (substations):
Here we would like to note that the use of @PostConctruct init () and DI in the Controller allows us to dynamically create the configuration of object states and save the user from unnecessary code in the configuration script.
And now let's see how it all looks in Groovy - the config file, which is why we created all this for ourselves:
root.groovy
srcs.groovy
src.groovy
Now, using Groovy's capabilities, we can create various configurations of hardware circuits from existing graphics primitives without project reassembly. And to effectively reuse the existing code (I specifically showed here the srcs.groovy and src.groovy files). The prototype sources are here .
A modern stack of Java technologies makes it possible to implement efficient and non-standard things without the use of bicycles, relatively easily and within a reasonable time. Without knowing Groovy and JavaFx itself, the prototype of the new application was implemented on the “knees” in a few days. And, more importantly, we created our application using powerful and open standards for Java production development.
Task Description
Technically, the task was to get data (packet-message) over the network (IP), parse it (get data about the substation and changes on it) and finally display all this in our UI client (display the changes on the map / diagram, for example, change the color of the element and make it blink). Each substation had a specific set of sensors and counters, the data of which were contained in message packages. It was necessary t. to realize the possibility of a choice on the substation map and display it in a schematic form with interactive control elements, with the help of which the operator could send commands.
Implementation
As you understand, the graphic elements were quite specific and, accordingly, the use of standard ones was not possible, moreover, in fact, it was necessary to implement animation. And then a solution was chosen using double buffering, when, with changes, the corresponding frame was drawn and they were changed with a certain frequency. The first implementation was performed on Delphi. But in the process of operation, we were faced with the fact that it was often necessary to change the display of the configuration of equipment and the network. Which, in turn, each time required intervention in the source code (then writing any Delphi configurator was lazy) and even then it didn't work out very nicely). And in 1999, I first met Java. Then I was hooked by the technology of reflection with which a simple scripting language was created (similar to Groovy, I really didn’t hear about it then, and I couldn’t, since Groovy appeared in 2003) to describe the scheme. It uses the same Java objects as Groovy.
')
Below is a fragment of the script where Tp, Bus, Lab, Led, Box is nothing but Java wrapper classes over graphic primitives allowing the implementation of the functionality described above in the task.
Root.txt
setFormFactor:4 4 setResolution:700 800 setScale:0.45 setScaleStep:0.1 define:"" "contr.txt" define:"1" "src/1.txt" define:"2" "src/2.txt" define:"3" "src/3.txt" define:"1" "dev/1.txt" define:"2" "dev/2.txt" define:"3" "dev/3.txt" define:"4" "dev/4.txt" define:"" "sw/0.txt" define:"1" "sw/1.txt" define:"2" "sw/2.txt" define:"3" "sw/3.txt" define:"4" "sw/4.txt" define:"5" "sw/5.txt" define:"6" "sw/6.txt" add:new Tp 31 { busWidth:7 setColor:col.red col.green add:new Bus 4 0 0 2 523 106 627 160 add:new Bus 5 0 0 2 636 164 683 190 add:new Bus 6 0 0 2 689 195 741 243 add:new Bus 29 0 0 2 730 268 650 268 setColor:col.black col add:new Led "" 627 157 8 add:new Led "" 682 187 8 add:new Led "" 739 239 8 add:new Led "" 734 268 8 setFontSize:21 add:new Lab "5311" 590 113 add:new Lab "5312" 670 159 add:new Lab "5313" 714 187 add:new Lab "5314" 660 280 ico:655 123 box { setFontSize:24 add:new Lab "(1802)" 70 5 recall:"" setFontSize:17 setColor:col.red col.black add:new Lab 18 400 200 recall:"1" setColor:col.white col add:new Box "" 10 50 10 10 { setColor:col.black col setFontSize:12 ins:new Lab ".5 -1808 116" 5 0 } recall:"2" setColor:col.white col add:new Box "" 130 50 10 10 { setColor:col.black col ins:new Lab ".6 -1808 206" 5 0 } busWidth:10 setColor:col.blue col add:new Bus "" 0 0 2 30 180 270 180 recall:"1" recall:"2" recall:"" recall:"1" recall:"2" recall:"3" recall:"4" moveX:74 busWidth:10 setColor:col.blue col add:new Bus "" 0 0 2 40 300 PX 300 } } Here, for example, the method of recall , which refers to the first argument of define - the equivalent of evaluate in Groovy). Let's see what happens there:
src / 1.txt
setColor:col.blue col busWidth:5 add:new Bus "" 65 60 2 0 0 0 120 { setColor:col.pink col add:new Box 88 -45 40 95 40 { setColor:col.red col.green add:new Led 90 5 5 19 add:new Led 87 33 5 19 add:new Box 86 66 8 23 23 { add:new Popup { setFontSize:17 add:new Btn 86 23 0 { add:new Act ON 131 setColor:col.black col ins:new Lab "" 5 5 } add:new Btn 86 23 34 { add:new Act OFF 131 setColor:col col.red add:new Box 131 8 8 15 15 { add:new Act TOG "" } setColor:col.black col ins:new Lab "" 25 5 } } } setFontSize:12 add:new Lab "" 5 24 add:new Lab "" 30 24 } } src / 2.txt
setColor:col.blue col busWidth:5 add:new Bus "" 180 60 2 0 0 0 120 { setColor:col.pink col add:new Box 94 -45 40 95 40 { setColor:col.red col.green add:new Led 96 5 5 19 add:new Box 92 66 8 23 23 { add:new Popup { setFontSize:17 add:new Btn 92 23 0 { add:new Act ON 132 setColor:col.black col ins:new Lab "" 5 5 } add:new Btn 92 23 34 { add:new Act OFF 132 setColor:col col.red add:new Box 132 8 8 15 15 { add:new Act TOG "" } setColor:col.black col ins:new Lab "" 25 5 } } } setFontSize:12 add:new Lab "" 5 24 } } These files describe the two uppermost devices (Fig. 1) and, as you can see, there is some kind of code repeatability. Accordingly, patterns for all complex blocks / devices are defined in this way and then re-used.
Fig. 1. The result of the script fragment
Fig. 2. Full contact network and substation map
The application in this form is still in use (although several generations of the backend changed during this time!) And the customer is completely satisfied, but all the time I unconsciously did not abandon the idea of getting rid of the existing “bicycle”, although I want to note that in 99th year it was not yet been. And so, with the advent of Spring 4 and the next context on Groovy, having smoked the manual, it seemed to me that I had already seen it somewhere)) (see above). It was decided Spring Boot, Groovy-config and JavaFx - a new stack for the new GUI client ...
Let's look at the architecture of the new solution. And let's start with the model, which is an abstract wrapper around the javafx graphics primitives and is essentially the core of the application. Includes a number of classes and interfaces. The abstract class Unit is the base for creating a custom graphic element from which the map and schemes are formed.
public abstract class Unit<T> implements Render { private static Logger log = LoggerFactory.getLogger(Unit.class); private Integer code; private State<T> state; Node node; private List<Unit> lays = new LinkedList<>(); public void init(Map<Integer, State> states) { lays.forEach(e -> e.init(states)); initState(states); } private void initState(Map<Integer, State> states) { if (code != null) { State<T> state = states.get(code); if (state == null) { state = new State<>(code); states.put(code, state); } state.addSlave(this); this.state = state; } } public void setCode(Integer code) { this.code = code; } public Integer getCode() { return code; } public State<T> getState() { return state; } public void setGeom(double[] geom) { node = createShape(geom); initNodeEvents(); } private void initNodeEvents() { if (node != null) { node.setOnMousePressed(this::mousePressed); node.setOnMouseReleased(this::mouseReleased); } } public void setLays(List<Unit> lays) { this.lays = lays; } public void render(Group group) { if (node != null) { group.getChildren().add(node); } render(); lays.forEach(e -> e.render(group)); } protected void mousePressed(MouseEvent e) { log.debug(e.toString()); } protected void mouseReleased(MouseEvent e) { log.debug(e.toString()); } protected abstract Node createShape(double[] geom); } It implements the Render interface, which manages image changes.
public interface Render { void render(); void next(); } where render () is the drawing after the state change;
next () - change frame.
Each Unit has a List Lays nested Unit , which allows you to draw and control the scene by layers. It also contains methods for capturing some mouse events.
In our case, the Unit has a FlashingUnit successor:
public abstract class FlashingUnit<T> extends Unit<T> { private static Logger log = LoggerFactory.getLogger(FlashingUnit.class); @Override public void next() { log.debug("{} next()", this); if (getState() != null && node != null) { node.setVisible(!getState().isChanged() || !node.isVisible()); } } } which implements the frame change (blinking of changed objects) in accordance with our task.
As an example, I cite the implementation of a text graphic element:
public class Lab extends FlashingUnit<Integer> { private Color[] color; private String text; private Double size; private Text shape; @Override protected Node createShape(double[] geom) { //Can't set text without graphic context shape = new Text(geom[0], geom[1], ""); if (size != null) { shape.setFont(Font.font(size)); } return shape; } public void setText(String text) { this.text = text; } public void setSize(Double size) { this.size = size; } public void setColor(Color[] color) { this.color = color; } @Override public void render(Group group) { super.render(group); shape.setText(text); } @Override public void render() { final Color[] c = new Color[]{color[0]}; if (getState() != null) { getState().initValue(0); c[0] = color[getState().getValue()]; } shape.setFill(c[0]); } } The state class is responsible for the state of graphic elements:
public class State<T> implements Render { private final int id; private T value; private boolean changed; private List<Render> slaves = new LinkedList<>(); public synchronized void initValue(T value) { if (this.value == null) { this.value = value; } } public State(int id) { this.id = id; } public int getId() { return id; } public synchronized T getValue() { return value; } public synchronized void setValue(T value) { if (!value.equals(this.value)) { this.value = value; changed = true; render(); } } public synchronized boolean isChanged() { return changed; } public synchronized void setChanged(boolean changed) { this.changed = changed; } public void addSlave(Render unit) { slaves.add(unit); } @Override public void render() { Platform.runLater(() -> slaves.forEach(Render::render)); } @Override public void next() { Platform.runLater(() -> slaves.forEach(Render::next)); } } which stores information about the state and its change of all elements with a common code located in the List slaves and provides a thread-safe update of subordinate elements via the Render interface.
The Controller class extends Unit and is a container for all our graphic elements and states of objects belonging in this case to a separate substation with a unique
id . public class Controller extends Unit { private int id; private final Root root; private final Map<Integer, State> states = new HashMap<>(); private Unit scheme; @Autowired public Controller(Root root) { this.root = root; } @PostConstruct void init() { super.init(states); if (scheme != null) { scheme.init(states); } root.addController(this); } public void setId(int id) { this.id = id; } public State getState(int code) { return states.get(code); } public int getId() { return id; } public void setScheme(Unit scheme) { this.scheme = scheme; } public Unit getScheme() { return scheme; } @Override protected Node createShape(double[] geom) { return null; } @Override public void render() { states.values().forEach(Render::render); } @Override public void next() { states.values().forEach(Render::next); } } Finally, the Root class, which contains the mapping of all controllers (substations):
public class Root implements Render { private final Map<Integer, Controller> controllers = new HashMap<>(); void addController(Controller controller) { if (controllers.containsKey(controller.getId())) { throw new DuplicateKeyException(String.format("Controller id %d already exists",controller.getId())); } controllers.put(controller.getId(), controller); } public Controller getController(int id) { return controllers.get(id); } public State getState(int controllerId, int code) { Controller controller = controllers.get(controllerId); if (controller != null) { return controller.getState(code); } return null; } public void render(Group group) { controllers.values().stream().map(Controller::getScheme) .filter(Objects::nonNull).forEach(r -> r.render(group)); } @Override public void render() { controllers.values().forEach(Render::render); } @Override public void next() { controllers.values().forEach(Render::next); } } Here we would like to note that the use of @PostConctruct init () and DI in the Controller allows us to dynamically create the configuration of object states and save the user from unnecessary code in the configuration script.
And now let's see how it all looks in Groovy - the config file, which is why we created all this for ourselves:
root.groovy
package scheme import com.ldim.granit.ui.model.Controller import com.ldim.granit.ui.model.shape.Box import com.ldim.granit.ui.model.shape.Bus import com.ldim.granit.ui.model.shape.Lab import com.ldim.granit.ui.model.shape.Led import javafx.scene.paint.Color suplyColor = [Color.GREEN, Color.RED] alarmColor = [Color.RED, Color.GREEN] beans { importBeans('classpath:/scheme/srcs.groovy') importBeans('classpath:/scheme/devs.groovy') importBeans('classpath:/scheme/sws.groovy') importBeans('classpath:/scheme/tsns.groovy') importBeans('classpath:/scheme/ctrls.groovy') controller2(Controller) { id = 2 lays = [dev1] } tp9scheme(Bus) { code = 5 color = suplyColor width = 6 geom = [653, 764, 698, 687, 701, 631] lays = [new Bus(code: 29, color: suplyColor, width: 6, geom: [701, 631, 701, 602]), new Bus(code: 6, color: suplyColor, width: 6, geom: [701, 602, 705, 560, 840, 591]), new Led(geom:[4.5, 701, 631, 701, 602]), new Lab(text: '5092', geom: [705, 684]), new Lab(text: '5094', geom: [715, 612]), new Lab(text: '5093', geom: [764, 544]), new Lab(text: '19 ', geom: [595, 630]), new Box(code: 129, color: alarmColor, geom: [598, 593, 10, 10]), new Box(code: 130, color: alarmColor, geom: [598, 603, 10, 10]), new Box(color: [Color.GRAY], geom: [608, 593, 30, 20], lays: [new Lab(size: 11, text: '9', geom: [613, 607])])] } tp9(Controller) { id = 3 lays = [src1, src2, src3, new Bus (color: [Color.BLUE], width: 8, geom: [40, 176, 380, 176]), dev1, dev2, dev3, dev4, new Bus (color: [Color.BLUE], width: 8, geom: [40, 276, 585, 276]), sw0, sw1, sw2, sw3, sw4, sw5, sw6, new Bus (code: 12, color: suplyColor, width: 8, geom: [30, 350, 615, 350]), lbl0, lbl1, lbl2, lbl3, lbl4, tsn1, tsn2, reqBtn, tstBtn, secBtn, okBtn] scheme = tp9scheme } } srcs.groovy
package scheme beanName = 'src1' offsetX = 0 reserved = true devCode = 1 swCode = 11 led1Code = 11 led2Code = 11 evaluate(new File("./src/main/resources/scheme/templates/src.groovy")) beanName = 'src2' offsetX = 120 reserved = false devCode = 1 swCode = 11 led1Code = 11 led2Code = 11 evaluate(new File("./src/main/resources/scheme/templates/src.groovy")) beanName = 'src3' offsetX = 240 reserved = false devCode = 1 swCode = 11 led1Code = 11 led2Code = 11 evaluate(new File("./src/main/resources/scheme/templates/src.groovy")) src.groovy
package scheme.templates import com.ldim.granit.ui.model.shape.Box import com.ldim.granit.ui.model.shape.Bus import com.ldim.granit.ui.model.shape.Lab import com.ldim.granit.ui.model.shape.Led import javafx.scene.paint.Color devX = 40 devY = 100 beans { "${beanName}led1"(Led) { bean -> bean.scope = 'prototype' code = led1Code color = [Color.GREEN, Color.RED] geom = [9, devX + 14 + offsetX, devY + 16] } "${beanName}lbl1"(Lab) { bean -> bean.scope = 'prototype' code = devCode text = '' size = 9 color = [Color.BLACK, Color.BLACK] geom = [devX + 5 + offsetX, devY + 35] } if (reserved) { "${beanName}led2"(Led) { bean -> bean.scope = 'prototype' code = led2Code color = [Color.GREEN, Color.RED] geom = [9, devX + 38 + offsetX, devY + 16] } "${beanName}lbl2"(Lab) { bean -> bean.scope = 'prototype' code = devCode text = '' size = 9 color = [Color.BLACK, Color.BLACK] geom = [devX + 30 + offsetX, devY + 35] } } "${beanName}btn"(Box) { bean -> bean.scope = 'prototype' code = swCode color = [Color.GREEN, Color.RED] press = true geom = [devX + 66 + offsetX, devY + 8, 23, 23] } "${beanName}box"(Box) { bean -> bean.scope = 'prototype' code = devCode color = [Color.GRAY, Color.PINK] geom = [devX + offsetX, devY, 95, 40] lays = reserved ? [ref("${beanName}btn"), ref("${beanName}led1"), ref("${beanName}lbl1"), ref("${beanName}led2"), ref("${beanName}lbl2")] : [ref("${beanName}btn"), ref("${beanName}led1"), ref("${beanName}lbl1")] } "${beanName}"(Bus) { bean -> bean.scope = 'prototype' color = [Color.BLUE] width = 4 geom = [devX + 77 + offsetX, devY - 30, devX + 77 + offsetX, devY + 70] lays = [ref("${beanName}box")] } } Now, using Groovy's capabilities, we can create various configurations of hardware circuits from existing graphics primitives without project reassembly. And to effectively reuse the existing code (I specifically showed here the srcs.groovy and src.groovy files). The prototype sources are here .
Conclusion
A modern stack of Java technologies makes it possible to implement efficient and non-standard things without the use of bicycles, relatively easily and within a reasonable time. Without knowing Groovy and JavaFx itself, the prototype of the new application was implemented on the “knees” in a few days. And, more importantly, we created our application using powerful and open standards for Java production development.
Source: https://habr.com/ru/post/328402/
All Articles