Getting rid of Auto Layout
Introduction
Hi, my name is Nick Snyder and I am a software engineer at LinkedIn. Today I want to tell you a story about Auto Layout:
- As we in LinkedIn use it.
- The problems we met.
- Why in some situations we stopped using Auto Layout.
- And what we use instead.
Good news
I would like to start with the good news:
- We on LinkedIn make extensive use of Auto Layout. This is our main method of building interfaces in all of our applications.
- Auto Layout is a powerful tool that facilitates support:
- Various screen sizes;
- Languages with writing from right to left.
The bad news
The bad news is that Auto Layout performance is not good enough:
')
- It does not scale for complex view hierarchies (from the subsequent presentation it will be clear that this is a non-linear increase in the calculation time with a linear increase in the number of view - approx. Transl.).
- We have seen a performance setback on some iOS releases.
- Performance may turn out to be unpredictably bad for some interface layouts (hereinafter the layout is translated as “markup” - approx. Transl.).
(Further, where the text of the transcript and the text of the slides significantly duplicate each other, I will merge without loss of information. The text and slides were used with the permission of the author. - approx. Transl.)
Auto Layout Problems
Consider an example of markup from a LinkedIn application. Let there be two labels (here and hereinafter “labels” are used - approx. Transl.): A multi-line label on the left, and a single-line label on the right. We need the right label to have enough space to display all its content. The left label contains just a certain amount of text, which should take a maximum of two lines.

Note. Auto Layout performance drop. On the left is a label containing a maximum of two lines. On the right is a label that should have the following properties:
- content reduction - i.e. the label occupies only the minimum space sufficient to display the text it contains,
- squeezing resistance - i.e. the label resists reducing its size to a size less than the minimum required to display the text it contains.
To implement the described markup using Auto Layout, we will set the required properties for the right label: compression of the content and resistance to compression. It worked fine on iOS 8, and worked fine on all test data during development. But with the release of iOS 9, this implementation has caused huge performance problems with some of our users. And we did not know about these issues until users complained.
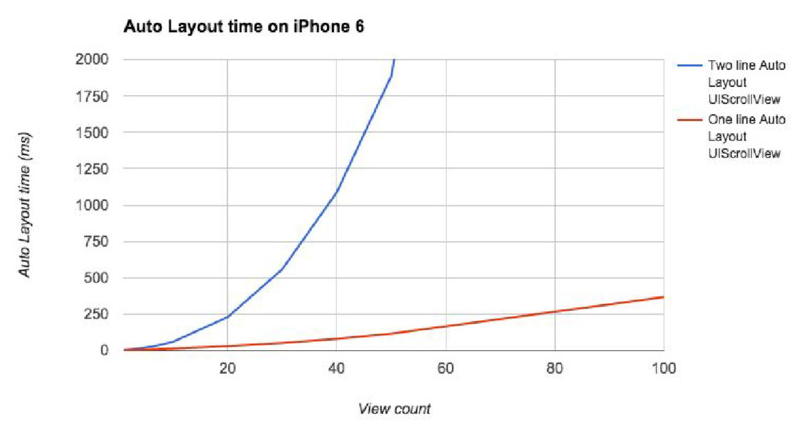
Note. The execution time of Auto Layout on iPhone 6. The horizontal axis is the number of view. The vertical axis is the Auto Layout runtime. Blue graph - UIScrollView with Auto Layout for two lines. The red graph is a single-row UIScrollView with Auto Layout.
Obviously, it’s not at all cool to receive notifications from your users about performance issues. You might think, "How bad can it be?" For this situation, when the label on the left contains several lines, the blue line shows how much time it takes to perform the markup for a certain number of view. As you can see, the blue line quickly goes up with the number of view. This was the source of the problem.
There is no such problem if the label on the left contains only one line or some other data type. So, the problem was caused by a specific data type.
News Feed LinkedIn.
- For some time, due to performance issues, Auto Layout has not been used.
- Each view implements the markup code manually:
- Hard to maintain
- I would like to have a reusable solution to apply on the Profile screen.
In the case of the LinkedIn news feed, we actually knew that the performance of Auto Layout was not at all excellent. For this reason, LinkedIn news feed has not used Auto Layout for a long time. In the ribbon, each view or cell implements its own markup code using layoutSubviews. This manual layout is much faster. However, the problem is that the support of such a code is exhausting. We have two functions. The first one calculates the height, so we can tell the table or the UICollectionView how high the cell is. And then the second performs the actual markup. The reason why we divided this logic is that this way we can perform height calculations quickly - without completely performing the markup.
We wanted something similar for the rest of the application. But we wanted it to be suitable for solving various problems, and so that many could use it.
Markup Solutions
Marking Solution Requirements
- Quick We wanted the solution to be fast, along with hand-written code, because this is what we already had in the tape.
- An API that is natural in the Swift application. Most of our applications on LinkedIn - including the main one - are written in Swift.
- Supported and used in serious projects. We would not want to use beta-level software in our products.
- With open source (debugging if something goes wrong). One of the sources of pain when working with Auto Layout is that Auto Layout is a black box. And when something goes wrong, we have no way to dig out the cause.
- Acceptable license (from the point of view of company lawyers).
Existing solutions
- React Native, AsyncDisplayKit, ComponentKit - Facebook has a lot of good open source libraries. Unfortunately, because of the license, we cannot use them.
- Few is a library, but it looks like it was abandoned - the last commit more than a year ago.
- Render - creation May 2016. Now we have found another library: Render. But she did not exist at the time of the decision.
Not one of these projects has satisfied all our requests.
Time to build something new ...
So, not one of the projects found in the network did not satisfy all our requirements. And we created what we called LayoutKit.
LayoutKit is a library for fast positioning of view on iOS, macOS, tvOS. Next, I will explain how to apply it, and how it works.
LayoutKit "hello world"
At the top level, the markup is carried out in three stages:
- The developer defines markup using immutable data structures.
- LayoutKit calculates frames for each view, and, if you wish, in the background thread.
- LayoutKit in the main thread creates the entire view and assigns them frames.
For a better understanding, consider an example, with simple, but fully implemented markup. In this markup will be the world, and the image, and the text label.

The first part is creating the markup for the UIImageView. So, we need a fixed-size markup, which we call SizeLayout containing a UIImageView, and with a width and height of 50 pixels (here and later in the original pixels). In the configuration block, we set the image for the UIImageView:
let image = SizeLayout<UIImageView>( width: 50, height: 50, config: { imageView in imageView.image = UIImage(named: “earth.jpg”) } ) Next we need markup for the label. We set the text and center alignment of the available space.
let label = LabelLayout( text: “Hello World!”, alignment: .center ) We want to place these views next to each other, so we will create a horizontal stack with an interval of 4 pixels.
StackLayout( axis: .horizontal, spacing: 4, sublayouts: [image, label] ) Finally, we need padding around the edges. We create an InsetLayout that wraps the newly created StackLayout.
helloWorld = InsetLayout( insets: UIEdgeInsets(top: 4, left: 4, bottom: 4, right: 8), sublayout: stack ) Our "Hello World" markup is ready, and we call the placement method. The method recursively calculates all frames for all views and layouts. This can be performed in a background thread.
Since its inception, arrangement is an immutable data structure, so we can pass it back to the main thread and make makeViews.
// . let arrangement = helloWorld.arrangement() // . arrangement.makeViews(in: rootView) We pass the rootView parameter to the makeViews method so that the necessary views are created right in it. If the parameter is not passed, makeViews returns a view, with which we can do whatever we want.

So we finished the markup.
One more example
In the example above, we called arrangement without parameters:
// . // . helloWorld.arrangement() Let's do it differently:
// . helloWorld.arrangement(width: 200) You can specify an explicit width, and the method will mark it on it:

You can see that the indents have increased, now all the space available in width is occupied. This width may be, for example, the width of the screen.
Another example is animation.
The markup can be animated. We will do this using a simple SizeLayout. Let's call it “box”. Using the viewReuseId parameter, you can set a unique identifier for the view or markup. Due to this, LayoutKit knows which view in the “before” state corresponds to which view in the “after” state.
In this example, in the “before” state, our “box” is simply a square of 50x50 pixels, and in the state after - a square of 25x25 pixels.
// viewReuseId // "" let before = SizeLayout( width: 50, height: 50, viewReuseId: “box”) // "" let after = SizeLayout( width: 25, height: 25, viewReuseId: “box”) These are two different markup. Create a view layout using the “before” markup. The views created from this location will be placed in some root view - the rootView. Then, using the “after” markup, prepare for the animation - create a special object for the animation, which has an animate method.
// "" view rootView. before.arrangement().makeViews(in: rootView) // . let animation = after.arrangement() .prepareAnimation(for: rootView) After receiving the animation object, you can use the usual call UIView.animate, withDuration, passing it the animation.apply method, which performs the animation of changing one markup to another.
// . UIView.animate(withDuration: 5.0, animations: animation.apply) An example of a slightly more complex animation.

(unfortunately, the animation is not visible even on the video in the source - approx. transl.)
There are red and two gray squares. The only note is that the red square at the beginning is the child view of the upper square, and then becomes the child view of the lower one. Both squares move from left to right. The bottom square shrinks in size, and the red one grows.
The stage of “preparation for animation” is what allows you to make such complex animations with a change in the parent view. If you skip the "preparation for animation" - then the expected result can not be obtained.
How LayoutKit Works
I would like to say about the benefits of Swift. LayoutKit is written in Swift, thanks to which it was possible to provide a clean API. We use generics, protocol extensions, and default parameters in the initializer. In the examples above, you could already see the benefits obtained.
How does LayoutKit work? The Layout Protocol is located in the center of the entire LayoutKit, and it determines that there is a markup. Anyone can implement this protocol, and LayoutKit provides a small set of pre-installed (basic) markups that implement it.

Note. On the left in the diagram is a set of markup, in the center is the Markup Protocol, on the right is the markup engine.
There is also a markup engine, which is a collection of classes. These classes work based only on the Layout Protocol: calculating frame sizes, creating their instances (apparently talking about creating allocations - approx. Transl.), Executing the logic of animation.
Basic markup
Basic markup is just a calculation packed into the Markup Protocol:
- LabelLayout - 124 lines of code,
- SizeLayout - 164 lines of code
- InsetLayout - 39 lines of code,
- StackLayout - 175 lines of code.
All these markup we have already seen in the examples. They are the main blocks, and they enable the construction of a decent number of different user interfaces.
Create your own markup
If 4 basic layouts are not enough to describe your user interface, you can do the following:
- Create the desired markup using the composition and the four base attachments.
- Create your own markup by implementing the Layout Protocol, which is called “Layout”.
What makes LayoutKit fast?
Two main reasons:
- LayoutKit does not use a generic solution search algorithm for system constraints like Auto Layout. In contrast, each markup uses a specialized algorithm. Thanks to this, you get an efficient implementation for each markup.
- The slowest thing we do around LayoutKit is sorting the child layouts by flexibility inside StackLayout. For everything else, the algorithmic complexity is O (n).
Let's look at the actually achieved level of performance in numbers. This is an example of execution on iPhone 6 with iOS 9. UICollectionView with UICollectionViewFlowLayout containing 20 cells was used. Each cell as a whole resembles its counterpart from the LinkedIn news feed. It takes up quite a lot of screen space.
On this chart, "more" - "better." We have designated Auto Layout as a reference point 1x. You can see that if you apply UIStackView, then it will work slower than Auto Layout. This is because the UIStackView is based on Auto Layout. The extreme right shows the result of applying the markup manually. Manual layout is 9.4 times faster than Auto Layout. The green bar is LayoutKit, and it is 7.7 times faster than Auto Layout. Not as fast as manual markup, but for this you get a lot of good pieces without having to write a lot of code.
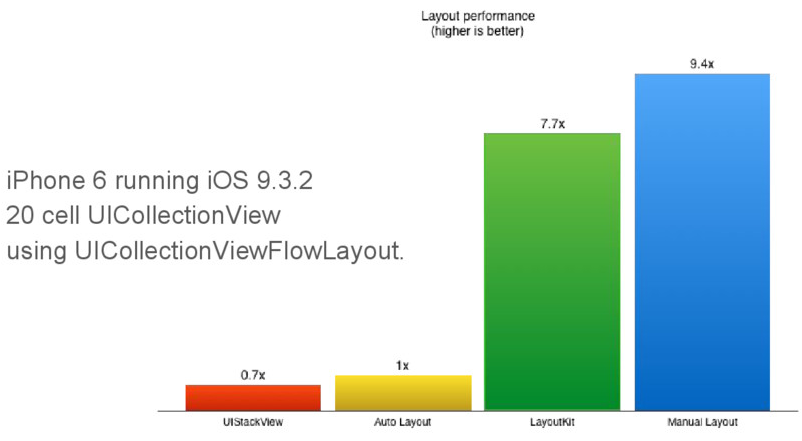
Note. Performance implementations markup. More is better.
You can look at it on the other hand: how much time do you have to execute your own code in the interval between the sequential display of two frames? The black horizontal line is 16 milliseconds. You can see that when using UIStackView, the markup for the news item will take 46 milliseconds. When using Auto Layout - 28 milliseconds. What this graph tells us is that when using Auto Layout or UIStackView, one or two frames will be skipped during each layout run on the main stream.
LayoutKit and manual layout are roughly equal. When using LayoutKit or manual layout it only takes 6 milliseconds. Additionally, with LayoutKit, markup can be performed in a background thread.
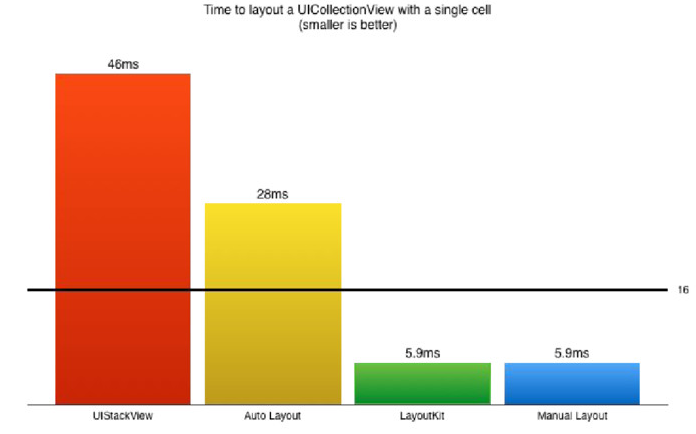
Note. The single-cell UICollectionView markup time. Less is better.
The next thing I want to say is that immutable data structures.
Unchangeable data structures
The markup objects and all intermediate data structures are immutable. What gives the following results:
- Thread safety. The ability to transfer data back and forth between the main and background threads.
- You can easily calculate and cache markup in advance. For example, it is possible to calculate the markup for rotating the screen in the background stream before the user actually turns the screen.
- Simple debugging. If it is known in advance that a variable cannot change, then there is no need to worry about checking this.
Other advantages of LayoutKit
- Automatic language support with right-to-left writing.
- Easy to read, write, build, and test declarative markup.
- Rapid sandbox prototyping.
- Support iOS, macOS, tvOS.
Application
Is LayoutKit ready for use in the industry? Yes, we use it in the main LinkedIn application, as well as in the application for job search.
In our experience, it was very easy to train LayoutKit engineers. Auto Layout training, on the other hand, was not so easy.
Conclusion
Open source code
1) LayoutKit is open source. Code can be obtained at layoutkit.org
2) Apache 2.0 license, so no patent fraud.
3) Release Date June 22, 2016.
4) Today (I took up-to-date data for the beginning of May 2017 - approx. Transl.) On a githaba: 59 observers, 1996 stars, 136 forks.
Thanks
Thanks to everyone who helped with the work on LayoutKit. Thank you, Sergei Taguer (Sergey Tager), Andy Clark (Andy Clark), Peter Livesey (Peter Livesey).
about the author
Nick Snyder is a software engineer on LinkedIn. Currently, he is working on building an infrastructure for mobile applications that is scalable for all company applications. He participated in the preparation of three company applications, including the latest version of the main application. Favorite thing - the creation of reusable components with a clean API, which is a pleasure to work with.
Source: https://habr.com/ru/post/328242/
All Articles