We do GraphQL API on PHP and MySQL. Part 1: Installation, layout and queries

Recently I’ve been hearing more and more about GraphQL. And on the Internet you can already find a lot of articles on how to make your GraphQL server. But almost all of these articles use Node.js as a backend.
I have nothing against Node.js and use it myself with pleasure, but nevertheless I do most of the projects in PHP. In addition, hosting with PHP and MySQL is much cheaper and more affordable than hosting with Node.js. Therefore, it seems to me not fair that there is almost no word about using GraphQL in PHP on the Internet.
')
In this article I want to talk about how to make your GraphQL server in PHP using the graphql-php library and using it to implement a simple API to get data from MySQL.
I decided to abandon the use of any specific PHP framework in this article, but after reading it, it will not be difficult for you to apply this knowledge in your application. Moreover, some frameworks already have their own graphql-php-based libraries that will facilitate your work.
Training
In this article, I will not do the frontend, so for convenient testing of queries to the GraphQL server, I recommend installing the GraphiQL browser extension.
For Chrome, these can be:
You will also need to create tables in the database and fill them with a test dataset.
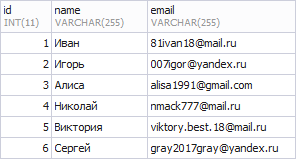
In the table “users” we will keep a list of users:
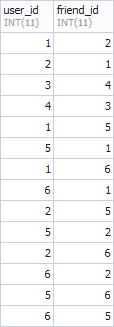
And in the “friendships” table, there are many-to-many connections that will mean friendship between users:
The database dump, like the rest of the code, can be taken from the repository of this article on Github .
Hello, GraphQL!
First you need to install graphql-php in our project. You can do this with composer:
composer require webonyx/graphql-php Now, according to tradition, we write “Hello, World”.
To do this, create a graphql.php file in the root, which will serve as the endpoint of our GraphQL server.
In it we will connect the autoloader composer:
require_once __DIR__ . '/vendor/autoload.php'; Connect GraphQL:
use GraphQL\GraphQL; To force GraphQL to execute a query, it is necessary to transfer the query and the data schema to it.
To receive a request, we write the following code:
$rawInput = file_get_contents('php://input'); $input = json_decode($rawInput, true); $query = $input['query']; To create a scheme, first connect GraphQL \ Schema:
use GraphQL\Schema; The schema constructor accepts an array in which the Query root data type must be specified, which serves to read the data of your API, so we first create this type.
Note
Also, the schema may contain the optional Mutation root data type, which provides an API for writing data, but will not be considered in this article.
In the simplest case, the Query data type must be an instance of the ObjectType class, and its fields must be of simple types (for example, int or string), so we include classes that provide these data types in GraphQL:
use GraphQL\Type\Definition\Type; use GraphQL\Type\Definition\ObjectType; And create the Query data type:
$queryType = new ObjectType([ 'name' => 'Query', 'fields' => [ 'hello' => [ 'type' => Type::string(), 'description' => ' ', 'resolve' => function () { return ', GraphQL!'; } ] ] ]); As you can see, the data type must contain a name (name) and an array of fields (fields), and you can also specify an optional description.
Note
Also, the data type may contain the “interfaces”, “isTypeOf” and “resolveField” properties, but we will not consider them in this article.
Data type fields must also have the required properties "name" and "type". If the “name” property is not specified, then the field key (in this case, “hello”) is used as the name. Also in our example, the “hello” field has the optional properties “description” - the description and “resolve” - the function that returns the result. In this case, the “resolve” function simply returns the string " Hello, GraphQL! ", But in a more complicated situation, it can retrieve any information on the API or from the database and process it.
Note
Also, the fields can contain the args property, which will be discussed in the article later, and the deprecationReason property, which is not covered in this article.
Thus, we have created the root data type “Query”, which contains only one “hello” field, which returns a simple string of text. Let's add it to the data schema:
$schema = new Schema([ 'query' => $queryType ]); And then execute the GraphQL query to get the result:
$result = GraphQL::execute($schema, $query); It remains only to output the result in the form of JSON and our application is ready:
header('Content-Type: application/json; charset=UTF-8'); echo json_encode($result); We wrap the code in a try-catch block, for error handling, and as a result, the code of the graphql.php file will look like
graphql.php
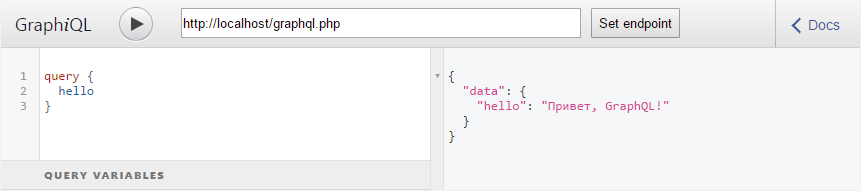
<?php require_once __DIR__ . '/vendor/autoload.php'; use GraphQL\GraphQL; use GraphQL\Schema; use GraphQL\Type\Definition\Type; use GraphQL\Type\Definition\ObjectType; try { // $rawInput = file_get_contents('php://input'); $input = json_decode($rawInput, true); $query = $input['query']; // "" $queryType = new ObjectType([ 'name' => 'Query', 'fields' => [ 'hello' => [ 'type' => Type::string(), 'description' => ' ', 'resolve' => function () { return ', GraphQL!'; } ] ] ]); // $schema = new Schema([ 'query' => $queryType ]); // $result = GraphQL::execute($schema, $query); } catch (\Exception $e) { $result = [ 'error' => [ 'message' => $e->getMessage() ] ]; } // header('Content-Type: application/json; charset=UTF-8'); echo json_encode($result); Check the work GraphQL. To do this, run the extension for GraphiQL, set the endpoint (in my case this is “ localhost / graphql.php ”) and execute the query:
User output from the database
Now let's complicate the task. Let's display a list of users from the MySQL database.
To do this, we need to create another data type for the ObjectType class. In order not to pile up the code in graphql.php, we will move all data types into separate files. And so that we have the opportunity to use data types within ourselves, we arrange them in the form of classes. For example, in the “user” data type you can add the field “friends”, which will be an array of users of the same type “user”.
When we design the data type as a class, it is not necessary to specify the name property from it, because it is taken from the class name by default (for example, the QueryType class will have the name Query).
Now the root data type is Query, which was in graphql.php:
$queryType = new ObjectType([ 'name' => 'Query', 'fields' => [ 'hello' => [ 'type' => Type::string(), 'description' => ' ', 'resolve' => function () { return ', GraphQL!'; } ] ] ]); It will be in a separate QueryType.php file and look like this:
class QueryType extends ObjectType { public function __construct() { $config = [ 'fields' => [ 'hello' => [ 'type' => Type::string(), 'description' => ' ', 'resolve' => function () { return ', GraphQL!'; } ] ] ]; parent::__construct($config); } } And in order to avoid infinite recursion in the future when defining types, in the “fields” property it is better to always specify not an array of fields, but an anonymous function that returns an array of fields:
class QueryType extends ObjectType { public function __construct() { $config = [ 'fields' => function() { return [ 'hello' => [ 'type' => Type::string(), 'description' => ' ', 'resolve' => function () { return ', GraphQL!'; } ] ]; } ]; parent::__construct($config); } } When developing a project, a lot of data types may appear, so it’s better for them to create a separate registry that will serve as a factory for all data types, including basic ones, used in the project. Let's create the App folder, and in it the file, Types.php, which will be the registry for all types of project data.
Also in the App folder we will create a Type subfolder in which we will store all our data types and transfer QueryType.php into it.
Now add the namespace and fill the Types.php registry with the necessary types:
App / Types.php
<?php namespace App; use App\Type\QueryType; use GraphQL\Type\Definition\Type; class Types { private static $query; public static function query() { return self::$query ?: (self::$query = new QueryType()); } public static function string() { return Type::string(); } } So far in our registry there will be only 2 data types: 1 simple (string) and 1 composite (query).
Now in all other files instead of:
use GraphQL\Type\Definition\Type; Connect our registry types:
use App\Types; And replace all the previously specified types of types from the registry.
In QueryType.php instead of:
Type::string() Will be:
Types::string() And the graph in graphql.php will now look like this:
$schema = new Schema([ 'query' => Types::query() ]); To get users from the database, you must provide an interface to access it. You can receive data from the database in any way. Each framework has its own tools for this. For this article, I wrote a simple interface that can connect to the MySQL database and execute queries in it. Since this does not apply to GraphQL, I will not explain how the methods in this class are implemented, but simply give its code:
App / DB.php
<?php namespace App; class DB { private static $pdo; public static function init($config) { self::$pdo = new PDO("mysql:host={$config['host']};dbname={$config['database']}", $config['username'], $config['password']); self::$pdo->setAttribute(PDO::ATTR_DEFAULT_FETCH_MODE, PDO::FETCH_OBJ); } public static function selectOne($query) { $records = self::select($query); return array_shift($records); } public static function select($query) { $statement = self::$pdo->query($query); return $statement->fetchAll(); } public static function affectingStatement($query) { $statement = self::$pdo->query($query); return $statement->rowCount(); } } In the graphql.php file, add the code to initialize the connection to the database:
// $config = [ 'host' => 'localhost', 'database' => 'gql', 'username' => 'root', 'password' => 'root' ]; // DB::init($config); Now in the Type folder, create a User data type that will display user data. The code for the UserType.php file will be:
App / Type / UserType.php
<?php namespace App\Type; use App\DB; use App\Types; use GraphQL\Type\Definition\ObjectType; class UserType extends ObjectType { public function __construct() { $config = [ 'description' => '', 'fields' => function() { return [ 'id' => [ 'type' => Types::string(), 'description' => ' ' ], 'name' => [ 'type' => Types::string(), 'description' => ' ' ], 'email' => [ 'type' => Types::string(), 'description' => 'E-mail ' ], 'friends' => [ 'type' => Types::listOf(Types::user()), 'description' => ' ', 'resolve' => function ($root) { return DB::select("SELECT u.* from friendships f JOIN users u ON u.id = f.friend_id WHERE f.user_id = {$root->id}"); } ], 'countFriends' => [ 'type' => Types::int(), 'description' => ' ', 'resolve' => function ($root) { return DB::affectingStatement("SELECT u.* from friendships f JOIN users u ON u.id = f.friend_id WHERE f.user_id = {$root->id}"); } ] ]; } ]; parent::__construct($config); } } The meaning of the fields can be understood from their description property. The “id”, “name”, “email” and “countFriends” properties have simple types, and the “friends” property is a list of friends of the same users, therefore, it has the type:
Types::listOf(Types::user()) You must also add to our registry a couple of basic types that we have not used before:
public static function int() { return Type::int(); } public static function listOf($type) { return Type::listOf($type); } And just that the User type we created:
private static $user; public static function user() { return self::$user ?: (self::$user = new UserType()); } Return values (resolve) for the properties "friends" and "countFriends" are taken from the database. The anonymous function in the “resolve” first argument receives the value of the current field ($ root), from which you can find the user id to insert it into the friend list request.
Note
I did not pay attention to the screening of requests, because this code was written for educational purposes, but on a real project, of course, this is not possible.
At the end, we will change the QueryType.php code so that the API contains fields for obtaining information about a specific user by his identifier (the “user” field), as well as for getting a list of all users (the “allUsers” field):
App / Type / QueryType.php
<?php namespace App\Type; use App\DB; use App\Types; use GraphQL\Type\Definition\ObjectType; class QueryType extends ObjectType { public function __construct() { $config = [ 'fields' => function() { return [ 'user' => [ 'type' => Types::user(), 'description' => ' id', 'args' => [ 'id' => Types::int() ], 'resolve' => function ($root, $args) { return DB::selectOne("SELECT * from users WHERE id = {$args['id']}"); } ], 'allUsers' => [ 'type' => Types::listOf(Types::user()), 'description' => ' ', 'resolve' => function () { return DB::select('SELECT * from users'); } ] ]; } ]; parent::__construct($config); } } Here, to find out the user ID, the data of which must be obtained, we use the “args” property in the “user” field, which contains an array of arguments. The array “args” is passed to the anonymous function “resolve” by the second argument, using which we recognize the target user id.
Note
Arguments can have their own properties, but in this case I use a simplified form of writing an array of arguments, in which the keys of the array are names, and the values are the types of arguments:
Instead:
'args' => [ 'id' => Types::int() ] Instead:
'args' => [ 'id' => [ 'type' => Types::int() ] ] Now you can start the GraphQL server and test its operation with the following query:
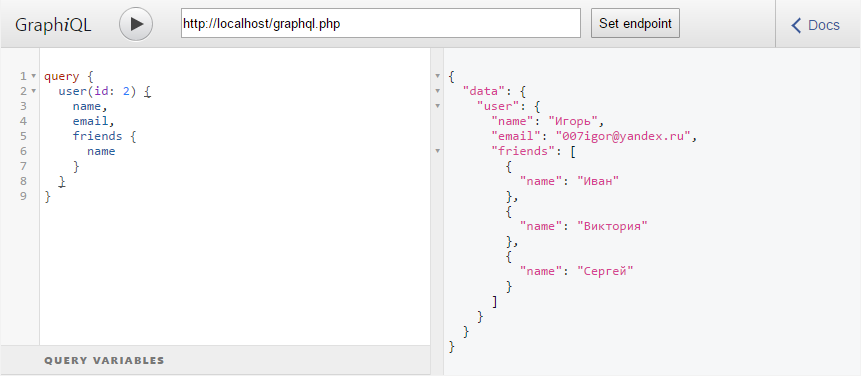
Or so:
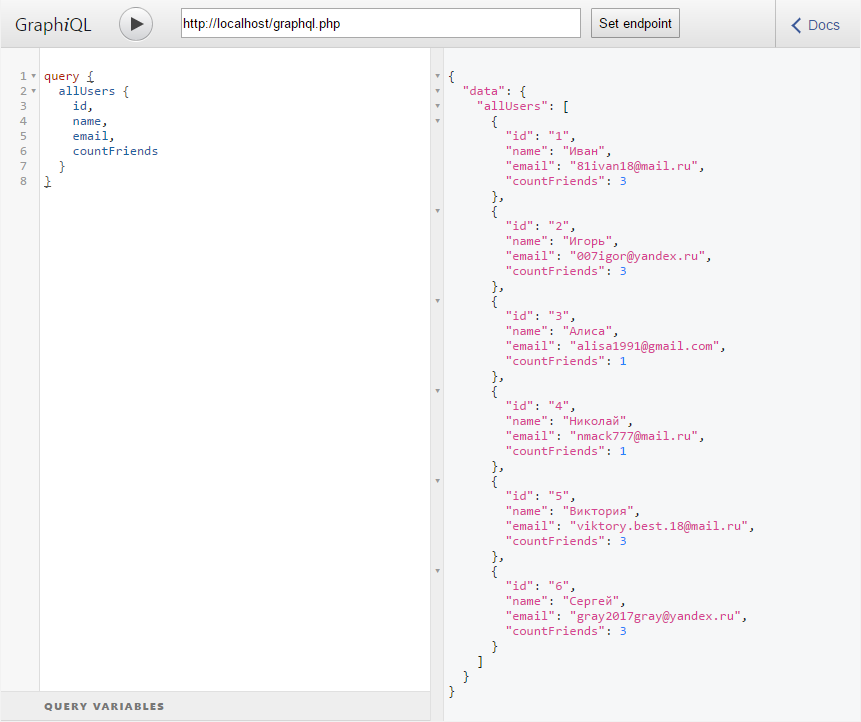
Or any other.
Conclusion
That's all. Read the documentation . Ask questions in the comments. Criticize.
I also recommend reading the source code with comments on Github .
Other parts of this article:
- Installation, layout and queries
- Mutations, variables, validation and security
- Problem solving N + 1 queries
Source: https://habr.com/ru/post/328122/
All Articles