Creating custom IP auto-configuration patterns for 3CX V15 phones
In this article we will look at a very useful technology - custom IP phone templates 3CX. The 3CX autotuning templates allow you to automatically and consistently configure a large fleet of IP phones in your organization. However, 3CX comes with ready-made templates customized by 3CX developers to suit most consumers. If your organization has any special requirements for the configuration of IP phones, for example, its own “layout” of programmable buttons under the phone’s display, configuration of ringing tones, specific SIP parameters, etc. - modify the stock template to suit your needs. How to do this is described below.
First of all, make a copy of the stock template 3CX. And continue to work with a copy.
Please note that in order to apply changes to the template, you need to restart the Management Console Service (MC01) . This is caused by the loss of connections in MyPhone / Web Client clients, which are responsible for the status and indication of user presence. Therefore, it is recommended to debug the templates on the 3CX test system and the test group of IP phones - not in the working environment.
')
The parameters transmitted to the phone begin with this line in the
All parameters specified above this line are necessary for the operation of the 3CX control interface, and they should not be changed. An error in these lines may result in the user template not being visible in the drop-down list in the 3CX control interface. The parameters for the extension in the interface will also be unavailable. In this case, you will need to restore the last working copy of the contents of the template file or completely remove this extension number (user).
There are several ways to make sure that the changes you make will be correctly processed by the IP phone.
If the IP phone is currently connected to 3CX, select it in the interface (section Phones ) and click the + Config button. This forces the configuration specified in the pattern to the phone.

You can also go to the Provisioning tab and copy the autotune URL. Instead of {mac}, specify the MAC address of the IP phone. For example, a URL might be http://mypbx.3cx.eu/provisioning/ads234cfsda/cfg123456787890 . Paste it into any browser, and you will receive a ready-made XML configuration file for a specific IP phone. Some browsers immediately display the contents of the file, if it has the correct XML format. To see the content in text form, right-click and select Show Source .
Depending on the changes made to the templates, you may need to completely reset the IP phone before auto-tuning the user template.
Unlike other manufacturers, Yealink for autotuning uses 2 configuration files. Because of this, the template has two sections <! [CDATA [, which generate two autotune files for each phone.
In order for the custom Yealink template to work correctly, you must manually edit the template before applying the template:

It is strongly not recommended to explicitly specify in the template such parameters as port numbers, IP address or FQDN of the 3CX server, user credentials, etc. If the template does not contain such hard-coded information, it can be called universal (portable). It can be transferred to another installation of the 3CX system. This is very useful for integrators who modify patterns to solve specific user tasks. Universal templates should be placed in the folder
When updating the system, files in this directory are saved (backed up and then restored). Do not use the file name of the custom template matching the name of the stock template . Stock templates are overwritten with every 3CX update. Thus, your custom templates will be overwritten without warning.
If the CustomTemplate \ phones path is missing, create these folders (case sensitive) and restart the MC01 service.
3CX supplies stock templates for all supported IP phones, as well as for some legacy IP phones. Patterns for outdated phones allow them to be automatically correctly configured and provide many of the latest features of 3CX. However, modifying stock templates deprives you of official 3CX support, as described here . If you have problems with a specific IP phone, before opening the application, you should reset it to the default settings and configure the stock template. After this, repeat the actions that caused the problem, and only after that open the application in 3CX technical support.
In other words, 3CX does not provide any additional support for custom templates, with the exception of this manual. In addition, if you have created a custom template, you must constantly monitor updates to the corresponding stock template. Since the stock patterns correspond to the IP phones' firmware, an outdated user pattern may cause the IP phone to work incorrectly with the updated firmware.
Beginning of work
First of all, make a copy of the stock template 3CX. And continue to work with a copy.
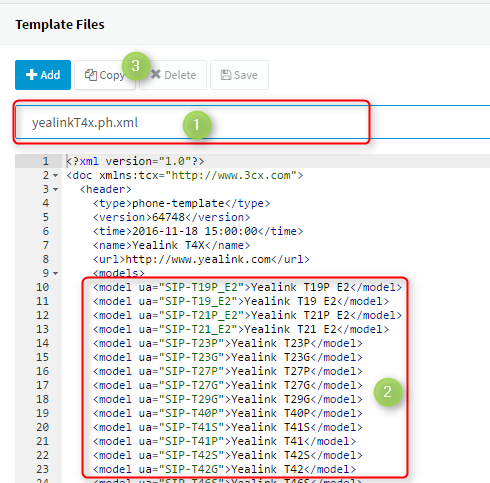
- In the 3CX control interface, go to Settings - Templates .
- In the drop-down list, select the stock template for auto-configuring the IP phone to be changed (1)
- Make sure that the phone model for which the user pattern will be created (2) is indicated inside the template file.
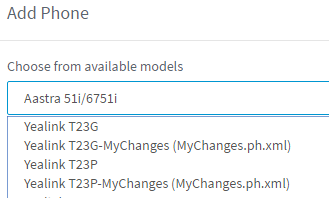
- At the top, click the Copy button (3), enter a new template name, and click OK . This name will be attached to the name of the stock template. You will see the full name of the custom template in the drop-down list, as shown below.
Alteration
Please note that in order to apply changes to the template, you need to restart the Management Console Service (MC01) . This is caused by the loss of connections in MyPhone / Web Client clients, which are responsible for the status and indication of user presence. Therefore, it is recommended to debug the templates on the 3CX test system and the test group of IP phones - not in the working environment.
')
The parameters transmitted to the phone begin with this line in the
<![CDATA[All parameters specified above this line are necessary for the operation of the 3CX control interface, and they should not be changed. An error in these lines may result in the user template not being visible in the drop-down list in the 3CX control interface. The parameters for the extension in the interface will also be unavailable. In this case, you will need to restore the last working copy of the contents of the template file or completely remove this extension number (user).
General recommendations
- Avoid duplicating the same autotuning parameters in the template.
- To clarify the parameters, refer to the auto-tuning documentation of the IP phone manufacturer, but not to 3CX technical support.
- You can also ask a question in the 3CX public forum .
- If any parameter should be changed from the set value B to the default value A , do not just delete this parameter, but explicitly set its value to A.
- Never change the definition of the phone model “ua =” XXXXX ”” specified in the template. It is used by the system.
- After making changes to the template, do not forget to restart the Management Console Service (MC01) and force the phone to re-configure after making the changes.
- If you do not re-tune the phone forcibly, the automatic application of template parameters occurs, as a rule, within 24 hours.
Validation of changes
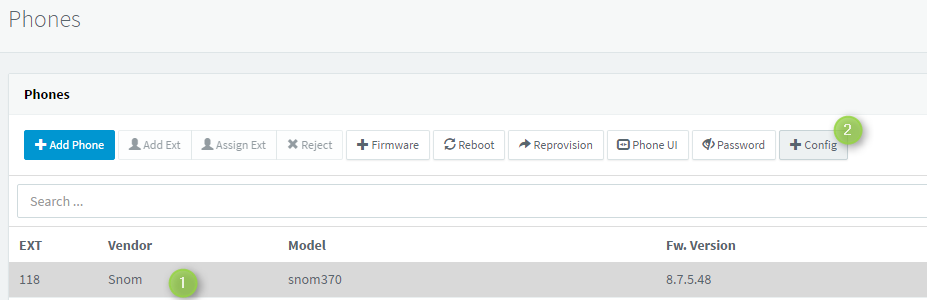
There are several ways to make sure that the changes you make will be correctly processed by the IP phone.
If the IP phone is currently connected to 3CX, select it in the interface (section Phones ) and click the + Config button. This forces the configuration specified in the pattern to the phone.
You can also go to the Provisioning tab and copy the autotune URL. Instead of {mac}, specify the MAC address of the IP phone. For example, a URL might be http://mypbx.3cx.eu/provisioning/ads234cfsda/cfg123456787890 . Paste it into any browser, and you will receive a ready-made XML configuration file for a specific IP phone. Some browsers immediately display the contents of the file, if it has the correct XML format. To see the content in text form, right-click and select Show Source .
Apply custom pattern to IP phone
Application to an unconfigured or reset IP phone
- In the 3CX interface, go to the Phones section.
- Highlight the new phone you want to configure.
- Select Add / Assign Ext , depending on what you need.
- In the Phone Provisioning tab, copy the phone's MAC address.
- In the same tab, in the drop-down list of your phones, delete the attached phone by clicking the Delete button on the right.
- At the top, click the Add button.
- In the drop-down list, select your custom template.
- Paste the previously copied MAC address of the phone.
- Click OK twice to save the user settings.
- Go to the Phones section, select the phone and click Reprovisioning .
Application to configured and connected IP phone
- In the 3CX management interface, go to the Extensions section, click on the number (user) for which you want to apply the template, and go to the Phone Provisioning tab.
- In the drop-down list with your phones, select the IP phone to which you want to apply a custom template.
- Copy the MAC address of the phone.
- Delete the attached phone by clicking the Delete button on the right.
- At the top, click the Add button.
- In the drop-down list, select your custom template.
- Paste the previously copied MAC address of the phone.
- Click OK twice to save the user settings.
- Go to the Phones section, select the phone and click Reprovisioning .
Pattern Features
Depending on the changes made to the templates, you may need to completely reset the IP phone before auto-tuning the user template.
Yealink Custom Templates
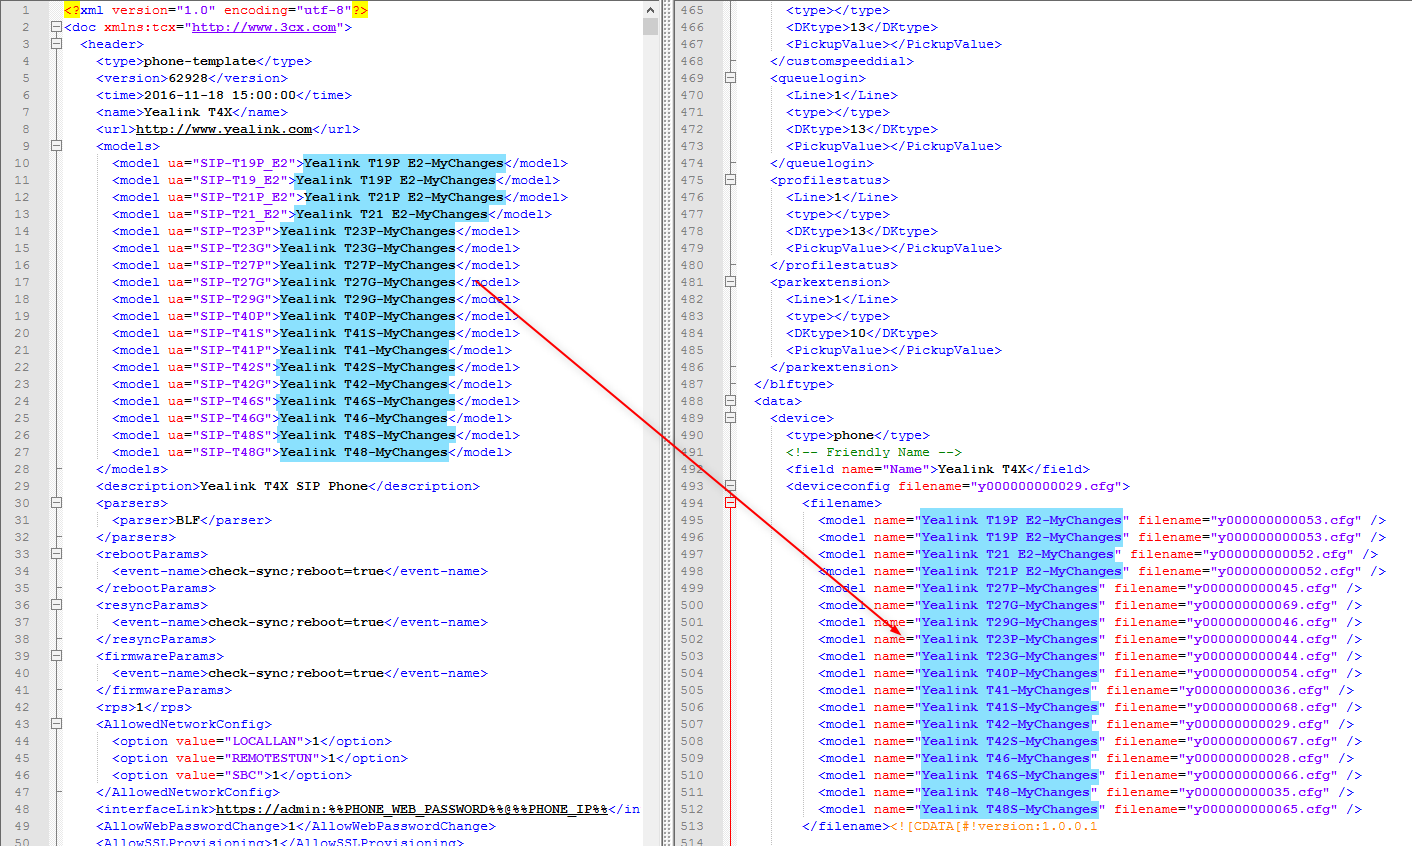
Unlike other manufacturers, Yealink for autotuning uses 2 configuration files. Because of this, the template has two sections <! [CDATA [, which generate two autotune files for each phone.
- The first section <! [CDATA [defines the general parameters of this phone model ( model ) and corresponds to file names of the form y0000000000xx.cfg . Here xx is the identifier of a specific model as defined by Yealink. You can not change it. In this article, these files are called y-files .
- The second section <! [CDATA [defines the individual configuration of the device with a given MAC address. It includes the extension number and other parameters of a particular user.
In order for the custom Yealink template to work correctly, you must manually edit the template before applying the template:
- The name of the custom template changes the name of the corresponding Yealink phone model. Therefore, this new name should be indicated above section <! [CDATA [ for the corresponding model (right screenshot). Please note that the model name corresponds to the correct xx index in the y-file (for example, the y-file T19P has the index 53 , and it cannot be changed!).
- The names y0000000000xx.cfg must be unique in the different user templates. The easiest way to achieve this is to select the contents of the file and copy it into a text editor. Then, using the Replace All function, find the test y0000000000 and replace it with y1000000000 for the first custom template, y2000000000 for the second custom template, etc.
Universal Templates
It is strongly not recommended to explicitly specify in the template such parameters as port numbers, IP address or FQDN of the 3CX server, user credentials, etc. If the template does not contain such hard-coded information, it can be called universal (portable). It can be transferred to another installation of the 3CX system. This is very useful for integrators who modify patterns to solve specific user tasks. Universal templates should be placed in the folder
C: \ ProgramData \ 3CX \ Instance1 \ Data \ Http \ Interface \ provisioning \ XXXXXXXXXX \ CustomTemplates \ phones
When updating the system, files in this directory are saved (backed up and then restored). Do not use the file name of the custom template matching the name of the stock template . Stock templates are overwritten with every 3CX update. Thus, your custom templates will be overwritten without warning.
If the CustomTemplate \ phones path is missing, create these folders (case sensitive) and restart the MC01 service.
3CX custom template support
3CX supplies stock templates for all supported IP phones, as well as for some legacy IP phones. Patterns for outdated phones allow them to be automatically correctly configured and provide many of the latest features of 3CX. However, modifying stock templates deprives you of official 3CX support, as described here . If you have problems with a specific IP phone, before opening the application, you should reset it to the default settings and configure the stock template. After this, repeat the actions that caused the problem, and only after that open the application in 3CX technical support.
In other words, 3CX does not provide any additional support for custom templates, with the exception of this manual. In addition, if you have created a custom template, you must constantly monitor updates to the corresponding stock template. Since the stock patterns correspond to the IP phones' firmware, an outdated user pattern may cause the IP phone to work incorrectly with the updated firmware.
Source: https://habr.com/ru/post/328070/
All Articles