All-In-One: Proxmox + OpenMediaVault or another idea for a home NAS
Astrologers have announced a month of articles about home NAS on Habré, so I will share my success story ...
Not so long ago, I tried the new FreeNAS Coral. I liked it in it, if not all, then very much: this is the new bhyve hypervisor, and the widespread use of 9P for forwarding the file system to the guest, as well as the idea with docker and much more.
In addition, I fell in love even more with ZFS with all its buns, such as deduplication and compression on the fly.
But unfortunately, not everything was as smooth as we would like, and, besides, the flash drive with the installed system ordered to live long, so the time has come for new experiments! This time I decided to implement something similar, but only better and entirely on Linux.
The article will also be a little talked about Docker and automatic proxy with automatic receipt of Letsencrypt certificates.
To begin with, I’ll tell you what I didn’t like about FreeNAS Corral:
- Not ready for production. (recently this release was withdrawn altogether)
- Working with docker is convenient only in the case of single containers, in the case of a lot of containers, management via the web-face becomes extremely inefficient.
- Containers run inside Linux virtual machines, and the ports are proxied through the host, which in principle is not bad, but implies some kind of overhead in comparison if they run directly on the host.
- The bhyve hypervisor does not yet support live-snapshots.
- There is no possibility to create virtual machines not from templates. (at least in GUI)
- The system installed on the USB flash drive was terribly slow.
In principle, one could live with all this, but as I said, the flash drive with the system died and now I have new ideas:
The system must be installed on a hard disk, even if it is the simplest, but on a disk, and not on a USB flash drive.
The idea of installing a separate system from the data is good, but how many flash drives I have tried (including USB 3.0) still works very poorly and shamelessly slows down. So we will put on a separate HDD.ZFS as a file system based. ZFS makes it possible for me not to think about how I can allocate storage resources between file systems and virtual machines, it supports snapshots, deduplication and compression on the fly, as well as the well-known RAIDZ.
- Proxmox as a virtualization management system. It has everything you need: it supports both full and container virtualization, snapshots, automatic backups and much more, and most importantly, ZFS is offered here by default and works right out of the box.
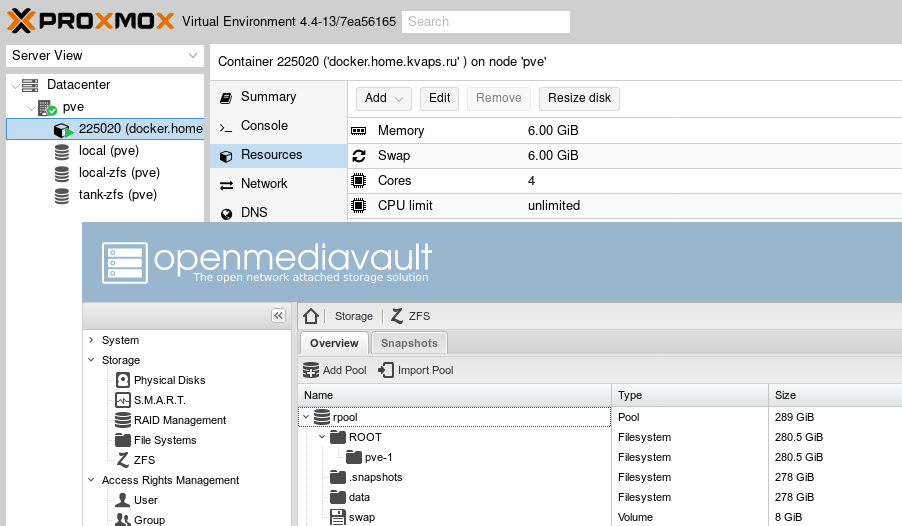
Proxmox is entirely controlled through a modern web interface on ExtJS:


HTML5 client noVNC is used for this.
- OpenMediaVault as a storage management system.
When choosing storage, the main criterion was ZFS support and work on linux, and not on FreeBSD. I wanted to install it on the host system along with Proxmox and not on a separate virtual machine.
I considered several softin for this role, I even tried openATTIC - unfortunately ZFS support turned out to be rather weak there and at the moment many options are simply not there, although I am sure that it will be a little different with CEPH.
While searching, I came across a great plugin that adds zfs support for OpenMediaVault - it gives you complete control over ZFS. Together with OpenMediaVault itself, it fully implements all the functions that I have wanted for a long time to get from the repository.
OpenMediaVault, like Proxmox, is entirely controlled through a modern web interface on ExtJS:
Proxmox and OpenMediaVault will be the core of our system, with the result that we get a multifunctional combine advanced storage system and advanced virtualization in one box, all data, as well as virtual machine disks will be stored on ZFS.
In case you need to deploy a new service, you can always create a separate
virtual machine or container for this. I will tell you about this a little later.
Both systems are delivered and run on Debian, which on the one hand should significantly simplify the task, but on the other hand both systems carry a huge number of packages and dependencies that can periodically overlap and conflict between themselves.
And especially for you, I wrote a small instruction on how to do this.
How to install OpenMediaVault on Proxmox
Install Proxmox
You will need an installation CD, you can take it on the official website:
- https://www.proxmox.com/en/downloads/category/iso-images-pve
(we need version 4, since it is based on Debian 8 Jessie)
Installation is simple and intuitive, so I think it will not cause you too many questions.
I can only say that it is desirable to have a separate physical disk under the system, so that in case of anything, it could always be safely reinstalled without affecting the data disks.
When installing Proxmox, you can also select a ZFS file system or even configure software RAID.
After installation, do not forget to register pve-no-subscription for the Proxmox repository in order to be able to install packages from it.
cat /etc/apt/sources.list.d/pve-enterprise.list deb http://download.proxmox.com/debian jessie pve-no-subscription Installing OpenMediaVault
Install the OpenMediaVault 3.0 Erasmus repository:
echo "deb http://packages.openmediavault.org/public erasmus main" > /etc/apt/sources.list.d/openmediavault.list As I said earlier, the openmediavault package has some insoluble dependencies with Proxmox components, in particular, the watchdog package, which since the release of version 4.0 is a default fencing daemon, is swinging this package. In our case, it is installed by default as a dependency on proxmox-ve , but we do not use it because do not use clustering.
In any case, we need to somehow resolve these dependencies, and therefore we will rebuild the deb-package for openmediavault .
Prepare the environment for the assembly:
apt install build-essential Download the sources of OpenMediaVault 3.0 Erasmus, and go to the build directory:
wget https://github.com/openmediavault/openmediavault/archive/3.x.tar.gz -O - | tar xzvf - cd openmediavault-3.x/deb/openmediavault This command will show us the necessary dependencies that we need to install on the system before building the package:
dpkg-checkbuilddeps Based on the output of the previous command, install the necessary packages:
apt install debhelper fakeroot gettext dh-systemd doxygen Now we need to remove the watchdog from the dependencies, to do this, edit debian/control and remove the watchdog from there.
You also need to remove the doxygen version requirement:
vim debian/control # remove: watchdog # remove version: doxygen (>= 1.8.9.1) Check the dependencies for the build again:
dpkg-checkbuilddeps And run the assembly itself:
dpkg-buildpackage -us -uc After the build, you will receive a ready-made deb-package, which we will install in the system:
cd .. dpkg -i openmediavault_*.deb Now we will install the rest of the dependencies, for this we run:
aptitude -f install Now you can run the script for the initial configuration, change the administrator password / port of the web server and something else:
omv-firstaid Installing the ZFS plugin:
The openmediavault-zfs plugin is installed separately from OpenMediaVault and since it also has unsolvable dependencies, we will also compile it manually:
Download the source code and go to the build directory:
wget https://github.com/OpenMediaVault-Plugin-Developers/openmediavault-zfs/archive/master.tar.gz -O - | tar xzvf - cd openmediavault-zfs-master We'll fix the dependencies, remove the zfs-dkms as well as in Proxmox since version 4.0, ZFS is already bundled with the kernel, we will also remove linux-headers-* / pve-headers to the heap as unnecessary:
vim debian/control # remove: zfs-dkms # remove: linux-headers-amd64 | pve-headers | linux-headers-3.16.0-4-all Check the build dependencies:
dpkg-checkbuilddeps Run the build:
dpkg-buildpackage -us -uc After assembly, install the resulting package and dependencies for it:
cd .. dpkg -i openmediavault-zfs_*.deb aptitude -f install If there are difficulties with packing packages, there is a good article in Russian in the Debian documentation:
- [ https://www.debian.org/doc/manuals/maint-guide/build.ru.html [) ( Chapter 6. Build Package)
That's probably all, now you have Proxmox and OpenMediaVault installed on the same system, it's time to go to the GUI to create and configure ZFS pools and connect them to Proxmox.
How to do this, I will not describe, this is so full of information on the Internet.
What's next?
Then the most interesting, now you can begin to configure additional services.
Of these, I want to show how to configure:
- Wordpress is one of the easiest and most common engines for building websites.
- Nextcloud - your personal cloud and interface for accessing files.
- Deluge - in my opinion the best torrenkachalkal.
- Emby is a free media server that allows you to stream media directly in a browser or via DLNA.
- nginx-proxy - which will automatically generate a config and proxy all these services.
- nginx-proxy-companion - will receive and update certificates in automatic order.
Each of these services will be available on a subdomain and protected by SSL, with a valid certificate from Letsencrypt. Docker will come to the rescue of us, I think that it is much easier than you could imagine.
I assume you have already configured the ZFS repository and connected it to the Proxmox interface.
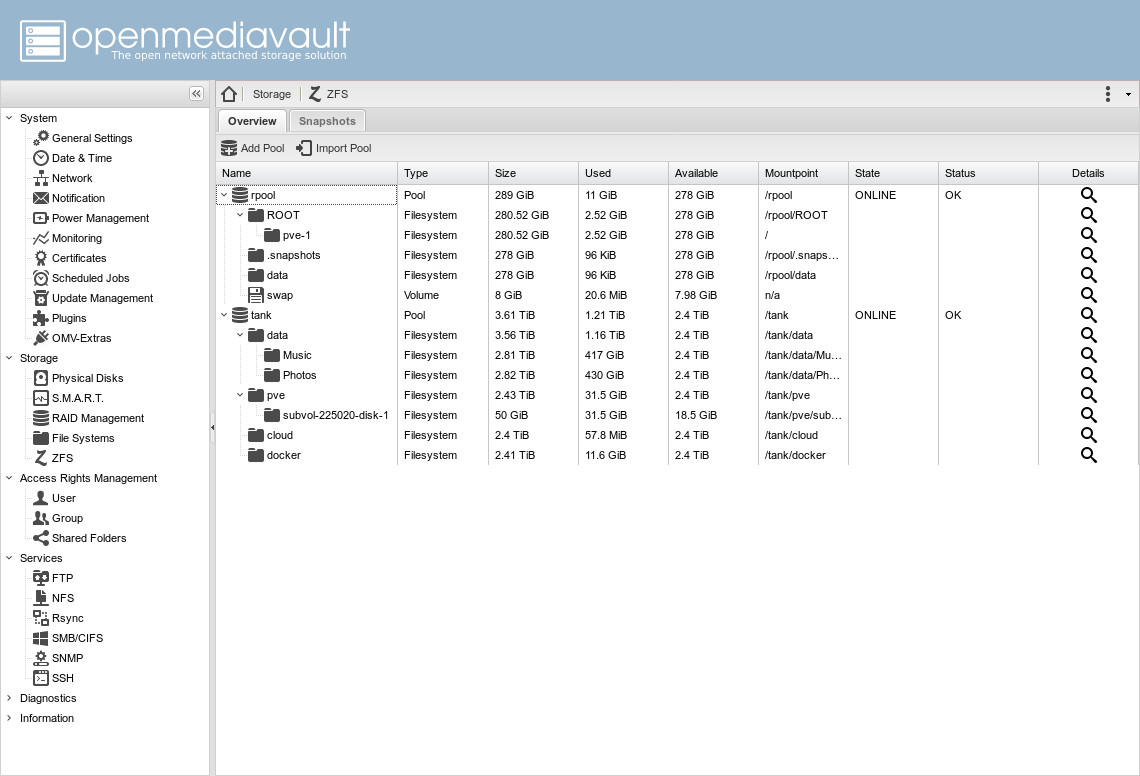
In my particular case, there are two pools:
rpoolis the one that proxmox created when installingtankis a RAIDZ pool of three data disks
I also created four main datastores:
tank/pve- for Proxmox virtual machinestank/docker- data of services running in docker will be stored heretank/cloud- for nextcloud datatank/datais the main file setting, there are several other datastores inside, such asMusic,Photos,Movies, each with its own settings, for example,MusicandPhotosdeduplication is enabled, since I have a large number of duplicate files that I have unsubscribed .. .
Now I want to create a separate virtual machine in Proxmox, or rather the container and run everything in it, so that I no longer scoff at the main system and, if possible, isolate these services from it.
I added the following lines to the container configuration:
lxc.aa_profile: unconfined lxc.cap.drop: mp0: /tank/data,mp=/data mp1: /tank/cloud,mp=/cloud mp2: /tank/docker,mp=/docker The first two give out more rights to the container, so it becomes possible to launch other containers inside it, this is necessary for the docker to function.
The remaining lines connect the necessary directories to the guest's file system.
It is worth paying attention to the fact that if you have others inside the zfs-datastores connected to the container, then you also need to add them to the container configuration, otherwise you risk getting some unpleasant bugs. I will give an example:
mp0: /tank/data,mp=/data mp3: /tank/data/Music,mp=/data/Music mp4: /tank/data/Pictures,mp=/data/Pictures Inside the container we need to install docker and docker-compose , and after that I will show how everything is organized.
Docker
In the /docker directory, I have created directories for each individual service:
# ls /docker/ deluge emby nextcloud nginx-proxy wordpress Each directory contains a separate docker-compose.yml file and data for each individual container.
For example, docker-compose.yml looks like docker-compose.yml :
nginx-proxy: restart: on-failure:5 image: jwilder/nginx-proxy:alpine ports: - "80:80" - "443:443" volumes: - ./certs:/etc/nginx/certs:ro - ./vhost.d:/etc/nginx/vhost.d - ./html:/usr/share/nginx/html - /var/run/docker.sock:/tmp/docker.sock:ro labels: - "com.github.jrcs.letsencrypt_nginx_proxy_companion.nginx_proxy=true" nginx-proxy-companion: restart: on-failure:5 image: jrcs/letsencrypt-nginx-proxy-companion volumes: - ./certs:/etc/nginx/certs:rw - /var/run/docker.sock:/var/run/docker.sock:ro volumes_from: - nginx-proxy You can go to the directory with nginx-proxy and run docker-compose up you will teach the finished running service, it is very convenient!
- The
nginx-proxycontainer in two words works as follows, it starts listening todocker.sockand if it loads the running container with the variableVIRTUAL_HOST, it will generate a config for this virtual host, with proxying to the virtual ip container. - The
nginx-proxy-companioncontainer works in a similar way, if it detects a running container with the variableLETSENCRYPT_HOSTit automatically receives a certificate for it.
For more detailed information refer to the official projects page:
- nginx-proxy - which will automatically generate a config and proxy all these services.
- nginx-proxy-companion - will receive and update certificates in automatic order.
Immediately I must warn you, nginx-proxy does not work with Compose file version 2 , because requires that there is one common network between containers.
So you need to use only Compose file version 1 , or keep all services in one config.
Now the configs themselves:
mysql: restart: on-failure:5 image: mariadb:10.0 hostname: mysql volumes: - /etc/localtime:/etc/localtime:ro - ./mysql:/var/lib/mysql environment: - MYSQL_ROOT_PASSWORD=seekac7aexoh2eithut6sie1eYaeNgei - MYSQL_DATABASE=example_org - MYSQL_USER=example_org - MYSQL_PASSWORD=imieth7iev4dah6eeraik6Ohz6oiVup7 wordpress: restart: on-failure:5 image: wordpress hostname: example.org volumes: - /etc/localtime:/etc/localtime:ro - ./wordpress:/var/www/html links: - mysql:mysql environment: - "VIRTUAL_HOST=example.org,www.example.org" - "LETSENCRYPT_HOST=example.org,www.example.org" - "LETSENCRYPT_EMAIL=admin@example.org" nextcloud: restart: on-failure:5 image: nextcloud hostname: cloud domainname: example.org volumes: - /etc/localtime:/etc/localtime:ro - ./nextcloud:/var/www/html - /cloud:/cloud - /data:/data links: - mysql:mysql - redis:redis environment: - "VIRTUAL_HOST=cloud.example.org" - "LETSENCRYPT_HOST=cloud.example.org" - "LETSENCRYPT_EMAIL=admin@example.org" redis: restart: on-failure:5 image: redis hostname: redis volumes: - /etc/localtime:/etc/localtime:ro mysql: restart: on-failure:5 image: mariadb:10.0 hostname: mysql volumes: - /etc/localtime:/etc/localtime:ro - ./mysql:/var/lib/mysql environment: - MYSQL_ROOT_PASSWORD=ei8aiWaeDaeDoo8aida0woaNaiy8deer - MYSQL_DATABASE=nextcloud - MYSQL_USER=nextcloud - MYSQL_PASSWORD=rahGhied8lei6ogh2keitie1chaiheex deluge: restart: on-failure:5 image: linuxserver/deluge hostname: torrent domainname: example.org volumes: - /etc/localtime:/etc/localtime:ro - ./config:/config - /data:/data ports: - 53160:53160 - 53160:53160/udp - 8112:8112 - 58846:58846 - 6881:6881 expose: - 8112 environment: - PUID=33 - PGID=33 - "VIRTUAL_HOST=torrent.example.org" - "VIRTUAL_PORT=8112" - "LETSENCRYPT_HOST=torrent.example.org" - "LETSENCRYPT_EMAIL=admin@example.org" emby: restart: on-failure:5 image: emby/embyserver volumes: - /etc/localtime:/etc/localtime:ro - ./config:/config - /data:/data environment: - APP_UID=33 - APP_GID=33 net: host For emby, I used net: host - this means that the container will use the host network instead of the virtual network for docker. This step is required for the DLNA server to work. For the same reason, the VIRTUAL_HOST and LETSENCRYPT_HOST variables are not specified.
But stand, how to be? - how to add such a container to nginx-proxy ?
And what if I want to have access to the Proxmox and OpenMediaVault web interfaces? - and they are started not at all in docker or even on this host.
The solution didn’t take a long time to look for itself; for these types of connections, you can create another separate proxy container:
nginx-local: restart: on-failure:5 image: nginx expose: - 80 environment: - "VIRTUAL_HOST=media.example.org,pve.example.org,nas.example.org" - "LETSENCRYPT_HOST=media.example.org,pve.example.org,nas.example.org" - "LETSENCRYPT_EMAIL=admin@example.org" volumes: - ./local-config:/etc/nginx/conf.d With this config:
# If we receive X-Forwarded-Proto, pass it through; otherwise, pass along the # scheme used to connect to this server map $http_x_forwarded_proto $proxy_x_forwarded_proto { default $http_x_forwarded_proto; '' $scheme; } # If we receive X-Forwarded-Port, pass it through; otherwise, pass along the # server port the client connected to map $http_x_forwarded_port $proxy_x_forwarded_port { default $http_x_forwarded_port; '' $server_port; } # Set appropriate X-Forwarded-Ssl header map $scheme $proxy_x_forwarded_ssl { default off; https on; } access_log off; # HTTP 1.1 support proxy_http_version 1.1; proxy_buffering off; proxy_set_header Host $http_host; proxy_set_header Upgrade $http_upgrade; proxy_set_header X-Real-IP $remote_addr; proxy_set_header X-Forwarded-For $proxy_add_x_forwarded_for; proxy_set_header X-Forwarded-Proto $proxy_x_forwarded_proto; proxy_set_header X-Forwarded-Ssl $proxy_x_forwarded_ssl; proxy_set_header X-Forwarded-Port $proxy_x_forwarded_port; # Mitigate httpoxy attack (see README for details) proxy_set_header Proxy ""; server { server_name _; # This is just an invalid value which will never trigger on a real hostname. listen 80; return 503; } # media.example.org server { server_name media.example.org; listen 80 ; location / { proxy_pass http://192.168.100.20:8096/; } } # pve.example.org server { server_name pve.example.org; listen 80 ; location / { proxy_pass https://192.168.100.10:8006/; } } # nas.example.org server { server_name nas.example.org; listen 80 ; location / { proxy_pass http://192.168.100.10:8080/; } } That's all, now you have a NAS with virtualization and several excellent services protected by SSL according to the latest fashion:
https://example.orghttps://cloud.example.orghttps://torrent.example.orghttps://media.example.orghttps://nas.example.orghttps://pve.example.org
Thank you for your attention and good luck in experiments :)
')
Source: https://habr.com/ru/post/328048/
All Articles