Computer vision on the example of an application for IKEA. Part 1
I was preparing for the next hackathon, I decided to update my knowledge in the field of computer vision. Last time, the problem of recognizing auto numbers in a video stream I was not able to solve quickly "head on." Now, on reflection, I decided to simplify the task a bit. There were a lot of ideas, I looked through the pictures in the phone and came across a familiar case for everyone who visited the ikea store - a photo with a check, where the item number and its position in the self-service warehouse are listed.
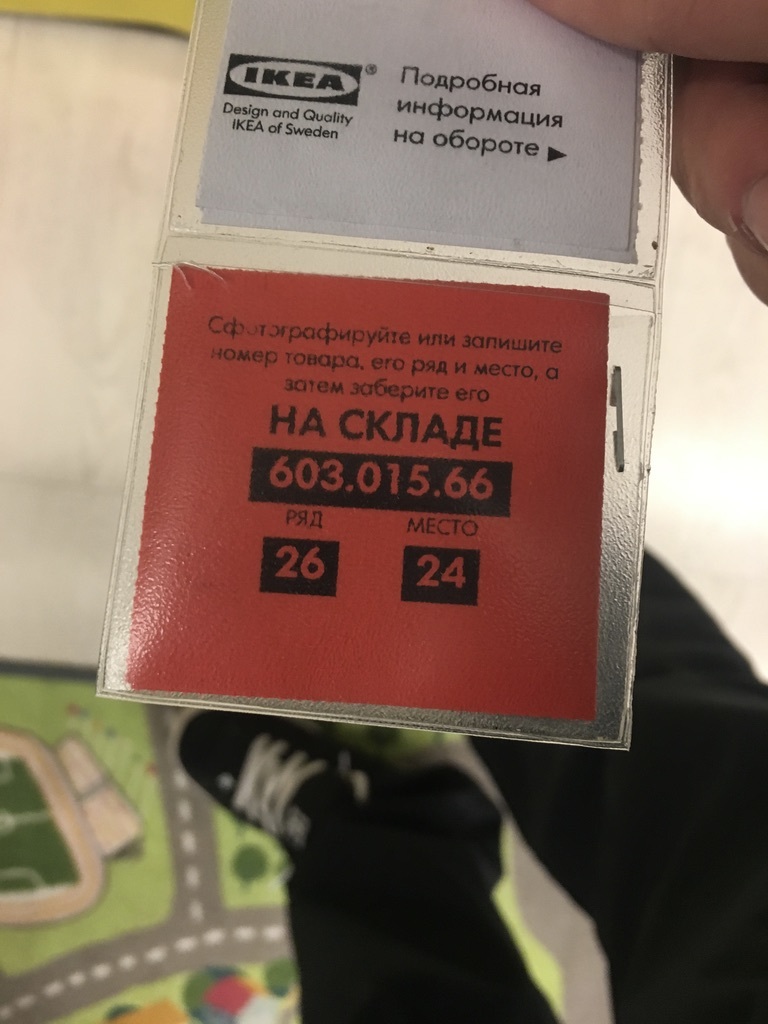
Case, of course, with a stretch. Having photos of checks in the phone is not at all necessary for the phone to recognize them, from the photo you can clearly see where and what you need to get. On the other hand, we are interested in the example of the work of such software + we can simplify our lives by placing all the goods we need on the warehouse map. Those. Having 4-5 photos of checks, we can recognize them and build a map of the route of running around the self-service warehouse. Well, one reason for the implementation of our ideas came up. The second reason is colors. Personally, I have repeatedly come across the fact that you check a check, for example, a black dresser, not paying attention to the fact that there is a white one next to you, which you need, whose check you wanted to take a picture of. When recognizing a check, we can immediately show a preview to the user of the product that is on the check (and therefore on the spot in the self-service warehouse). Great, the second reason behind the ears is found.
')
So what do we need to do?
We define the toolkit. We will work with the image using OpenCV , trust recognition
  Tesseract . Shell write on
  NodeJS .
The choice of OpenCV is obvious. Even the pros who can rewrite most of the image processing algorithms with their hands most often use OpenCV. Not for nothing, this library stands for “ Open Source Computer Vision Library ”. Although purely in theory, you can come up with a solution to our cases on gd + imagick. But this is a perversion.
OpenCV will be responsible for finding the check on camera + for preparing the check for recognition.
At one time I used Tesseract to recognize captcha Yandex, Rambler, Google. There is no doubt that this library will easily cope with the recognition of plain text. Well, to be honest, being a "profane" in ocr, I just do not know anything else so powerful with open source.
NodeJS is an exclusively personal choice. At the moment I am doing a lot of things in JS and this language is just closer syntactically closer, if there is such a word at all.
I do not pretend to the speed and quality of algorithms, and even more so to clean code, the task for me was to extremely quickly recall computer vision, update my knowledge and implement a project. Therefore, any edits and criticisms are welcome, but please, without hysteria. Well, I repeat, I share the practice for the same "old men" like myself, so as not to be a complete sucker among the party of young progres (where my 17 years old ...).
They drove. I created turnip on githaba , all the code is actually there. Let's understand a little more. In the turnip in / public / images / you will find 4 pictures of Ikeev's checks. So it turned out that I had pictures from different angles, different sizes. What you need for tests.
The OpenCV library is very powerful and is far from being limited to those features that I will discuss in this article. At first, I didn’t say for nothing that GD + IMagick can solve our problem. In particular, the pros would most likely use the Template Matching technique to detect a check, but we will go more simply. Fortunately, ikea helps us a lot with this.
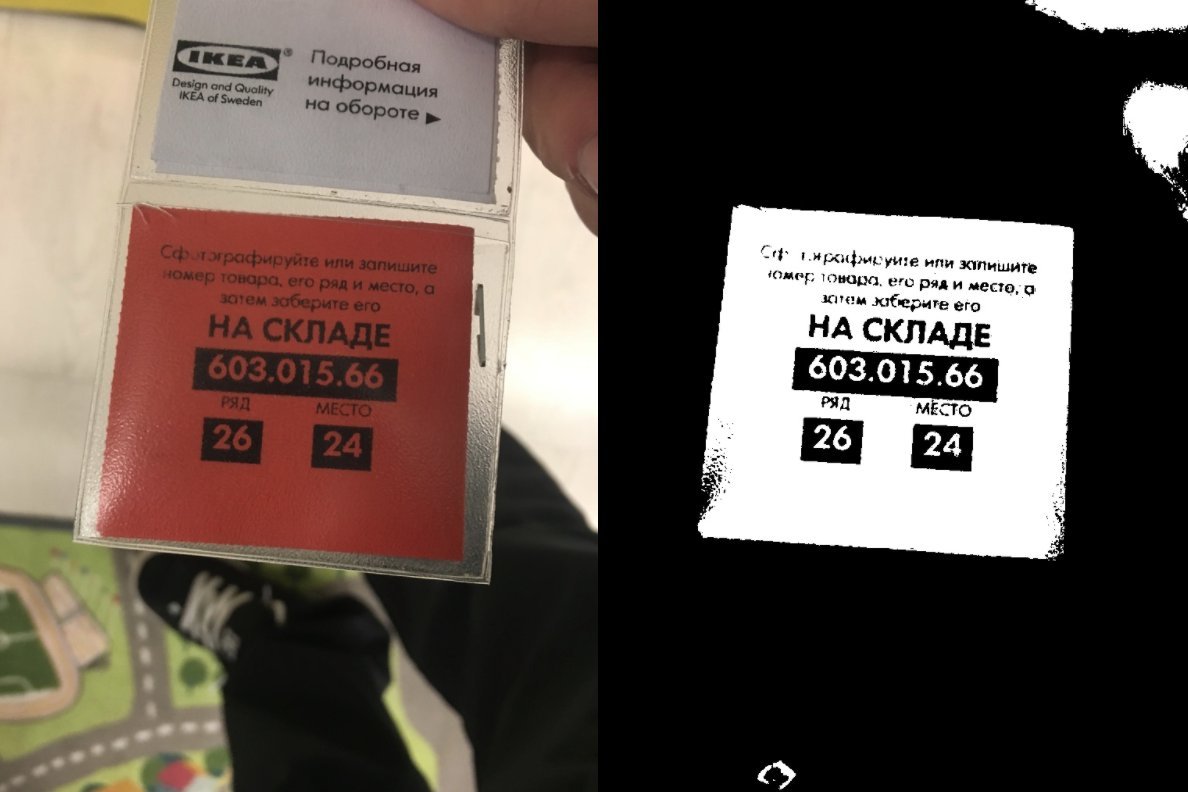
The first thing we need to know is that the check with the info about the location of the goods is always red. Well, from this we will make a start.
Convert our image (which in this case is read into the process variable) in HSV and look for the image between the specified channels. I have little idea how it works, but in search of the opportunity to select a specific color from the image and its range I came across two materials, a developer’s article and official documentation . From the code it is clear that I use the matrix between [0,100,100] and [10,255,255] in the HSV palette. From the official documentation on color highlighting, it follows that the general rule is very simple. We take [h-10, 100, 100] and [h + 10, 255,255], where h is the color we need. I used the colorizer.org service to get the indexes.
Let's see what happened.
Great, we've singled out red and its shades. Total found a check, my hand and a red square on the carpet print. Now, using the findContour method , we can easily separate flies from cutlets, i.e. find the "borders" in our image.
Pay attention to the line
Using the approxPolyDP method, we “smooth the corners” of the contours found, eliminating “noise”. More information can be found on the pages of official documentation .
It is also worth noting that findContour does an excellent job with its task, but the order of the points found may be unpredictable. It is important for us to keep the order of points in the format top-left, top-right, bottom-right, bottom-left for the correct perspective.
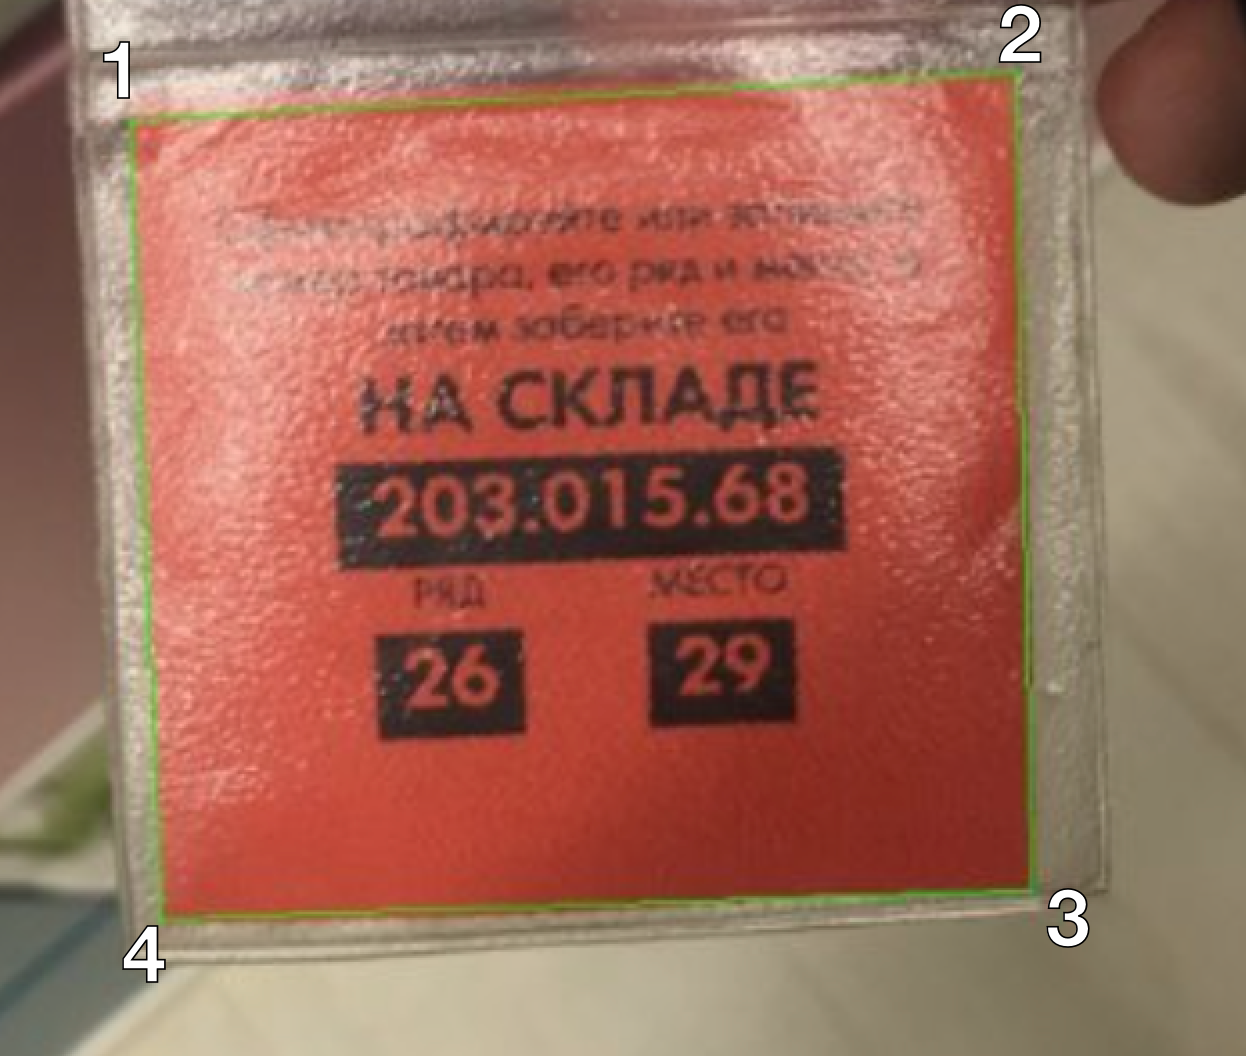
It would seem that the task is simple, to find a top-left point and so on. In practice, this has turned into a bunch of odds over arrays. He started to google, came across an excellent blog on computer vision and opencv, including the developer suggested the trick to search for these very “extremes” for the positions we need. In particular, the minimum sum of x + y coordinates will always be equal to the top-left point, while the maximum sum will be equal to bottom-right. Similarly, the maximum spacing xy will be equal to the top-right point and the minimum will be equal to the bottom-left point. Get the pointOrder method
The order we need for perception. We know in advance the horizontal and vertical points (this is 0/0, maxWidth / 0, maxWidth / maxHeight and 0 / maxHeight) and in order not to turn the image, we need to transfer the points of our contour in that order.
Prepared the contours, the next step aligns the perspective.

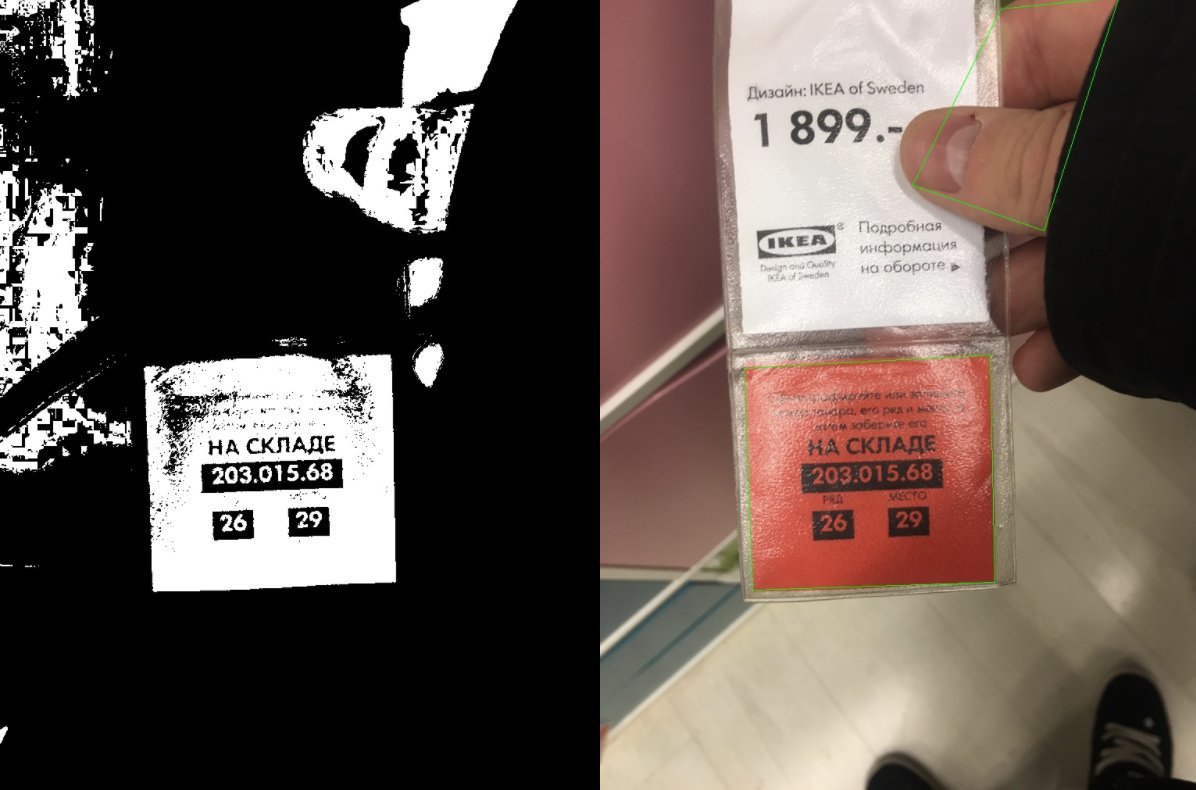
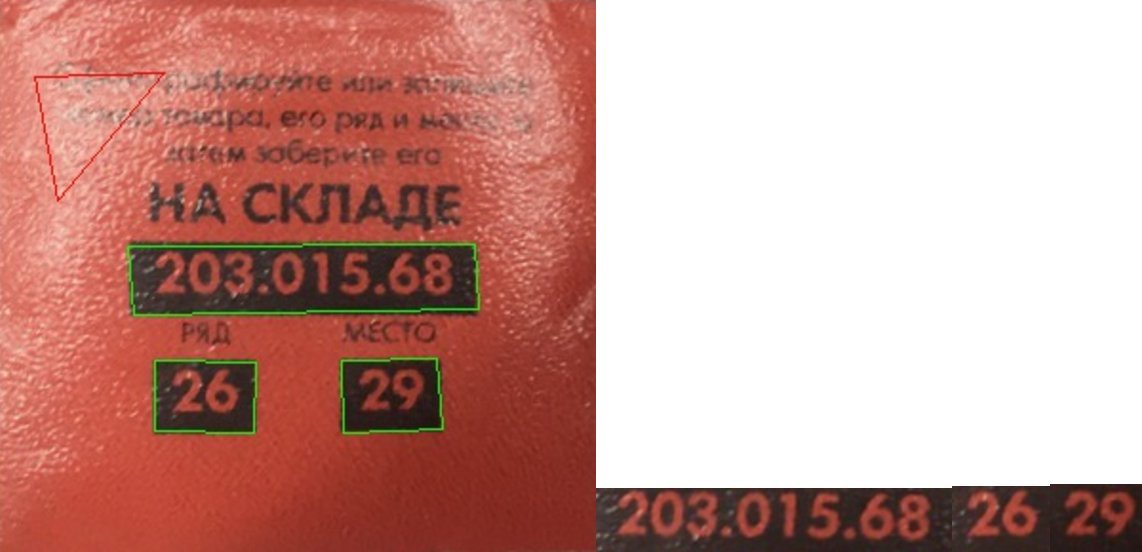
Find 2 contours, as can be seen from the image. One we need, the second "noisy."
First of all, we eliminate the "left" contours of the opposite, i.e. immediately identify the check. And what do we know about the check? True, it is rectangular in shape, with text and 3 data rectangles. From them, and we will build. Already in the found images we look for contours by analogy, however this time we select only those found areas in which there are 3 rectangular contours.
Oh, well, in general, I warned that the task was QUICKLY to consider an example, with the duplication of code, I did not particularly bother. And I don’t like to do it when the project is not prepared for a pro. And if to be frank, for many production projects in some places I leave code duplication to make it easier for beginners to read. We pay attention that the contours can be found in a random order, it is important for us to know their order, where is the product code, where is the row, and where is the place.
At the exit, we found an ikea check, made sure that it was he + who extracted the data for recognition.
In order to simplify the tesseract life, we will cut off our images, isolate the red (in order to make the image BW) and enlarge. Increasing slightly slows down tesseract, but increases the% recognition by an order of magnitude.
We get in the console
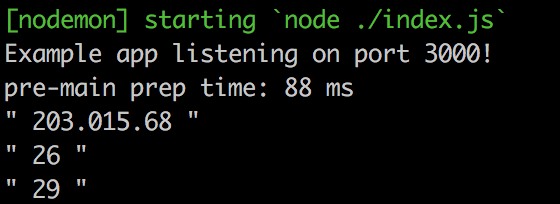
It is not bad.
In the following parts, we will transfer the code to mobile platforms and make a mobile cross platform. Fill the application with storage cards, loading the ikea database and, of course, we’ll make everything work offline.
Well, duplicate link on the turnip project.
Material used:
Useful materials:
Case, of course, with a stretch. Having photos of checks in the phone is not at all necessary for the phone to recognize them, from the photo you can clearly see where and what you need to get. On the other hand, we are interested in the example of the work of such software + we can simplify our lives by placing all the goods we need on the warehouse map. Those. Having 4-5 photos of checks, we can recognize them and build a map of the route of running around the self-service warehouse. Well, one reason for the implementation of our ideas came up. The second reason is colors. Personally, I have repeatedly come across the fact that you check a check, for example, a black dresser, not paying attention to the fact that there is a white one next to you, which you need, whose check you wanted to take a picture of. When recognizing a check, we can immediately show a preview to the user of the product that is on the check (and therefore on the spot in the self-service warehouse). Great, the second reason behind the ears is found.
')
So what do we need to do?
- Find the ikea check in the image.
- Identify the check and prepare the data from the check for recognition.
- Recognize the data.
We define the toolkit. We will work with the image using
The choice of OpenCV is obvious. Even the pros who can rewrite most of the image processing algorithms with their hands most often use OpenCV. Not for nothing, this library stands for “ Open Source Computer Vision Library ”. Although purely in theory, you can come up with a solution to our cases on gd + imagick. But this is a perversion.
OpenCV will be responsible for finding the check on camera + for preparing the check for recognition.
At one time I used Tesseract to recognize captcha Yandex, Rambler, Google. There is no doubt that this library will easily cope with the recognition of plain text. Well, to be honest, being a "profane" in ocr, I just do not know anything else so powerful with open source.
NodeJS is an exclusively personal choice. At the moment I am doing a lot of things in JS and this language is just closer syntactically closer, if there is such a word at all.
I do not pretend to the speed and quality of algorithms, and even more so to clean code, the task for me was to extremely quickly recall computer vision, update my knowledge and implement a project. Therefore, any edits and criticisms are welcome, but please, without hysteria. Well, I repeat, I share the practice for the same "old men" like myself, so as not to be a complete sucker among the party of young progres (where my 17 years old ...).
They drove. I created
1. Detection of a check on the image.
The OpenCV library is very powerful and is far from being limited to those features that I will discuss in this article. At first, I didn’t say for nothing that GD + IMagick can solve our problem. In particular, the pros would most likely use the Template Matching technique to detect a check, but we will go more simply. Fortunately, ikea helps us a lot with this.
The first thing we need to know is that the check with the info about the location of the goods is always red. Well, from this we will make a start.
// convert to HSV process.convertHSVscale(); // find only red process.inRange([0,100,100], [10,255,255]); Convert our image (which in this case is read into the process variable) in HSV and look for the image between the specified channels. I have little idea how it works, but in search of the opportunity to select a specific color from the image and its range I came across two materials, a developer’s article and official documentation . From the code it is clear that I use the matrix between [0,100,100] and [10,255,255] in the HSV palette. From the official documentation on color highlighting, it follows that the general rule is very simple. We take [h-10, 100, 100] and [h + 10, 255,255], where h is the color we need. I used the colorizer.org service to get the indexes.
Let's see what happened.
Great, we've singled out red and its shades. Total found a check, my hand and a red square on the carpet print. Now, using the findContour method , we can easily separate flies from cutlets, i.e. find the "borders" in our image.
var possibleContour = []; // var contours = process.findContours(); for (var i = 0; i < contours.size(); i++) { if (contours.area(i) < 20000) continue; // var arcLength = contours.arcLength(i, true); contours.approxPolyDP(i, 0.05 * arcLength, true); // (« …») switch(contours.cornerCount(i)) { case 4: contourImg.drawContour(contours, i, [0,255,0]); // 4- break; default: contourImg.drawContour(contours, i, [0,0,255]); // } if (contours.cornerCount(i) ==4) { // 4- . , , . possibleContour.push(pointOrder(contours.points(i))); } } Pay attention to the line
var arcLength = contours.arcLength(i, true); contours.approxPolyDP(i, 0.05 * arcLength, true); // (« …») Using the approxPolyDP method, we “smooth the corners” of the contours found, eliminating “noise”. More information can be found on the pages of official documentation .
It is also worth noting that findContour does an excellent job with its task, but the order of the points found may be unpredictable. It is important for us to keep the order of points in the format top-left, top-right, bottom-right, bottom-left for the correct perspective.
It would seem that the task is simple, to find a top-left point and so on. In practice, this has turned into a bunch of odds over arrays. He started to google, came across an excellent blog on computer vision and opencv, including the developer suggested the trick to search for these very “extremes” for the positions we need. In particular, the minimum sum of x + y coordinates will always be equal to the top-left point, while the maximum sum will be equal to bottom-right. Similarly, the maximum spacing xy will be equal to the top-right point and the minimum will be equal to the bottom-left point. Get the pointOrder method
pointOrder: function (point) { var ordered = []; var sum = []; for (var x in point) { sum[x] = point[x].x+point[x].y; } ordered[0] = point[sum.indexOf(_.min(sum))]; ordered[2] = point[sum.indexOf(_.max(sum))]; var diff = []; for (var x in point) { diff[x] = point[x].x-point[x].y; } ordered[1] = point[diff.indexOf(_.max(diff))]; ordered[3] = point[diff.indexOf(_.min(diff))]; return ordered; } The order we need for perception. We know in advance the horizontal and vertical points (this is 0/0, maxWidth / 0, maxWidth / maxHeight and 0 / maxHeight) and in order not to turn the image, we need to transfer the points of our contour in that order.
Prepared the contours, the next step aligns the perspective.
var warpImg = []; for (var x in possibleContour) { var point = possibleContour[x]; var maxWidth = 0; var maxHeight = 0; var tmp = 0; // width/height if (pointWidth(point[0], point[1]) >pointWidth(point[3], point[2])) { maxWidth = Math.round(pointWidth(point[0], point[1])); } else { maxWidth = Math.round(pointWidth(point[3], point[2])); } if (pointWidth(point[0], point[3]) >pointWidth(point[1], point[2])) { maxHeight = Math.round(pointWidth(point[0], point[3])); } else { maxHeight = Math.round(pointWidth(point[1], point[2])); } // var tmpWarpImg = img.copy(); var srcWarp = [point[0].x, point[0].y, point[1].x, point[1].y, point[2].x, point[2].y, point[3].x, point[3].y]; var dstWarp = [0, 0, maxWidth, 0, maxWidth, maxHeight, 0, maxHeight]; var perspective = tmpWarpImg.getPerspectiveTransform(srcWarp, dstWarp); tmpWarpImg.warpPerspective(perspective, maxWidth, maxHeight, [255, 255, 255]); warpImg.push(tmpWarpImg); } Find 2 contours, as can be seen from the image. One we need, the second "noisy."
2. Identify the receipt and prepare the data.
First of all, we eliminate the "left" contours of the opposite, i.e. immediately identify the check. And what do we know about the check? True, it is rectangular in shape, with text and 3 data rectangles. From them, and we will build. Already in the found images we look for contours by analogy, however this time we select only those found areas in which there are 3 rectangular contours.
// filter wrapped img var trueWarpImg = []; for (var x in warpImg) { var warpedImg = warpImg[x].copy(); // convert to HSV warpedImg.convertHSVscale(); // find only red warpedImg.inRange([0,100,100], imgProc.[10,255,255]); var possibleContour = []; var contourImg = warpImg[x].copy(); var contours = warpedImg.findContours(); for (var i = 0; i < contours.size(); i++) { if (contours.area(i) < 2000 || contours.area(i) > 20000) continue; // var arcLength = contours.arcLength(i, true); contours.approxPolyDP(i, 0.05 * arcLength, true); switch(contours.cornerCount(i)) { case 4: contourImg.drawContour(contours, i, [0,255,0]); break; default: contourImg.drawContour(contours, i, [0,0,255]); } if (contours.cornerCount(i) ==4) { possibleContour.push(pointOrder(contours.points(i))); } } // , 3 , if (possibleContour.length == 3) { var trueContour = []; var width = []; var tmpContour = _.cloneDeep(possibleContour); // . , . for (var x2 in tmpContour) { width.push(tmpContour[x2][1].x - tmpContour[x2][0].x); } var maxIndex = width.indexOf(_.max(width)); trueContour[0] = tmpContour[maxIndex]; var left = []; for (var x2 in tmpContour) { if (x2 == maxIndex) continue; left.push(tmpContour[x2][0].x); } trueContour[1] = tmpContour[left.indexOf(_.min(left))]; trueContour[2] = tmpContour[left.indexOf(_.max(left))]; trueWarpImg.push({img: warpImg[x], contour: trueContour}); } } Oh, well, in general, I warned that the task was QUICKLY to consider an example, with the duplication of code, I did not particularly bother. And I don’t like to do it when the project is not prepared for a pro. And if to be frank, for many production projects in some places I leave code duplication to make it easier for beginners to read. We pay attention that the contours can be found in a random order, it is important for us to know their order, where is the product code, where is the row, and where is the place.
At the exit, we found an ikea check, made sure that it was he + who extracted the data for recognition.
3. Recognize the data.
In order to simplify the tesseract life, we will cut off our images, isolate the red (in order to make the image BW) and enlarge. Increasing slightly slows down tesseract, but increases the% recognition by an order of magnitude.
// ocr img for (var x in labelImg) { var label = labelImg[x]; for (var x2 in label) { var labelLine = label[x2]; // convert to HSV labelLine.convertHSVscale(); // find only red labelLine.inRange([0,100,100], [10,255,255]); // labelLine.gaussianBlur([5,5]); // , . labelLine.resize(labelLine.width()*3,labelLine.height()*3); Tesseract.recognize(labelLine.toBuffer(), { lang: 'eng', tessedit_char_whitelist: '0123456789.' }) .progress(function(msg){/*console.log('tesseract', msg)*/}) .catch(function(msg){/*console.log('tesseract', msg)*/}) .then(function(result){console.log('"', result.text.trim(), '"')}); } } We get in the console
It is not bad.
In the following parts, we will transfer the code to mobile platforms and make a mobile cross platform. Fill the application with storage cards, loading the ikea database and, of course, we’ll make everything work offline.
Well, duplicate link
Material used:
- Excellent material on color detection in the image.
- Official documentation on finding a specific color in an image
- Convenient color manipulation service, including for working with HSV
- Search contours in OpenCV
- Smooths the corners of the contours found, removing noise
- Search top-left, top-right, bottom-right, bottom-left points of the specified
Useful materials:
Source: https://habr.com/ru/post/327704/
All Articles