learnopengl. Lesson 1.9 - Camera
 In the previous lesson, the view matrix was discussed, and how it can be used to move around the scene (we moved the observer's point back a little). In OpenGL, there is no camera concept, but you can try to imitate it by moving all the objects in the scene in the direction opposite to the observer’s movement, and thereby create the illusion that we ourselves are moving.
In this tutorial we will look at how to create a camera in OpenGL. We discuss the camera type FPS (First Person Shooter), which allows you to move freely in a three-dimensional scene. In addition, we will talk about keyboard and mouse input, and finish by creating our own C ++ camera class.
Part 1
- Opengl
- Creating a window
- Hello window
- Hello triangle
- Shaders
- Textures
- Transformations
- Coordinate systems
- Camera
Content:- Camera / View Space
- 1. Camera position
- 2. Camera direction
- 3. Right axis
- 4. Axis up
- Lookat
- Take a walk
- Movement speed
- Look around
- Euler angles
- Mouse control
- Zoom
- Camera class
- Exercises
Part 2
')
Part 3
Camera / View Space
When we talk about camera / view space, we mean the view of all the vertices from the point of view of the camera, whose position in this space is the base point of the origin: the view matrix transforms the world coordinates into view coordinates, measured relative to the camera position and direction. For an unambiguous mathematical description of the camera, we need its position in world space, the direction in which it looks, the vector indicating the right direction, and the vector indicating the direction upwards. The attentive reader may notice that in fact we are going to create a coordinate system with 3 perpendicular axes and the camera position as a reference point.
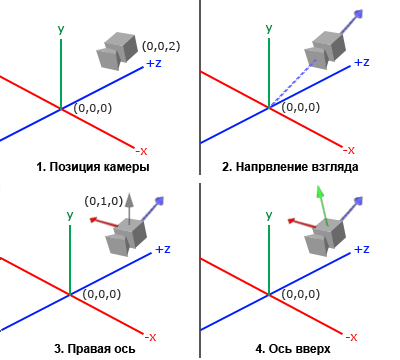
1. Camera position
Getting a camera position is easy. Camera position is a vector containing camera coordinates in world space. We will place the camera in the same place where we installed it in the previous lesson:
glm::vec3 cameraPos = glm::vec3(0.0f, 0.0f, 3.0f); Do not forget that the positive direction of the Z axis passes through the screen plane to you, therefore, if we want the camera to move backwards, we move along the positive Z axis.
2. Camera direction
The next vector we need will be the direction vector of the camera. So far, the camera is aimed at the base point of our scene: (0,0,0). You have not forgotten that if we subtract two vectors from each other, then we get a vector that is the difference of the original vectors? Subtracting the camera position vector from the origin point gives us the camera direction vector. We know that the camera looks along the negative direction of the Z axis, and we need a vector directed along the positive Z axis of the camera itself. If during subtraction we change the order of the arguments, we get a vector pointing in the positive direction of the camera axis Z:
glm::vec3 cameraTarget = glm::vec3(0.0f, 0.0f, 0.0f); glm::vec3 cameraDirection = glm::normalize(cameraPos - cameraTarget); The name “ direction vector” is not quite appropriate, because this vector actually points in the direction opposite to the direction of the camera.
3. Right axis
Another vector, without which we can not do, is a vector pointing to the right side and representing the positive direction of the camera axis X. To calculate this vector, we will do a small trick, and for this we first set the vector pointing up (in world space). Then we multiply the vector camera direction calculated in step 2 and the vector pointing up. Since the result of a vector product is a vector perpendicular to the original vectors, we get a vector pointing in the positive direction of the x-axis (if we change the factors in some places, we get a vector that points in the negative direction of the x-axis):
glm::vec3 up = glm::vec3(0.0f, 1.0f, 0.0f); glm::vec3 cameraRight = glm::normalize(glm::cross(up, cameraDirection)); 4. Axis up
Now, when we have the vectors of two axes X and Z, to get a vector that would point in the positive direction of the camera Y-axis, it will be quite simple: we will make a vector multiplication of the right vector and the camera direction vector:
glm::vec3 cameraUp = glm::cross(cameraDirection, cameraRight); With the help of the vector product and small tricks we were able to calculate all the vectors that define the space of the Camera / View. More sophisticated in mathematics readers, this algorithm in linear algebra is known as the Gram-Schmidt process. Using these vectors, we can now create a LookAt matrix, which will be very useful for us to create a camera.
Lookat
One of the remarkable properties of matrices is that if you specify the coordinate space using 3 perpendicular (or linearly independent) axes, then from the vectors of these axes and the additional displacement vector, you can form a matrix, the multiplication by which will convert any vectors to this coordinate space. This is exactly what the LookAt matrix does, and now that we have everything we need to define the Camera / View space, i.e. 3 perpendicular axes and camera position vector, we can create our own LookAt matrix:
Where R is the right vector, U is the vector pointing up, D is the camera direction vector, and P is the camera position. Notice that the camera position vector is inverted, because ultimately we will shift the world coordinates in the opposite direction of the camera movement. Using the LookAt matrix as a view matrix allows you to effectively convert all world coordinates into the space we have just defined. The LookAt matrix does exactly what its name says: it creates a view matrix that looks at a given target.
Fortunately, the GLM library will do all this work for us. We only need to indicate the position of the camera, the coordinate of the target and the vector in world space upward (the auxiliary vector that we used to calculate the right vector). Using these data, GLM independently creates a LookAt matrix, which we can use as our matrix of the form:
glm::mat4 view; view = glm::lookAt(glm::vec3(0.0f, 0.0f, 3.0f), glm::vec3(0.0f, 0.0f, 0.0f), glm::vec3(0.0f, 1.0f, 0.0f)); The functions glm :: LookAt require the following parameters: camera position, target coordinate, and upward vector. The function will calculate a matrix of the form identical to the one we used in the previous lesson.
Before we delve into the issues related to user input, let's have a little fun and twist the camera around our scene. For simplicity, we will keep the camera aimed at the point (0,0,0) all the time.
To calculate the position of our camera, we apply some trigonometry and calculate for each frame the coordinates X and Z, which will be a point located on a circular path. Recalculating the X and Z coordinates in each frame, we will move through all points of the circle and, thus, the camera will begin to rotate around the scene. Let's set the size of this circle with a constant radius value and, using the glfwGetTime function from the GLFW library, calculate for each iteration of the game cycle a new matrix of the form:
GLfloat radius = 10.0f; GLfloat camX = sin(glfwGetTime()) * radius; GLfloat camZ = cos(glfwGetTime()) * radius; glm::mat4 view; view = glm::lookAt(glm::vec3(camX, 0.0, camZ), glm::vec3(0.0, 0.0, 0.0), glm::vec3(0.0, 1.0, 0.0)); If you run this code, you will see something like this:
Now, with this small code snippet, the camera rotates around the scene. Don't be afraid to experiment with the radius and position / direction parameters to understand how the LookAt matrix works. If you have something wrong, compare your code with the source code , and the shaders with the texts of the vertex and fragment shaders.
Take a walk
Rotate the camera around the scene of course fun, but even more interesting to move it yourself! First, we will have to create the “infrastructure” of the camera, and for this at the beginning of our program, let's define several variables:
glm::vec3 cameraPos = glm::vec3(0.0f, 0.0f, 3.0f); glm::vec3 cameraFront = glm::vec3(0.0f, 0.0f, -1.0f); glm::vec3 cameraUp = glm::vec3(0.0f, 1.0f, 0.0f); Now the function call LookAt will be like this:
view = glm::lookAt(cameraPos, cameraPos + cameraFront, cameraUp); First we set the camera to the position whose coordinate is stored in the variable cameraPos . The direction of the camera is calculated as its current position + vector cameraFront , which we have just announced and initialized. This ensures that despite the movement of the camera, it will always look in the direction of the target. Let's play a little with these variables by changing the vector of cameraPos by pressing the keys.
In Lesson 1.3, we created the key_callback callback function needed to get keyboard input from GLFW, and now let's add a few new checks for pressing certain buttons:
void key_callback(GLFWwindow* window, int key, int scancode, int action, int mode) { ... GLfloat cameraSpeed = 0.05f; if(key == GLFW_KEY_W) cameraPos += cameraSpeed * cameraFront; if(key == GLFW_KEY_S) cameraPos -= cameraSpeed * cameraFront; if(key == GLFW_KEY_A) cameraPos -= glm::normalize(glm::cross(cameraFront, cameraUp)) * cameraSpeed; if(key == GLFW_KEY_D) cameraPos += glm::normalize(glm::cross(cameraFront, cameraUp)) * cameraSpeed; } Whenever we press one of the WASD keys, the camera position is updated according to its new coordinates. If we want to move forward or backward, then add or subtract the direction vector from the camera position vector. When moving in the lateral direction, we find the vector directed to the right through the vector product and move along it. With a lateral displacement of the camera, this creates a streyf effect familiar to gamers.
Please note that we normalize the resulting right vector. If we did not do this, then depending on the value of cameraFront, the results of the vector product could be vectors of different lengths. Without normalization of the right vector, the speed of the camera would not be constant, but would accelerate or slow down when the direction of the camera changes.
If you complement the key_callback function with this code snippet, you can move around the scene, moving forward / backward or to the side.
Having fun with this simple camera control system, you probably noticed that you cannot move in two directions at the same time (make a diagonal movement), and when you hold one of the keys, it first works once, and only then, after a short delay, continuous movement. This is due to the fact that most input systems have an event-oriented architecture (event-driven architecture, EDA) capable of simultaneously processing only one keystroke, which the corresponding handler calls. This works well in many GUI systems, but is not very suitable for smooth camera movement. I will show a little trick to solve this problem.
The trick is in the key_callback callback function to keep track of which keys were pressed or released. Then, in the game cycle, we count these values, check which keys are active and, based on their state, change the value of the variable cameraPos accordingly . Thus, in the handler function, we simply save the information about which keys were pressed or released, and respond to their states already in the game cycle. First, let's create an array of variables of the logical type representing the pressed or released states of the keys:
bool keys[1024]; After that, in the key_callback function , we need to set the keystrokes to true , and those released to false :
if(action == GLFW_PRESS) keys[key] = true; else if(action == GLFW_RELEASE) keys[key] = false; And let's create a new function, which we call do_movement , where we will update the coordinates of the camera, relying on the state of keystrokes:
void do_movement() { // Camera controls GLfloat cameraSpeed = 0.01f; if(keys[GLFW_KEY_W]) cameraPos += cameraSpeed * cameraFront; if(keys[GLFW_KEY_S]) cameraPos -= cameraSpeed * cameraFront; if(keys[GLFW_KEY_A]) cameraPos -= glm::normalize(glm::cross(cameraFront, cameraUp)) * cameraSpeed; if(keys[GLFW_KEY_D]) cameraPos += glm::normalize(glm::cross(cameraFront, cameraUp)) * cameraSpeed; } The code from the previous section has now been moved to the do_movement function. Since the GLFW key identifier enums are simply integers, we can use them to index the array.
And last but not least, we need to add a new function call to the body of the game cycle:
while(!glfwWindowShouldClose(window)) { // glfwPollEvents(); do_movement(); // ... } Now you should be able to move simultaneously in two directions, and continuous movement should begin immediately after pressing the keys. If you're stuck on something, feel free to compare your code with the source code .
Movement speed
Currently, we use a constant value of the speed of movement when moving the camera. In theory, this seems normal, but in practice, different users may have very different computational powers, as a result, on some computers at the same time many more frames will be drawn than on others. And if one user draws more frames than another, then the do_movement function will be called more often.
As a result, depending on the configuration of the computer, some users will move around the scene very quickly, while others will move very slowly. But in spreading your program, you probably want it to work equally on any hardware.
Graphic applications and games typically use a special variable deltaTime , in which they store the time spent on rendering the last frame output. And then, all the speeds in the game are multiplied by this deltaTime value. As a result, when the frame output takes a lot of time and the deltaTime value is large, then the speed multiplied by this variable will become larger, which will balance the overall performance. When using this approach, the power of the computer ceases to influence the behavior of the program and no longer matters whether your computer is slow or very fast, the speed of the camera will be adjusted anyway, and all users will have the same result.
To calculate the deltaTime value, we will need 2 global variables:
GLfloat deltaTime = 0.0f; // , GLfloat lastFrame = 0.0f; // Then, in each frame, we calculate the new deltaTime value for later use:
GLfloat currentFrame = glfwGetTime(); deltaTime = currentFrame - lastFrame; lastFrame = currentFrame; Now that we have deltaTime , we can take its value into account when calculating speeds:
void do_movement() { GLfloat cameraSpeed = 5.0f * deltaTime; ... } Together with the code from the previous section, we should have a smoother and more consistent system for moving the camera around the stage:
And now we have a camera that moves at the same speed on any system. If something goes wrong, check the source code again. Later we will make sure that the deltaTime value often appears in any code related to speed and movement.
Look around
Using only the keyboard to move is not very interesting. Moreover, the lack of opportunity to turn around makes our movements quite constrained. This is where the mouse comes in handy!
In order to freely inspect the scene, we must change the direction vector of the cameraFront camera guided by mouse input. However, changing the direction vector based on the turns of the mouse creates certain difficulties and requires some knowledge of trigonometry. If you do not understand trigonometry, do not worry. You can simply go to the sections with the source code and insert them into your program, and if you want to know the details, you can always return.
Euler angles
Euler angles are three quantities, described by Leonard Euler sometime in the 1700s, which can represent any rotation in three-dimensional space. There are 3 Euler angles: pitch (pitch), yaw (yaw) and roll (roll). They are illustrated in the following image:
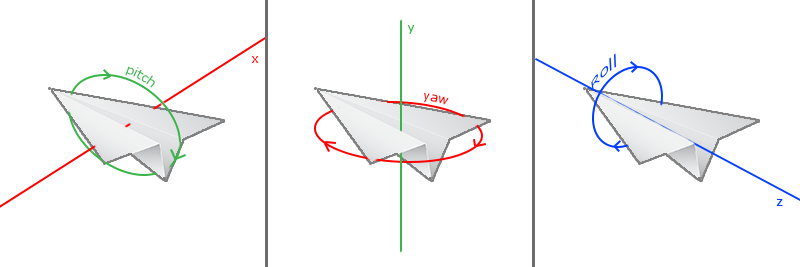
As seen in the first image, pitch is the angle that characterizes the amount of tilt up or down. The second image shows yaw , which is the amount of turning left or right. The heel sets the turn along the longitudinal axis, and is usually often used in various flight simulators. Each Euler angle is given by one scalar quantity, and the combination of all three angles allows us to calculate any rotation vector in three-dimensional space.
In our camera control system, we will use only the yaw and pitch angles, so we will not discuss the value of the roll here. Having yaw and pitch values, we can convert them into a 3D vector of camera direction. The process of converting yaw and pitch values to a direction vector will require some trigonometric calculations. Let's start with a simple example:

If we set the length of the hypotenuse to 1, then from the main trigonometric relations (soh cah toa: Sine Opposite Hypotenuse, Cosine Adjacent Hypotenuse, Tangent Opposite Adjacent, ie, sine is the ratio of the opposite side to the hypotenuse, cosine is the ratio of the adjacent side to the hypotenuse , tangent - the ratio of the opposite leg to the adjacent one. It is known that the length of the adjacent leg is cos X / h = cos X / 1 = cos X , and the length of the opposite side is sin Y / h = sin Y / 1 = sin Y. These formulas enable us to calculate the length of the projection of the hypotenuse on the X and Y axes at a given angle. Let's use them to calculate the components of the camera direction vector:
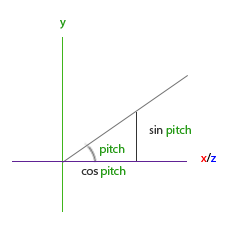
This triangle is similar to the triangle from the previous illustration, and if we imagine that we are on the XZ plane and look at the Y axis, we can calculate the value of the Y-component (defining the orientation up or down) of the direction vector using the formula given for the first triangle. The figure shows that the Y value for a given pitch angle sin:
direction.y = sin(glm::radians(pitch)); // , Here we calculated only the value of Y, now we need to calculate the components X and Z. Looking at the image of the triangle, we see that their values are equal:
direction.x = cos(glm::radians(pitch)); direction.z = cos(glm::radians(pitch)); Let's see how we find the corresponding components of the direction vector for the yaw angle:

Just as in the figure of a triangle constructed for the pitch angle, this illustration shows the dependence of the X-component on the cos (yaw) value, and the Z-component on the sin (yaw). Combining these values with the results calculated for the pitch angle will give us the final vector of the camera direction, built on two angles of rotation - pitch and yaw:
direction.x = cos(glm::radians(pitch)) * cos(glm::radians(yaw)); direction.y = sin(glm::radians(pitch)); direction.z = cos(glm::radians(pitch)) * sin(glm::radians(yaw)); This gives us a formula for converting the pitch and yaw angles into a three-dimensional direction vector, which we can use to orient the camera. Probably you have already wondered: how do we get the values of yaw and pitch angles?
Mouse control
Pitch and yaw angles change their values depending on mouse movements (or game controller / joystick); lateral movements of the mouse affect the yaw angle, and forward / backward movement affects the pitch angle. The idea is to save the mouse coordinates for the last frame, and in the current frame compare them with the new coordinates and calculate how many pixels the mouse pointer has moved. The greater this shift, the more it will change the value of the pitch and / or yaw, and, accordingly, the camera will turn to a greater angle.
First we tell the GLFW library that it should capture the cursor and hide the mouse pointer. Capturing the cursor means that after the application receives the input focus, the cursor will remain within the window (until the application loses focus or completes its work). We can do this with one simple configuration call:
glfwSetInputMode(window, GLFW_CURSOR, GLFW_CURSOR_DISABLED); After this call, wherever we move the mouse, its pointer will not be visible and will not be able to go beyond the window. This is ideal for controlling camera in FPS type games.
, , GLFW, . ( ), :
void mouse_callback(GLFWwindow* window, double xpos, double ypos); xpos ypos . , GLFW mouse_callback , :
glfwSetCursorPosCallback(window, mouse_callback); FPS, , :
- .
- .
- / /
. - . , ( 800 600):
GLfloat lastX = 400, lastY = 300; :
GLfloat yaw = -90.0f; GLfloat pitch = 0.0f; , :
GLfloat xoffset = xpos - lastX; GLfloat yoffset = lastY - ypos; // Y- lastX = xpos; lastY = ypos; GLfloat sensitivity = 0.05f; xoffset *= sensitivity; yoffset *= sensitivity; , sensitivity (). , ; .
pitch yaw :
yaw += xoffset; pitch += yoffset; , ( ). , 89 ( 90 , 89), -89 . , . :
if(pitch > 89.0f) pitch = 89.0f; if(pitch < -89.0f) pitch = -89.0f; , , . , , , .
, :
glm::vec3 front; front.x = cos(glm::radians(pitch)) * cos(glm::radians(yaw)); front.y = sin(glm::radians(pitch)); front.z = cos(glm::radians(pitch)) * sin(glm::radians(yaw)); cameraFront = glm::normalize(front); , . cameraFront glm::lookAt , .
, , , . , mouse_callback xpos ypos . , , , . - bool , , xpos ypos ; , :
if (firstMouse) // true { lastX = xpos; lastY = ypos; firstMouse = false; } :
void mouse_callback(GLFWwindow* window, double xpos, double ypos) { if(firstMouse) { lastX = xpos; lastY = ypos; firstMouse = false; } GLfloat xoffset = xpos - lastX; GLfloat yoffset = lastY - ypos; lastX = xpos; lastY = ypos; GLfloat sensitivity = 0.05; xoffset *= sensitivity; yoffset *= sensitivity; yaw += xoffset; pitch += yoffset; if(pitch > 89.0f) pitch = 89.0f; if(pitch < -89.0f) pitch = -89.0f; glm::vec3 front; front.x = cos(glm::radians(yaw)) * cos(glm::radians(pitch)); front.y = sin(glm::radians(pitch)); front.z = sin(glm::radians(yaw)) * cos(glm::radians(pitch)); cameraFront = glm::normalize(front); } : , firstMouse , glfwSetCursorPos — lastX lastY glfwGetCursorPos .
. , fov . , , . . , , :
void scroll_callback(GLFWwindow* window, double xoffset, double yoffset) { if(fov >= 1.0f && fov <= 45.0f) fov -= yoffset; if(fov <= 1.0f) fov = 1.0f; if(fov >= 45.0f) fov = 45.0f; } yoffset , . scroll_callback , fov . fov 45.0f, 1.0f 45.0f.
, - fov , , :
projection = glm::perspective(fov, (GLfloat)WIDTH/(GLfloat)HEIGHT, 0.1f, 100.0f); , , :
glfwSetScrollCallback(window, scroll_callback); That's all. , .
Camera
. , , , , . , , ( ) , , .
, Shader, Camera . Camera . . , .
FPS- , , . , . , FPS- 90 , (0,1,0) , .
Exercises
Source: https://habr.com/ru/post/327604/
All Articles