Tale of creating a classic RTS at home from scratch (Part 2: "Resurrection")
About a year ago my article came out, which can be called the " first part " of this article. In the first part, as far as I could, I sorted out in detail the thorny path of an enthusiastic developer who I was once able to independently walk from beginning to end. The result of these efforts was the game of the RTS genre "The Land of Onimods " that I created at home without engines, designers and other modern development tools. For the project, C ++ and Assembler were used , well, and my own head was the main tool.
In this article I will try to talk about how I decided to take on the role of "resuscitator" and try to "resurrect" this project. A lot of attention will be paid to writing your own game server.
Continued article: GUI
End of article: Network
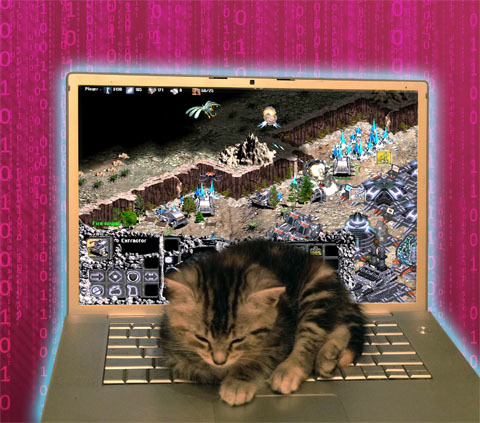
I attach a short video to the article so that it is immediately clear what is at stake:
')
Introduction
This whole story goes back to 1998, when the IT world was very different. The game, of course, was originally designed for the conditions existing at that moment. In particular, I would hardly begin using assembler for plotting graphics, but at that moment it seemed to me almost the only solution. If someone is interested in how it all works (game mechanics, AI, etc.) and how was the Russian "publisher" of games at the end of the last century, refer you to the first part of the article .
There is also a separate description of the pathfinding algorithm that I once developed for my RTS. This article has been for more than 10 years and was written, rather, “for itself,” but it was written in sufficient detail so that I myself can remember how it all works. The used solution, in my opinion, is highly effective in terms of speed of work and is guaranteed to build a path to the target on a cellular field with any degree of complexity of the location of the obstacles. You can get acquainted with this method here .
Why did I decide to continue this whole “epic”? It has always hurt me to realize that the work of such magnitude was just buried by me for economic reasons at one time. And when it seemed to me that there was at least some chance to give this game a second attempt, then I naturally tried to do it. The last year of my life, I almost completely devoted this issue. Thanks mainly to the support of the readers of the first part of the article , the game passed Greenlight , and I decided to put everything in order with my characteristic purpose. And this article will be devoted to my work. In the beginning, I thought to describe in detail the whole process, starting with creating my own GUI (graphical user interface) and ending with writing a game server. But, unfortunately, I found out that this information is received too much. As a result, I paid more attention to the description of the network, since it seemed to me that this topic was more interesting for many. I tried to give explanations in such a way that it could somehow be put into practice. However, I do not have confidence that as a result, the article did not work out slightly "hard" to understand.
A “shell” for a game or something that can be downloaded and viewed in C ++ source code
Oddly enough, this section, which is at the very beginning of the article, I wrote in the last place. In the course of writing this article, I realized that I need to show at least something “from the inside,” otherwise all my explanations do not have much practical sense and in fact turn into a verbiage. And I really would not want this.
Therefore, in addition, I provided an article with an example by which anyone can get acquainted with some aspects of my approach to writing large projects:

Visually, this example is not very similar to my game, but in fact the game uses this particular code, only it uses a different “decorating theme”. Setting up a game session in the game looks like this:
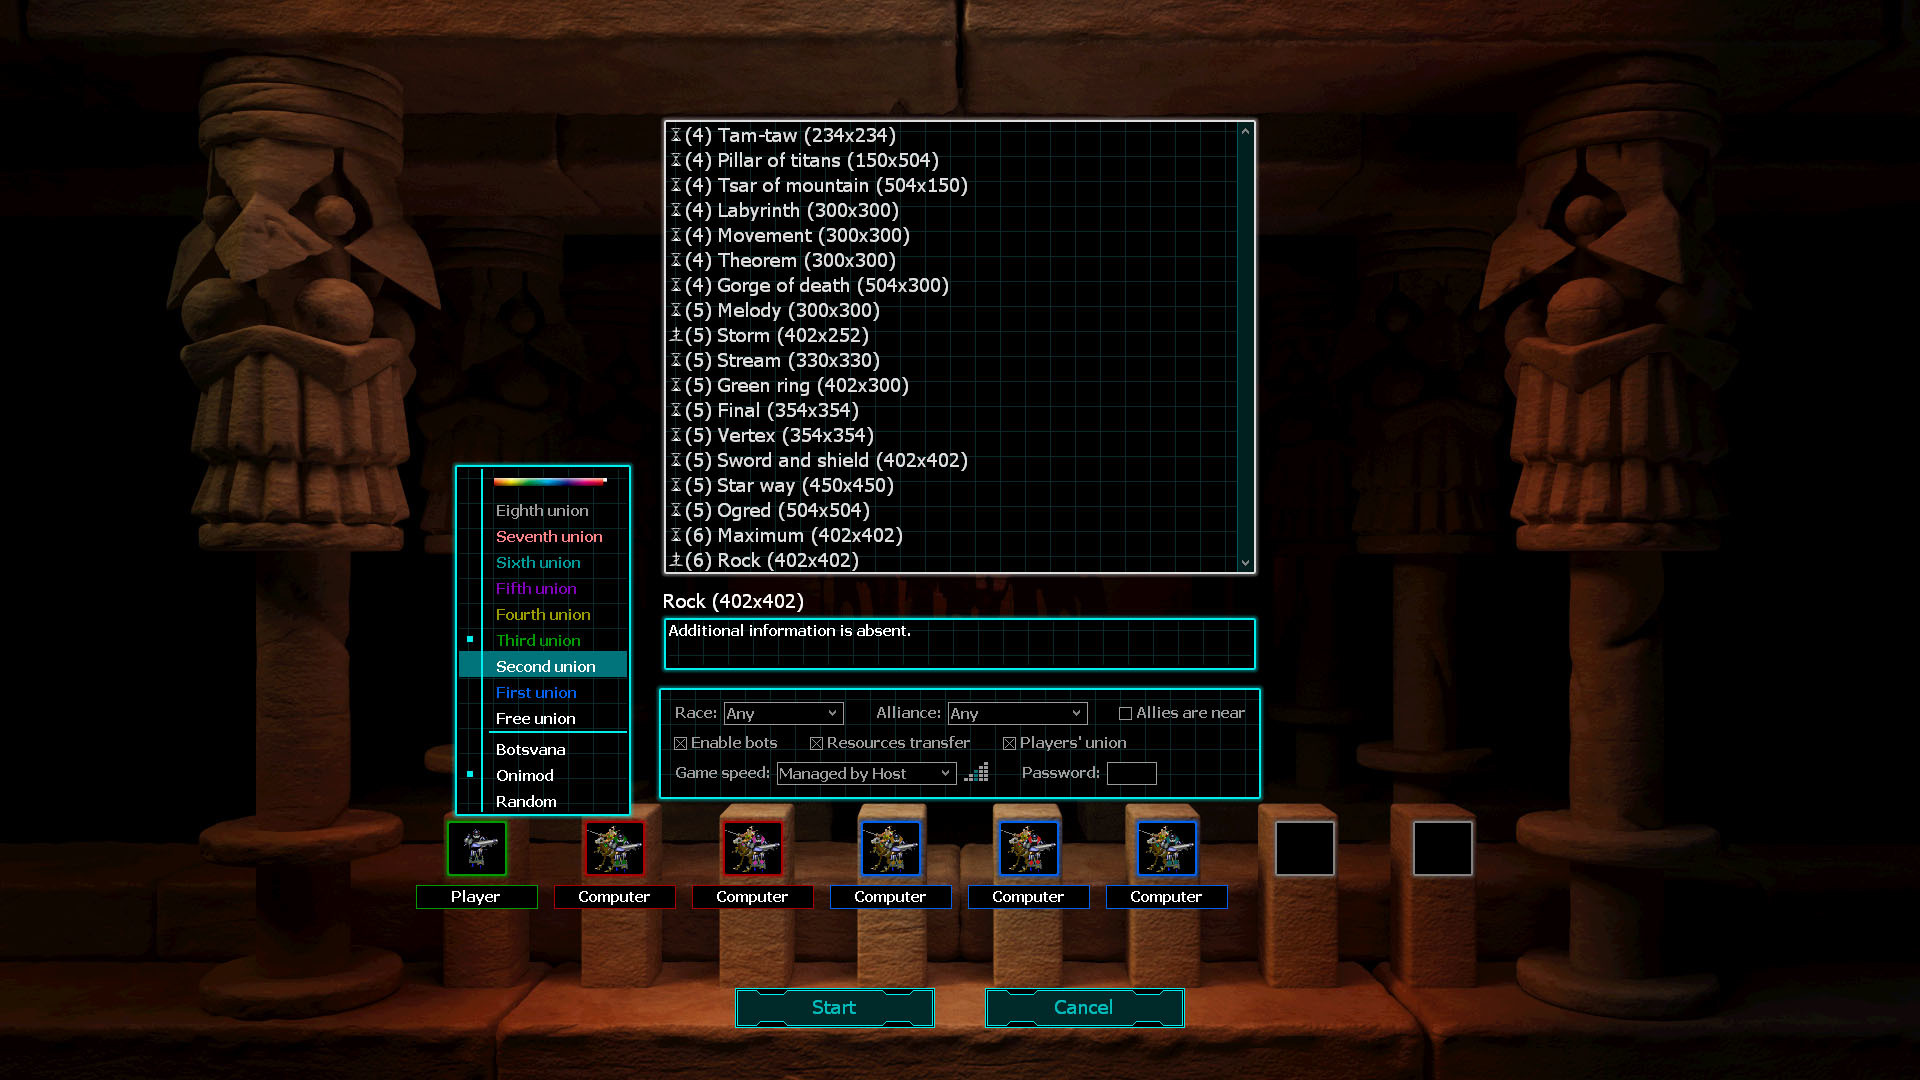
Also, just in case, I clarify that these are not “Windows buttons,” as someone might think, but my own components, which I did in the volume that my game required.
An example is not just a “formal” example, but contains a shell that I created to use as part of a game. This product has no names, but it was created by me, taking into account that the game may need to be ported to another platform. Currently, in a fully operational state, there is only a Windows version, but all calls to the operating system are made through virtual functions that can be replaced. In practice, it took me when it came time to lay out the game server on the Internet. For free testing, only the version of the server managed by Unix -like OS was available to me. As a result, I had to add a Unix branch to the shell. I didn’t change the server myself at all, only replaced the functions that the server needed to interact with the OS. I do not particularly understand the Unix API , but I have a good acquaintance programmer (on this resource is code-named Komei ), who is well aware of this topic. With it, the server has been ported for several days. In addition, my friend kindly provided me with his Unix -server for launching and testing my online gaming server, and this, at least, was a decent financial assistance to my project, since keeping your own dedicated server is not such a cheap pleasure.
I needed an example in the article due to the fact that the entire second part of the article is devoted to a network game device. And there I have to periodically go into the explanations for the code. And by themselves, individual pieces of code seem to me quite meaningless. I considered publishing the source code of the game “brute-force”, yet this is a commercial product for me, and besides, a relatively small example seems to me much more understandable. So I decided to make the shell source code public, providing it with an example for clarity. The example shows how to work with my GUI , loses sound and demonstrates network interaction. Those. the user can click the "Enable Network" button, then the "New" button and a game session will be created, which you can join from the example running on another computer. The configuration of the player in the session is reduced to the ability to change its color, but to demonstrate the principle of this is quite enough.
I did not begin to describe in detail the organization of the GUI , since I am not sure that this is very interesting for someone, and the article turned out to be quite large. In any case, the example demonstrates how to work with all the components in my GUI .
I do not mind if someone takes advantage of my work for their own selfish or selfless purposes. But I do not promise that I will develop this project or that I will maintain compatibility with the current version. I also clarify that the GUI was designed not for speed, but for versatility, as was required in my case. In addition, I have implemented a branch that works only with 16-bit color, which is necessary for my game, but no one bothers to add a branch of code that will work with 32-bit colors, as well as use hardware acceleration of the GPU , where possible . Download this project here .
The sample project was made in Visual Studio 2008 and uses the C ++ and DirectX9 language.
The problems that I had to solve
First, here is a list of problems that existed in the game a year ago:
- The game fully worked only under Windows XP . Under Windows 7, the game started normally, but the local network did not function at all. And Windows 8/10 simply refused to launch the game.
- The game was tightly nailed to the Windows platform. Actively used DirectX , as well as MFC .
- The design of the menu was very "dumb" even in my opinion. This was due to the fact that I am engaged in programming and I have a very distant attitude to drawing, and I completed the game alone.
- Visually, with the “research icons”, the situation was even worse than with the menu.
- Voice voice left, to put it mildly, much to be desired.
- There was no Internet server that I always wanted to have, since I believe that the most interesting thing about RTS is the game over the network.
Gradually, step by step, I solved these problems and now I feel that finally the result suits me perfectly. However, it was not always so ...
Where to begin
The game project was once done in Visual Studio C ++ 6.0 . Now this Visual Studio C ++ 6.0 did not even want to work in Windows 8 . Therefore, first of all, I had to transfer the project to a new environment for it. On the one hand, everything should be simple, since Visual Studio is able to convert projects from previous versions into its own format, but this was not the case. The fact is that I used the assembler tasm32 , which created me an obj file. This file was linked to Visual Studio C ++ 6.0 without any problems, but I didn’t want to link to Visual Studio 2008 at all . A new version of tasm32 was not in the world, and other masm type assemblers somehow flamed to the syntax of tasm32 with fierce hatred and gave a lot of errors when trying to slip my asm file into them.
Upon reflection, I decided that I was not ready at this stage to rewrite the assembler code under a different syntax, because at first I was not at all sure that I was moving in the right direction. As a result, I made the following decision: I installed Windows XP , put Visual Studio C ++ 6.0 in it , created a project of type DLL , wrote exported functions that simply called assembler functions through myself and linked my assembly obj file to it, which is fine in Windows XP Created through tasm32.exe . As a result, I got the asm.dll library, which I was able to easily connect to a new project in Visual Studio 2008 . This decision worked, almost immediately, and while I decided to stop at it. Naturally, I understand that this solution is absolutely not portable to other platforms, but if the question of porting really comes up, you can “gather the will into a fist” and translate the assembler into another syntax. In the meantime, the fate of this game is foggy for me, although I definitely reanimated it for the last year. In any case, I spent on this project already enough strength to finally get a clear answer from the universe on this matter.
After I was able to start the game in Windows 8 using Visual Studio 2008 , I finally had a debugger in my hands. To begin with, I needed to understand the reasons why the new versions of Windows did not want to run the game. I haven’t been involved in games for a long time and didn’t particularly follow the evolution of restrictions that Windows began to impose on the work of old programs. For me personally, this reason was very unexpected. I found that the 16-bit color mode that was used by my game was removed from Windows 8/10 . After several “magic rituals,” I still managed to start the game and even play a little, but everything worked dangerously slowly, and instead of the landscape, the main part of the screen was clean and beautiful black. For myself, I noted that the 16-bit mode is now emulated and has restrictions on use.
Battle for 16-bit video mode
How to deal with this problem? At least there are 2 exits:
- Transform all the graphics in the game so that it can work in 24-bit resolution. In my case, this option is bad because all the graphics were stored in a compressed form and drawn by an assembler. All functions of the assembler were able to work only with 16-bit graphics, the functions themselves were many and they worked quickly enough, assumed many nuances when drawing and, most importantly, over the years I have forgotten how it all functions in detail.
- Create your own surface in RAM, which will be a screen memory for the game. Draw everything on this surface, and then copy it to a real screen. I chose this option as the only correct one. With this solution, the fattest plus also appeared - I now almost don't need DirectX to work with graphics, since the only thing he had to do now was copy my surface onto the screen. But there is in this decision and not immediately an obvious disadvantage - DirectX allowed me to easily display the text, and I, naturally, did just that. And now it turned out: “no DirectX - no text”.
As a result, I decided to do the following - to write something like a “shell” through which the game would communicate with the operating system. Any calls to OS resources should be performed through virtual functions, so that if something happens, they can be replaced. Practically, this makes it possible to port a game to another OS relatively quickly, but as always, not everything is so simple ... almost any program that at least communicates with the user needs an interface. The interface consists of different small (but cute) elements like " Text field ", " List ", " Tree ", " Dialog window " and so on. In other words, if you go this way, then you need to make your own GUI , which will work the same way in any OS. In addition, you need to somehow solve the problem with playing sounds and networking.
For sounds, I decided to use the Squall library. There were several advantages to its use ... firstly, this library was already used in the old version of the game, secondly, compared to other similar free solutions, it played almost all the wav files that I shoved to it, thirdly, I was personally familiar with the author of cesium , which is also important. The main disadvantage of Squall is that it has not been developed for a long time and exists only under Windows . Recently, however, I began to try to make such a structure with my programs so that it would be relatively easy to replace the external library with some analogue. As a result, I did all the interaction with Squall through a small layer of my own class. A little later, as an experiment, I replaced Squall with BASS , but not really feeling the benefit of this replacement, I returned Squall back. But now I knew that if I needed another platform, I could use BASS , which is everywhere.
Since I almost had to get rid of DirectX as part of the game, for starters, I just commented out all the DirectX h- files. I clicked on Build and got ready to estimate the amount of the proposed work on replacing DirectX functions with my own. When the long “list of problems” finally stopped, the number of errors found a total of just over 9,000 was very eloquently displayed below. Least of all, the errors concerned DirectInput , since the input from the mouse and keyboard is a relatively small part of the code, but DirectDraw and DirectPlay were noted, as they say, “to the fullest”.
There was another powerful problem. The fact is that the game is attached to the editor maps and campaigns. And it was completely written using MFC , and since this is practically a windowing Windows application, I immediately decided not to even think that the editor could work on another platform in the future. But the fact is that both the game and the editor were, in my case, the same project (in the literal sense, it was the same exe file that was run with different parameters). Accordingly, I had to divide this project into 2 parts: the game had to work almost completely independently of Windows , and the editor, on the contrary, remained an MFC project. As a result, when I ripped the game out of the MFC framework, I often ran into a situation where the functions common to these projects should now perform their task in different ways. We had to insert a conditional compilation into the code and generate the second branch of the code.
First of all, I began to create my own shell, which would help me get rid of DirectX- dependency. It was necessary for me that the shell be able to work with 16-bit resolution, be composed of standard components for the formation of the interface, and also allow the display of text.
Shell structure
I made the GGame class as the base class for the whole shell, which will already contain all the other important objects. The GPlatform class is responsible for my communication with the OS, excluding graphic operations. But everything related to working with the file system, processing the message loop, shutting down the application, starting threads and processes belongs to GPlatform . The GSound class is responsible for sound, and the GNet class is either a GNetServer server or a GNetClient client, depending on the task. The most difficult was the class GDevice , which manages the graphics.
The GDevice class works with GSurface surfaces. These surfaces are defined by me very abstractly, i.e. there are no hints of the number of bits per pixel, but there are a number of abstract functions that should replace the standard GDI . However, in reality, objects like GSurface are never created in the game; instead, child objects of type GSurface16 are used that are just able to perform GDI work as applied to 16-bit surfaces. I reasoned that if I need to give my shell the opportunity to work with 24-bit graphics, I can always create a similar class GSurface24 and this does not require any global changes to the overall structure of the shell.
The GDevice class is also responsible for working with screen resolutions, it has abstract functions that determine the available screen resolutions, and allows you to select a new resolution. GDevice can also scale the size of the scene to the size of the monitor. For example, the game uses any resolution simply by increasing the visible area of the playing field, but the menu always works only in 1920 x 1080 resolution. However, if the actual resolution of the monitor is smaller, then GDevice scaled the menu to the current resolution of the monitor. It is possible that a better solution would be to make several types of menus for different monitor resolutions, but I am still not a corporation, and such decisions in my case would simply be irrational. In any case, on a laptop with a resolution of 1366 x 768, the menu looks quite acceptable.
All these base classes are GPlatform , GDevice , GNet , etc. contain many abstract functions. In a real program, instead of the GPlatform class, the child class is GPlatformWindows , instead of the GDevice class, the GDeviceOnimodLandDX9 class, instead of the GNet class, either the GNetServerLibUV class or the GNetClientLibUV class, i.e. I use class objects that are already adapted to the desired platform and my game. The “shell” itself has neither the game, nor the OS, not the slightest idea.
And the most basic class actually transforms from GGame to GGameOnimodLandDX9 . How does all this bind together? The answer is to never create important objects in the program directly through the new operator. Instead, there are virtual functions that create the object of the desired type. For example, abstract functions of the GGame class:
// virtual GPlatform* GGame::NewPlatform(GGame* owner, const char* game_name)=0; // virtual GSound* GGame::NewSound()=0; look for the GGameOnimodLand class like this:
// GPlatform* GGameOnimodLand::NewPlatform(GGame* owner, const char* game_name) { return new GPlatformWindows(owner, game_name); } // GSound* GGameOnimodLand::NewSound() { #ifdef SQUALL_SOUND return new GSoundSquall(); #endif #ifdef BASS_SOUND return new GSoundBass(); #endif } And now how all this is created through the base class:
// , bool GGame::CreateGame(void* init, int view_width, int view_height) { platform=NewPlatform(this, game_name.c_str()); platform->Create(); device=NewDevice(init); device->Create(view_width, view_height); sound=NewSound(); .... .... .... } Thus, it turns out that the base class creates the objects it needs, without delving into the subtleties of the specifics of the OS or the graphics API . This approach allows us to separate the main program code from the features of the runtime environment. It also makes it relatively easy to port to another platform, and to replace DirectX with OpenGL , since all the specifics of the execution environment are rendered into small and completely separate classes and their functions.
Continued article: GUI
End of article: Network
Source: https://habr.com/ru/post/327596/
All Articles