Learning from the masters: design levels Legend Of Zelda
Returning in search of knowledge to the passing of the games I played as a child, I always fear that the games of the NES era and the earlier ones are too old to get any lessons from them.
It seems to me that they lack many elements of modern game design: no learning, abrupt changes in complexity, ill-conceived level design, and so on. Before writing this article, I had the impression that many of the “rules of good design” I learned were invented and started to be used in the SNES era.
I thought that NES was the Wild West of game development, which did not adopt any laws. So when I decided to play the first Zelda on Link's 25th anniversary, and perhaps write an article about her, I was a little afraid of the consequences.
')
As it turned out, I was completely wrong! Instead of an outdated scheme, valued mainly for nostalgic reasons, I found an excellent tutorial on the basics of non-linear game design.
In one of the interviews, the creator of the game, Sigaru Miyamoto, said that in The Legend of Zelda he wanted to evoke sensations in the player that appear during the study:
“As a child, I once went for a walk and came across a lake. This surprised me a lot. When I traveled around the country without a map, trying to find the road I needed, and finding amazing views, I realized what it was like to participate in such an adventure ”(from Wikipedia .
To achieve this feeling, Miyamoto and his company invented really clever tricks for creating non-linear levels. These tricks are useful today.

I still hear this music in my dreams ...
What are we going to do here?
Passing The Legend of Zelda , I played each of the levels, and then performed a detailed analysis of the level on paper. Such an analysis is a fairly standard approach; I constantly make it in the design of the levels of my colleagues. Here is what I always try to highlight:
- Passing the level . Do level spaces fit together well? Where should the player go, and will he understand how to get there?
- The change in intensity . Does the intensity of the game increase in the right way? Do monsters get harder along the way? Does the player have the opportunity to master the behavior of enemies and later show their skills?
- Variability . Is the gameplay variable enough? Do you often meet with the same enemies? Are the spaces interesting?
- Training If the design requires new skills from the player, does the game teach these skills and check them correctly?
In this article I will apply the same technique to the first level of the original Legend of Zelda . Fortunately, this is easy to do, because top-level level maps are widespread and accessible. I will consider only the first dungeon in the article, but the same principles apply to all levels.
If you want to check them out, you can use the maps that I found: Mike's RPG Center . (By the way, Mike kindly gave me permission to use his cards in this article. Thank you, Mike.)
Passing level
Breakdown
Based on my memories, at the beginning of this experiment, I thought that the dungeon rooms were not thought out. I never forgot the feeling of how I make my way through the rooms almost by accident, spitting on the developers' plan and going through the game only thanks to my great skill!
After analyzing the process of passing the dungeons, I quickly refused this opinion. As it turned out, the dungeon schemes were made very carefully and the passage was implemented extremely cleverly.
I began by analyzing the critical path. The critical path is the shortest path through the level without using secrets, abbreviations and cheats. In essence, this is the path that the player must follow according to the designer’s plan, unless he is very clever.
It is worth noting that the critical path often does not require a player to complete a level. It requires performing only mandatory tasks at the level.
In each dungeon, the critical path is almost always linear. In very rare cases, the player needs to re-visit the rooms in which he already was. The only exception to this rule of linearity is two or three rooms at the beginning of the dungeons, allowing you to choose from a small subset of rooms.

The player starts from room 1 and can choose to enter room 2 or 3. Rooms that are not on the critical path are marked as more pale on the map (click on the image to view it in full size).
Extra rooms (and sometimes whole paths) branch off from the critical path and reward the player with bonuses. The levels are also full of cuts, cutting through critical paths. For example, if a player has bombs, he may jump from room 5 to room 8 in the diagram above.
If Miyamoto really wanted to convey the feelings of the researcher, then this design is a masterful realization of his intentions.
The linear scheme of the critical path is very interesting to me, because when I played the level, it felt much less linear. I often re-visited the rooms I saw earlier. I sought to visit each room and collect all the items.
I found out that the development team managed to create the illusion of a very open level design through the use of several very clever tricks:
- As I mentioned, the critical path is almost completely linear. This means that it is much easier for the player to find the way through the dungeon without losing it.
- Thanks to the rooms branching off from the critical path, the level feels less linear.
- Re-visited rooms at the beginning of the level also increase the feeling of non-linearity, and because of the small number of such rooms, the player most likely will not be able to get lost.
- Small hidden path cuts at the level allow the player to feel smart, and the designer can thus disguise the linearity of the level.
In short, the optional paths and abbreviations give the sensations of research, and the linear critical path means that after visiting all the rooms in the dungeon, the player will be able to find the path of his passage.
When analyzing the passage of a level, it turns out that the level design succeeds in providing an excellent balance: it gives a sense of exploration and at the same time prevents the player from getting lost.
Intensity change
Breakdown
When studying the change in intensity, I usually pay attention to two aspects:
- In the process of passing the level of enemies usually must increase the complexity.
- No meeting with enemies should be repeated twice. This provides increased variability, and allows the player to constantly answer new questions when passing a level.
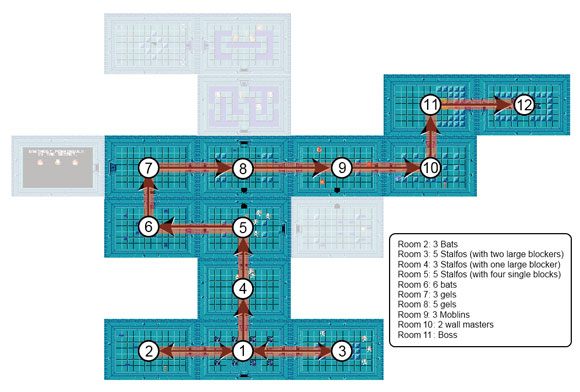
When passing in the correct order, placing enemies in the room increases the difficulty and never repeats (click to view the full image).
Room 2: 3 Bats
Room 3: 5 Stalfos (with two large blocks)
Room 4: 3 Stalfos (with one big block)
Room 5: 5 Stalfos (with four separate blocks)
Room 6: 6 Bats
Room 7: 3 gels
Room 8: 5 gels
Room 9: 3 Moblins
Room 10: 2 wall masters
Room 11: boss
Analysis
And again my initial impressions were completely different. When I just looked at the maps or wandered around the dungeons (or remembered them), the sets of monsters and the schemes of the rooms seemed to me rather arbitrary. It did not seem that the complexity was increasing consciously, and I was sure that the sets of enemies were repeating.
When I began to analyze the enemies, at first it seemed that I was right. However, when I looked only at the enemies on the critical path, a scheme emerged. It was obvious that the sets of enemies and the scheme of rooms increase the complexity in the process of passing the critical path.
For example, in room 3, a player fights with five Stalfos, but two blocks in a room make it much easier to avoid them. Later, when he fights with three Stalfos in room 4, the scheme becomes more difficult, because there is only one big block in the center of the room, which more obstructs the player’s movement than the monsters.
In general, it is obvious that the design of the sets of enemies and their location on the level was intentional, subtle and very well implemented.
Variability
Breakdown
As I mentioned above, the sets of enemies and the scheme of rooms are not repeated. The combination of level design elements (blocks) and monsters is always different.
Analysis
However, you can add one critical remark - the variability of monsters may be too large. In ten rooms with monsters, the developers used six types of monsters and a boss. In most modern games there would be fewer types of enemies, and the complexity of the rooms was enhanced by a combination of monster types. For example, if only Stalfos, Bats and Moblins (and the boss, of course) were in the dungeon, all three types would be combined in the distant rooms part, and their passage would be more difficult due to such combinations.
At later levels, the game uses such combinations more often, so it is not clear why the developers did not apply such a principle here. Perhaps due to technical limitations?
Training
Breakdown
Training is an obvious sign of most modern games. However, in the days of The Legend of Zelda, you had to read the manual in order to understand how to play the game. When the SNES era came, many AAA games had training built into it, but it was rare at the NES.
It is interesting that in the original Legend of Zelda there are elements of learning, but they differ from learning in modern games. The Legend of Zelda training is mainly performed in “black rooms”, where the NPC gives the player clues.
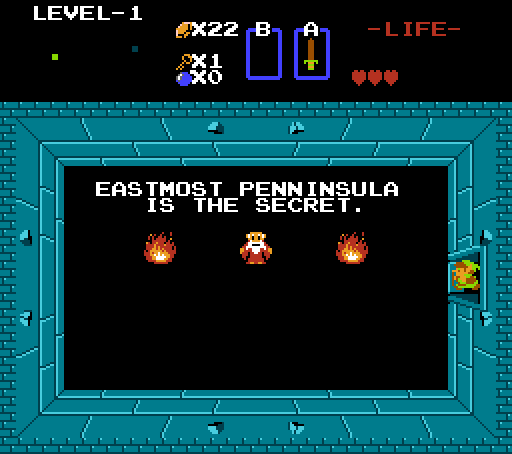
Not the most helpful hint if you are not playing the Japanese version.
For example, at the first level, the hint looks like "Eastmost peninsula has the secret" ("There is a secret on the eastern peninsula") and makes it clear that you need to get to the end of the dungeon. Pretty useless tip.
I studied this question and found that in the Japanese version, the hints are different from the hints in the American. For example, the Japanese version of the message at level 1 states that money is needed to shoot arrows. This is much more useful advice.
Analysis
This find surprised me more than others. I remembered the black rooms, but I never perceived them as part of the training, because they were rather useless.
When I found out about this issue with the translation, everything changed. It became clear that Miyamoto and his team were trying to guide the player and train him in important aspects of the game.
The “black room” method was not very successful, and I think that’s why they abandoned it in subsequent games.
Open question
Taking into account all of the above, only one design decision left me at a loss.
For example, on the first level we are considering, the bow is not on the critical path, although it is necessary for the passing game. Why designers did not force the player to take it? Perhaps they wanted him to visit the dungeon again later if they forgot about the bow? Given the extreme attention paid to ensure that the player does not get lost, I doubt it.
They successfully solved this problem at level 4 (which is shown in the appendix below), so I do not understand why they did not do the same at many other levels.
By the time we got to A Link to the Past on Super Nintendo (six years later), they eliminated this problem, so it’s obvious that they didn’t like it either. But I still do not understand what the intention was.
What have we learned?
- You can achieve a sense of non-linear level design by taking a linear path and adding short branches to it.
- Increasing the complexity along the critical path still allows you to create a smooth increase, even if the level design is not completely linear.
- Miyamoto and his company wanted to build training into the game, but it was lost due to localization errors.
I want to emphasize how amazing it was to create all this in those times. Game Design Masters discovered these tricks and gradually developed them over time.
How lucky we are that we can turn back and learn from their examples.
Appendix: Level 4, Level 9
I wanted to add analysis of several more levels, but I did not find a place for it in the article. Therefore, I added an application in which I analyze levels 4 and 9 to demonstrate how the trends noted above continue to apply throughout the game.
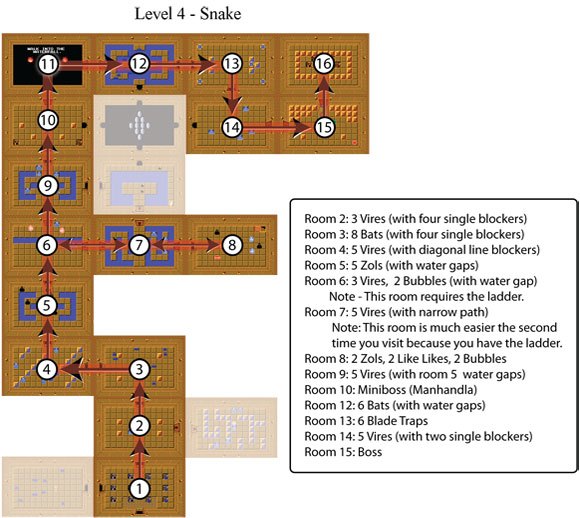
Level 4: Snake (click to view full size).
Room 2: 3 Vires (with four separate blocks)
Room 3: 8 Bats (with four separate blocks)
Room 4: 5 Vires (with diagonal blocks)
Room 5: 5 Zols (with stretches of water)
Room 6: 3 Vires, 2 Bubbles (with a stretch of water)
Note - this room needs a ladder
Room 7: 5 Vires (with a narrow path)
Note - this room is much easier to pass the second time when a player has a ladder
Room 8: 2 Zols, 2 Like Likes, 2 Bubbles
Room 9: 5 Vires (with water from room 5)
Room 10: Mini Boss (Manhandla)
Room 12: 6 Bats (with stretches of water)
Room 13: 6 Blade Traps
Room 14: 5 Vires (with two separate units)
Room 15: boss
Explanations
This level is very interesting. Its passage is generally linear, and the difficulty rises smoothly, as at level 1, but the designers stop the player in room 6 and do not allow him to move further until he takes the stairs in room 8.
As at level 1, the designers added a few extra rooms. At this level, they made it so that in the additional room next to room 2 the key from the room to the left of room 1 was used. This means that the player might have to run a little on the level if he used the key from room 3 in room 2.
However, this is not a very big problem, because they have blocked movement forward in room 6. Because of this, the player will not get lost too much.
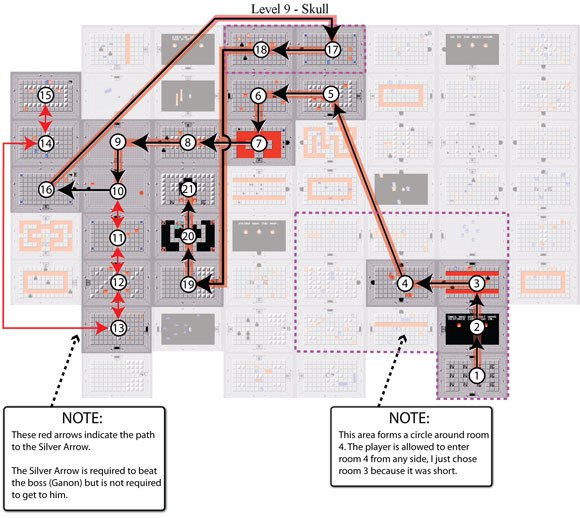
Level 9: Skull (click to view full size). The red arrows indicate the path to the silver arrow. She is needed to defeat the boss Genon, but is not required to get to him. A circle has been created around room 4, allowing the player to enter it from any direction. I chose the entrance from room 3 because it’s so shorter.
Explanations
When I began to follow the critical path at this level, at first I was stunned. As on other levels, to pass a level you need to minimally re-visit rooms here, because the critical path is extremely linear.
The surprise was that the silver arrow was not technically on the critical path, despite the fact that without it, it was impossible to defeat the last boss (Genon). In the modern Zelda game, developers would place gates directly in front of the door of Genon (and in terms of level too) that can only be opened with a silver arrow. In this way, you can guarantee that the player received it before you go to Genon.
I marked the path to the silver arrow with red lines so that you could see where to go. In this case, you need to re-cross the 5 rooms, which strongly deviates from the norm.
Source: https://habr.com/ru/post/327448/
All Articles