How to beat groundhog day → Automate testing of the KOMPAS-3D v17 interface
In the last article, we described how the KOMPAS-3D testing process is organized. We continue the topic. Today's post is devoted to how regression tests were automated and developed its own program for testing not only the interface, but also other KOMPAS-3D modules.

Says testing engineer Ekaterina Rodina.
')
The key element of the KOMPAS-3D v17 version is the new interface. Its development was carried out in a separate branch, and every two or three days the developments merged into the main branch of the product so that other teams could use them. But before you give, you need to check.
The interface was changing very actively. It so happened that because of the innovations, what had been done “broke down”. In order not to miss such moments, we did manual regression tests. Before each discharge into the common branch, in addition to testing the new code, they checked the old one. Over time, the work of testers turned into an endless groundhog day, as in the eponymous film: each working day began with a manual run of all test cases.
The first time the check took only half an hour. With the accumulation of functionality working with the new interface, the duration of the regression test increased, approached the whole working day, and this was not the limit. Less time was left for testing new functionality; programmers stood in line waiting to check their work. The question arose: “What should I do?” The answer suggested itself: regression testing should be automated!
The first task is the selection of a tool. Do we need to “reinvent the wheel” for this? Or you can use existing and well-proven automated testing programs?
After the research, it became clear that the adaptation of ready-made solutions, writing tests for them and maintaining them in working condition in a constantly changing interface is an impossible task.
As a result, it was decided to modify KOMPAS to test itself using its own modules. With this approach, the main problems that are not allowed to use third-party products for regression testing are solved.
1. Does not interfere with the constantly changing environment.
2. Fully simulated user actions in a window with 3D-graphics.
The task of creating an automated testing module KOMPAS-3D for our programmers was new and unusual, and therefore interesting. Inspiration was enough for the entire development period and allowed to bring this complex work to implementation. The “tape recorder” (the resulting module was so named) became the main tool of regression testing v17. Of course, not everything was smooth, but we managed!
First, manual testing of each element is performed, errors are fixed, their solution is discussed. Regression testing tests are recorded at the final stage of work, when all errors are corrected and the element is stable.
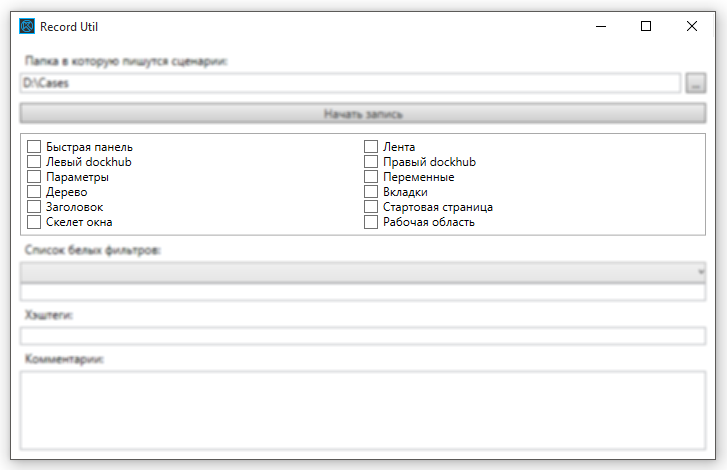
Recording is carried out on the principle of a recorder. Press the Play button — execute the test case script by hand — press Stop. The test case fully describes the user's actions with the element being checked: opening the program, performing the build, closing the program. Control points are created at certain points in time. The test file is ready, it is now possible to use it for automated testing.
When you run the test, the program repeats the previously recorded actions, the test points compare the results, the test closes.
The test script is written in an xml-file with the possibility of manual editing by a tester or a programmer.
Software KOMPAS-3D is divided into modules: interface, module of 3D-models, module of drawings. Respectively divided into modules and autotests.
The interface test record is based on binding events to interface logical objects. There is a button name and there is an event that happens to it. Interface checkpoint consists of two elements - snapshot and screenshot.
A snapshot is a text file in which all data on the state of the system is currently recorded. In fact, when comparing two control points, the snapshots are compared. All differences are displayed as errors.
Screenshots are used for visualization. To simplify the visual assessment of the result, a feature has been added: all differences that are identified in the snapshot are highlighted in the screenshot with a purple frame.

Visualization of differences in snapshots
1. Large size snapshots
I wanted to have all the information about the state of the system, so the snapshots took up too much space. 100 tests - 28 GB.
The first thing that was done to reduce the volume - removed elements that do not affect the appearance. If the user does not see any elements, then at the moment information about them is not needed, and there is no need to write it in snapshots. Then the entire interface was divided into components with a choice: whether you want to - write down information about all the elements, or about one or two that you are working with at the moment.
Select items to compare
This approach has reduced the space occupied on the hard disk, 50 times. Now 100 tests occupy 0.5 GB. The test run time has been reduced three times - from an average of 30 seconds per test to 10 seconds.
2. A large number of errors
Often after draining the next interface changes as a result of running autotests, a shaft of errors was observed (1000 errors in one test). For example, the length of the panel has changed and the length of all controls that are located on this panel has changed. The tester perceives this as one mistake, the program - as a dozen. Such errors were combined into blocks with the addition of verification between the parent and child elements. If a child had the same error as the parent, it was excluded from the results, it was thought that this error was already taken into account in the tests.
3. Separation of errors from modifications
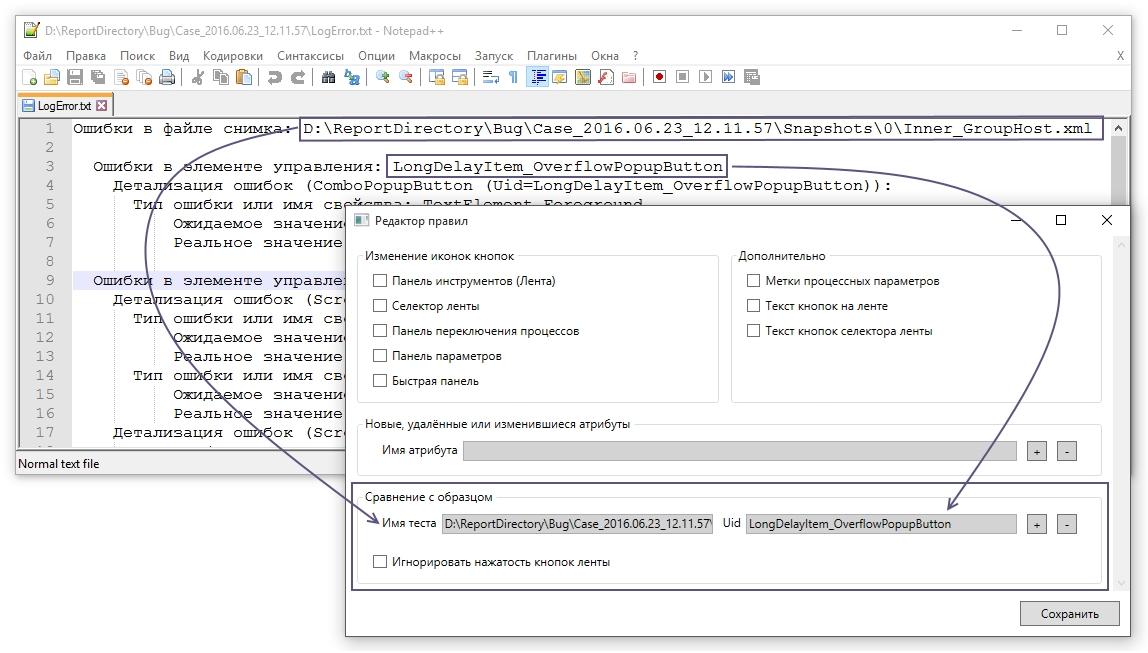
For example, analysts have decided that the button on the left looks ugly and needs to be moved to the right. As a result, all tests where this button is physically present give an error - the button is in the wrong position. Separating such a mistake from the real one in the general pool was difficult. We added the ability to ignore the error pattern.
Ignore by pattern
We run 100 tests, open one of them, we see that the button was moved, we set the “ignore error” checkbox, and in all subsequent tests this error is wiped out and is no longer taken into account.
4. Work with test suites
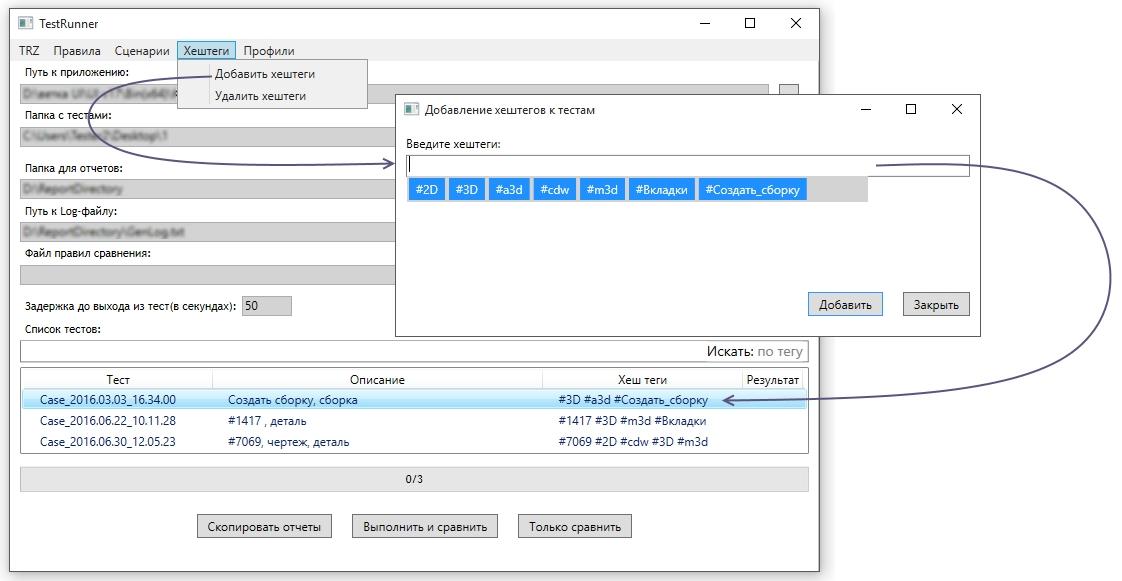
For each test a certain number of tags are hung in order to sort them easily.
Use of tags
The test for the workspace is fundamentally different from the interface. Events are tied to the three-dimensional coordinates (x, y, z) of the model. We create a bitmap image that is compared with the standard. To do this, use a third-party program ImageMagick, all differences are highlighted in red.
Test Example
Tests for different modules can be recorded both together and separately from each other. In the test from the video for clarity, an error was specifically laid down: the wrong distance between the wheel and the brake disc was set. When comparing raster images, we see that the wheels are highlighted in red - they are located incorrectly.
1. Scalability
On monitors with different resolutions (different scales), a situation arose when the cursor clicked and clicked and suddenly began to miss. This was due to recalculation to another scale. The resulting error at some point became critical. We solved this problem very simply - by compulsory assignment of resolution and scale in all tests. No matter which monitor you run the test on, the program window will automatically adjust to the size of the desired resolution. Naturally, this works from a smaller scale to a larger one. In the opposite direction will not work. We just agreed on the scale of the monitor writing tests.
2. Performance
For example, the user performs the action in two seconds, and the program in ten seconds, five times longer. What are these autotests? Began to understand and found out. The cursor coordinates were recorded as follows: the 2D coordinate of the cursor was taken on the monitor, converted through a video card into a 3D coordinate that is in the model, and then an event occurred. The conversion constantly pulled a redraw on the video card, the model was constantly redrawn. If you come across a three-dimensional model with a large number of parts lying inside, the redrawing took a long time. We generally refused to convert and immediately began to write in the three-dimensional coordinates of the model. Excluded the video card from this chain.
3. Implementation of models on different video cards
Anyway, on different video cards the bitmap image of the same model will be different. However, the differences are insignificant, and we decided to assign an error of 1%. If the model matches up to 1%, then the model is correct. If more than 1%, then an error has occurred. Now on different video cards, the models coincide to 0.01.
4. Background control
The solution to this problem is, but not yet implemented. Suppose we have a photo of a 3D model, but from this photo you will not find out what is located on the “back” of the model until you turn it back and take a photo. It is planned to use the refined control system - split the model into segments, vertices, faces, and compare the properties of the specified elements.
In the process of developing KOMPAS-3D v17, automatically regression checks were performed every 2-3 days. We have more time to test the new functionality, less time was spent on processing tests. Initially, the recorder was designed to relieve the interface group, but it found application in testing other KOMPAS-3D modules.
We are not going to stop there. The plans include expanding the use of autotests (ideally covering all the functionality of KOMPAS), increasing the test base. And, of course, the use of "tape recorder" to stabilize subsequent updates and service packs KOMPAS-3D v17.
 Ekaterina Rodina, interface testing engineer.
Says testing engineer Ekaterina Rodina.
')
The key element of the KOMPAS-3D v17 version is the new interface. Its development was carried out in a separate branch, and every two or three days the developments merged into the main branch of the product so that other teams could use them. But before you give, you need to check.
The interface was changing very actively. It so happened that because of the innovations, what had been done “broke down”. In order not to miss such moments, we did manual regression tests. Before each discharge into the common branch, in addition to testing the new code, they checked the old one. Over time, the work of testers turned into an endless groundhog day, as in the eponymous film: each working day began with a manual run of all test cases.
The first time the check took only half an hour. With the accumulation of functionality working with the new interface, the duration of the regression test increased, approached the whole working day, and this was not the limit. Less time was left for testing new functionality; programmers stood in line waiting to check their work. The question arose: “What should I do?” The answer suggested itself: regression testing should be automated!
The first task is the selection of a tool. Do we need to “reinvent the wheel” for this? Or you can use existing and well-proven automated testing programs?
After the research, it became clear that the adaptation of ready-made solutions, writing tests for them and maintaining them in working condition in a constantly changing interface is an impossible task.
As a result, it was decided to modify KOMPAS to test itself using its own modules. With this approach, the main problems that are not allowed to use third-party products for regression testing are solved.
1. Does not interfere with the constantly changing environment.
2. Fully simulated user actions in a window with 3D-graphics.
The task of creating an automated testing module KOMPAS-3D for our programmers was new and unusual, and therefore interesting. Inspiration was enough for the entire development period and allowed to bring this complex work to implementation. The “tape recorder” (the resulting module was so named) became the main tool of regression testing v17. Of course, not everything was smooth, but we managed!
How we work with “tape recorder”
First, manual testing of each element is performed, errors are fixed, their solution is discussed. Regression testing tests are recorded at the final stage of work, when all errors are corrected and the element is stable.
Recording is carried out on the principle of a recorder. Press the Play button — execute the test case script by hand — press Stop. The test case fully describes the user's actions with the element being checked: opening the program, performing the build, closing the program. Control points are created at certain points in time. The test file is ready, it is now possible to use it for automated testing.
When you run the test, the program repeats the previously recorded actions, the test points compare the results, the test closes.
The test script is written in an xml-file with the possibility of manual editing by a tester or a programmer.
Software KOMPAS-3D is divided into modules: interface, module of 3D-models, module of drawings. Respectively divided into modules and autotests.
Interface
The interface test record is based on binding events to interface logical objects. There is a button name and there is an event that happens to it. Interface checkpoint consists of two elements - snapshot and screenshot.
A snapshot is a text file in which all data on the state of the system is currently recorded. In fact, when comparing two control points, the snapshots are compared. All differences are displayed as errors.
Screenshots are used for visualization. To simplify the visual assessment of the result, a feature has been added: all differences that are identified in the snapshot are highlighted in the screenshot with a purple frame.
Visualization of differences in snapshots
What problems had to be solved:
1. Large size snapshots
I wanted to have all the information about the state of the system, so the snapshots took up too much space. 100 tests - 28 GB.
The first thing that was done to reduce the volume - removed elements that do not affect the appearance. If the user does not see any elements, then at the moment information about them is not needed, and there is no need to write it in snapshots. Then the entire interface was divided into components with a choice: whether you want to - write down information about all the elements, or about one or two that you are working with at the moment.
Select items to compare
This approach has reduced the space occupied on the hard disk, 50 times. Now 100 tests occupy 0.5 GB. The test run time has been reduced three times - from an average of 30 seconds per test to 10 seconds.
2. A large number of errors
Often after draining the next interface changes as a result of running autotests, a shaft of errors was observed (1000 errors in one test). For example, the length of the panel has changed and the length of all controls that are located on this panel has changed. The tester perceives this as one mistake, the program - as a dozen. Such errors were combined into blocks with the addition of verification between the parent and child elements. If a child had the same error as the parent, it was excluded from the results, it was thought that this error was already taken into account in the tests.
3. Separation of errors from modifications
For example, analysts have decided that the button on the left looks ugly and needs to be moved to the right. As a result, all tests where this button is physically present give an error - the button is in the wrong position. Separating such a mistake from the real one in the general pool was difficult. We added the ability to ignore the error pattern.
Ignore by pattern
We run 100 tests, open one of them, we see that the button was moved, we set the “ignore error” checkbox, and in all subsequent tests this error is wiped out and is no longer taken into account.
4. Work with test suites
For each test a certain number of tags are hung in order to sort them easily.
Use of tags
Workspace 3D
The test for the workspace is fundamentally different from the interface. Events are tied to the three-dimensional coordinates (x, y, z) of the model. We create a bitmap image that is compared with the standard. To do this, use a third-party program ImageMagick, all differences are highlighted in red.
Test Example
Tests for different modules can be recorded both together and separately from each other. In the test from the video for clarity, an error was specifically laid down: the wrong distance between the wheel and the brake disc was set. When comparing raster images, we see that the wheels are highlighted in red - they are located incorrectly.
What difficulties arose here:
1. Scalability
On monitors with different resolutions (different scales), a situation arose when the cursor clicked and clicked and suddenly began to miss. This was due to recalculation to another scale. The resulting error at some point became critical. We solved this problem very simply - by compulsory assignment of resolution and scale in all tests. No matter which monitor you run the test on, the program window will automatically adjust to the size of the desired resolution. Naturally, this works from a smaller scale to a larger one. In the opposite direction will not work. We just agreed on the scale of the monitor writing tests.
2. Performance
For example, the user performs the action in two seconds, and the program in ten seconds, five times longer. What are these autotests? Began to understand and found out. The cursor coordinates were recorded as follows: the 2D coordinate of the cursor was taken on the monitor, converted through a video card into a 3D coordinate that is in the model, and then an event occurred. The conversion constantly pulled a redraw on the video card, the model was constantly redrawn. If you come across a three-dimensional model with a large number of parts lying inside, the redrawing took a long time. We generally refused to convert and immediately began to write in the three-dimensional coordinates of the model. Excluded the video card from this chain.
3. Implementation of models on different video cards
Anyway, on different video cards the bitmap image of the same model will be different. However, the differences are insignificant, and we decided to assign an error of 1%. If the model matches up to 1%, then the model is correct. If more than 1%, then an error has occurred. Now on different video cards, the models coincide to 0.01.
4. Background control
The solution to this problem is, but not yet implemented. Suppose we have a photo of a 3D model, but from this photo you will not find out what is located on the “back” of the model until you turn it back and take a photo. It is planned to use the refined control system - split the model into segments, vertices, faces, and compare the properties of the specified elements.
Practical application
In the process of developing KOMPAS-3D v17, automatically regression checks were performed every 2-3 days. We have more time to test the new functionality, less time was spent on processing tests. Initially, the recorder was designed to relieve the interface group, but it found application in testing other KOMPAS-3D modules.
We are not going to stop there. The plans include expanding the use of autotests (ideally covering all the functionality of KOMPAS), increasing the test base. And, of course, the use of "tape recorder" to stabilize subsequent updates and service packs KOMPAS-3D v17.
Ekaterina Rodina, interface testing engineer.Source: https://habr.com/ru/post/327266/
All Articles