Broadcast RTMP video stream from Live Encoder to WebRTC

HTTP video delivery protocols, such as HLS and DASH, have long pressed Flash into a niche for playing online video content in browsers.
However, initially flash RTMP , remains one of the most popular ways to deliver live video from a video source to a repeater server. RTMP continues to use services such as Facebook Live , Youtube Live , and others where it is required to broadcast live video and broadcast. Thus, despite the predictions and findings of the imminent demise of Flash, the RTMP protocol is still on the line and is not inferior to its position in the video broadcast niche.
To capture video from cameras, followed by encoding, RTMP has created many hardware and software solutions - boxes that connect to one or more cameras, process the received video signals and send the resulting image via RTMP to a remote server or service for further retransmission. The classic translation scheme looks like this:
')

The disadvantage of this scheme can only be called a delay in the video broadcast, which may be about 30 seconds. If instead of HLS and DASH we use Adobe Flash Player and RTMP, then we return to the Flash plug-in, which is, to put it mildly, not at the forefront of modern online video display facilities.
Webrtc
The solution that allows playing a stream without plug-ins and with minimal delay is WebRTC and converting RTMP to WebRTC on the server side solves the problem of playing the stream on a large number of devices and browsers.
However, here it should be understood that WebRTC is a technology honed under realtime. Unlike, for example, HTTP (HLS), where segments are simply sent over HTTP, WebRTC is much more complicated and uses tight data exchange between the sender and receiver of traffic, using RTCP feedbacks , bandwidth control, and delay targeting.
Therefore, before enabling WebRTC for simple playback of the stream, you need to answer one simple question: does the video delivery project require a low latency . And if low latency is not required, then it makes sense to consider other delivery technologies, such as HLS and DASH, to avoid overheading with WebRTC.
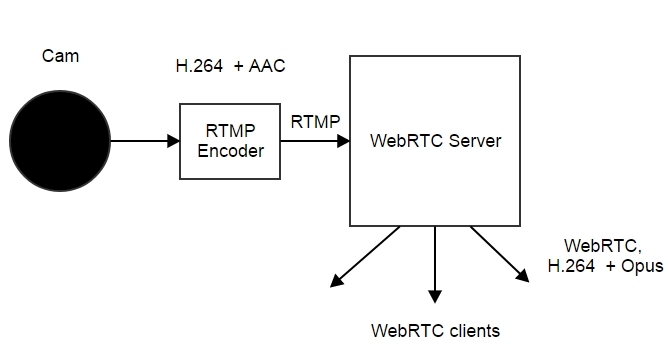
For maximum compatibility with other devices and to preserve the possibility of distribution to HLS, you must select the correct codecs. Typically, RTMP encoders support H.264 video codec and AAC audio codec . This combination is quite standard and occurs very often.
WebRTC in browsers does not support AAC codec, so you have to transcode AAC to Opus or AAC to G.711 . Transcoding in Opus gives the best quality and allows, if desired, unscrew it even higher with the help of settings. Therefore, if transcode, it is preferable to do it in Opus .
Since we use H.264 when receiving the video stream by the server and when playing it from WebRTC devices, transcoding is not required here, and depacking of the video received via RTMP with subsequent packaging into SRTP (WebRTC) is required. The re-packetization process obviously takes less CPU time than transcoding, which allows you to service more incoming streams.
However, not all devices support H.264. For example, the Chrome browser for Android does not allow to use this codec everywhere. In this case, full-fledged transcoding in the WebRTC VP8 codec will turn on and the scheme will look like this:
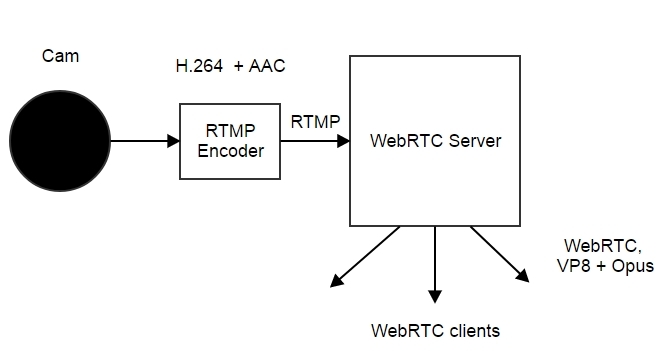
Server-side transcoding makes serious demands on the CPU, so you need to be prepared to build about 1 server core, if you need to transcode a high-resolution stream, for example, 720p
Coders
Professional boxes like this cost good money and are required for professional broadcasting 24x7 and serious business tasks:

For broadcasting more simple events, software solutions are suitable, one of which is the free Live Media Encoder from Adobe.

The version of the encoder for Mac OS has support for H.264 and AAC codecs . Therefore, if you use Live Media Encoder on a Mac, it can in some sense be a replacement for a hardcoder or paid software that allows broadcasting RTMP over the network with the same codecs.
Testing
First, make sure that the stream is available and plays via RTMP. If the RTMP playback is OK and the stream is in place, connect to it via WebRTC.
The process of streaming a video stream to a server is called publishing (publishing) and requires at a minimum:
- Choose your camera.
- Specify the RTMP stream publishing address
Example:
rtmp: //192.168.88.59/live - Specify stream name
Example:
stream2229
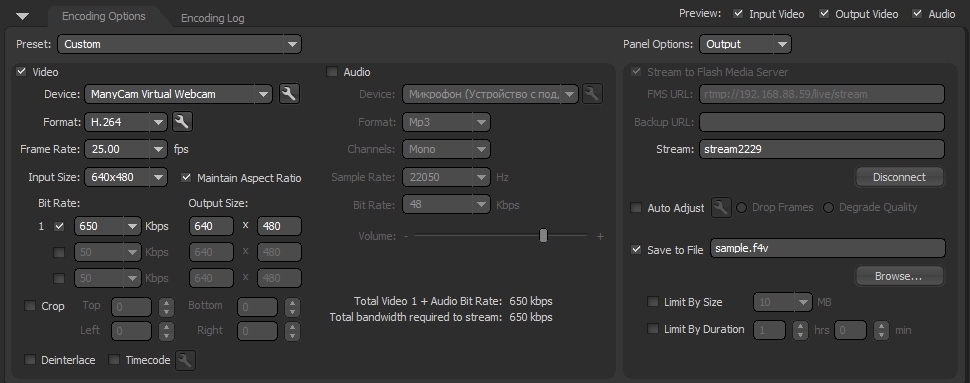
If the server address is correct, there is access to the camera, then when you click the Start button, the encoder should get a connection to the server via RTMP protocol and start publishing the video stream to the specified address and with the specified name stream2229.

Now you need to take a video stream from the server via RTMP. For this we will use a simple Flash Streaming Flash application, which is also available at this link . This is a regular flash drive (swf-file), which is located on a web page and runs in Adobe Flash Player. Therefore, make sure that Flash Player is installed and available on your system for this test.
Here you need to enter the same data: the address of the RTMP stream and its name. The result is a video on a web page. It is played by the flash player.
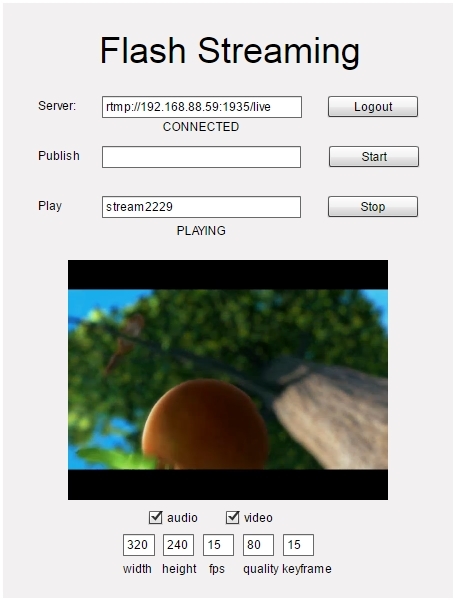
Further, we recall that our goal was to test playback using WebRTC, and playback in Flash was only an intermediate test confirming the operation of the RTMP encoder and the broadcast server.
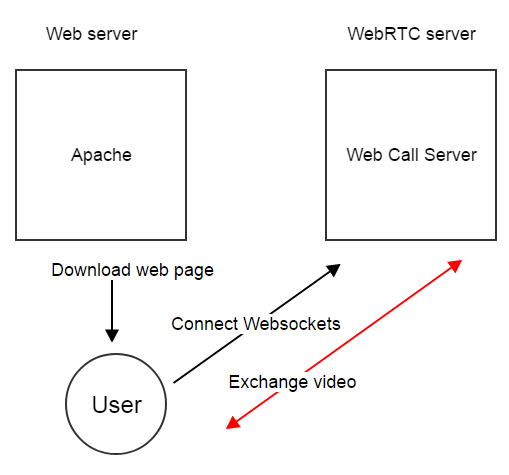
For the test, just take the video stream WebRTC player. This player does not require the specification of the RTMP address, since the Websockets protocol is used to connect to the server and the address will be: wss: //192.168.88.59: 8443
Here:
wss are web sockets via SSL
192.168.88.59 - address of the WebRTC server
8443 - server port for Websockets SSL protocol

After you specify stream2229 as the stream name, click Play and get the image already via WebRTC.
It should be noted here that despite the fact that the connection to the server occurred via Websockets and the port is specified 8443, the video traffic will not go through this connection. For the video, special UDP ports will be opened on the browser side and on the server side, and it is through these open UDP ports that the video will be transmitted. Simple replay commands, statuses, as well as the configuration of codecs and other information important for WebRTC will be transmitted via Websockets.
To see how WebRTC video traffic comes in, use the Google Chrome browser and during playback, open the chrome: // webrtc-internals

The graphs show that the bit rate of the received video stream is about 600 kbps, the frame rate is 28-30 FPS.
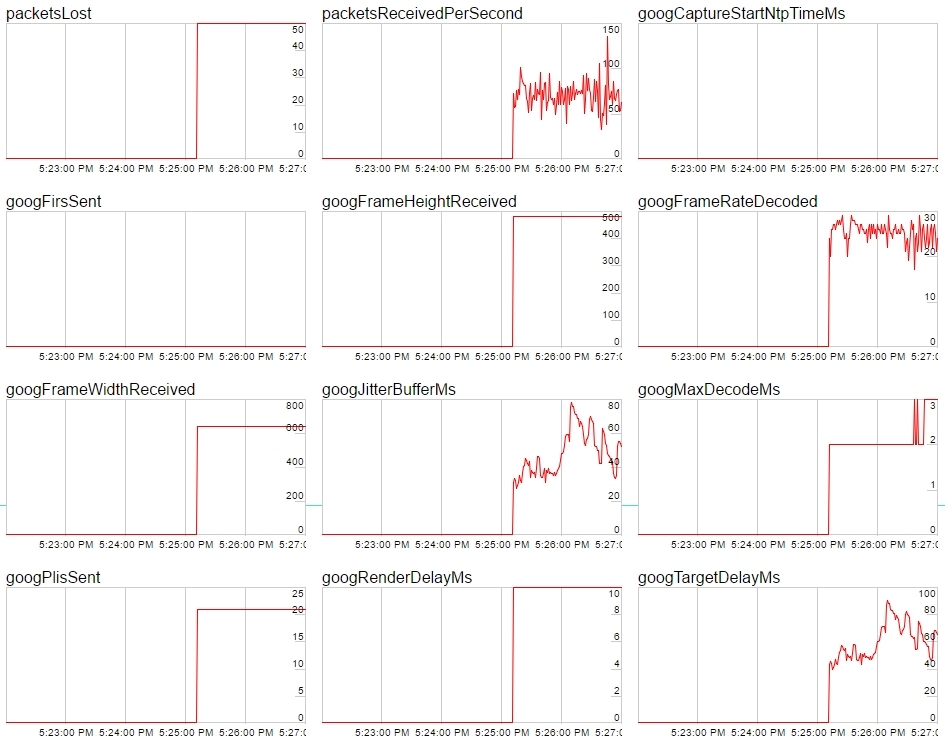
The following graphs give information about the number of lost UDP packets (50), the speed of receiving packets per second, the resolution of the video stream 640x480, jitter and decoding time.
Thus, we tested the playback of an RTMP video stream sent from Adobe Live Media Encoder on HTML5 - a page in a browser with WebRTC support and did not use additional browser plug-ins. Testing took place with the Web Call Server 5 server , which supports incoming RTMP streams followed by distribution via RTMP, WebRTC and other protocols.
Page code - WebRTC player
Minimal player code for embedding in a web page looks like this
<html> <head> <script language="javascript" src="flashphoner.js"></script> <script language="javascript" src="player.js"></script> </head> <body onLoad="init()"> <h1>The player</h1> <div id="remoteVideo" style="width:320px;height:240px;border: 1px solid"></div> <input type="button" value="start" onClick="start()"/> <p id="status"></p> </body> </html> This code is based on the flashphoner.js API file , which is available in the Web SDK assembly. The player itself will be embedded in the remoteVideo div element.
The player.js script uses three functions: initialization using Flashphoner.init () , creating a connection to the server using Flashphoner.createSession (), and playing WebRTC video stream session.createStream (...). Play () .
Server connection status is tracked using events: ESTABLISHED, DISCONNECTED, FAILED.
Video stream statuses are tracked using the PLAYING, STOPPED, FAILED events.
Thus, we get full control over the connection to the server and the status of the video stream.
var remoteVideo; function init(){ Flashphoner.init(); remoteVideo = document.getElementById("remoteVideo"); } function start() { Flashphoner.createSession({urlServer: "wss://wcs5-eu.flashphoner.com:8443"}).on(Flashphoner.constants.SESSION_STATUS.ESTABLISHED, function (session) { //session connected, start streaming startPlayback(session); }).on(Flashphoner.constants.SESSION_STATUS.DISCONNECTED, function () { setStatus("DISCONNECTED"); }).on(Flashphoner.constants.SESSION_STATUS.FAILED, function () { setStatus("FAILED"); }); } function startPlayback(session) { session.createStream({ name: "stream2229", display: remoteVideo, cacheLocalResources: true, receiveVideo: true, receiveAudio: true }).on(Flashphoner.constants.STREAM_STATUS.PLAYING, function (playStream) { setStatus(Flashphoner.constants.STREAM_STATUS.PLAYING); }).on(Flashphoner.constants.STREAM_STATUS.STOPPED, function () { setStatus(Flashphoner.constants.STREAM_STATUS.STOPPED); }).on(Flashphoner.constants.STREAM_STATUS.FAILED, function () { setStatus(Flashphoner.constants.STREAM_STATUS.FAILED); }).play(); } function setStatus(status) { document.getElementById("status").innerHTML = status; } The minimal code of the WebRTC player is available for download via this link and requires WebRTC server WebRTC server to work. The server can be downloaded and installed on the Linux host https://flashphoner.com/download or launched as an image on Amazon EC2 .
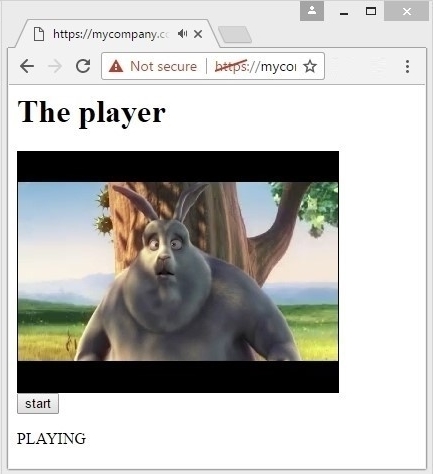
Minimum code WebRTC player in work
The sample player and screenshots presented above had some additional styles and scripts for positioning the image.
In the minimum code, we have limited ourselves to the simplest HTML and cut-down script for the quickest possible introduction into the page of the site. The result looks like this:
This player can be integrated into any web page of a site or project, since it only requires the inclusion of the flashphoner.js API script and one div-block under the video on the web page.
A server that works with WebRTC can be physically located on another independent machine that is not related to hosting a web project.
As a result, we described the code of the WebRTC-player and showed how to embed the player in the web page of the site and deploy it on our own web server. The player plays WebRTC H.264 video stream. The source of the RTMP stream is the Adobe Live Media Encoder.
Links
Adobe Flash Media Encoder is an Adobe encoder that allows you to stream RTMP.
Flash Streaming Demo - Play RTMP stream in Flash Player.
Player is a standard example of a WebRTC player with source code.
Player Minimal - download scripts for minimal player WebRTC player.html and player.js
WebRTC Server - Web Call Server 5 server for relaying an RTMP stream over WebRTC.
Web SDK - assembly contains flashphoner.js - API file for the player.
Source: https://habr.com/ru/post/327214/
All Articles