Setting up Zabbix 3.2 on Ubuntu Server 16.04 LTS
All the good time! It was possible recently to configure the monitoring system zabbix. Customized for the first time. Therefore, I decided to take a note here. There are enough examples on the Internet, but versions are being updated, new “features” appear.
The purpose of the article is to ensure that knowledge is open, who needs to be able to use it, and most importantly the development of its community in runet.
Content
After a clean installation of the system, you need to update the information about the repositories about updating packages:
')
Next, install the mysql server and the apache web server (in the process, you need to create a password for the root mysql).
Then go to the directory with temporary files: cd / tmp
Download and install the package that will add the repository for Zabbix server, for Ubuntu 16.04 you need to select the version “xenial”. Package download from off.sayta .
Add the zabbix repository:
Update the package manager cache and make sure that the repository for Zabbix has been added:
Zabbix server will store all information in MySQL and therefore install the package for Zabbix server with MySQL support:
There are cases when an error occurs with dependencies. To avoid this, run the command to fix dependencies:
Now you need to create a database in MySQL. Connect to MySQL:
Here we connected to the database, create a database called zabbix, give full rights to the user zabbix @ localhost and set a password for this user.
Then you need to go to the directory where the script is located that will create the structure for the database. The file is called create.sql.gz
cd / usr / share / doc / zabbix-server-mysql
Run the script (there are a lot of files in the archive you will have to wait)
At this stage, you need to specify Zabbix, that you need to use a local database. To do this, uncomment the parameter:
DBHost = localhost
The DBName and DBUser parameters will be active, you will not have to touch them.
Follow the path to the file and edit the parameters:
sudo vim /etc/zabbix/zabbix_server.conf
My configuration file settings:

You should also create an A-record for the zabbix server with a tick marked PTR. Run Zabbix server and see its status:
Then you need to go to the apache config and select the desired time zone. These two parameters need to be uncommented from blocks:
<IfModule mod_php5.c>
<IfModule mod_php 7.c>
Parameter name: php_value date.timezone Europe / Minsk
Next, restart the web server:
In the next step, you can go by ip_address / zabbix and see the Zabbix web interface.
It is necessary to go through the wizard setup, but at the second step I “caught the error”. Therefore, you need to install the missing packages and reboot the web server:
Then again we go along the path ip_address / zabbix , click on the “next” wizard. From the interesting, you need to specify the password that was specified when creating the mysql database, leave the port by default, leave the host name either by default or given as the host. Then all the settings are checked and we get to the Zabbix web management interface. System login / password Admin / zabbix
The first thing to do is create a user in the Active Directory. User group after creating “Domain Users”. This is sufficient for authentication on a zabbix server.
Next, in the zabbix web interface, we create exactly the same user as in AD.
“Administration-Users-Create user” add to the Zabbix administrators group and set a password. In the “Permission” tab add Zabbix Super Admin rights. (You always need to create a user in AD and similar in zabbix).
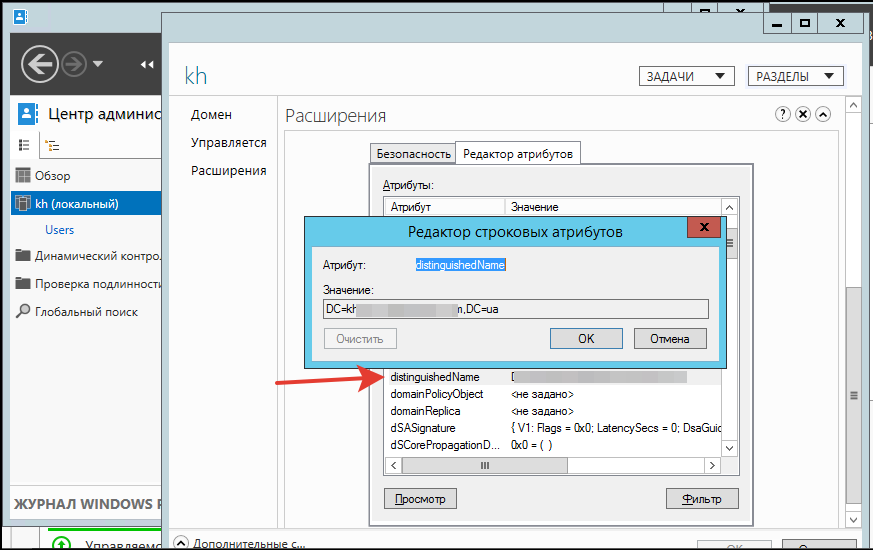
Then go to Zabbix under the created user, go along the path “Administration-Authentification” to the LDAP tab, fill in the Bind DN fields for the created user (zabbix). In order not to confuse anything, we take the value from the AD snap-in. Active Directory Administrative Center .
Select the current domain and “click mouse” - “Properties”, “Extensions”, “Attribute Editor”. Find the attribute “distinguishedName” and copy the values to the zabbix setting of the Bind DN field ( for example example.lan ).
When we log in to zabbix from an AD user, the standard UserName: Admin Password: zabbix will not be able to log in.
There is a situation when the AD domain is unavailable, the LDAP does not respond, and when you try to log in to zabbix, the message “Login name or password is incorrect” will be displayed. In such a situation, it is necessary to switch to zabbix internal authentication.
To do this, we perform a “pair” of actions:
Connect to mysql:
Perform a command that disables LDAP authentication and activates internal zabbix authentication. Admin / zabbix standard login / password:
Linux
Zabbix agent is already installed on my Linux server, but for “perfectionism” I want to use the latest version of the agent. To view the version of zabbix agent, execute the command:
or
Go to the temporary directory, download the latest version of zabbix and install the agent:
cd / tmp
Then we configure the zabbix configuration file. Personally, my experience with zabbix is not great, and following the example I took the parameters from the articles in the manual section and studied them in the official zabbix documentation. These parameters were enough for the stable operation of the agent. There were no problems with it.
sudo vi /etc/zabbix/zabbix_agentd.conf
You need to edit the following parameters:
The “Server” and “ServerActive” parameters are the full name (FQDN) of the PC on which the zabbix server is running.
“Hostname” is the name of the PC on which we install the agent.
After editing the necessary parameters, reboot the zabbix agent:
Add a zabbix agent to autoload:
Linux host settings on zabbix server
In the zabbix web interface we create a host that will be “monitored” (the screen is arranged in steps)
Specify his name and add to the desired group. I specify the host by DNS name, since on the Zabbix host I have the correct settings for interacting with the internal DNS infrastructure. If you have a domain and DNS is configured, then you should add two entries to the network configuration file.
sudo vi / etc / network / interfaces
dns-nameservers 192.168.1.100 # ip_domain_domain
dns-search example.lan # domain search_name
* The name must match the name of the PC on the network.
Next, on the Templates tab, “link” to our host, the standard template for monitoring Linux systems and accessing ssh (optional):
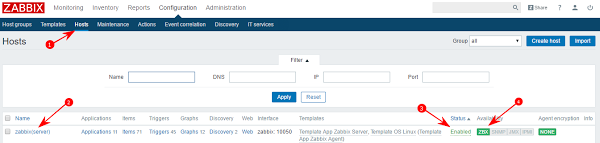
Then go to the tab "host" and observe the indicator zabbix agent, its working status is displayed in green. The status must be “Enabled” . After we applied the template, the standard set of parameters began to be monitored. You can see them in the host settings tab “items” and “triggers” .
It is also possible to edit the “items” and “triggers” to remove or add parameters.
The screenshot shows the operational status, which means that monitoring is performed.
Windows
Install the zabbix agent on Windows. In my case, this is Hyper-V Server 2012R2 without Gui.
We download the agent from the official Zabbix website, choose for the Windows platform.
On the console Hyper-V, I have a free two-pane file manager Unreal Commander installed. Therefore, I unpack the archive using it, then save two files to the root of the “C drive”:
zabbix_agentd.exe
zabbix_agentd.conf
At the initial stage, we configure Windows Firewall. You should add the incoming rule allowing connection to TCP port 10050. I proceed to the installation of the zabbix agent and import the config file:
Then, by analogy with setting up an agent for Linux, I enter the necessary parameters into the zabbix_agentd.conf configuration file
The file is modified using the text editor notepad ++.
If everything went well, we will not see any warnings. Then you need to start the Zabbix Agent service.
In cmd, we run taskmgr and right-click to start the service. Similarly, through the console:
If it is necessary to remove the service and configuration file, then execute the command:
The procedure for creating a host in Zabbix is similar to Linux, the difference is that the standard template for Windows systems (Template OS Windows) is used .
In order for the Zabbix web interface to be displayed in Russian, you need to Russify the console (of the Linux server itself, on which Zabbix is installed).
View which localizations are installed:
View available localizations (relative to Russian):
I install the necessary localization:
Reload apache and select Russian language in Zabbix web interface:
PS If I’minterested in describing how to screw Telegram to Zabbix.
Links to manual:
→ Installation and basic configuration of the Zabbix 3.0 LTS monitoring system on Ubuntu Server 14.04 LTS
→ Documentation Zabbix
The purpose of the article is to ensure that knowledge is open, who needs to be able to use it, and most importantly the development of its community in runet.
Content
- Installing Zabbix 3.2 on Ubuntu 16.04
- Configure AD LDAP Authentication
- Installing Zabbix agents on Linux and Windows OS
Installing Zabbix 3.2 on Ubuntu 16.04
After a clean installation of the system, you need to update the information about the repositories about updating packages:
')
sudo apt update && sudo apt upgrade Next, install the mysql server and the apache web server (in the process, you need to create a password for the root mysql).
sudo apt install mysql-server mysql-client apache2 Then go to the directory with temporary files: cd / tmp
Download and install the package that will add the repository for Zabbix server, for Ubuntu 16.04 you need to select the version “xenial”. Package download from off.sayta .
sudo wget http://repo.zabbix.com/zabbix/3.2/ubuntu/pool/main/z/zabbix-release/zabbix-release_3.2-1+xenial_all.deb Add the zabbix repository:
sudo dpkg -i zabbix-release_3.2-1+xenial_all.deb Update the package manager cache and make sure that the repository for Zabbix has been added:
sudo apt update cat /etc/apt/sources.list.d/zabbix.list Zabbix server will store all information in MySQL and therefore install the package for Zabbix server with MySQL support:
sudo apt install zabbix-server-mysql zabbix-frontend-php There are cases when an error occurs with dependencies. To avoid this, run the command to fix dependencies:
sudo apt-get -f install Now you need to create a database in MySQL. Connect to MySQL:
mysql -uroot -p Here we connected to the database, create a database called zabbix, give full rights to the user zabbix @ localhost and set a password for this user.
create database zabbix character set utf8 collate utf8_bin; grant all privileges on zabbix.* to zabbix@localhost identified by 'zabbix_test'; quit; Then you need to go to the directory where the script is located that will create the structure for the database. The file is called create.sql.gz
cd / usr / share / doc / zabbix-server-mysql
Run the script (there are a lot of files in the archive you will have to wait)
sudo zcat create.sql.gz | mysql -uroot zabbix -p At this stage, you need to specify Zabbix, that you need to use a local database. To do this, uncomment the parameter:
DBHost = localhost
The DBName and DBUser parameters will be active, you will not have to touch them.
Follow the path to the file and edit the parameters:
sudo vim /etc/zabbix/zabbix_server.conf
My configuration file settings:
grep -v '^#\|^$' /etc/zabbix/zabbix_server.conf You should also create an A-record for the zabbix server with a tick marked PTR. Run Zabbix server and see its status:
sudo systemctl start apache2.service sudo systemctl status apache2.service Then you need to go to the apache config and select the desired time zone. These two parameters need to be uncommented from blocks:
<IfModule mod_php5.c>
<IfModule mod_php 7.c>
Parameter name: php_value date.timezone Europe / Minsk
Next, restart the web server:
sudo systemctl restart apache2.service In the next step, you can go by ip_address / zabbix and see the Zabbix web interface.
It is necessary to go through the wizard setup, but at the second step I “caught the error”. Therefore, you need to install the missing packages and reboot the web server:
sudo apt install php-mbstring php-bcmath php-xml sudo systemctl reload apache2.service Then again we go along the path ip_address / zabbix , click on the “next” wizard. From the interesting, you need to specify the password that was specified when creating the mysql database, leave the port by default, leave the host name either by default or given as the host. Then all the settings are checked and we get to the Zabbix web management interface. System login / password Admin / zabbix
Configure AD LDAP Authentication
The first thing to do is create a user in the Active Directory. User group after creating “Domain Users”. This is sufficient for authentication on a zabbix server.
Next, in the zabbix web interface, we create exactly the same user as in AD.
“Administration-Users-Create user” add to the Zabbix administrators group and set a password. In the “Permission” tab add Zabbix Super Admin rights. (You always need to create a user in AD and similar in zabbix).
Then go to Zabbix under the created user, go along the path “Administration-Authentification” to the LDAP tab, fill in the Bind DN fields for the created user (zabbix). In order not to confuse anything, we take the value from the AD snap-in. Active Directory Administrative Center .
Select the current domain and “click mouse” - “Properties”, “Extensions”, “Attribute Editor”. Find the attribute “distinguishedName” and copy the values to the zabbix setting of the Bind DN field ( for example example.lan ).
When we log in to zabbix from an AD user, the standard UserName: Admin Password: zabbix will not be able to log in.
There is a situation when the AD domain is unavailable, the LDAP does not respond, and when you try to log in to zabbix, the message “Login name or password is incorrect” will be displayed. In such a situation, it is necessary to switch to zabbix internal authentication.
To do this, we perform a “pair” of actions:
Connect to mysql:
mysql -uroot -p Perform a command that disables LDAP authentication and activates internal zabbix authentication. Admin / zabbix standard login / password:
mysql> UPDATE `zabbix`.`config` SET `authentication_type` = '0' WHERE `config`.`configid` =1; Installing Zabbix agents on Linux and Windows OS
Linux
Zabbix agent is already installed on my Linux server, but for “perfectionism” I want to use the latest version of the agent. To view the version of zabbix agent, execute the command:
sudo dpkg -s zabbix-agent or
sudo aptitude show zabbix-agent Go to the temporary directory, download the latest version of zabbix and install the agent:
cd / tmp
wget http://repo.zabbix.com/zabbix/3.2/ubuntu/pool/main/z/zabbix-release/zabbix-release_3.2-1+xenial_all.deb sudo dpkg -i zabbix-release_3.2-1+xenial_all.deb sudo apt update sudo dpkg -s zabbix-agent sudo apt install zabbix-agent Then we configure the zabbix configuration file. Personally, my experience with zabbix is not great, and following the example I took the parameters from the articles in the manual section and studied them in the official zabbix documentation. These parameters were enough for the stable operation of the agent. There were no problems with it.
sudo vi /etc/zabbix/zabbix_agentd.conf
You need to edit the following parameters:
PidFile=/var/run/zabbix/zabbix_agentd.pid LogFile=/var/log/zabbix/zabbix_agentd.log LogFileSize=10 Server=zabbix.example.lan ServerActive=zabbix.example.lan Hostname=Ubuntu-server Include=/etc/zabbix/zabbix_agentd.d/*.conf The “Server” and “ServerActive” parameters are the full name (FQDN) of the PC on which the zabbix server is running.
“Hostname” is the name of the PC on which we install the agent.
After editing the necessary parameters, reboot the zabbix agent:
sudo systemctl restart zabbix-agent.service Add a zabbix agent to autoload:
sudo systemctl enable zabbix-agent.service Linux host settings on zabbix server
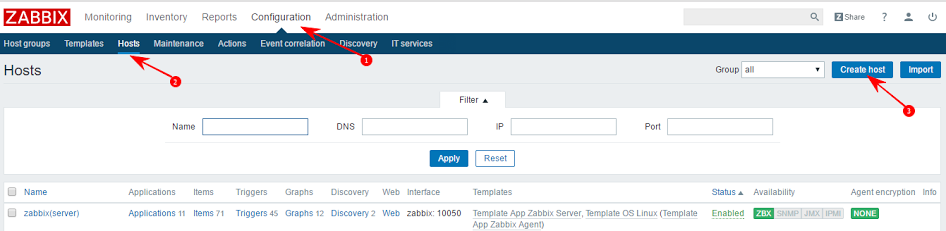
In the zabbix web interface we create a host that will be “monitored” (the screen is arranged in steps)
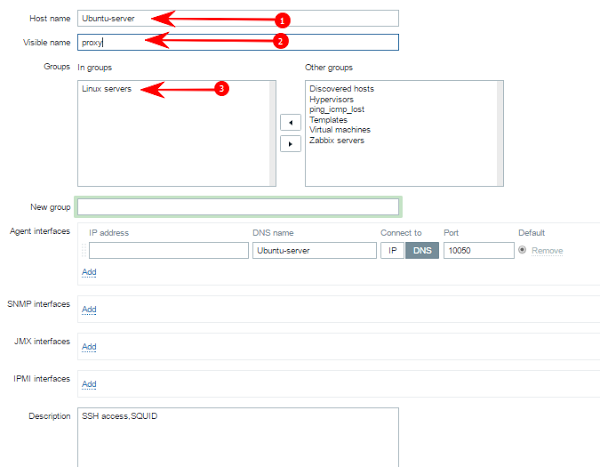
Specify his name and add to the desired group. I specify the host by DNS name, since on the Zabbix host I have the correct settings for interacting with the internal DNS infrastructure. If you have a domain and DNS is configured, then you should add two entries to the network configuration file.
sudo vi / etc / network / interfaces
dns-nameservers 192.168.1.100 # ip_domain_domain
dns-search example.lan # domain search_name
* The name must match the name of the PC on the network.
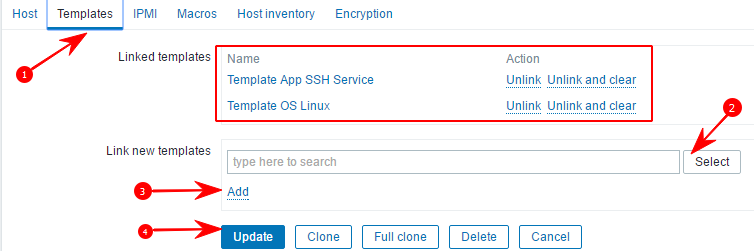
Next, on the Templates tab, “link” to our host, the standard template for monitoring Linux systems and accessing ssh (optional):
Then go to the tab "host" and observe the indicator zabbix agent, its working status is displayed in green. The status must be “Enabled” . After we applied the template, the standard set of parameters began to be monitored. You can see them in the host settings tab “items” and “triggers” .
It is also possible to edit the “items” and “triggers” to remove or add parameters.
The screenshot shows the operational status, which means that monitoring is performed.
Windows
Install the zabbix agent on Windows. In my case, this is Hyper-V Server 2012R2 without Gui.
We download the agent from the official Zabbix website, choose for the Windows platform.
On the console Hyper-V, I have a free two-pane file manager Unreal Commander installed. Therefore, I unpack the archive using it, then save two files to the root of the “C drive”:
zabbix_agentd.exe
zabbix_agentd.conf
At the initial stage, we configure Windows Firewall. You should add the incoming rule allowing connection to TCP port 10050. I proceed to the installation of the zabbix agent and import the config file:
c:\zabbix_agentd.exe --config c:\zabbix_agentd.conf --install Then, by analogy with setting up an agent for Linux, I enter the necessary parameters into the zabbix_agentd.conf configuration file
The file is modified using the text editor notepad ++.
If everything went well, we will not see any warnings. Then you need to start the Zabbix Agent service.
In cmd, we run taskmgr and right-click to start the service. Similarly, through the console:
zabbix_agentd.exe -cc:\zabbix_agentd.conf -s If it is necessary to remove the service and configuration file, then execute the command:
c:\zabbix_agentd.exe --config c:\zabbix_agentd.conf --uninstall The procedure for creating a host in Zabbix is similar to Linux, the difference is that the standard template for Windows systems (Template OS Windows) is used .
Russification Zabbix
In order for the Zabbix web interface to be displayed in Russian, you need to Russify the console (of the Linux server itself, on which Zabbix is installed).
View which localizations are installed:
sudo locale -a View available localizations (relative to Russian):
cat /usr/share/i18n/SUPPORTED | grep ru_ I install the necessary localization:
sudo locale-gen ru_RU sudo locale-gen ru_RU.UTF-8 sudo dpkg-reconfigure locales Reload apache and select Russian language in Zabbix web interface:
sudo systemctl restart apache2.service PS If I’m
Links to manual:
→ Installation and basic configuration of the Zabbix 3.0 LTS monitoring system on Ubuntu Server 14.04 LTS
→ Documentation Zabbix
Source: https://habr.com/ru/post/327150/
All Articles