Experience migrating applications from Unity3D to iOS sdk and SceneKit
Today, we are sharing the experience of our partners - the company Try Sports Now - about how to use the SceneKit framework to give the application a second life.
“It happens that an application that has long disappeared into obscurity suddenly begins to gain popularity among users and bring profit. It goes without saying that in this situation it is advisable to develop and update it. One thing is bad: it may turn out that the source code of the product is so morally obsolete during the absence of demand that the time spent on updating it is comparable to the resource leaving for the development of a new source from scratch. We encountered a similar problem when working with the Human Anatomy 3D project. In this article we will describe how the new version of the application was transferred from Unity3D source code to native ones, and we will highlight some of the problems encountered in the process.
The application was written several years ago on the cross-platform Unity3D. After some time, the cross-platform became irrelevant, and the version for the App Store continued to occupy a lot of space on users' devices, which could not but disappoint them. And the capabilities of the Unity3D engine were redundant for the implementation of the functional: it was necessary to simply display 3D objects with the possibility of basic interaction with them and animation. In view of the above, we decided to update the version with native iOS and macOS sources, and to implement modules for working with 3D objects, use SceneKit. The decision was dictated mainly by the fact that we are well acquainted with this tool.
SceneKit is a high-level framework designed to work with three-dimensional objects. It includes a physics engine, a particle generator and a convenient API. SceneKit is based on a scene graph. This approach is widely used in game engines (Unity, Cocos ...), as well as in 3D editors (Blender, Lightwave ...). Read more about the scene graph here . Consider its typical structure:
')
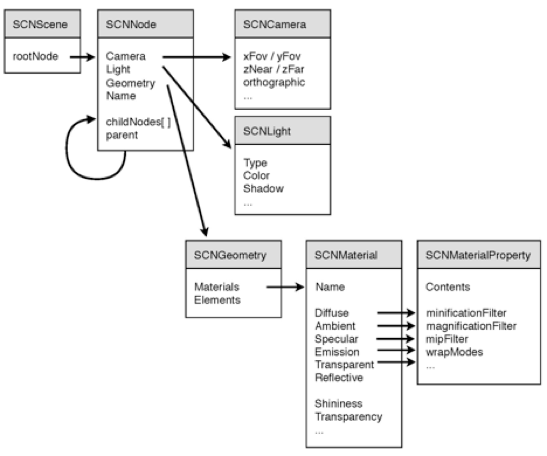
The main element of this structure is the node (SCNNode), which contains information about position, angles of rotation and scale. The position, rotation and scale of the child nodes are determined relative to the parent node.
As can be seen from the structure, the root object is SCNScene, which contains a link to the root node. It is with respect to this node that the entire structure of the scene is built.
Now let's see how it was used in our project. First of all, the scene object (SCNScene) was created, and the finished scene with the model was loaded into it. The recommended .scnassets folder was used to store scenes and textures. because in this case Xcode optimizes them for maximum performance on the device. We imported the scene from the editor in the format COLLADA (* .dae). Here is an example of loading a scene from .scnassets:
Objective-C:
Swift:
As a result, the entire hierarchy of objects of the loaded scene will be added to the root node of the scene (rootNode). After that, we decided that it would be nice to find our model on the stage and add material with texture to it, which is an image and is stored in the same .scnassets:
Objective-C iOS:
Swift macOS:
As you can see, the search for the desired node is carried out simply by name. The recursively parameter determines whether it is necessary to search further, deep into the scene graph, or it is sufficient to restrict ourselves to the child nodes of the current one. Having found the node we need, we take the first material that lies on it and assign it the selected texture.
Next, you need to enter the camera. To do this, create and add 2 nodes to the scene hierarchy: cameraNode, which will be the camera, and cameraRoot, to which the camera will be attached and relative to which it will move:
Objective-C iOS:
Swift macOS:
This is done for the convenience of working with the camera, since in this case all movements will be relative to a fixed point, and this is more convenient for those cases when, for example, the camera should fly around the object.
To display the scene, use the SceneKit View interface element, which is added to the application screen:

Since there is no need for specific lighting in our project, we will not add light sources to the scene. Instead, use the default lighting. The autoenablesDefaultLighting parameter of SCNView is responsible for it. It remains only to point our scene to the SCNView component:
In SceneKit there is a built-in camera control mechanism, for which the parameter allowsCameraControl is responsible. However, in our case, it had to be turned off, as it was necessary to provide for limiting the amplitude of the camera rotation around the object.
As an example of working with scene objects, consider the implementation of zoom and camera rotation around our model.
Let's start with the approach / distance implementation, which, in essence, comes down to moving the camera node along the Z axis relative to the node of the parent object. All movements, rotations, changes of scale in SceneKit are carried out in the same way as in CoreGraphics. This is due to the fact that SceneKit uses CoreGraphics to implement animation:
Objective-C iOS:
Swift macOS:
In this function, we determine what exactly happens - approximation or distance - and, if the current camera position fits into the set limit, we move the camera using SCNMatrix4Translate, which takes the transform as the first parameter - relative to it and the movement will occur. The remaining parameters are the offsets along the X, Y, Z axes, respectively. When implementing a zoom on macOS, it should be taken into account that the scrolling speed of the Apple Mouse and TouchPad is higher than the standard values: this may cause a violation of the limitation of the extreme limits of the zoom.
The implementation of camera rotation around the model is in many ways similar to the approximation implementation, however, in the case of rotation, we, of course, deal with 2 axes at once: the Y axis for flying around the model and the X axis for the possibility of viewing the model from above / below:
Objective-C iOS:
Swift macOS:
Here we rotate the model itself on the Y axis so that the rotation on each axis is performed independently. Directly rotation is implemented through SCNMatrix4Rotate. Its first parameter is the transform, with respect to which the rotation will be performed, the second parameter is the angle of rotation, and the other three are the components of rotation along the X, Y and Z axis, respectively.
With the new iOS version of the application, there were no problems, we managed to lower the minimum required iOS version to 10.0. Difficulties began when a similar application needed to be implemented on macOS. On versions of macOS lower than 10.12, we faced global problems when working with models:
These problems have not yet been resolved; I had to leave the minimum required version of macOS 10.12 for a while.
Migrating an application from Unity3D to iOS sdk and SceneKit made it possible to simplify and speed up the development of the application interface, the implementation of gesture control. Without any extra effort, the interfaces of iOS and macOS applications have become as familiar to the user as possible, and the size of archive files has decreased by 2-2.5 times. In general, if we talk about display requirements and basic interactions, SceneKit allowed integrating three-dimensional objects with animation on fresh versions of macOS and iOS without global difficulties, as well as implement the simplest interaction with the camera. ”
“It happens that an application that has long disappeared into obscurity suddenly begins to gain popularity among users and bring profit. It goes without saying that in this situation it is advisable to develop and update it. One thing is bad: it may turn out that the source code of the product is so morally obsolete during the absence of demand that the time spent on updating it is comparable to the resource leaving for the development of a new source from scratch. We encountered a similar problem when working with the Human Anatomy 3D project. In this article we will describe how the new version of the application was transferred from Unity3D source code to native ones, and we will highlight some of the problems encountered in the process.
The application was written several years ago on the cross-platform Unity3D. After some time, the cross-platform became irrelevant, and the version for the App Store continued to occupy a lot of space on users' devices, which could not but disappoint them. And the capabilities of the Unity3D engine were redundant for the implementation of the functional: it was necessary to simply display 3D objects with the possibility of basic interaction with them and animation. In view of the above, we decided to update the version with native iOS and macOS sources, and to implement modules for working with 3D objects, use SceneKit. The decision was dictated mainly by the fact that we are well acquainted with this tool.
SceneKit Overview
SceneKit is a high-level framework designed to work with three-dimensional objects. It includes a physics engine, a particle generator and a convenient API. SceneKit is based on a scene graph. This approach is widely used in game engines (Unity, Cocos ...), as well as in 3D editors (Blender, Lightwave ...). Read more about the scene graph here . Consider its typical structure:
')
The main element of this structure is the node (SCNNode), which contains information about position, angles of rotation and scale. The position, rotation and scale of the child nodes are determined relative to the parent node.
- SCNGeometry determines the shape of the object and its display by a set of materials;
- SCNCamera is responsible for the point from which we see the scene (similar to the camera when shooting a film);
- SCNLight is responsible for the lighting; its position affects all objects in the scene.
As can be seen from the structure, the root object is SCNScene, which contains a link to the root node. It is with respect to this node that the entire structure of the scene is built.
Now let's see how it was used in our project. First of all, the scene object (SCNScene) was created, and the finished scene with the model was loaded into it. The recommended .scnassets folder was used to store scenes and textures. because in this case Xcode optimizes them for maximum performance on the device. We imported the scene from the editor in the format COLLADA (* .dae). Here is an example of loading a scene from .scnassets:
Objective-C:
SCNScene *scene = [SCNScene sceneNamed:@" "]; Swift:
let scene = SCNScene(named: " ") As a result, the entire hierarchy of objects of the loaded scene will be added to the root node of the scene (rootNode). After that, we decided that it would be nice to find our model on the stage and add material with texture to it, which is an image and is stored in the same .scnassets:
Objective-C iOS:
SCNNode *meshNode = [scene.rootNode childNodeWithName:@" " recursively:true]; meshNode.geometry.materials.firstObject.diffuse.contents = [UIImage imageNamed:@" "]; Swift macOS:
let meshNode: SCNNode? = mydae.rootNode.childNode(withName: " ", recursively: true) meshNode?.geometry?.materials.first?.diffuse.contents = NSImage(named: " ") As you can see, the search for the desired node is carried out simply by name. The recursively parameter determines whether it is necessary to search further, deep into the scene graph, or it is sufficient to restrict ourselves to the child nodes of the current one. Having found the node we need, we take the first material that lies on it and assign it the selected texture.
Next, you need to enter the camera. To do this, create and add 2 nodes to the scene hierarchy: cameraNode, which will be the camera, and cameraRoot, to which the camera will be attached and relative to which it will move:
Objective-C iOS:
SCNNode *cameraNode = [SCNNode node]; cameraNode.camera = [SCNCamera camera]; SCNNode * cameraRoot = [SCNNode node]; cameraNode.position = SCNVector3Make(0, 0, 3); [cameraRoot addChildNode:cameraNode]; [scene.rootNode addChildNode:cameraRoot]; Swift macOS:
let cameraNode = SCNNode() cameraNode.camera = SCNCamera() let cameraRoot = SCNNode() cameraNode.position = SCNVector3Make(0, 0, 3) cameraRoot.addChildNode(cameraNode) scene.rootNode.addChildNode(cameraRoot) This is done for the convenience of working with the camera, since in this case all movements will be relative to a fixed point, and this is more convenient for those cases when, for example, the camera should fly around the object.
To display the scene, use the SceneKit View interface element, which is added to the application screen:
Since there is no need for specific lighting in our project, we will not add light sources to the scene. Instead, use the default lighting. The autoenablesDefaultLighting parameter of SCNView is responsible for it. It remains only to point our scene to the SCNView component:
_sceneView.scene = scene; In SceneKit there is a built-in camera control mechanism, for which the parameter allowsCameraControl is responsible. However, in our case, it had to be turned off, as it was necessary to provide for limiting the amplitude of the camera rotation around the object.
An example of working with objects
As an example of working with scene objects, consider the implementation of zoom and camera rotation around our model.
Let's start with the approach / distance implementation, which, in essence, comes down to moving the camera node along the Z axis relative to the node of the parent object. All movements, rotations, changes of scale in SceneKit are carried out in the same way as in CoreGraphics. This is due to the fact that SceneKit uses CoreGraphics to implement animation:
Objective-C iOS:
- (void)zoomCamera:(CGFloat) zoom{ CGFloat speedZ = 0,245; if (zoom< 1) zoom= speedZ; else if (zoom> 1) zoom= -speedZ; if (zoom< 0){ if (cameraNode.position.z < 2.5) return; } else{ if (cameraNode.position.z > 6) return; } cameraNode.transform = SCNMatrix4Translate(cameraNode.transform, 0, 0, zoom); } Swift macOS:
var allZoom: CGFloat = 0 func zoomCamera(zoom: CGFloat) { if allScrollX < 1 { let cam = ViewController.cameraRoot.childNodes[0] allZoom = zoom let speedZ = CGFloat(7) if allZoom < -speedZ { allZoom = -speedZ } else if allZoom > speedZ { allZoom = speedZ } if allZoom < 0 { if cam.position.z < 3 { return } } else { if cam.position.z > 5 { return } } cam.transform = SCNMatrix4Translate(cam.transform, 0, 0, allZoom * 0.035) } } In this function, we determine what exactly happens - approximation or distance - and, if the current camera position fits into the set limit, we move the camera using SCNMatrix4Translate, which takes the transform as the first parameter - relative to it and the movement will occur. The remaining parameters are the offsets along the X, Y, Z axes, respectively. When implementing a zoom on macOS, it should be taken into account that the scrolling speed of the Apple Mouse and TouchPad is higher than the standard values: this may cause a violation of the limitation of the extreme limits of the zoom.
The implementation of camera rotation around the model is in many ways similar to the approximation implementation, however, in the case of rotation, we, of course, deal with 2 axes at once: the Y axis for flying around the model and the X axis for the possibility of viewing the model from above / below:
Objective-C iOS:
- (void)rotateCamera:(CGPoint) rotation{ allScrollX = rotation.x / 2; for (SCNNode *item in _sceneView.scene.rootNode.childNodes) { if (item != cameraRoot && item != cameraNode) item.transform = SCNMatrix4Rotate(item.transform, rotation.x * M_PI/180.0, 0, 0.1, 0); } if (cameraRoot.eulerAngles.x* 180.0/M_PI > 45 && rotation.y < 0){ return; } if (cameraRoot.eulerAngles.x* 180.0/M_PI < -45 && rotation.y > 0){ return; } cameraRoot.transform = SCNMatrix4Rotate(cameraRoot.transform, rotation.y * M_PI/180.0, -0.1, 0, 0); } Swift macOS:
func anglCamera(x: CGFloat, y: CGFloat) { if allZoom < 1 { allScrollX = x / 2 let cam = ViewController.cameraRoot let rootNode = ViewController.sceneRoot let dX = x * CGFloat(Double.pi / 180) for item in rootNode.childNodes { if item.name != "camera" { item.transform = SCNMatrix4Rotate(item.transform, -dX, 0, 0.1, 0) } } let angle = cam.eulerAngles let dY = y * CGFloat(Double.pi / 180) if dY < 0 { if angle.x < -1 { return } } else { if angle.x > 1 { return } } cam.transform = SCNMatrix4Rotate(cam.transform, dY, 0.1, 0, 0) } } Here we rotate the model itself on the Y axis so that the rotation on each axis is performed independently. Directly rotation is implemented through SCNMatrix4Rotate. Its first parameter is the transform, with respect to which the rotation will be performed, the second parameter is the angle of rotation, and the other three are the components of rotation along the X, Y and Z axis, respectively.
Problems
With the new iOS version of the application, there were no problems, we managed to lower the minimum required iOS version to 10.0. Difficulties began when a similar application needed to be implemented on macOS. On versions of macOS lower than 10.12, we faced global problems when working with models:
- animations were ignored;
- shifted the coordinates of the animations;
- increased likelihood crash IDE Xcode when working with models.
These problems have not yet been resolved; I had to leave the minimum required version of macOS 10.12 for a while.
Conclusion
Migrating an application from Unity3D to iOS sdk and SceneKit made it possible to simplify and speed up the development of the application interface, the implementation of gesture control. Without any extra effort, the interfaces of iOS and macOS applications have become as familiar to the user as possible, and the size of archive files has decreased by 2-2.5 times. In general, if we talk about display requirements and basic interactions, SceneKit allowed integrating three-dimensional objects with animation on fresh versions of macOS and iOS without global difficulties, as well as implement the simplest interaction with the camera. ”
Source: https://habr.com/ru/post/327074/
All Articles