All you need to know about detecting changes in Angular
I stumbled upon a good article about the device Angular change detection mechanism. Since The topic is important enough, but it is not even deeply disclosed on English-language resources, and it’s not possible to find Russian-language materials on this topic in general, I decided to translate this article.
If, like me, you want to fully understand the mechanism for detecting changes in Angular, you need to investigate the source code, since there is not enough information on the Internet about it. Most of the articles mention that each component has its own change detector, which is responsible for checking components, but, in fact, this is limited by focusing on immunity and change detection strategies. This article provides you with information that is sufficient to understand why application examples with immunity work and how a change detection strategy affects validation. Also, the information obtained from this article will allow you to independently use various approaches in optimizing performance.
The article is divided into two parts. The first part is sufficiently technical and contains many references to the source code. She explains in detail how the mechanism for detecting changes "under the hood." Its content is based on the latest version of Angular - 4.0.1. The implementation of the mechanism for detecting changes in this version differs from the previous 2.4.1. If interested, you can read a little how the previous implementation works in this response to stackoverflow .
The second part shows how to use the detection of changes in applications and its contents is applicable for the previous 2.4.1 and for the latest 4.0.1 versions of Angular, since The public API has not changed.
')
The guide to Angular constantly mentions that an application is, in fact, a tree of components. However, under the hood Angular uses a low-level abstraction called view (hereinafter the view will be used without translation). There is a direct 1: 1 relationship between the component and the view - one view is associated with one component, and vice versa. The views contain a link to the related component in the component property. All operations, such as checking properties and updating the DOM, perform a view, so it’s technically more true to treat Angular as a view tree, while a component can be described as a high-level view. Here is a description of the view can be found in the source code :
In this article I will use the concept of a component and its view interchangeably.
There are two important things about view in the context of change detection. The first is that each view contains references to child views in the nodes property and, thus, can perform actions on child views. The second is that each view has a state (the state property), which plays a big role, because it is based on its value that Angular decides whether to start detecting changes for this view and all its children, or to skip. There are four possible states :
Changes are not detected for the view and its descendants if the status attribute of ChecksEnabled is set to false or if the view is in the Errored or Destroyed state. By default, all views are initialized with ChecksEnabled, unless the onPush ChangeDetectionStrategy.OnPush strategy is applied. By this point we will be back a bit later. States can be combined, for example, the view can have the FisrtCheck and ChecksEnabled flags set at the same time.
Angular has a number of high-level concepts for view manipulation. I described some of them in this article . One of these abstract entities is ViewRef . It isolates the view of the component and has a very well- known method called detectChanges . When an asynchronous event occurs, Angular triggers the detection of changes on the top-level ViewRef, which, after running the detection of changes within themselves, trigger the detection of changes in their descendants .
The main logic that is responsible for starting the detection of changes for the view is located in the checkAndUpdateView function. Basically, its functionality performs actions on the child views of the component. When it is called for a specific view, it performs the following operations in the specified order:
Based on the above list of operations, I would like to draw attention to some points.
The first is that the onChanges hook is called on the child component before the child view is checked, it will be called even if the detection of changes in this child view is skipped. This is very important, and then we will see how we can use this knowledge in the second part of the article.
The second point, the DOM update for the view, is part of the change detection mechanism and happens during the checkout. This means that if a component is not checked, its DOM will not be updated even if the properties of this component are used in the display template.
Another interesting observation is that the view state of the child component can be changed during the detection of changes. Earlier, I mentioned that all view components are initialized with the ChecksEnabled flag set by default, but for all components that use the OnPush strategy, change detection will be disabled after the first check (the 9th operation in the list):
This means that during the next launch of the change detection, the check will be skipped for the view of this component and its descendants. Documentation tells us that the component will be checked only in case of changes in its connections (input-parameters) using the OnPush strategy. Thus, to perform a check, you should set the ChecksEnabled flag, which we see in the following code (clause 2):
The state is updated only if the connections (input parameters) of the parent view have been changed and the child component has been initialized with the ChangeDetectionStrategy.OnPush strategy.
Well, ultimately, the detection of changes for the current view is responsible for starting the detection of changes in the child view (paragraph 8). Here the state of the view component is checked and, if it is in the status of ChecksEnabled, then a change is detected for this view. This displays the code below:
Now we know that the view state determines whether changes will be detected on this view and its descendants, or not. This begs the question - can we control this state? It turns out that yes - we can, and this is what the second part of this article will be about.
Suppose we have the following component tree:
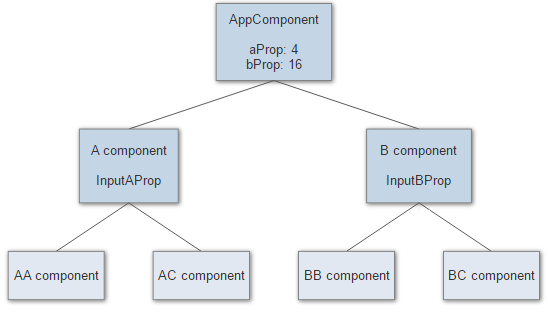
As we found out earlier, each component is associated with a view. Each view is initialized with the ViewState.ChecksEnabled flag set, which determines that when you start the change detection Angular, each component will be checked.
Suppose we want to cancel change detection for the AComponent component and its descendants. This is easy to do — we just need to set the value of false to the state attribute of ViewState.ChecksEnabled. State change is a low-level action, so Angular provides a number of public methods that are available to us in view. Each component can access its associated view through a ChangeDetectorRef. For Angular provides the following public interface of this class:
Let's see how much benefit we can get from it.
The first method that allows us to manipulate the state is detach, which simply cancels checks on the current view:
detach can be applied in the code as follows:
This will ensure that the left branch is skipped by the AComponent at the time of the subsequent detection of changes (components marked in orange will not be checked):
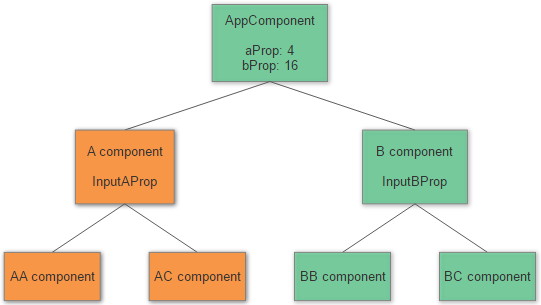
Here you should pay attention to a couple of points - firstly, even if we change the state of only AComponent, all its descendants will also not be subject to checks. Second, until the change detection is done for the left branch, the DOM will also not be updated. A small example to demonstrate:
During the first component check, the contents of the span will be displayed as See if I change: false. After two seconds, when the changed property is set to true, the text in the span will not change. However, if we delete the line this.cd.detach (), everything will start working as expected.
As mentioned in the first part of the article, the OnChanges hook is still called for AComponent, if the incoming property aProp is changed in the AppComponent component. This means that when the input parameter has been changed, we can activate the detector of the current component to start the change detection and disable it for the next pass. This is what is displayed in the following code:
Since, reattach simply sets the ViewState.ChecksEnabled flag:
this is completely identical to what happens when we set the OnPush value for a ChangeDetectionStrategy: cancel checks after the first start of detection of changes, turn on when the related property of the parent component has been changed, and turn off again after starting
It is important to note that the OnChanges hook works only on the top-level component of a disabled branch, and not on all components of this branch.
The reattach method allows you to check only the current component, but if change detection is disabled on the parent component, it will not have any effect. This means that the reattach method is only useful for top-level components of a disabled branch.
We need a way to enable detection for all parent components, right up to the root component. The method to do this is called markForCheck.
Looking at the implementation, we see that it just iteratively goes up the tree and includes checks for change detection for each parent component, right up to the root component.
And can we one-time run the change detection for the current component and its descendants? Yes, for this we just need to use the detectChanges method . This method starts detecting changes for the view of the current component, regardless of its state, i.e. the detection may remain disabled for the current view and the component will not be checked during subsequent regular launches of detection. Here is a sample code:
When input properties change, the DOM is updated, even if the change detector remains disabled.
This is the last method presented, which guarantees the absence of changes on the current launch of the detector. In essence, it performs 1, 7, and 8 list items from the first part of this article and throws an exception if the links (incoming properties) have been changed, or there is a need to update the DOM.
→ Link to the original article
A study of the underlying implementations and examples
If, like me, you want to fully understand the mechanism for detecting changes in Angular, you need to investigate the source code, since there is not enough information on the Internet about it. Most of the articles mention that each component has its own change detector, which is responsible for checking components, but, in fact, this is limited by focusing on immunity and change detection strategies. This article provides you with information that is sufficient to understand why application examples with immunity work and how a change detection strategy affects validation. Also, the information obtained from this article will allow you to independently use various approaches in optimizing performance.
The article is divided into two parts. The first part is sufficiently technical and contains many references to the source code. She explains in detail how the mechanism for detecting changes "under the hood." Its content is based on the latest version of Angular - 4.0.1. The implementation of the mechanism for detecting changes in this version differs from the previous 2.4.1. If interested, you can read a little how the previous implementation works in this response to stackoverflow .
The second part shows how to use the detection of changes in applications and its contents is applicable for the previous 2.4.1 and for the latest 4.0.1 versions of Angular, since The public API has not changed.
')
The guide to Angular constantly mentions that an application is, in fact, a tree of components. However, under the hood Angular uses a low-level abstraction called view (hereinafter the view will be used without translation). There is a direct 1: 1 relationship between the component and the view - one view is associated with one component, and vice versa. The views contain a link to the related component in the component property. All operations, such as checking properties and updating the DOM, perform a view, so it’s technically more true to treat Angular as a view tree, while a component can be described as a high-level view. Here is a description of the view can be found in the source code :
View is the main building block for a UI application. This is the minimum group of items that are created and deleted together.
The properties of the View elements may change, but the structure (number and order) of these elements is not. Changing the structure of elements can only be done by inserting, moving or deleting an nested View through the ViewContainerRef. Any View can contain many view containers.
In this article I will use the concept of a component and its view interchangeably.
There are two important things about view in the context of change detection. The first is that each view contains references to child views in the nodes property and, thus, can perform actions on child views. The second is that each view has a state (the state property), which plays a big role, because it is based on its value that Angular decides whether to start detecting changes for this view and all its children, or to skip. There are four possible states :
- FisrtCheck
- ChecksEnabled
- Errored
- Destroyed
Changes are not detected for the view and its descendants if the status attribute of ChecksEnabled is set to false or if the view is in the Errored or Destroyed state. By default, all views are initialized with ChecksEnabled, unless the onPush ChangeDetectionStrategy.OnPush strategy is applied. By this point we will be back a bit later. States can be combined, for example, the view can have the FisrtCheck and ChecksEnabled flags set at the same time.
Angular has a number of high-level concepts for view manipulation. I described some of them in this article . One of these abstract entities is ViewRef . It isolates the view of the component and has a very well- known method called detectChanges . When an asynchronous event occurs, Angular triggers the detection of changes on the top-level ViewRef, which, after running the detection of changes within themselves, trigger the detection of changes in their descendants .
The main logic that is responsible for starting the detection of changes for the view is located in the checkAndUpdateView function. Basically, its functionality performs actions on the child views of the component. When it is called for a specific view, it performs the following operations in the specified order:
- updates incoming properties on instances of child components
- updates the change detection status of child views (as part of the implementation of the change detection strategy)
- calls the OnChanges hook on the child components, in case the connection has changed
- causes OnInit and ngDoCheck hooks on child components
- calls the AfterContentInit, AfterContentChecked, AfterViewInit and AfterViewChecked hooks on instances of child components
- calls the OnDestroy hook if the child / parent component is deleted
- updates the DOM for the current view if the properties of the instance of the current view have been changed.
- launches change detection for child views
- Cancels change checks for the current view (if provided by the strategy used)
- sets the state of the FirstCheck flag to false
Based on the above list of operations, I would like to draw attention to some points.
The first is that the onChanges hook is called on the child component before the child view is checked, it will be called even if the detection of changes in this child view is skipped. This is very important, and then we will see how we can use this knowledge in the second part of the article.
The second point, the DOM update for the view, is part of the change detection mechanism and happens during the checkout. This means that if a component is not checked, its DOM will not be updated even if the properties of this component are used in the display template.
Another interesting observation is that the view state of the child component can be changed during the detection of changes. Earlier, I mentioned that all view components are initialized with the ChecksEnabled flag set by default, but for all components that use the OnPush strategy, change detection will be disabled after the first check (the 9th operation in the list):
if (view.def.flags & ViewFlags.OnPush) { view.state &= ~ViewState.<ChecksEnabled; } This means that during the next launch of the change detection, the check will be skipped for the view of this component and its descendants. Documentation tells us that the component will be checked only in case of changes in its connections (input-parameters) using the OnPush strategy. Thus, to perform a check, you should set the ChecksEnabled flag, which we see in the following code (clause 2):
if (compView.def.flags & ViewFlags.OnPush) { compView.state |= ViewState.ChecksEnabled; } The state is updated only if the connections (input parameters) of the parent view have been changed and the child component has been initialized with the ChangeDetectionStrategy.OnPush strategy.
Well, ultimately, the detection of changes for the current view is responsible for starting the detection of changes in the child view (paragraph 8). Here the state of the view component is checked and, if it is in the status of ChecksEnabled, then a change is detected for this view. This displays the code below:
viewState = view.state; ... case ViewAction.CheckAndUpdate: if ((viewState & ViewState.ChecksEnabled) && (viewState & (ViewState.Errored | ViewState.Destroyed)) === 0) { checkAndUpdateView(view); } } Now we know that the view state determines whether changes will be detected on this view and its descendants, or not. This begs the question - can we control this state? It turns out that yes - we can, and this is what the second part of this article will be about.
Suppose we have the following component tree:
As we found out earlier, each component is associated with a view. Each view is initialized with the ViewState.ChecksEnabled flag set, which determines that when you start the change detection Angular, each component will be checked.
Suppose we want to cancel change detection for the AComponent component and its descendants. This is easy to do — we just need to set the value of false to the state attribute of ViewState.ChecksEnabled. State change is a low-level action, so Angular provides a number of public methods that are available to us in view. Each component can access its associated view through a ChangeDetectorRef. For Angular provides the following public interface of this class:
class ChangeDetectorRef { markForCheck() : void detach() : void reattach() : void detectChanges() : void checkNoChanges() : void } Let's see how much benefit we can get from it.
detach
The first method that allows us to manipulate the state is detach, which simply cancels checks on the current view:
detach(): void { this._view.state &= ~ViewState.ChecksEnabled; } detach can be applied in the code as follows:
export class AComponent { constructor(public cd: ChangeDetectorRef) { this.cd.detach(); } This will ensure that the left branch is skipped by the AComponent at the time of the subsequent detection of changes (components marked in orange will not be checked):
Here you should pay attention to a couple of points - firstly, even if we change the state of only AComponent, all its descendants will also not be subject to checks. Second, until the change detection is done for the left branch, the DOM will also not be updated. A small example to demonstrate:
@Component({ selector: 'a-comp', template: `<span>See if I change: {{changed}}</span>` }) export class AComponent { constructor(public cd: ChangeDetectorRef) { this.changed = 'false'; setTimeout(() => { this.cd.detach(); this.changed = 'true'; }, 2000); } During the first component check, the contents of the span will be displayed as See if I change: false. After two seconds, when the changed property is set to true, the text in the span will not change. However, if we delete the line this.cd.detach (), everything will start working as expected.
reattach
As mentioned in the first part of the article, the OnChanges hook is still called for AComponent, if the incoming property aProp is changed in the AppComponent component. This means that when the input parameter has been changed, we can activate the detector of the current component to start the change detection and disable it for the next pass. This is what is displayed in the following code:
export class AComponent { @Input() inputAProp; constructor(public cd: ChangeDetectorRef) { this.cd.detach(); } ngOnChanges(values) { this.cd.reattach(); setTimeout(() => { this.cd.detach(); }) } Since, reattach simply sets the ViewState.ChecksEnabled flag:
reattach(): void { this._view.state |= ViewState.ChecksEnabled; } this is completely identical to what happens when we set the OnPush value for a ChangeDetectionStrategy: cancel checks after the first start of detection of changes, turn on when the related property of the parent component has been changed, and turn off again after starting
It is important to note that the OnChanges hook works only on the top-level component of a disabled branch, and not on all components of this branch.
markForCheck
The reattach method allows you to check only the current component, but if change detection is disabled on the parent component, it will not have any effect. This means that the reattach method is only useful for top-level components of a disabled branch.
We need a way to enable detection for all parent components, right up to the root component. The method to do this is called markForCheck.
let currView: ViewData|null = view; while (currView) { if (currView.def.flags & ViewFlags.OnPush) { currView.state |= ViewState.ChecksEnabled; } currView = currView.viewContainerParent || currView.parent; } Looking at the implementation, we see that it just iteratively goes up the tree and includes checks for change detection for each parent component, right up to the root component.
detectChanges
And can we one-time run the change detection for the current component and its descendants? Yes, for this we just need to use the detectChanges method . This method starts detecting changes for the view of the current component, regardless of its state, i.e. the detection may remain disabled for the current view and the component will not be checked during subsequent regular launches of detection. Here is a sample code:
export class AComponent { @Input() inputAProp; constructor(public cd: ChangeDetectorRef) { this.cd.detach(); } ngOnChanges(values) { this.cd.detectChanges(); } When input properties change, the DOM is updated, even if the change detector remains disabled.
checkNoChanges
This is the last method presented, which guarantees the absence of changes on the current launch of the detector. In essence, it performs 1, 7, and 8 list items from the first part of this article and throws an exception if the links (incoming properties) have been changed, or there is a need to update the DOM.
→ Link to the original article
Source: https://habr.com/ru/post/327004/
All Articles