Private cloud for video and photos for half an hour "on the knee"
Many use the synchronization function with the cloud from large companies such as Apple or Google, someone prefers Yandex, mail.ru and the like. I did not like these options, I prefer to store my data on my own. Therefore, one day, I decided to make myself a simple “cloud”.

The task: to synchronize the devices and give the opportunity to get the footage through a web browser, logging in with a password. Pass this password to relatives and friends.
Why is all this necessary? The fact that divorced, without a measure, all kinds of "authorized" and those who consider themselves as such. This may be a police officer who is not particularly willing to follow not only the spirit, but also the letter of the law, all sorts of employees of the Horns and Hoofs, who know the law, and the brain in general, replace the decree of the authorities, insane watchmen with the same syndrome, the Cossacks , diverse activists - you can enumerate well for a very long time.

All this respectable public doesn’t like it when their art is filmed. During the shooting you can hear "it is forbidden to shoot here", "I am an official", "remove the camera, yes I am you!", And even participate in the game "do not let me break your gadget and do not get a fist in the face."
')
I noticed that when the phrase “live broadcast” is heard, the ardor of the above characters somewhat fades away, the handles stretching towards the annoying device fall off, and “you” abruptly changes to “you”. Improves, in general, the magic phrase.
From the material tools, I had an Android smartphone, a home server running Debian GNU / Linux, and a couple of laptops on hand. It was decided that it’s not worth storing all the eggs in one basket, so I purchased another device and placed it where the grabbing handles of various authorities could not reach it.
The home server was ready initially, the system is on LUKS, so no additional actions, except for installing Syncthing, were required.
On the second server, the system works from a memory card, therefore I connect LUN from the storage and install packages to support MPIO:
Activate autostart:
Check availability:
Fine. We install software for working with LUKS, encrypt the device, create a file system and mount:
In / etc / crypttab, we write:
In / etc / fstab:
Explanation: I created a separate user, from which syncthing will work on this server.
I installed nginx and apache utilities for working with htpasswd:
There are quite a few articles devoted to configuring nginx and getting credentials with letsencrypt, so I’ll just show the config / etc / nginx / sites-available / default:
Accordingly, files with passwords will be in / etc / nginx / passwd. Create files, set accounts:
To allow nginx to read user files, add it to the group:
Create custom directories, mount and re-read the nginx config:
And add mount points in / etc / fstab:
Here everything is very trivial. On servers running Debian, I added the repositories and installed the application using the instructions from the site.
On Void Linux, under which the laptops work, just installed from the repository:
For autorun application, added in /etc/rc.local:
Here, too, everything is simple. One way or another, we need to install Syncthing on our smartphone. I did it through F-Droid:

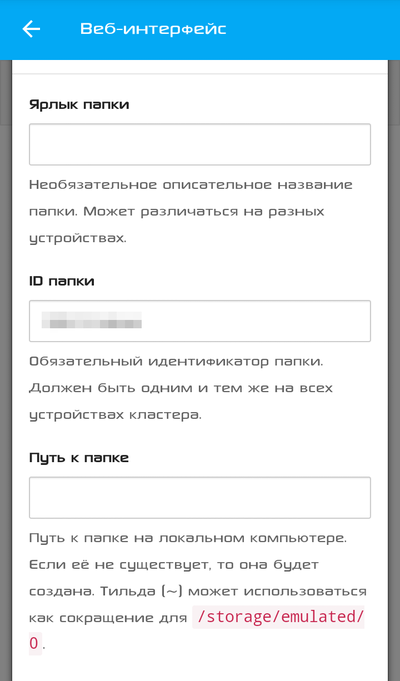
It is better to share folders through the web-interface, clearly indicating the path:
The actions are extremely simple. Go to the browser at http: // localhost: 8384 /
To access the headless machines, you can forward the port. I do this using ssh:
As a result, for the duration of the ssh session activity, the web interface of the server will be accessible via the link http: // localhost: 38384 /
Next, the menu “Actions” → “Show ID”, after which we scan the QR code from Syncthing on the smartphone.
You can add, on one of the computers, all the rest, by directly entering the ID and specify this device as a “referee”, after which you can add it on your smartphone. All other devices will pull up automatically.
In the access settings of the shared folder, you can specify which of the devices will have access. Suddenly you will need some sort of exclude from the list.
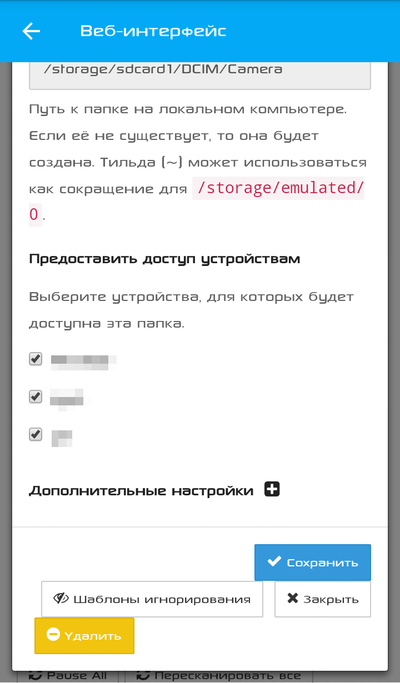
I also highly recommend activating at least simple versioning, in case the file is deleted from one of the devices, for example, under the strict guidance of a police officer.

So, from improvised materials, they collected, in fact, a fault-tolerant “cloud” for storing and returning the footage. If desired, you can add a couple more nodes, such as a computer at work, or a Raspberry Pi with encrypted USB-HDD in the garage, the main thing is to have access to the web.


If there are any additions and comments, I will be glad to read them in the comments.
PS: on Syncthing’s smartphone, I highly recommend setting the “run with high priority” option so that the system doesn’t stop.
The task: to synchronize the devices and give the opportunity to get the footage through a web browser, logging in with a password. Pass this password to relatives and friends.
Why is all this necessary? The fact that divorced, without a measure, all kinds of "authorized" and those who consider themselves as such. This may be a police officer who is not particularly willing to follow not only the spirit, but also the letter of the law, all sorts of employees of the Horns and Hoofs, who know the law, and the brain in general, replace the decree of the authorities, insane watchmen with the same syndrome, the Cossacks , diverse activists - you can enumerate well for a very long time.
All this respectable public doesn’t like it when their art is filmed. During the shooting you can hear "it is forbidden to shoot here", "I am an official", "remove the camera, yes I am you!", And even participate in the game "do not let me break your gadget and do not get a fist in the face."
')
I noticed that when the phrase “live broadcast” is heard, the ardor of the above characters somewhat fades away, the handles stretching towards the annoying device fall off, and “you” abruptly changes to “you”. Improves, in general, the magic phrase.
From the material tools, I had an Android smartphone, a home server running Debian GNU / Linux, and a couple of laptops on hand. It was decided that it’s not worth storing all the eggs in one basket, so I purchased another device and placed it where the grabbing handles of various authorities could not reach it.
Training
The home server was ready initially, the system is on LUKS, so no additional actions, except for installing Syncthing, were required.
On the second server, the system works from a memory card, therefore I connect LUN from the storage and install packages to support MPIO:
#apt-get install multipath-tools Activate autostart:
#systemctl enable multipath-tools Check availability:
#multipath -l 000003333300000044444444400000000 dm-1 XXXXXXXXX size=500G features='1 queue_if_no_path' hwhandler='0' wp=rw |-+- policy='service-time 0' prio=0 status=active | |- 0:0:2:1 sdd 8:48 active undef running | |- 0:0:3:1 sde 8:64 active undef running | |- 2:0:0:1 sdf 8:80 active undef running | `- 2:0:1:1 sdg 8:96 active undef running `-+- policy='service-time 0' prio=0 status=enabled |- 0:0:0:1 sdb 8:16 active undef running |- 0:0:1:1 sdc 8:32 active undef running |- 2:0:2:1 sdh 8:112 active undef running `- 2:0:3:1 sdi 8:128 active undef running Fine. We install software for working with LUKS, encrypt the device, create a file system and mount:
#apt-get install cryptsetup #cryptsetup create data0-crypt /dev/dm-1 #mkfs.ext4 /dev/mapper/data0-crypt #mount /dev/mapper/data0-crypt /home/videoupl In / etc / crypttab, we write:
data0-crypt /dev/dm-1 none luks In / etc / fstab:
/dev/mapper/data0-crypt /home/videoupl ext4 auto,rw 0 0 Explanation: I created a separate user, from which syncthing will work on this server.
I installed nginx and apache utilities for working with htpasswd:
#apt-get install nginx apache2-utils There are quite a few articles devoted to configuring nginx and getting credentials with letsencrypt, so I’ll just show the config / etc / nginx / sites-available / default:
Hidden text
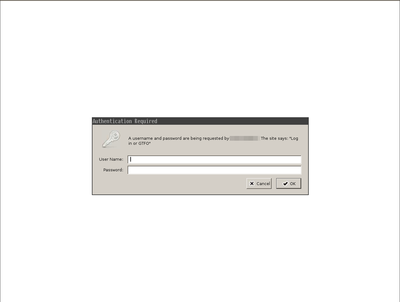
server { listen 80 default_server; listen [::]:80 default_server; listen 443 ssl default_server; listen [::]:443 ssl default_server; ssl_certificate /etc/letsencrypt/live/mysuperpupersite.xyz/fullchain.pem; ssl_certificate_key /etc/letsencrypt/live/mysuperpupersite.xyz/privkey.pem; ssl_trusted_certificate /etc/letsencrypt/live/mysuperpupersite.xyz/chain.pem; ssl_stapling on; ssl_stapling_verify on; resolver 8.8.8.8 8.8.4.4; add_header Strict-Transport-Security "max-age=31536000"; add_header Content-Security-Policy "block-all-mixed-content"; root /var/www/html; index index.html index.htm server_name _; include acme; location / { try_files $uri $uri/ =404; location ^~ /video/ { auth_basic "Log in or GTFO"; auth_basic_user_file passwd/video; autoindex on; autoindex_exact_size off; autoindex_localtime on; } location ^~ /photo/ { auth_basic "Log in or GTFO"; auth_basic_user_file passwd/ph; autoindex on; autoindex_exact_size off; autoindex_localtime on; } } } Accordingly, files with passwords will be in / etc / nginx / passwd. Create files, set accounts:
#touch /etc/nginx/passwd/{video,photo} #htpasswd -b /etc/nginx/passwd/video myname mysuperpassword #htpasswd -b /etc/nginx/passwd/photo myanorhtername myanorthersuperpassword To allow nginx to read user files, add it to the group:
#usermod -aG videoupl www-data Create custom directories, mount and re-read the nginx config:
#su videoupl $mkdir ~/{video,photo};exit #mount -o bind /home/videoupl/video /var/www/html/video #mount -o bind /home/photoupl/photo /var/www/html/photo #service nginx reload And add mount points in / etc / fstab:
/home/videoupl/video /var/www/html/video ext4 auto,rw,bind 0 0 /home/videoupl/photo /var/www/html/photo ext4 auto,rw,bind 0 0 Installing Syncthing on Computers
Here everything is very trivial. On servers running Debian, I added the repositories and installed the application using the instructions from the site.
# Add the release PGP keys: curl -s https://syncthing.net/release-key.txt | sudo apt-key add - # Add the "stable" channel to your APT sources: echo "deb https://apt.syncthing.net/ syncthing stable" | sudo tee /etc/apt/sources.list.d/syncthing.list # Update and install syncthing: sudo apt-get update sudo apt-get install syncthing On Void Linux, under which the laptops work, just installed from the repository:
xbps-install syncthing For autorun application, added in /etc/rc.local:
nohup su videoupl -c syncthing >/home/videoupl/sync.log & Mobile app
Here, too, everything is simple. One way or another, we need to install Syncthing on our smartphone. I did it through F-Droid:
It is better to share folders through the web-interface, clearly indicating the path:
We connect devices
The actions are extremely simple. Go to the browser at http: // localhost: 8384 /
To access the headless machines, you can forward the port. I do this using ssh:
ssh -L 127.1:38384:127.1:8384 server1 As a result, for the duration of the ssh session activity, the web interface of the server will be accessible via the link http: // localhost: 38384 /
Next, the menu “Actions” → “Show ID”, after which we scan the QR code from Syncthing on the smartphone.
You can add, on one of the computers, all the rest, by directly entering the ID and specify this device as a “referee”, after which you can add it on your smartphone. All other devices will pull up automatically.
In the access settings of the shared folder, you can specify which of the devices will have access. Suddenly you will need some sort of exclude from the list.
I also highly recommend activating at least simple versioning, in case the file is deleted from one of the devices, for example, under the strict guidance of a police officer.
Total
So, from improvised materials, they collected, in fact, a fault-tolerant “cloud” for storing and returning the footage. If desired, you can add a couple more nodes, such as a computer at work, or a Raspberry Pi with encrypted USB-HDD in the garage, the main thing is to have access to the web.
If there are any additions and comments, I will be glad to read them in the comments.
PS: on Syncthing’s smartphone, I highly recommend setting the “run with high priority” option so that the system doesn’t stop.
Source: https://habr.com/ru/post/326982/
All Articles