Chat bot for VKontakte on Python on Callback API
Chat bots have already become very common, and appear in all instant messengers daily.
In this article we will step by step analyze the creation of a bot with a set of simple commands and find out how to further expand its functionality. The article will be useful for the most newbies who have never tried to create chat bots.
When I wanted to create a bot, I studied the available examples of bots for VKontakte and tried to achieve maximum simplification of their structure.
To create a bot, I used Python 3.5 (probably, other versions of the 3rd python are also suitable) and additional libraries Flask and VK . They will need to be installed. On installing Flask there are many articles in Russian. If you have Pycharm, then it is most likely installed with it.
')
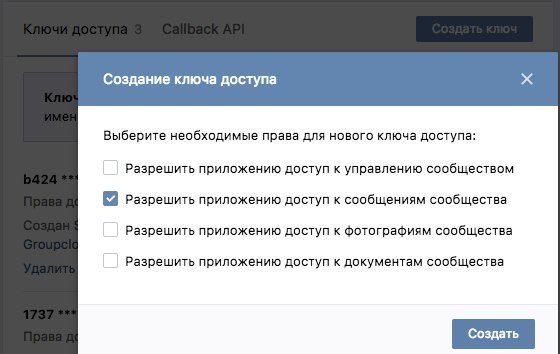
Let's start with the API itself. For our bot, we will use the Callback API, available for group messages. First of all, we need to create or already have a VKontakte group with connected messages.
In the community management section → working with the API, you need to create a key with access to community messages.
To work with Callback, you need to have a web server that will receive requests for any events from the API, process them and send response requests. That is, we will write a “site” that will only respond to requests sent to it and send its own.
As we write on python, the easiest thing to use is hosting for python. I used free hosting for Python. There you need to register, and then create an application for Python 3.5 on Flask (you can create it in the Web section). The initial file will be created:
The only function that is now in the file is responsible for filling the page at the address issued during registration. If you go to the browser at username.pythonanywhere.com (with your nickname), you can only see the text “Hello from Flask!”.
In the future, the code will be described in blocks and after the completion of the whole block it will be possible to check, and in the process the code may be marked with an environment as erroneous. Do not be afraid of this, it is better to just finish the block to the end.
So, BLOCK 1 .
To process requests sent to the site, add the following code at the end of the document:
Where instead of X, we substitute "the string that the server should return". She is listed in the group management in the Callback API section.
This feature will allow us to connect our site for notifications to the group.
Now we can check the work. Only need to restart the application. On the hosting, after the files have been modified and saved, in order for the site to work with new data, you need to reload it in the Web tab. After adding this code, we can enter the corresponding address username.pythonanywhere.com in the address bar of the server in the VKontakte group and click "Confirm".
A green notification should appear indicating that the server address has been successfully connected.
When you click "Confirm", VKontakte tries to contact our server and make sure that it really belongs to the group owner, and "waits" for the server to return a confirmation code in response to the request.
BLOCK 2
We can proceed to the next step. Add the ability to write messages on behalf of the community. It's time to install on the hosting library VK. In the Consoles section, launch the bash-console and execute the command (or the corresponding one for the selected version of python):
How to install modules is described here .
Let's change the code of our function for processing incoming requests:
The message that the processing was successful, you need the server VKontakte. If an error occurs, or some other response arrives, the server will continue to send a notification about the incoming message at intervals (until we process it).
The structure of the incoming request announcing a new message is as follows:
Vkontakte transmits to our site three objects: “type”, “object”, “group_id”, and inside “object” information about the message itself is stored.
All requests can be viewed in the documentation VKontakte.
We also add new “import” to the beginning of the file:
We created a new file in the same folder settings.py, in which the necessary login data is saved:
They need to be replaced with your tokens. We created the first one at the beginning of the article, the second - the confirmation code to connect the group with the server.
Now our bot can greet incoming messages and confirm their belonging to the group, the code of which we gave it.
We can check it and write some message to it, only it is necessary to enable notifications about incoming messages in the group settings in the Callback API section.
To bot began to send messages, you need to restart the application. After that, we write the bot again and, if everything is all right, proceed to the next step.
BLOCK 3
If everything went well, and the bot greeted you in response to your message, proceed to the next step. We will export all the interaction with the library vk to another file, I called it vkapi:
So far there is only one function and initialization of the VKontakte session, then we will add others. Potentially, the function can also send attachments. Later we will take advantage of this opportunity.
Next we get the file - message handler. It will process incoming messages, determine the appropriate commands when they appear, and issue the necessary answers.
File "messageHandler.py":
It remains to connect our new files to the main one. Change the request processing function in the main file:
And add the corresponding import to the beginning of the file:
We can check what we did by reloading the application.
UNIT 4
Let's start creating teams. Create a class of commands.
File "command_system.py":
The class has a keys property where keys will be stored by which you can refer to this command. All keys are stored in lowercase letters when setting the property, and they should be compared with the user's messages converted to lowercase form so that the register does not affect the success of the command call.
The description field will be used to display information on bot commands. The process function will be executed to form a response message.
There is a general list in which all commands are saved when they are initialized. He is outside the classroom. This list will be used to search for the command that the user requested with his message.
Now we will create several commands for our bot. For convenience of loading, we will place the files in which we initialize the commands in the “commands” folder.
I will create several files, but you can also place commands in one file.
"Hello.py"
"Cat.py"
For the team sending the seal, we need a new token and a new function in the “vkapi” file, which returns a random picture from the wall of the group or user. In this case, we will receive a random photograph from the wall of a public with cats.
Let's start by getting a token. We need a service access key. To do this, create a new Standalone application. It can be created by reference . Then, when the application is created, you need to go to its settings and copy what is in the “Service Access Key” field.
This should be added to our file with tokens.
"Settings.py"
We now turn to the creation of a new method vkapi. Here we slightly expand the range of API methods used.
This method looks like this:
We add it to the file "vkapi". Also, in the beginning of the “vkapi” file, add the necessary import:
And the last team
"Info.py"
Final file hierarchy:
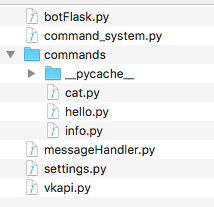
botFlask is the main file that accepts incoming requests.
Now that we have described the commands, we need to ensure that our list of commands is full, and we can understand which of the commands the user has addressed, since the “command_list” list is filled only at the time of launching files with specific commands.
We will automatically launch for execution all files from the “commands” folder when you launch our bot.
To do this, in the file “messageHandler.py” we add a function:
In this function, we load the list of files from the directory with commands, filter only the python files and import them into our program, which ensures that the list is filled with commands.
Call this function is added to the "create_answer". Now we will change the get_answer function so that it invokes the appropriate response.
The final file view:
That's all, our bot is ready! Now you know how to create a basis for a bot and add new commands for it.
UNIT 5
The rest of this article will be about one improvement that I consider necessary. However, the bot will work without it.
Approximate command recognition
If the user made a mistake in one character, most likely, he meant the most similar command. Therefore, it would be good if our bot still gave an answer, and did not say "I do not understand you."
For approximate recognition we will use the Damerau-Levenshtein distance. It shows how many operations for deleting, inserting, replacing and moving characters can move from one line to another.
The algorithm for finding this distance is described, for example, on Wikipedia.
Add to the file “messageHandler.py” function:
It implements the algorithm for finding this distance, if you wish, you can change or improve it.
According to the rows, it will give the number of operations to convert one to another. Now let's change the get_answer method:
In this function, we calculate the distance for the message and each of the keys. If the match is not accurate, we write how the bot recognized each of the commands that were sent to it. In case the distance has exceeded 40% of the length of the submitted message, we consider that the user has made a mistake too much and return the message by default, where we offer to ask for help.
That's all, working (at the time of writing), the code is laid out on the githaba .
I hope this article will make your life a little easier if you decide to create your own bot for VK.
In this article we will step by step analyze the creation of a bot with a set of simple commands and find out how to further expand its functionality. The article will be useful for the most newbies who have never tried to create chat bots.
When I wanted to create a bot, I studied the available examples of bots for VKontakte and tried to achieve maximum simplification of their structure.
To create a bot, I used Python 3.5 (probably, other versions of the 3rd python are also suitable) and additional libraries Flask and VK . They will need to be installed. On installing Flask there are many articles in Russian. If you have Pycharm, then it is most likely installed with it.
')
Let's start with the API itself. For our bot, we will use the Callback API, available for group messages. First of all, we need to create or already have a VKontakte group with connected messages.
In the community management section → working with the API, you need to create a key with access to community messages.
To work with Callback, you need to have a web server that will receive requests for any events from the API, process them and send response requests. That is, we will write a “site” that will only respond to requests sent to it and send its own.
As we write on python, the easiest thing to use is hosting for python. I used free hosting for Python. There you need to register, and then create an application for Python 3.5 on Flask (you can create it in the Web section). The initial file will be created:
# A very simple Flask Hello World app for you to get started with... from flask import Flask app = Flask(__name__) @app.route('/') def hello_world(): return 'Hello from Flask!' The only function that is now in the file is responsible for filling the page at the address issued during registration. If you go to the browser at username.pythonanywhere.com (with your nickname), you can only see the text “Hello from Flask!”.
In the future, the code will be described in blocks and after the completion of the whole block it will be possible to check, and in the process the code may be marked with an environment as erroneous. Do not be afraid of this, it is better to just finish the block to the end.
So, BLOCK 1 .
To process requests sent to the site, add the following code at the end of the document:
@app.route('/', methods=['POST']) def processing(): return 'xxxxxxxx' Where instead of X, we substitute "the string that the server should return". She is listed in the group management in the Callback API section.
This feature will allow us to connect our site for notifications to the group.
Now we can check the work. Only need to restart the application. On the hosting, after the files have been modified and saved, in order for the site to work with new data, you need to reload it in the Web tab. After adding this code, we can enter the corresponding address username.pythonanywhere.com in the address bar of the server in the VKontakte group and click "Confirm".
A green notification should appear indicating that the server address has been successfully connected.
When you click "Confirm", VKontakte tries to contact our server and make sure that it really belongs to the group owner, and "waits" for the server to return a confirmation code in response to the request.
BLOCK 2
We can proceed to the next step. Add the ability to write messages on behalf of the community. It's time to install on the hosting library VK. In the Consoles section, launch the bash-console and execute the command (or the corresponding one for the selected version of python):
pip3.5 install --user vk How to install modules is described here .
Let's change the code of our function for processing incoming requests:
@app.route('/', methods=['POST']) def processing(): # json POST- data = json.loads(request.data) # if 'type' not in data.keys(): return 'not vk' if data['type'] == 'confirmation': return confirmation_token elif data['type'] == 'message_new': session = vk.Session() api = vk.API(session, v=5.0) user_id = data['object']['user_id'] api.messages.send(access_token=token, user_id=str(user_id), message=', !') # , return 'ok' The message that the processing was successful, you need the server VKontakte. If an error occurs, or some other response arrives, the server will continue to send a notification about the incoming message at intervals (until we process it).
The structure of the incoming request announcing a new message is as follows:
{"type":"message_new","object":{"id":43, "date":1492522323, "out":0, "user_id":xxxxxxxx, "read_state":0, "title":" ... ", "body":""}, "group_id":xxxxxxxxxxx} Vkontakte transmits to our site three objects: “type”, “object”, “group_id”, and inside “object” information about the message itself is stored.
All requests can be viewed in the documentation VKontakte.
We also add new “import” to the beginning of the file:
from flask import Flask, request, json from settings import * import vk We created a new file in the same folder settings.py, in which the necessary login data is saved:
token = 'xxxxxxxxxxxxxxxxxxxxxxxxxxxxxxxxxxxxxxxxxxxxxxxxxxxxxxxxxxxxxxxxxxxxxxxxxxxxxxxxxxxxx' confirmation_token = 'xxxxxxxx' They need to be replaced with your tokens. We created the first one at the beginning of the article, the second - the confirmation code to connect the group with the server.
Now our bot can greet incoming messages and confirm their belonging to the group, the code of which we gave it.
We can check it and write some message to it, only it is necessary to enable notifications about incoming messages in the group settings in the Callback API section.
To bot began to send messages, you need to restart the application. After that, we write the bot again and, if everything is all right, proceed to the next step.
BLOCK 3
If everything went well, and the bot greeted you in response to your message, proceed to the next step. We will export all the interaction with the library vk to another file, I called it vkapi:
import vk session = vk.Session() api = vk.API(session, v=5.0) def send_message(user_id, token, message, attachment=""): api.messages.send(access_token=token, user_id=str(user_id), message=message, attachment=attachment) So far there is only one function and initialization of the VKontakte session, then we will add others. Potentially, the function can also send attachments. Later we will take advantage of this opportunity.
Next we get the file - message handler. It will process incoming messages, determine the appropriate commands when they appear, and issue the necessary answers.
File "messageHandler.py":
import vkapi def get_answer(body): message = ", !" return message def create_answer(data, token): user_id = data['user_id'] message = get_answer(data['body'].lower()) vkapi.send_message(user_id, token, message) It remains to connect our new files to the main one. Change the request processing function in the main file:
@app.route('/', methods=['POST']) def processing(): data = json.loads(request.data) if 'type' not in data.keys(): return 'not vk' if data['type'] == 'confirmation': return confirmation_token elif data['type'] == 'message_new': messageHandler.create_answer(data['object'], token) return 'ok' And add the corresponding import to the beginning of the file:
import messageHandler We can check what we did by reloading the application.
UNIT 4
Let's start creating teams. Create a class of commands.
File "command_system.py":
command_list = [] class Command: def __init__(self): self.__keys = [] self.description = '' command_list.append(self) @property def keys(self): return self.__keys @keys.setter def keys(self, mas): for k in mas: self.__keys.append(k.lower()) def process(self): pass The class has a keys property where keys will be stored by which you can refer to this command. All keys are stored in lowercase letters when setting the property, and they should be compared with the user's messages converted to lowercase form so that the register does not affect the success of the command call.
The description field will be used to display information on bot commands. The process function will be executed to form a response message.
There is a general list in which all commands are saved when they are initialized. He is outside the classroom. This list will be used to search for the command that the user requested with his message.
Now we will create several commands for our bot. For convenience of loading, we will place the files in which we initialize the commands in the “commands” folder.
I will create several files, but you can also place commands in one file.
"Hello.py"
import command_system def hello(): message = ', !\n -.' return message, '' hello_command = command_system.Command() hello_command.keys = ['', 'hello', '', '', ''] hello_command.description = ' ' hello_command.process = hello "Cat.py"
import command_system import vkapi import settings def cat(): # attachment = vkapi.get_random_wall_picture(-32015300, settings.access_token) message = ' :)\n .' return message, attachment cat_command = command_system.Command() cat_command.keys = ['', '', '', '', '', 'cat'] cat_command.description = ' ' cat_command.process = cat For the team sending the seal, we need a new token and a new function in the “vkapi” file, which returns a random picture from the wall of the group or user. In this case, we will receive a random photograph from the wall of a public with cats.
Let's start by getting a token. We need a service access key. To do this, create a new Standalone application. It can be created by reference . Then, when the application is created, you need to go to its settings and copy what is in the “Service Access Key” field.
This should be added to our file with tokens.
"Settings.py"
token = 'xxxxxxxxxxxxxxxxxxxxxxxxxxxxxxxxxxxxxxxxxxxxxxxxxxxxxxxxxxxxxxxxxxxxxxxxxxxxxxxxxxxxx' confirmation_token = 'xxxxxxxx' access_token = 'xxxxxxxxxxxxxxxxxxxxxxxxxxxxxxxxxxxxxxxxxxxxxxxxxxxxxxxxxxxxxxxxxxxxxxx' We now turn to the creation of a new method vkapi. Here we slightly expand the range of API methods used.
This method looks like this:
def get_random_wall_picture(group_id, token): max_num = api.photos.get(owner_id=group_id, album_id='wall', count=0, access_token=token)['count'] num = random.randint(1, max_num) photo = api.photos.get(owner_id=str(group_id), album_id='wall', count=1, offset=num, access_token=token)['items'][0]['id'] attachment = 'photo' + str(group_id) + '_' + str(photo) return attachment We add it to the file "vkapi". Also, in the beginning of the “vkapi” file, add the necessary import:
import random And the last team
"Info.py"
import command_system def info(): message = '' for c in command_system.command_list: message += c.keys[0] + ' - ' + c.description + '\n' return message, '' info_command = command_system.Command() info_command.keys = ['', '', 'help'] info_command.desciption = ' ' info_command.process = info Final file hierarchy:
botFlask is the main file that accepts incoming requests.
Now that we have described the commands, we need to ensure that our list of commands is full, and we can understand which of the commands the user has addressed, since the “command_list” list is filled only at the time of launching files with specific commands.
We will automatically launch for execution all files from the “commands” folder when you launch our bot.
To do this, in the file “messageHandler.py” we add a function:
def load_modules(): # , files = os.listdir("mysite/commands") modules = filter(lambda x: x.endswith('.py'), files) for m in modules: importlib.import_module("commands." + m[0:-3]) In this function, we load the list of files from the directory with commands, filter only the python files and import them into our program, which ensures that the list is filled with commands.
Call this function is added to the "create_answer". Now we will change the get_answer function so that it invokes the appropriate response.
The final file view:
import vkapi import os import importlib from command_system import command_list def load_modules(): # , files = os.listdir("mysite/commands") modules = filter(lambda x: x.endswith('.py'), files) for m in modules: importlib.import_module("commands." + m[0:-3]) def get_answer(body): # message = ", . '', " attachment = '' for c in command_list: if body in c.keys: message, attachment = c.process() return message, attachment def create_answer(data, token): load_modules() user_id = data['user_id'] message, attachment = get_answer(data['body'].lower()) vkapi.send_message(user_id, token, message, attachment) That's all, our bot is ready! Now you know how to create a basis for a bot and add new commands for it.
UNIT 5
The rest of this article will be about one improvement that I consider necessary. However, the bot will work without it.
Approximate command recognition
If the user made a mistake in one character, most likely, he meant the most similar command. Therefore, it would be good if our bot still gave an answer, and did not say "I do not understand you."
For approximate recognition we will use the Damerau-Levenshtein distance. It shows how many operations for deleting, inserting, replacing and moving characters can move from one line to another.
The algorithm for finding this distance is described, for example, on Wikipedia.
Add to the file “messageHandler.py” function:
def damerau_levenshtein_distance(s1, s2): d = {} lenstr1 = len(s1) lenstr2 = len(s2) for i in range(-1, lenstr1 + 1): d[(i, -1)] = i + 1 for j in range(-1, lenstr2 + 1): d[(-1, j)] = j + 1 for i in range(lenstr1): for j in range(lenstr2): if s1[i] == s2[j]: cost = 0 else: cost = 1 d[(i, j)] = min( d[(i - 1, j)] + 1, # deletion d[(i, j - 1)] + 1, # insertion d[(i - 1, j - 1)] + cost, # substitution ) if i and j and s1[i] == s2[j - 1] and s1[i - 1] == s2[j]: d[(i, j)] = min(d[(i, j)], d[i - 2, j - 2] + cost) # transposition return d[lenstr1 - 1, lenstr2 - 1] It implements the algorithm for finding this distance, if you wish, you can change or improve it.
According to the rows, it will give the number of operations to convert one to another. Now let's change the get_answer method:
def get_answer(body): message = ", . '', " attachment = '' distance = len(body) command = None key = '' for c in command_list: for k in c.keys: d = damerau_levenshtein_distance(body, k) if d < distance: distance = d command = c key = k if distance == 0: message, attachment = c.process() return message, attachment if distance < len(body)*0.4: message, attachment = command.process() message = ' "%s"\n\n' % key + message return message, attachment In this function, we calculate the distance for the message and each of the keys. If the match is not accurate, we write how the bot recognized each of the commands that were sent to it. In case the distance has exceeded 40% of the length of the submitted message, we consider that the user has made a mistake too much and return the message by default, where we offer to ask for help.
That's all, working (at the time of writing), the code is laid out on the githaba .
I hope this article will make your life a little easier if you decide to create your own bot for VK.
Source: https://habr.com/ru/post/326898/
All Articles