Working with ConstraintLayout via XML Markup
Hello! My name is Gabriel, I am Android lead Touch Instinct.
In March, Google rolled out a release update for ConstraintLayout. Presented it on the past Google I / O. Almost a year has passed since that moment, ConstraintLayout has become better, faster, and overgrown with new features. For example, it is nice that the possibility of combining elements into chains has appeared - this allows using ConstraintLayout instead of LinearLayout.
About all the new and old features of ConstraintLayout I will try to tell you in this article. I'll warn you right away - the article will be long and there will be no other seven parts. About the visual editor ConstraintLayout in the article there is not a word - only XML-markup (the old fashioned way) and a bit of code.
Navigation:
1. Add to the project
2. Contsraints. Bind items to each other
3. Set the size of the View
4. Set the dimensions of the View based on the aspect ratio
5. Set the relative position of the View inside ConstraintLayout
6. Features of binding lines
7. Features of Baseline Binding
8. Create chains
8.1. Spread style
8.2. Spread_inside style
8.3. Packed style
8.4. Weighted style
9. Specify indents with regard to hidden elements.
10. We understand with the Guidelines
11. Configure the parameters of ConstraintLayout from the code.
12. Briefly about animation
13. Should I use ConstraintLayout?
Add to the project
- Update version of Android Studio to 2.3;
- We check that the latest version of ConstraintLayout is installed - this can be viewed in
Android Studio → Settings(Preferences) → Appearance & Behavior → System Settings → Android SDK → SDK Tools → Support Repository; - Add dependency to the project module
build.gradle:dependencies { ... compile 'com.android.support.constraint:constraint-layout:1.0.2' ... } Now you can use ConstraintLayout in your project:
<android.support.constraint.ConstraintLayout android:id="@+id/my_first_constraint_layout" android:layout_width="match_parent" android:layout_height="match_parent"> <TextView android:id="@+id/some_constraint_layout_element" android:layout_width="wrap_content" android:layout_height="wrap_content" android:text="Hello world!"/> </android.support.constraint.ConstraintLayout>
Constraints. Bind items to each other
Constraints are the lines on which the view is positioned inside a ConstraintLayout. Constraints can be tied to the sides of the ConstraintLayout itself or to the sides of other views inside ConstraintLayout. Constraints can be divided into vertical and horizontal.
Horizontal constraints:
- right side (Right), left side (Left);
- start side (start), end side (end).
Vertical constraints:
- top side (Top), bottom side (Bottom);
- baseline.
Vertical and horizontal constraints are not related to each other.
Let me remind you that Baseline is an element content alignment line. Example - for TextView is the line of the line on which the text is written. If the view has Baseline onstraint, then the baseline of the element will be at the level of the baseline view to which thestraint is attached.
For starters, the easiest way to consider are the constraints as a side view. That is, for example, you can bind the left side of view B to the right side of view A - then view B will be located to the right of view A
The general format of the attributes for the constraint binding is as follows:
app:layout_constraint{X}_to{Y}Of="{Z}" Where:
- X - constraint bind view;
- Y - side of the view to which they are attached;
- Z - id view, to which they are attached, or
parent, if you need to bind to the side of ContraintLayout.
Example bindings:
<android.support.constraint.ConstraintLayout android:layout_width="match_parent" android:layout_height="wrap_content"> <!-- constraint view_1 ConstraintLayout. constraint view_1 — ConstraintLayout. constraint --> <TextView android:id="@+id/view_1" android:layout_width="wrap_content" android:layout_height="wrap_content" android:text="view_1" android:textSize="24sp" app:layout_constraintLeft_toLeftOf="parent" app:layout_constraintTop_toTopOf="parent"/> <!-- constraint view_2 view_1. Constraint view_2 — view_1. constraint , . constraint . --> <TextView android:id="@+id/view_2" android:layout_width="wrap_content" android:layout_height="wrap_content" android:text="view_2" android:textSize="14sp" app:layout_constraintLeft_toRightOf="@id/view_1" app:layout_constraintBaseline_toBaselineOf="@id/view_1"/> <!-- constraint view_3 view_1. constraint view_3 — view_1. constraint . --> <TextView android:id="@+id/view_3" android:layout_width="wrap_content" android:layout_height="wrap_content" android:text="view_3" android:textSize="14sp" app:layout_constraintTop_toBottomOf="@id/view_1" app:layout_constraintLeft_toRightOf="@id/view_1"/> <!-- constraint view_4 view_2. constraint view_4 — view_2. constraint . --> <TextView android:id="@+id/view_4" android:layout_width="wrap_content" android:layout_height="wrap_content" android:text="view_4" android:textSize="18sp" app:layout_constraintBottom_toBottomOf="@id/view_1" app:layout_constraintLeft_toRightOf="@id/view_2"/> </android.support.constraint.ConstraintLayout> 
Basic rules for binding parties:
- Only
Start End,Left Right,Top Bottomcan be attached to each other. That is, it is impossible, for example, to bind Left to Start or Baseline to Top; Baselinecan only be linked toBaselineanother view;- during the Start / End binding, Left / Right bindings are ignored;
- Baseline bindings ignore Top / Bottom bindings;
- do not tie the view from the outside with a ConstraintLayout, for example,
layout_constraintRight_toLeftOf="parent". ConstraintLayout will handle such a binding, but how it will behave is difficult to predict.
Set the size of the View
To set view sizes, the required attributes are layout_width and layout_height , and optional attributes are layout_constraintWidth_default and layout_constraintHeight_default .
The value of the attributes layout_constraintWidth_default and layout_constraintHeight_default defaults to spread .
View size can be specified as (for example, height):
layout_height="100dp"- we denote it as fixed_size. View will be the specified size;layout_height="wrap_content"- we denote as any_size. The size is calculated by the view itself, it can be any;layout_height="0dp"+layout_constraintHeight_default="spread"- we denote as match_constraint_spread. The view size will be equal to the distance between the constraints. For height, for example, this is the distance between the upper constraint and the lower constraint;layout_height="0dp"+layout_constraintHeight_default="wrap"- we denote as match_constraint_wrap. The size is calculated by the view itself, but it cannot go beyond constraints.
Important! match_parent size of match_parent or fill_parent not allowed. To match the size of the view with the dimensions of the ConstraintLayout, simply bind the constraints to the sides of the ConstraintLayot and use the size of the match_constraint_spread.
If the size is match_constraint_wrap or match_constraint_spread, it is worth considering that:
- for this type of size to work correctly, the view must have two constraints attached: for the width, these are
Left RightorStart End. For heights -Top Bottom; - view size cannot go beyond constraints;
- You can set the minimum and maximum size of the view within the constraints. To do this, use the attributes
layout_constraintWidth_min,layout_constraintHeight_min,layout_constraintWidth_max,layout_constraintHeight_max; - You should not set this type of size for height, if the view has
Baselineconstraint attached - the element height will probably be calculated incorrectly.
For other types of sizes, consider that:
- if any_size or fixed_size is specified, then the element can go beyond constraints. For example, in the example from the section "Constraints", if you specify a long text in a text view, it will go beyond the scope of ConstraintLayout;
- ConstraintLayout sizes are affected by view with fixed_size, any_size and match_constraint_wrap. If it appears that the size of the ConstraintLayout is calculated incorrectly, most likely one of the views with such dimensions is to blame;

Set View dimensions based on the aspect ratio
ConstraintLayout allows you to calculate the height or width of the view on the basis of a given aspect ratio. That is, for example, with an aspect ratio of 16:9 , if the height is 900dp , then the width will be calculated as 1600dp .
The layout_constraintDimensionRatio attribute is responsible for this. You can set the aspect ratio in two formats: text 16:9 or numeric 1.8 . In this case, before the value, you can specify the symbol of the side that is in the numerator of the ratio For example, H,16:9 will mean that 16 is the value corresponding to the height (H), and 9 is the width (W).
The value in layout_constraintDimensionRatio taken into account when calculating view sizes, only if at least one of the parties is set to match_constraint_wrap or match_constraint_spread.
Example:
<android.support.constraint.ConstraintLayout android:layout_width="match_parent" android:layout_height="match_parent"> <!-- 16:9 constraints view ConstraintLayout. view ConstraintLayout, layout_width — match_constraint_spread. view , layout_height — any_size. --> <ImageView android:layout_width="0dp" android:layout_height="wrap_content" android:scaleType="centerCrop" app:layout_constraintDimensionRatio="16:9" app:layout_constraintLeft_toLeftOf="parent" app:layout_constraintTop_toTopOf="parent" app:layout_constraintRight_toRightOf="parent" app:layout_constraintBottom_toBottomOf="parent" android:background="@drawable/big_widescreen_image"/> </android.support.constraint.ConstraintLayout> 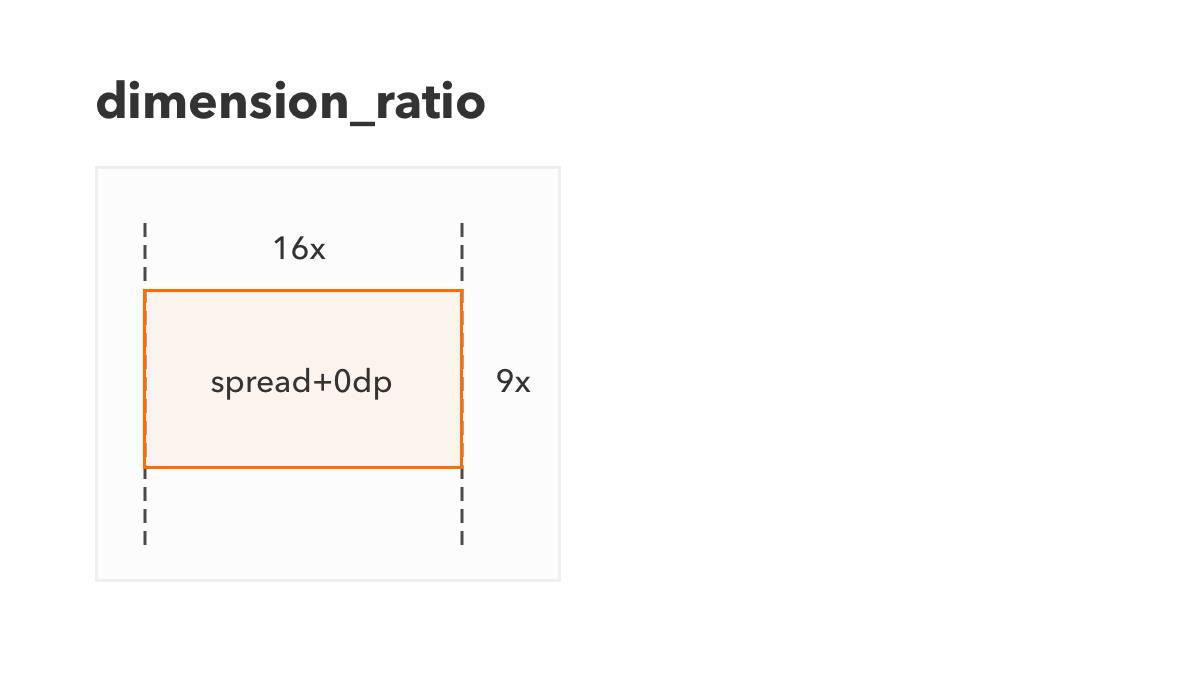
We set the relative position of the View inside ConstraintLayout
If the view has two horizontal constraints, then it can be set to a horizontal relative position. The same applies to vertical constraints.
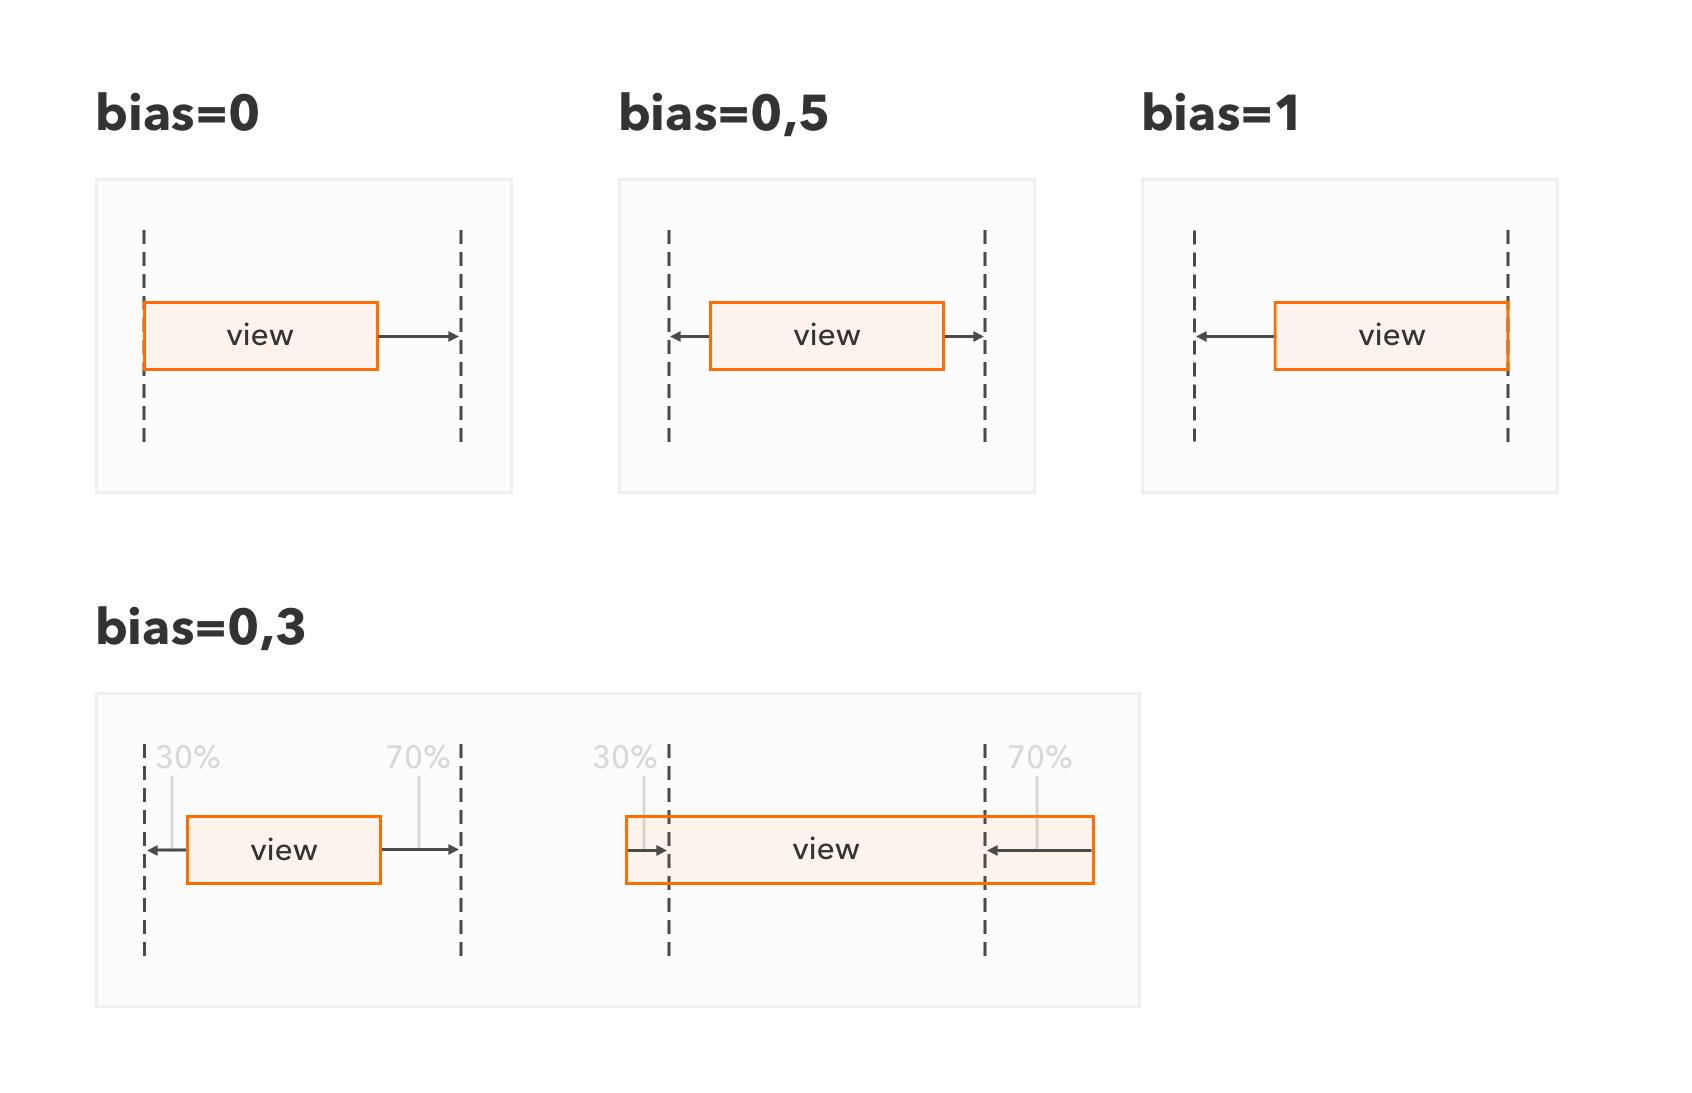
The layout_constraintHorizontal_bias attribute is responsible for horizontal positioning, and layout_constraintHorizontal_bias is for vertical layout_constraintVertical_bias . Relative location is indicated by a value from 0 to 1.
In essence, this is a more flexible replacement for the layout_gravity attribute. For example, for a horizontal location, 0 would mean the location to the far left , 0.5 to the center , 1 to the far right . The default is 0.5 .
Now, for example, set the value to 0.3 . This will mean that 30% of the empty view space will be to the left of the view, and 70% to the right. If the size of the view is larger than the size of the distance between the constraints, then 30% of the size beyond the constraints will be to the left of the constraints, and 70% to the right.
A small important note: if RTL languages are supported in the manifest, layout_constraintHorizontal_bias will place elements "from the beginning" instead of "left", and instead of "right" instead of "left". That is, those who support RTL languages should take into account that obviously setting the location to the left and right will not work. At least I have not found such an opportunity.
Example:
<android.support.constraint.ConstraintLayout android:layout_width="match_parent" android:layout_height="match_parent"> <!-- bias 0.3 (30% / ). bias — 1 (). Constraints . — match_constraint_wrap, — match_constraint_wrap. --> <TextView android:id="@+id/view_1" android:text="view_1" android:layout_width="0dp" android:layout_height="0dp" app:layout_constraintWidth_default="wrap" app:layout_constraintHeight_default="wrap" android:scaleType="centerCrop" app:layout_constraintHorizontal_bias="0.3" app:layout_constraintVertical_bias="1" app:layout_constraintLeft_toLeftOf="parent" app:layout_constraintRight_toRightOf="parent" app:layout_constraintTop_toTopOf="parent" app:layout_constraintBottom_toBottomOf="parent"/> </android.support.constraint.ConstraintLayout> Line binding features
After the presentation of ConstraintLayout, it was often compared to RelativeLayout. But, in fact, they have fundamentally different calculations of the location of elements. In the RelativeLayout view, it simply indicates from which side of the other view it needs to be - “to the left of,” “to the right of,” etc. In ConstraintLayout, constraints are attached to the sides of other views and the location of the view depends on how its constraints are calculated.
For the location of constraint, first calculate the location of the view to which this constraint is attached. And for the location of the view, all the constraints specified for it are calculated first. Cyclical dependencies of view and constraints are thus forbidden, so that, in fact, a built-in acyclic dependency graph of constraints from view and view from constraints is constructed inside ConstraintLayout. All calculations are performed sequentially, starting from the independent elements of the graph.
For simplicity, I advise you to separate the vertical and horizontal dependencies into two independent groups, as if inside the ConstraintLayout is built separately the graph of vertical dependencies and separately - horizontal ones.
But, generally speaking, it should be understood that the vertical parameters of the view, indirectly, may depend on the horizontal parameters of another view. An example is a size calculation based on the aspect ratio: when the width is changed, the view also changes its height. That is, if the view width changes due to changes in its horizontal constraints, the height of the view also changes.
Now consider a curious example of calculating vertical constraints:
<android.support.constraint.ConstraintLayout xmlns:android="http://schemas.android.com/apk/res/android" xmlns:app="http://schemas.android.com/apk/res-auto" android:layout_width="match_parent" android:layout_height="wrap_content"> <TextView android:id="@+id/view_A" android:layout_width="wrap_content" android:layout_height="wrap_content" android:text="View A" app:layout_constraintLeft_toLeftOf="parent" app:layout_constraintTop_toTopOf="parent"/> <TextView android:id="@+id/view_B" android:text="View B" android:layout_width="wrap_content" android:layout_height="0dp" app:layout_constraintTop_toBottomOf="@id/view_A" app:layout_constraintBottom_toTopOf="@id/view_A"/> <TextView android:id="@+id/view_C" android:text="View C" android:layout_width="wrap_content" android:layout_height="wrap_content" app:layout_constraintLeft_toRightOf="@id/view_A" app:layout_constraintTop_toBottomOf="@id/view_B"/> </android.support.constraint.ConstraintLayout> Result: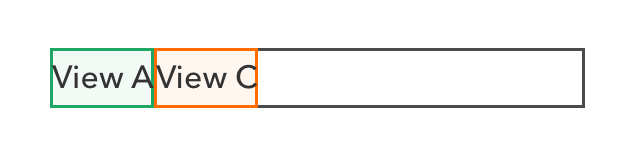
View A simply tied to the left and top sides of the ConstraintLayout, that is, it is located on the upper left.
View B is oddly attached - Top(B)->bottom(A) Bottom(B)->top(A) , - the distance between its vertical constraints is, in fact, negative. The height B itself is set to match_constraint_spread.
View C is located to the right of A - Left(C)toRight(A) - and (sort of like) below B - Top(C)toBottom(B) .
On the horizontal arrangement of questions should arise. Now I will explain the vertical location.
The sequence of vertical calculations:
- To calculate
Cyou must calculate its lower constraint; - To calculate the lower constraint
Cyou must calculate the upper sideB; - To calculate the upper side of
Bit is necessary to calculate its lower and upper constraints; - To calculate the lower and upper constraints
Byou must calculate the upper and lower sidesA; Asimply located on the left-top, the size counts itself.
The results of vertical calculations:
- The upper side of
Ais at the level of the upper side of ConstraintLayout, the lower side is calculated by the size of the textA, as forAheight is wrap_content; - The upper constraint
Bat the level of the lower side ofA, the lower one is tied to the upper side ofA, that is, it is at the level of the upper side of ConstraintLayout; - Since the height
Bis match_constraint_spread, the upper sideBis at the level of the lower sideA, and the lower side is at the level of the upper side of ConstraintLayout. This is strange, but, in fact, the heightBis negative. - The upper constraint
Ctied to the bottom side ofB, that is, it is at the level of the upper side of the ConstraintLayout; - As a result, the upper side
Cat the upper side of the ConstraintLayout, the lower side is calculated by the size of the textC, sinceAheight of wrap_content.
In general, in my opinion, such a calculation algorithm should be taken into account in order to understand where the view will ultimately be located.
Baseline peculiarities
A view linked to Baseline cannot be bounded above and below, that is, Top and Bottom constraints will be ignored. This means that you cannot set the size of match_constraint_spread or match_constraint_wrap for this view.
It is not entirely obvious from this that Baseline should link low to high views. Otherwise there is a chance that a high view will go beyond the ConstraintLayout or the size of the ConstraintLayout will be calculated incorrectly.
An example of an incorrect baseline binding:
<android.support.constraint.ConstraintLayout android:layout_width="match_parent" android:layout_height="wrap_content"> <!-- 12sp --> <TextView android:id="@+id/left_view" android:layout_width="wrap_content" android:layout_height="wrap_content" android:text="Left view" android:textSize="12sp" app:layout_constraintLeft_toLeftOf="parent" app:layout_constraintTop_toTopOf="parent"/> <!-- 20sp, --> <TextView android:id="@+id/right_view" android:text="Right view" android:layout_width="wrap_content" android:layout_height="wrap_content" android:textSize="20sp" app:layout_constraintBaseline_toBaselineOf="@id/left_view" app:layout_constraintLeft_toRightOf="@id/left_view"/> </android.support.constraint.ConstraintLayout> Result: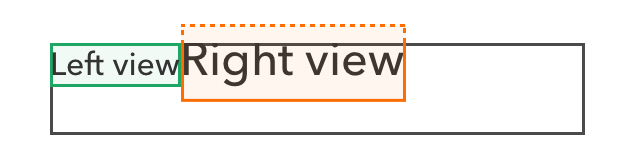
The height of the ConstraintLayout (in the black frame) is equal to the height of the large TextView (in the red frame), since the height of the TextView is set as wrap_content .
The baseline of a large TextView is tied to the baseline of a small TextView (in the green frame), so the text is on the same line.
With this, a large TextView goes beyond ConstraintLayout.
We create chains
When binding sides, there is one interesting rule - if you bind the two sides of two elements to each other Left(B)toRight(A) Right(A)toLeft(B) , then the elements will be selected into a chain and special arrangement rules will apply to them.
A chain is a set of elements, the sides of which are attached to each other. Chains are automatically determined based on the element bindings within ConstraintLayout . The chain is located on the basis of the bindings of its extreme elements, and the elements inside the chain are arranged according to the rules of a certain style of the chain. The style of the chain is defined by the layout_constraint{X}_chainStyle , where X is Horizontal for horizontal chains or Vertical for vertical.
Chain example: the Right(A)toLeft(B) + Left(B)toRight(A) will connect the A and B elements to the chain, and the Left(A)toLeft(parent) + Right(B)toRight(parent) link the entire chain elements to outside sides of the ConstraintLayout .
The style of the chain and its parameters are taken from the attributes of the head element of the chain - the leftmost, primary, or uppermost.
Spread style
The elements of the chain are distributed evenly, that is, the spaces between the elements and from the elements to the edges of the chain will be the same. Used by default;
<android.support.constraint.ConstraintLayout android:layout_width="match_parent" android:layout_height="match_parent"> <!-- chainStyle — spread, --> <TextView android:id="@+id/view_1" android:layout_width="wrap_content" android:layout_height="wrap_content" android:text="view_1" app:layout_constraintLeft_toLeftOf="parent" app:layout_constraintRight_toLeftOf="@+id/view_2"/> <TextView android:id="@+id/view_2" android:layout_width="100dp" android:layout_height="wrap_content" android:text="view_2" app:layout_constraintLeft_toRightOf="@id/view_1" app:layout_constraintRight_toLeftOf="@+id/view_3"/> <TextView android:id="@+id/view_3" android:layout_width="200dp" android:layout_height="wrap_content" android:text="view_3" app:layout_constraintLeft_toRightOf="@id/view_2" app:layout_constraintRight_toRightOf="parent"/> </android.support.constraint.ConstraintLayout> 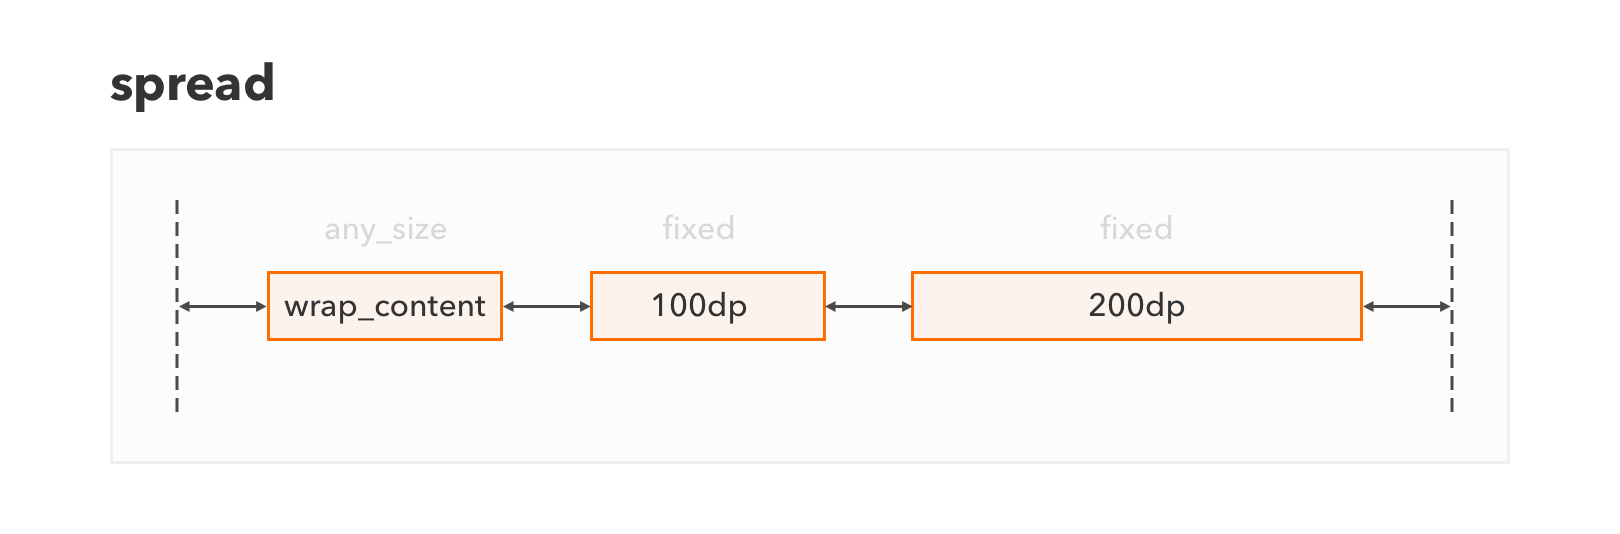
Spread_inside style
The chain elements are distributed in the same way as with the spread style, but the indents from the chain borders are always zero;
<android.support.constraint.ConstraintLayout android:layout_width="match_parent" android:layout_height="match_parent"> <!-- ChainStyle — spread_inside --> <TextView android:id="@+id/view_1" app:layout_constraintHorizontal_chainStyle="spread_inside" android:layout_width="wrap_content" android:layout_height="wrap_content" android:text="view_1" app:layout_constraintLeft_toLeftOf="parent" app:layout_constraintRight_toLeftOf="@+id/view_2"/> <TextView android:id="@+id/view_2" android:layout_width="100dp" android:layout_height="wrap_content" android:text="view_2" app:layout_constraintLeft_toRightOf="@id/view_1" app:layout_constraintRight_toLeftOf="@+id/view_3"/> <TextView android:id="@+id/view_3" android:layout_width="200dp" android:layout_height="wrap_content" android:text="view_3" app:layout_constraintLeft_toRightOf="@id/view_2" app:layout_constraintRight_toRightOf="parent"/> </android.support.constraint.ConstraintLayout> 
Packed style
The elements are grouped one after another. This style allows you to set the relative position of a group of elements in an accessible chain space through the layout_constraint{*}_bias attribute. Bias attribute must be specified at the head of the chain;
<android.support.constraint.ConstraintLayout android:layout_width="match_parent" android:layout_height="match_parent"> <!-- ChainStyle — packed, bias — 0.3 (30% / ) --> <TextView android:id="@+id/view_1" app:layout_constraintHorizontal_chainStyle="packed" app:layout_constraintHorizontal_bias="0.3" android:layout_width="wrap_content" android:layout_height="wrap_content" android:text="view_1" app:layout_constraintLeft_toLeftOf="parent" app:layout_constraintRight_toLeftOf="@+id/view_2"/> <TextView android:id="@+id/view_2" android:layout_width="100dp" android:layout_height="wrap_content" android:text="view_2" app:layout_constraintLeft_toRightOf="@id/view_1" app:layout_constraintRight_toLeftOf="@+id/view_3"/> <TextView android:id="@+id/view_3" android:layout_width="200dp" android:layout_height="wrap_content" android:text="view_3" app:layout_constraintLeft_toRightOf="@id/view_2" app:layout_constraintRight_toRightOf="parent"/> </android.support.constraint.ConstraintLayout> 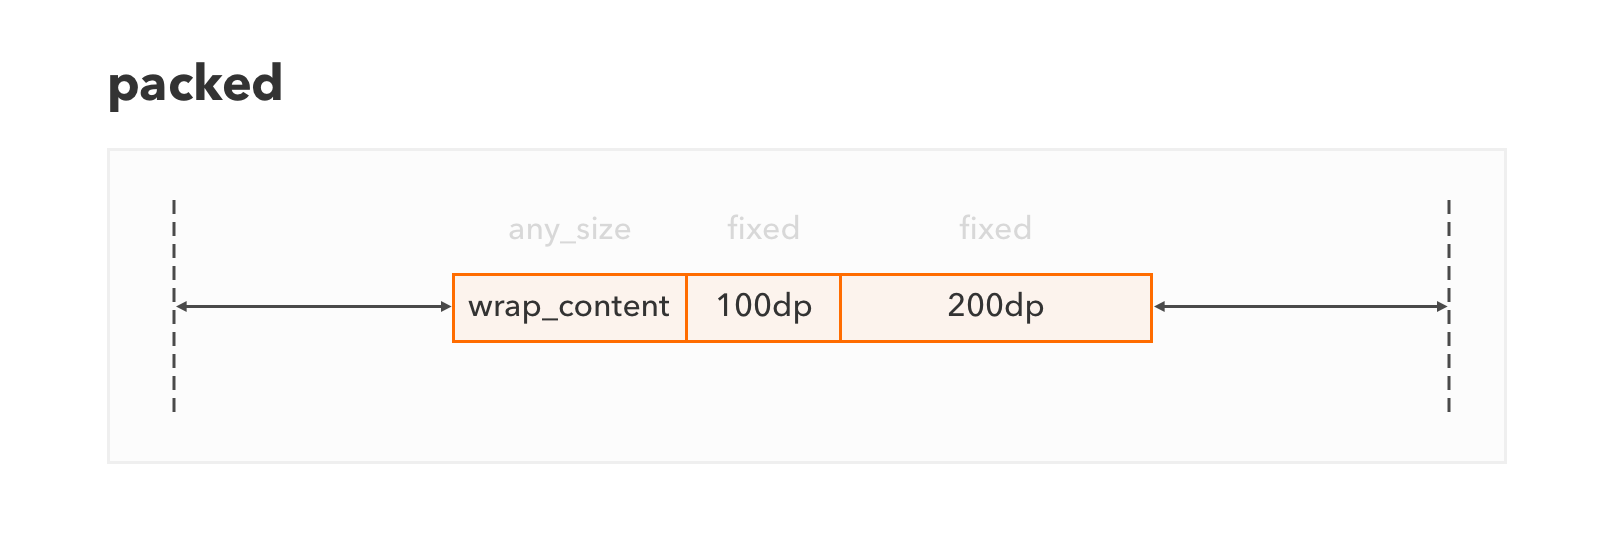

Weighted style
The elements are arranged in accordance with their weight by analogy with the way LinearLayout works. In order for this style to work, one of the view chains must be match_constraint_spread. To specify the weight of an element, the layout_constraintHorizontal_weight and layout_constraintVertical_weight attributes are used.
<android.support.constraint.ConstraintLayout android:layout_width="match_parent" android:layout_height="match_parent"> <!-- match_constraint_spread, weight=3, 3/4 --> <TextView android:id="@+id/view_1" android:layout_width="0dp" android:layout_height="wrap_content" app:layout_constraintHorizontal_weight="3" android:text="view_1" app:layout_constraintLeft_toLeftOf="parent" app:layout_constraintRight_toLeftOf="@+id/view_2"/> <!-- — match_constraint_spread, weight=1, 1/4 --> <TextView android:id="@+id/view_2" android:layout_width="0dp" android:layout_height="wrap_content" app:layout_constraintHorizontal_weight="1" android:text="view_2" app:layout_constraintLeft_toRightOf="@id/view_1" app:layout_constraintRight_toLeftOf="@+id/view_3"/> <!-- — any_size, , --> <TextView android:id="@+id/view_3" android:layout_width="wrap_content" android:layout_height="wrap_content" android:text="view_3" app:layout_constraintLeft_toRightOf="@id/view_2" app:layout_constraintRight_toRightOf="parent"/> </android.support.constraint.ConstraintLayout> 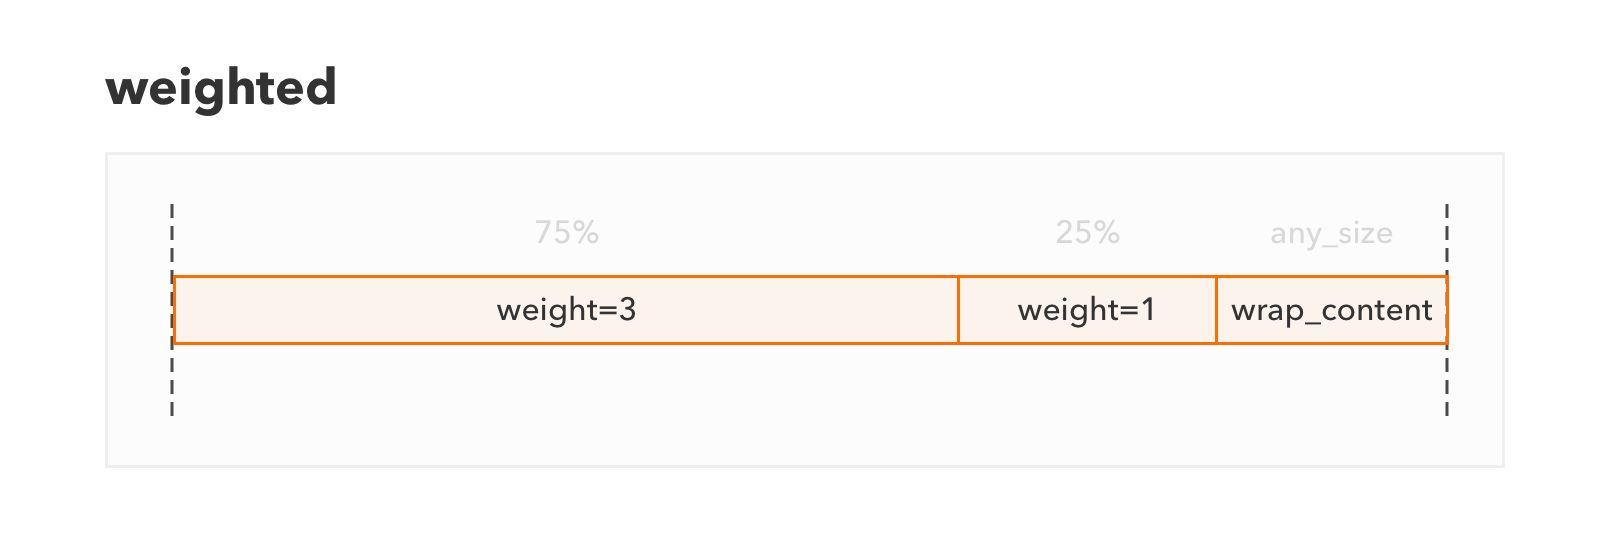
Specify indents with regard to hidden elements.
Indents are indicated by the standard attributes of layout_margin{X} , where X is the indent side ( Left/Right/Top/Bottom/Start/End ). , . , , .
, , Visibility GONE . , , gone- . . Gone- : layout_goneMargin{X} , X — .
, , A B 10dp , gone- 50dp . B ( GONE ), A 50dp , B — VISIBLE INVISIBLE , A 10dp .
Example:
<android.support.constraint.ConstraintLayout android:layout_width="match_parent" android:layout_height="match_parent"> <TextView android:id="@+id/view_1" android:layout_width="wrap_content" android:layout_height="wrap_content" android:visibility="gone" android:text="view_1" app:layout_constraintLeft_toLeftOf="parent"/> <!-- constraint view_2 view_1. view_1 (gone), goneMarginLeft (50dp). --> <TextView android:id="@+id/view_2" android:layout_marginLeft="10dp" app:layout_goneMarginLeft="50dp" android:layout_width="wrap_content" android:layout_height="wrap_content" android:text="view_2" app:layout_constraintHorizontal_bias="0" app:layout_constraintLeft_toRightOf="@id/view_1" app:layout_constraintRight_toRightOf="parent"/> </android.support.constraint.ConstraintLayout> 
Guidelines
Guideline — , , . view android.support.constraint.Guideline . Guideline — android:orientation . guideline , ConstraintLayout.
Guideline , view .
guideline :
layout_constraintGuide_begin— (Left,Start) ConstraintLayout gudeline — ;layout_constraintGuide_end— (Right,End) ConstraintLayout guideline — ;layout_constraintGuide_percent— guideline ConstraintLayout gudeline — . 0 1.
<android.support.constraint.ConstraintLayout android:layout_width="match_parent" android:layout_height="match_parent"> <!-- guideline 25% --> <android.support.constraint.Guideline android:id="@+id/line_1" android:orientation="vertical" app:layout_constraintGuide_percent="0.25" android:layout_width="wrap_content" android:layout_height="wrap_content"/> <!-- guideline 100dp ConstraintLayout --> <android.support.constraint.Guideline android:id="@+id/line_2" android:orientation="vertical" app:layout_constraintGuide_begin="100dp" android:layout_width="wrap_content" android:layout_height="wrap_content"/> <!-- guideline 50dp ConstraintLayout --> <android.support.constraint.Guideline android:id="@+id/line_3" android:orientation="vertical" app:layout_constraintGuide_end="50dp" android:layout_width="wrap_content" android:layout_height="wrap_content"/> <TextView android:id="@+id/view_1" android:layout_width="0dp" android:layout_height="wrap_content" android:text="view_1" app:layout_constraintLeft_toLeftOf="@id/line_1" app:layout_constraintRight_toRightOf="parent"/> <TextView android:id="@+id/view_2" android:layout_width="0dp" android:layout_height="wrap_content" android:text="view_2" app:layout_constraintTop_toBottomOf="@id/view_1" app:layout_constraintLeft_toLeftOf="@id/line_1" app:layout_constraintRight_toRightOf="@id/line_3"/> <TextView android:id="@+id/view_3" android:layout_width="0dp" android:layout_height="wrap_content" android:text="view_3" app:layout_constraintTop_toBottomOf="@id/view_2" app:layout_constraintLeft_toLeftOf="parent" app:layout_constraintRight_toRightOf="@id/line_2"/> </android.support.constraint.ConstraintLayout> 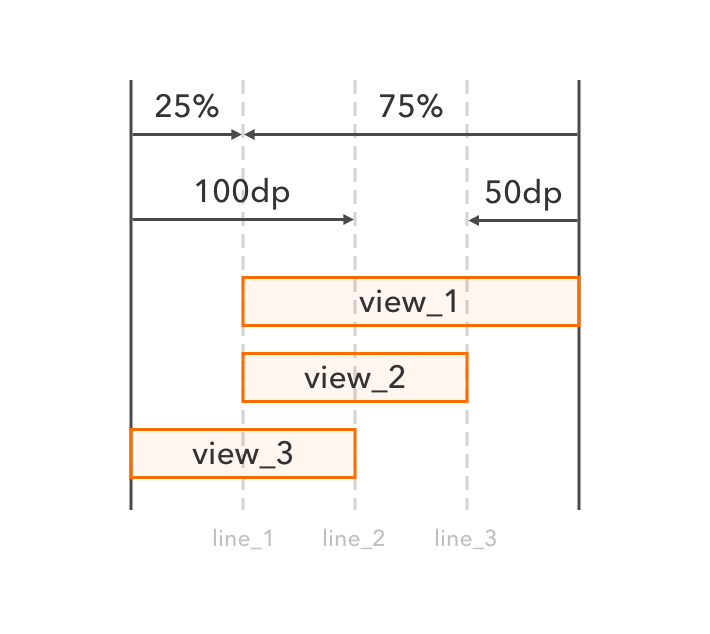
ConstraintLayout
— android.support.constraint.ConstraintSet .
ConstraintSet :
ConstraintLayout;ConstraintLayout constraintLayout = LayoutInflater.from(context).inflate(R.layout.my_constraint_layout, null); ConstraintSet constraintSet = new ConstraintSet(); constraintSet.clone(constraintLayout);*.xml,ConstraintLayout;ConstraintSet constraintSet = new ConstraintSet(); constraintSet.clone(context, R.layout.my_constraint_layout);ConstraintSet.ConstraintSet constraintSet = new ConstraintSet(); constraintSet.clone(constraintSet2);
ConstraintSet ConstraintLayout applyTo .
final ConstraintLayout constraintLayout = (ConstraintLayout) findViewById(R.id.constr); ConstraintSet constraintSet = new ConstraintSet(); constraintSet.clone(constraintLayout); constraintSet.setHorizontalBias(R.id.sample_view, 0.5f); constraintSet.applyTo(constraintLayout); , LayoutParams requestLayout . , ConstraintLayout — android.support.constraint.ConstraintLayout.LayoutParams .
ConstraintLayout . ConstraintLayout ViewGroup , , : ValueAnimator , TransitionManager .
ConstraintLayout?
:
- , ;
- Android Studio ;
- , ;
- ,
ConstraintLayout, :FrameLayout,LinearLayout,RelativeLayout,GridLayout,PercentRelativeLayout; - Support Library, , , .
:
- , ;
- - — , ;
- , ;
- , ;
- views , layouts.
Touch Instinct , , . , RecyclerView — , .
Google ConstraintLayout UI, RecyclerView CoordinatorLayout.
')
Source: https://habr.com/ru/post/326814/
All Articles