Paparazzo. Powerful, stylish, your own. Part I
Not so long ago, we were faced with the task of dramatically reworking the process of submitting an ad through the Avito mobile app for iOS. The result should have been a tool that would make this process quick and easy for the user. Obviously, the buyer prefers to see what he is going to pay for. Therefore, to give the seller the ability to easily add and edit photos was one of our top priorities. How we have achieved the desired, read under the cut.
Looking a little further, our media picker is called Paparazzo and we have already posted it on Github . In this part we will reveal the technical details of how we capture the image from the camera and output it to several UIViews at the same time.
UIImagePickerController and open source
The simplest standard way to implement a camera is, of course, the UIImagePickerController. This is a very limited functionality component, which imposes certain restrictions when using it:
')

- It can work either in camera mode or in gallery mode, and we needed a hybrid of these two modes.
- It must be shown modally, because it is a UINavigationController, which cannot be run in another UINavigationController, and our camera must be one of the steps in a linear sequence of screens.
- As a result, the UIImagePickerController returns a UIImage. UIImage is an uncompressed image representation that is stored in memory and takes up a lot of space. Working with UIImagePickerController in my previous projects, I came across the fact that on weak devices like the iPhone 4, and even sometimes on the iPhone 5, the application crashed due to lack of memory even before the delegate method that directly returns the image to the client code was called . We also had to avoid the irrational use of RAM in order to eliminate such problems.
We also looked at some of the off-the-shelf solutions available in open source, but they all didn’t meet our requirements. In some, there were no necessary features, like cropping or turning a photo, in some there was a choice of only one photo, there was no ribbon with the selected photos. In general, the user flow that was implemented in these components did not suit us. Therefore, we decided to write a camera from scratch, which would guarantee us the possibility of its quick revision as needed.
AVFoundation
Another way to implement the camera is to use a low-level AVFoundation framework. It allows you to get the most out of the recording and playback capabilities of photos, videos and audio that iOS provides.
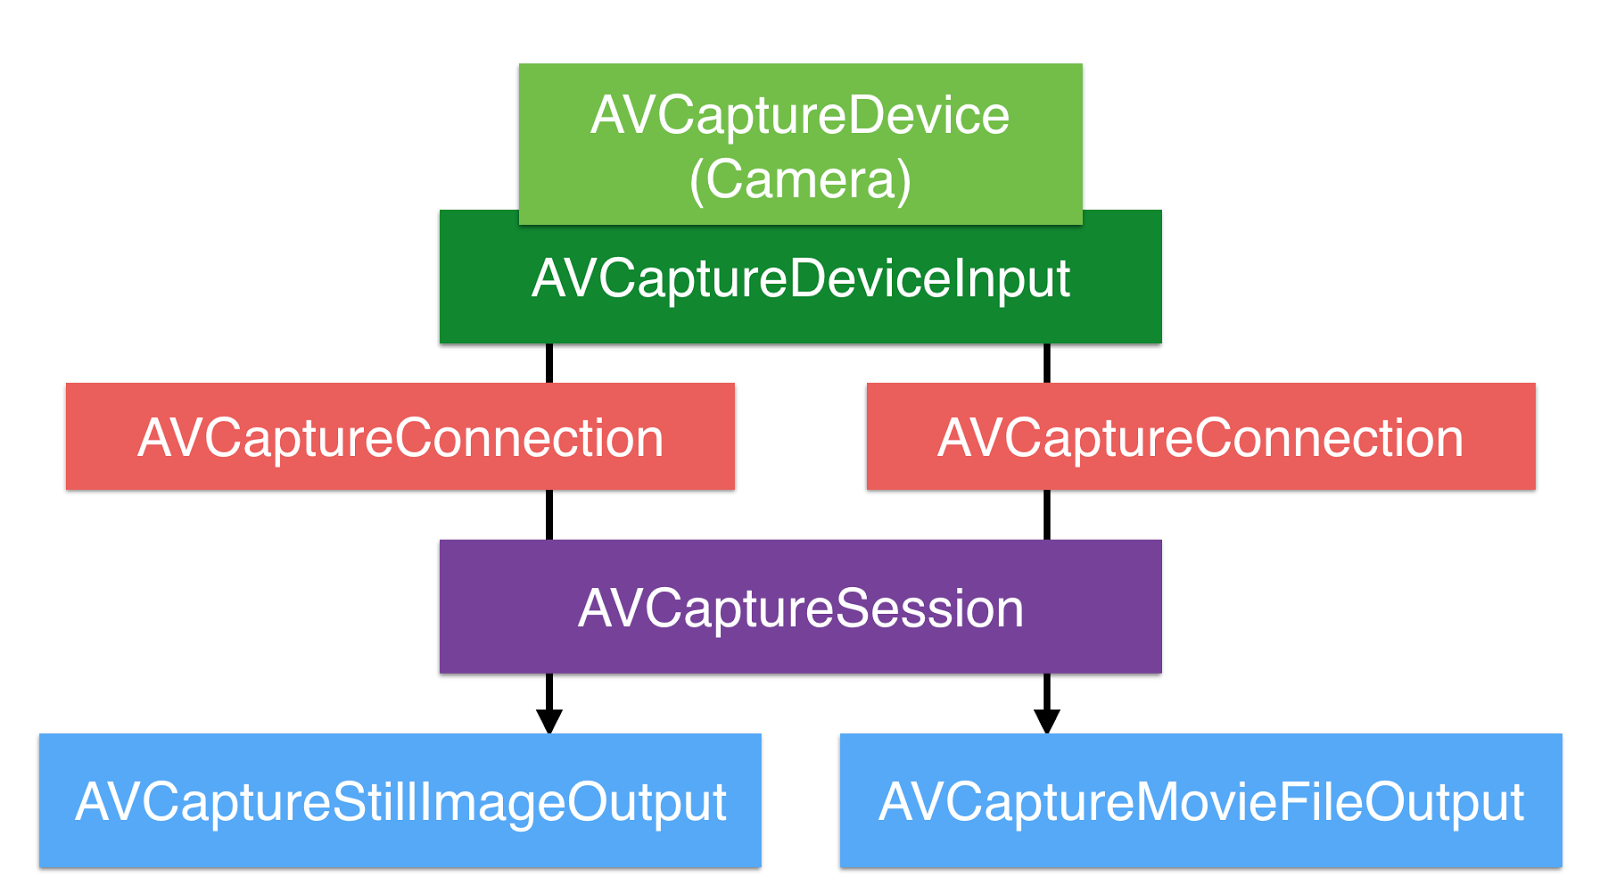
The central object in AVFoundation is the AVCaptureSession, which coordinates the flow of data from capture devices to consumers. But before using it, you need to decide where the record will be made from.
Recording sources are represented by AVCaptureDeviceInput objects, and are taken from AVCaptureDevice representing physical devices, such as a front-facing camera, a rear-facing camera, and a microphone. Just as we say where to record, we also have to tell where to send it then.
To do this, on the other side of the AVCaptureSession is one or more AVCaptureOutput. Examples of output can be AVCaptureStillImageOutput (for photos) and AVCaptureMovieFileOutput (for video). Each output can receive information from one or several sources (for example, AVCaptureMovieFileOutput can receive both video from a camera and audio from a microphone).
The connections between inputs and outputs are set using one or more AVCaptureConnection objects, and if we, for example, need to record video without sound, we can not establish a connection between AVCaptureMovieFileOutput and the microphone input.
Configuring AVCaptureSession is pretty simple. First you need to get a list of devices that support video capture. Next, look for the rear camera, checking the value of the position parameter for each of the devices found. Finally, we initialize AVCaptureDeviceInput, passing the camera object as a parameter.
let videoDevices = AVCaptureDevice.devices(withMediaType: AVMediaTypeVideo) let backCamera = videoDevices?.first { $0.position == .back } let input = try AVCaptureDeviceInput(device: backCamera) Creating output is even simpler: just create an AVCaptureStillImageOutput and set the codec to be used for the capture.
let output = AVCaptureStillImageOutput() output.outputSettings = [AVVideoCodecKey: AVVideoCodecJPEG] Now that we have input and output, we are ready to create an AVCaptureSession.
let captureSession = AVCaptureSession() captureSession.sessionPreset = AVCaptureSessionPresetPhoto if captureSession.canAddInput(input) { captureSession.addInput(input) } if captureSession.canAddOutput(output) { captureSession.addOutput(output) } captureSession.startRunning() The sessionPreset property allows you to set the quality, bit rate and other parameters of the output. There are 14 ready-made presets, which, as a rule, are sufficient for solving typical tasks. In case they do not give the desired result, there are also specific properties that are set on the AVCaptureDevice instance that represents the physical capture device itself.
Before adding inputs and outputs to a session, it is necessary to check the possibility of such an operation with the methods canAddInput and canAddOutput, respectively, otherwise you can run into a crash.
After that, you can tell the
startRunning() session to start the transfer of data from inputs to outputs. And there is an important nuance - startRunning() is a blocking call, and its execution can take some time, so it is recommended to set up the session in the background in order not to block the main thread.AVFapation also includes the AVCaptureVideoPreviewLayer class. This is CALayer’s successor, which allows you to effortlessly display a preview of the record, initializing it with an AVCaptureSession instance. We just put this layer in the right place, and everything works automatically. It would seem that could go wrong? However, everything is not as cloudless as it seems at first glance.
Display camera preview
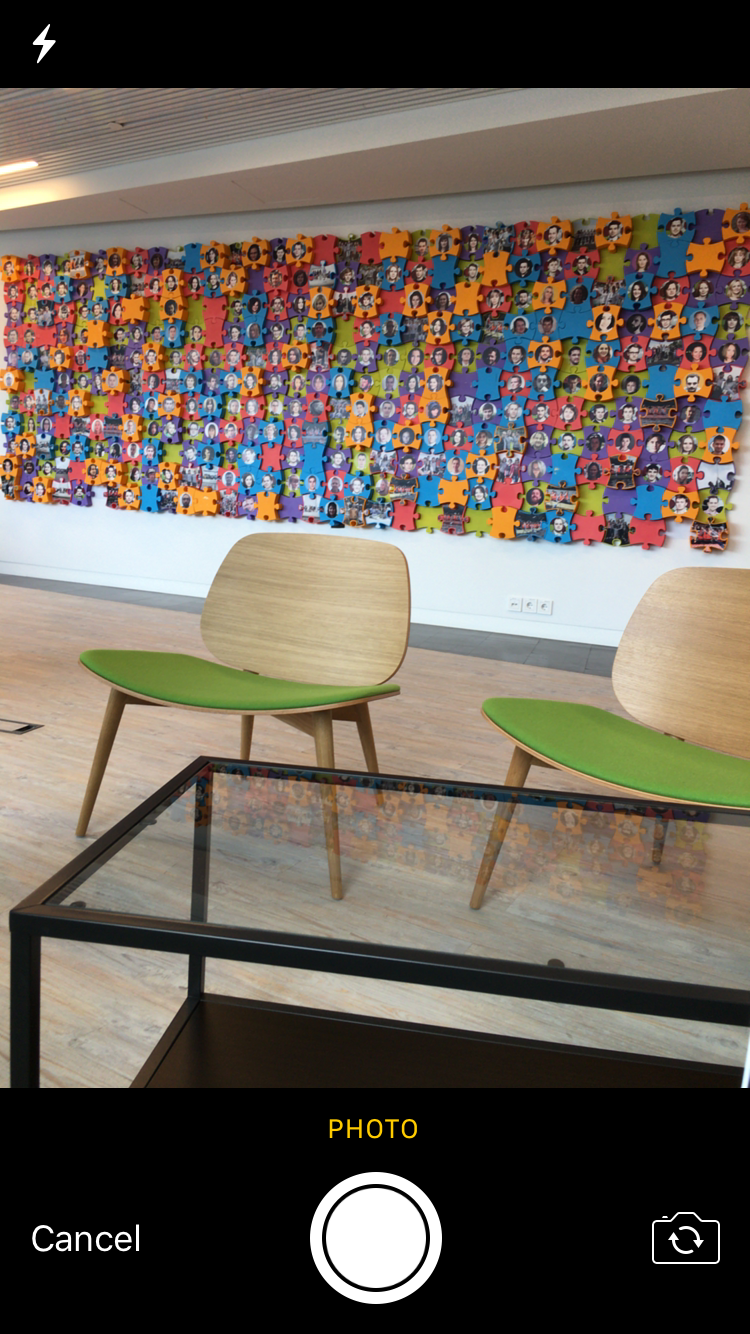
As you can see, in the lower right corner of the screen, in addition to the icons of the selected photos, there is another one - with a live preview of the camera, which duplicates the main preview. In the original version of its design was not. When it appeared as a result of finalizing the layouts, we thought - well, this is easy, we just add another AVCaptureVideoPreviewLayer and associate it with the existing AVCaptureSession. But we were disappointed. Because one AVCaptureSession can output only one AVCaptureVideoPreviewLayer.
Another thought immediately arose: we will create two sessions, and each of them will output to its own AVCaptureVideoPreviewLayer. But that doesn't work either. As soon as the second session starts, the first one automatically stops.
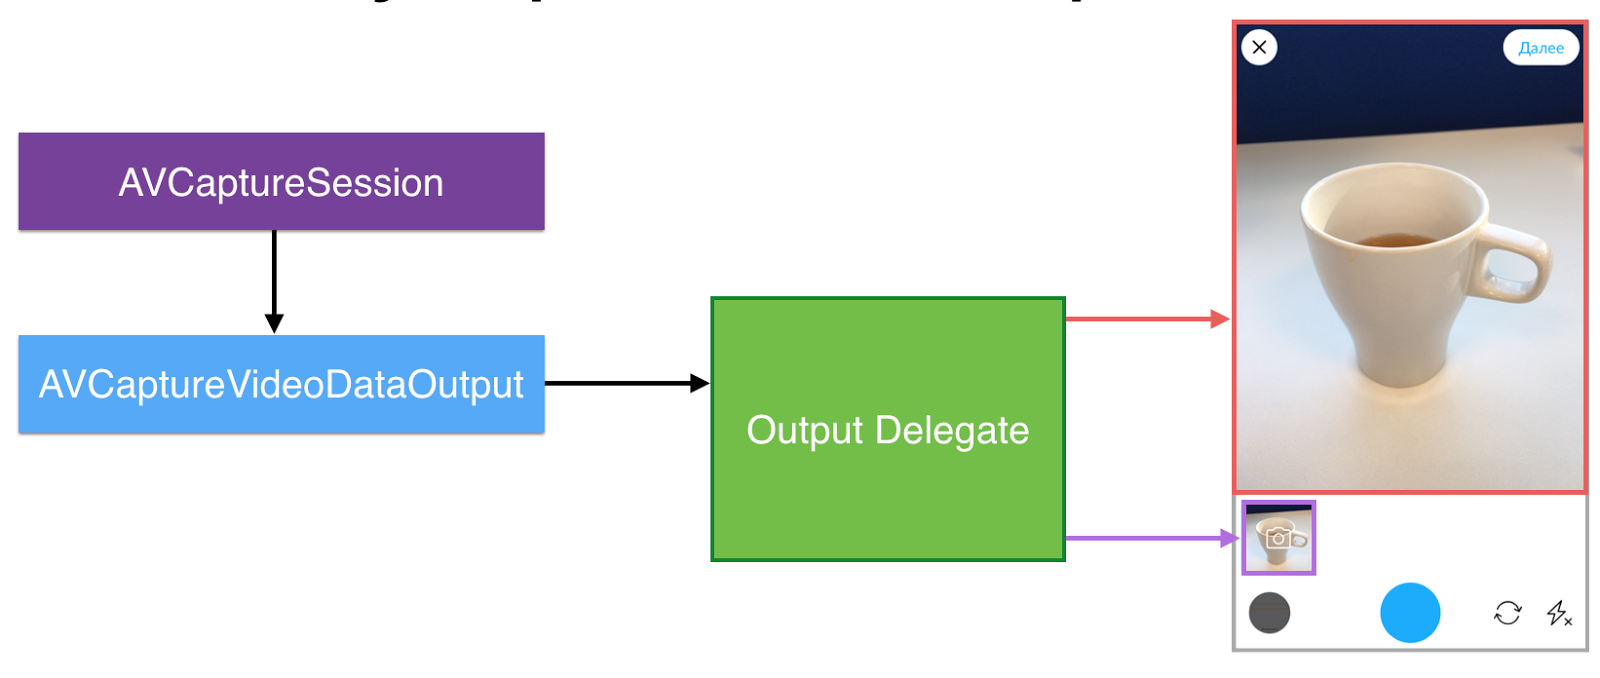
In the course of further search, it turned out that there was a solution. In addition to CaptureStillImageOutput, which was present to our CaptureSession initially, we need to add a new output of type AVCaptureVideoDataOutput.

This output has a delegate, and the delegate has a method that allows us to get every frame from the camera, giving you the opportunity to do anything you want with it, including drawing it yourself.
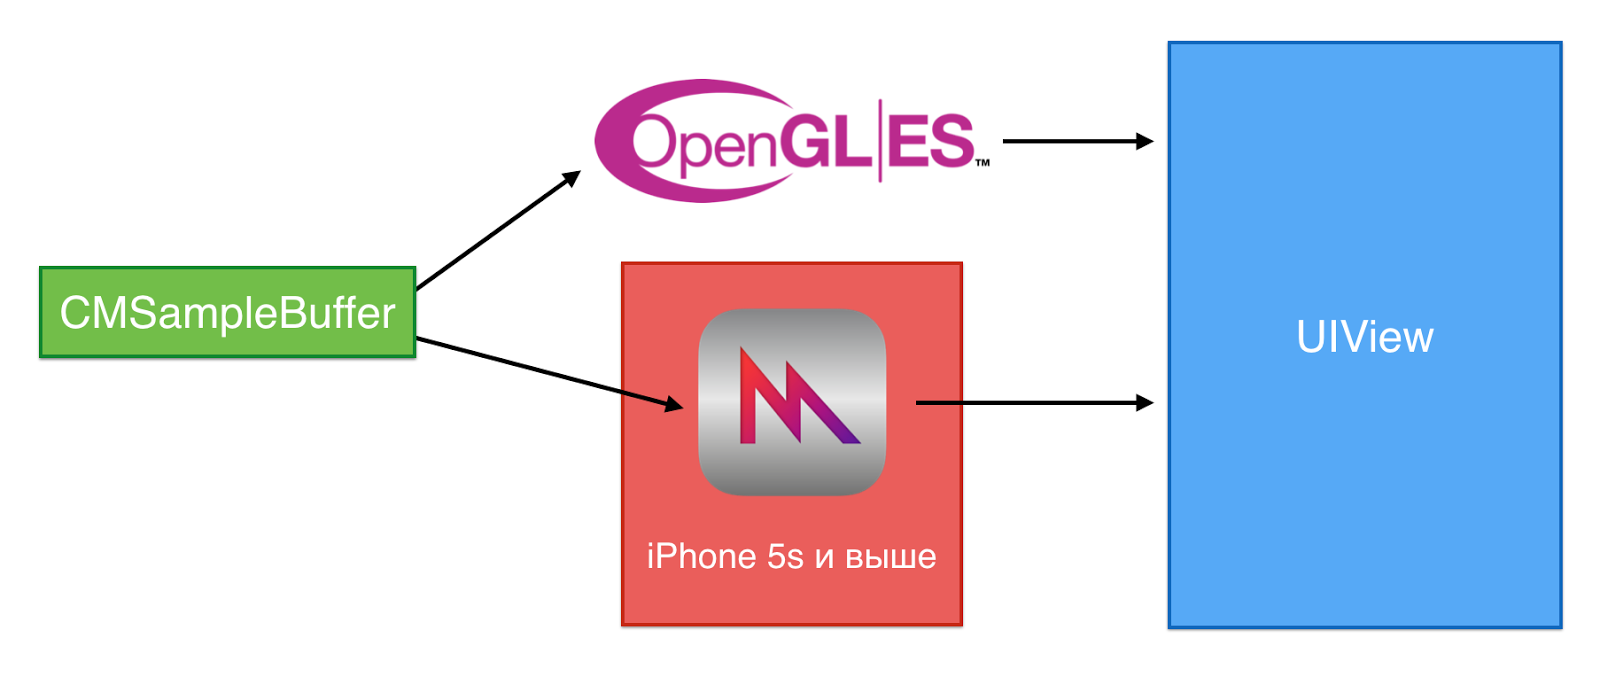
The result is given in the form of CMSampleBuffer. The data represented by this object can be effectively drawn by the graphics processor using OpenGL, as well as a low-level framework from Apple itself - Metal, which was introduced relatively recently. According to Apple, Metal can be 10 times faster than OpenGL ES, but it works only from iPhone 5s and up. Therefore, we stopped at OpenGL.
As I said, for self-rendering of frames received from the camera, you need to implement the AVCaptureVideoDataOutputSampleBufferDelegate protocol, namely, its captureOutput method (_: didOutputSampleBuffer: from :).
func captureOutput( _: AVCaptureOutput?, didOutputSampleBuffer sampleBuffer: CMSampleBuffer?, from _: AVCaptureConnection?) { let imageBuffer: CVImageBuffer? = sampleBuffer.flatMap { CMSampleBufferGetImageBuffer($0) } if let imageBuffer = imageBuffer, !isInBackground { views.forEach { $0.imageBuffer = imageBuffer } } } Then you will see that Core Image will undertake all the hard work of drawing frames, but Core Image does not know how to work directly with CMSampleBuffer, but it does work with CVImageBuffer, and here we are converting one object to another.
Please note that at this stage we are checking the isInBackground flag. OpenGL calls cannot be made when the application is in the background, otherwise the system will immediately unload it from memory. I will tell you how to avoid this in a minute, but for now just remember that this flag is there.
Further in the cycle we go through all the views in which the preview will be displayed, and pass on the resulting imageBuffer. These views are instances of our own GLKViewSubclass class.
This class, as you probably guessed from its name, is a successor of GLKView. Like any other GLKView, this view is initialized by the OpenGL ES context. What distinguishes it from others is the presence of the Core Image context, which will perform the entire heavy lifting on drawing the contents of the image buffer.
With the exception of a few irrelevant details, the full implementation of the draw (_ :) method is shown here.
// instance vars: let eaglContext = EAGLContext(api: .openGLES2) let ciContext = CIContext(eaglContext: eaglContext) var imageBuffer: CVImageBuffer? // draw(_:) implementation: if let imageBuffer = imageBuffer { let image = CIImage(cvPixelBuffer: imageBuffer) ciContext.draw( image, in: drawableBounds(for: rect), from: sourceRect(of: image, targeting: rect) ) } The drawableBounds method simply converts the CGRect specified in points to a pixel CGRect, since Core Image deals with pixels and does not know whether we have a screen - retina or not.
The sourceRect method returns a rectangle corresponding to a fragment of the displayed frame that will fit in our view, taking into account the ratio of its sides. That is, if the frame has a 3: 4 format, and our twist is square, then this method will return the frame corresponding to its central part.

As I said, OpenGL calls cannot be made when the application is in the background. And in order to control this, you need to handle the ApplicationWillResignActive and ApplicationDidBecomeActive events.
// UIApplicationWillResignActive func handleAppWillResignActive(_: NSNotification) { captureOutputDelegateBackgroundQueue.sync { glFinish() self.isInBackground = true } } // UIApplicationDidBecomeActive func handleAppDidBecomeActive(_: NSNotification) { captureOutputDelegateBackgroundQueue.async { self.isInBackground = false } } Both of these notifications are sent in the main thread, but the AVCaptureSession delegate messages are delivered in the background thread. To ensure that after exiting the first handler, no drawing will definitely occur, you need to synchronously switch to the delegate's queue, call glFinish (), and set the isInBackground flag, which the output delegate checks before drawing each frame.
The second event must also be processed in the delegate's thread, but this can already be done asynchronously, because the delay in this case is not critical and will not lead to unpleasant consequences.
So, to summarize all of the above, the general scheme of implementation is as follows: CaptureSession transfers the frame from the camera to the VideoDataOutput, it forwards it to its delegate, and the delegate, in turn, sends the data to the desired views if the application has not gone into the background, after which the views themselves perform frame rendering.
On this our problems with the conclusion of the preview camera ended.
So, in the first part, we discussed in detail the use of AVFoundation for capturing an image from a camera, as well as for outputting it to several UIViews simultaneously. In the second part, we will talk about abstraction, which was done to work equally with photos from different sources, from disk, from photo galleries and from the network.
Useful links:
- Paparazzo on github
- Record of the report Media Picker - to infinity and beyond (CocoaHeads Russia 03/01/2017)
Source: https://habr.com/ru/post/326774/
All Articles