Step by step: we assemble and test the Internet of things based on the SAP Cloud Platform platform
This article can help the SAP Coder 2017 contestants to solve one of the problems.
The Internet of Things is an exciting topic that will change the world tomorrow. Existing IoT platforms allow testing technology, which we will do.
Here is a step-by-step example of creating and configuring a data collection system from Arduino-based devices and connecting it to the SAP Cloud Platform.
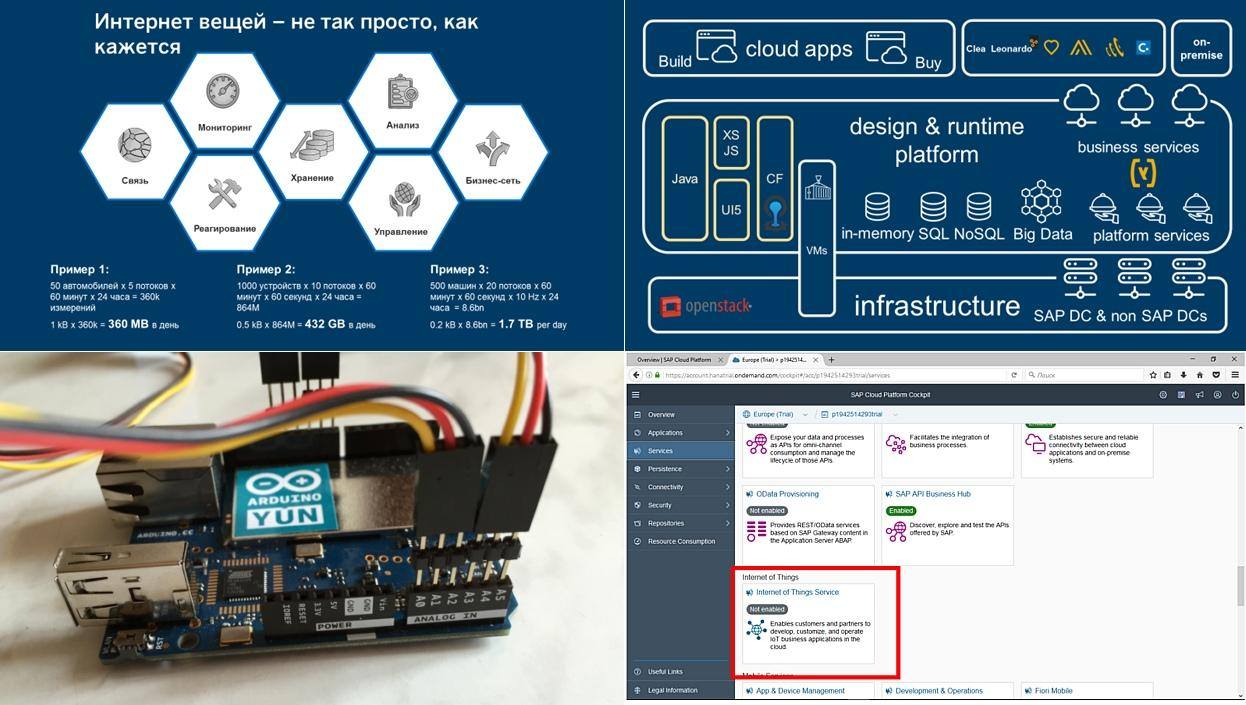
IoT is the most promising topic of the next decade. The most important catalyst of the Internet of Things was the dramatic drop in prices for miniature sensors, microcontrollers, RFID sensors and memory chips. They can be put hundreds, thousands. For example, about 30,000 sensors are installed on an oil platform. But only 1% of the information taken from them is actually used to control the platform and detect abnormal situations. The infrastructure is there, but IoT applications are not enough.
')
According to analysts, the global IoT market will grow to 10 trillion dollars by 2025, and most of the cake - 69% - will eat off the industrial segment. All major IT developers urgently build their platforms for IoT deployment. Today we will work with one of them - our SAP Cloud Platform cloud development platform. It includes a set of tools and services that allow you to create your own Internet of Things project very quickly from ready-made blocks and templates.
The SAP Cloud Platform supports OpenStack technology, which makes it independent of hardware infrastructure. When developing applications, you can use various technologies for working with data - both conventional relational DBMS and DBMS with in-memory storage (SAP HANA), as well as mechanisms for working with unstructured “big” HADOOP data. Java, Java Script, XS JS are supported from programming languages, so it will be easy to start coding. But the main value of the platform lies in the set of ready-made business services that significantly reduce application development time.
This article focuses on the basic functions of the Internet of things of the things that allow you to collect data from equipment and sensors. Further development of the SAP IoT line will allow you to use ready-made libraries for working with a wide range of equipment and templates for developing typical IoT applications, for example, to create applications for monitoring machine operation and predicting emergency situations.
Almost all SAP technologies are available for study. To get acquainted with the platform, you just need to register on the website hcp.sap.com and get a test account. You can also try your hand at creating on-prem applications based on HANA Express , which you can deploy on your personal computer.
But enough of the lyrics, let's create our first IoT solution based on the SAP Cloud Platform. For example, we will develop a variant when data on temperature and light level are collected by the controller on the Arduino. Then they are transferred to the SAP “cloud”, where you can see the information in the form of a table and a graph.
Step 1. We register in the cloud service SAP Cloud Platform
To register in the SAP Cloud Platform, you need to follow the link:
https://hcp.sap.com . Free registration will allow you to use all the features of the SAP platform in demo mode.

Click the Try for Free button, then Try Now.
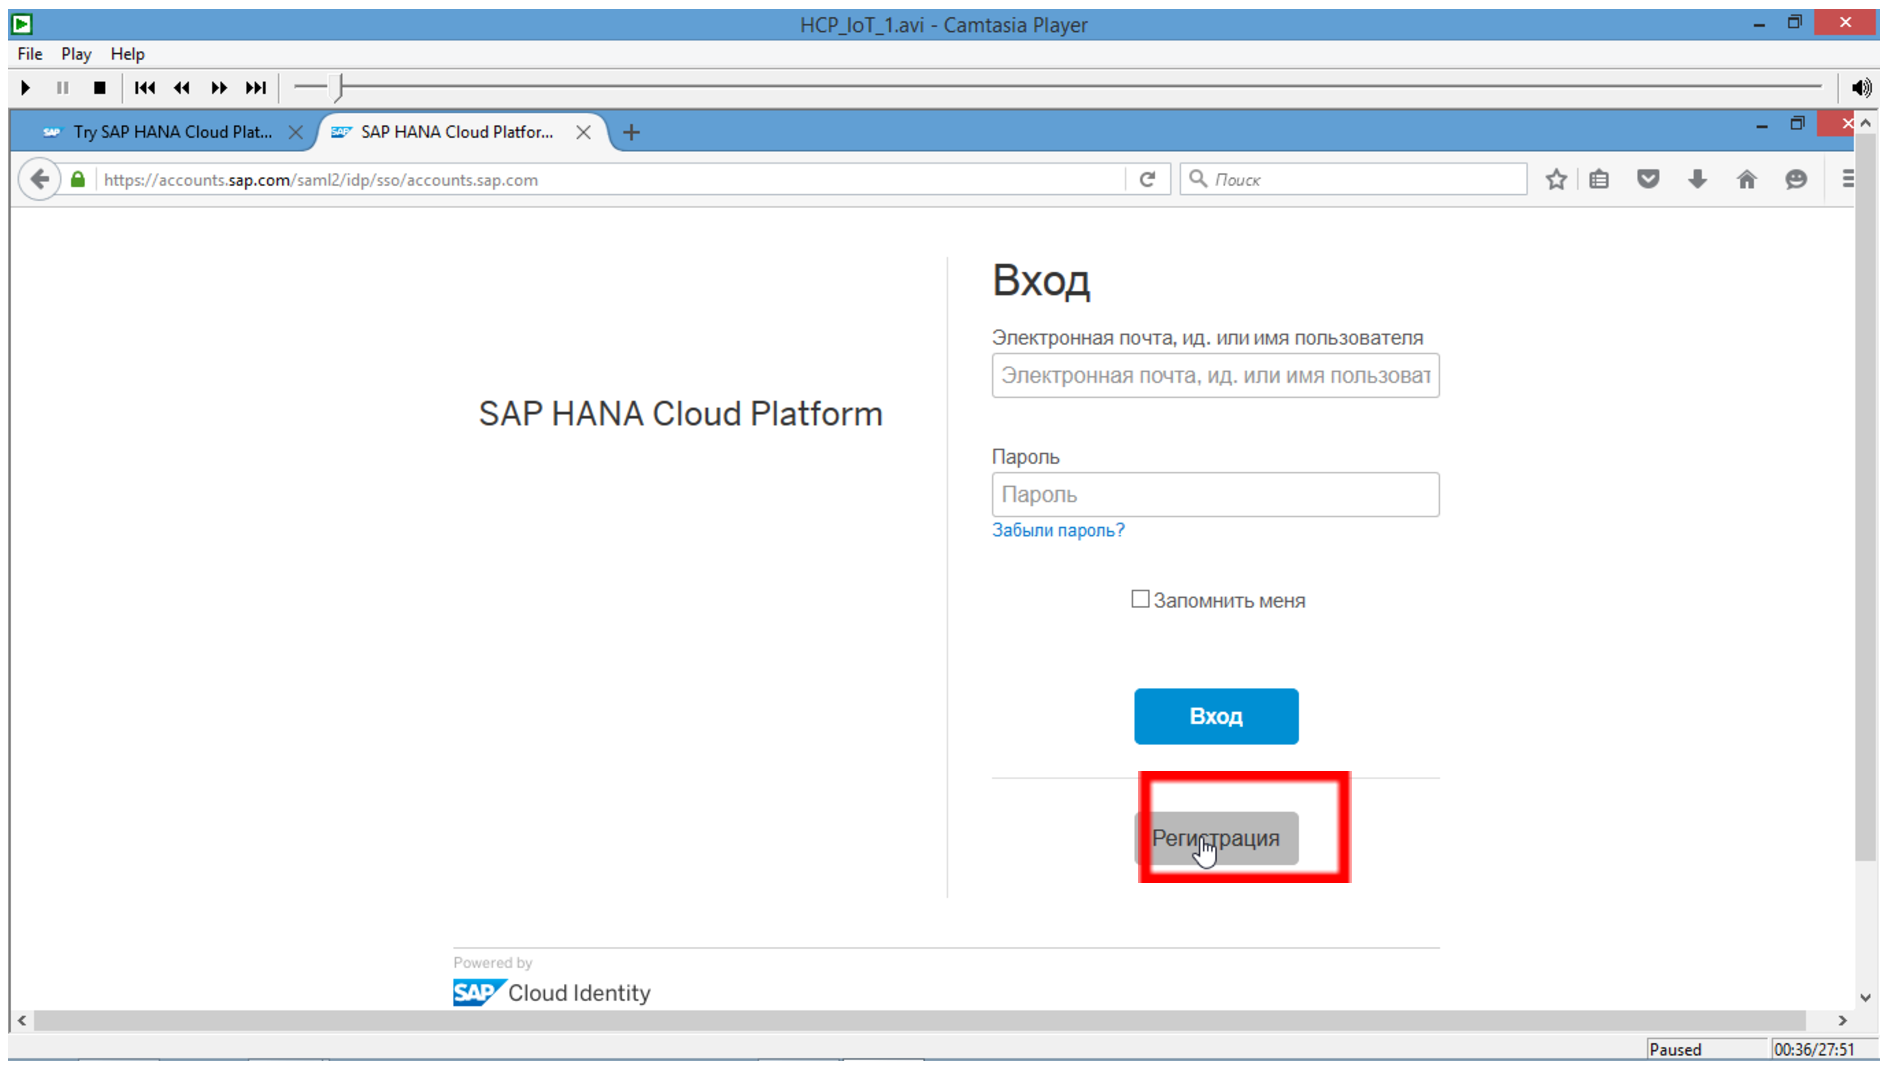
Click the "Register" button and enter your registration information.
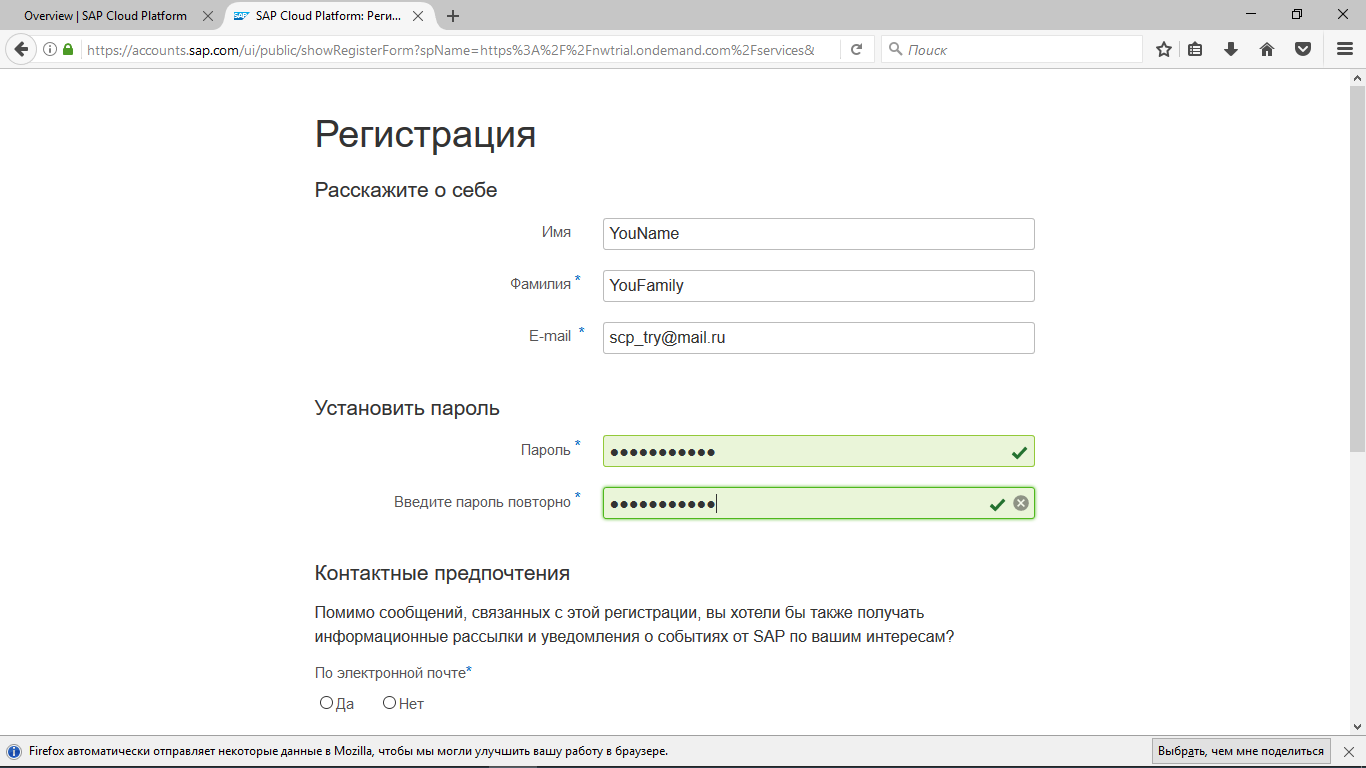
At the specified email address must receive a letter confirming registration. To complete the process, you need to activate your account by clicking on the link in the letter.

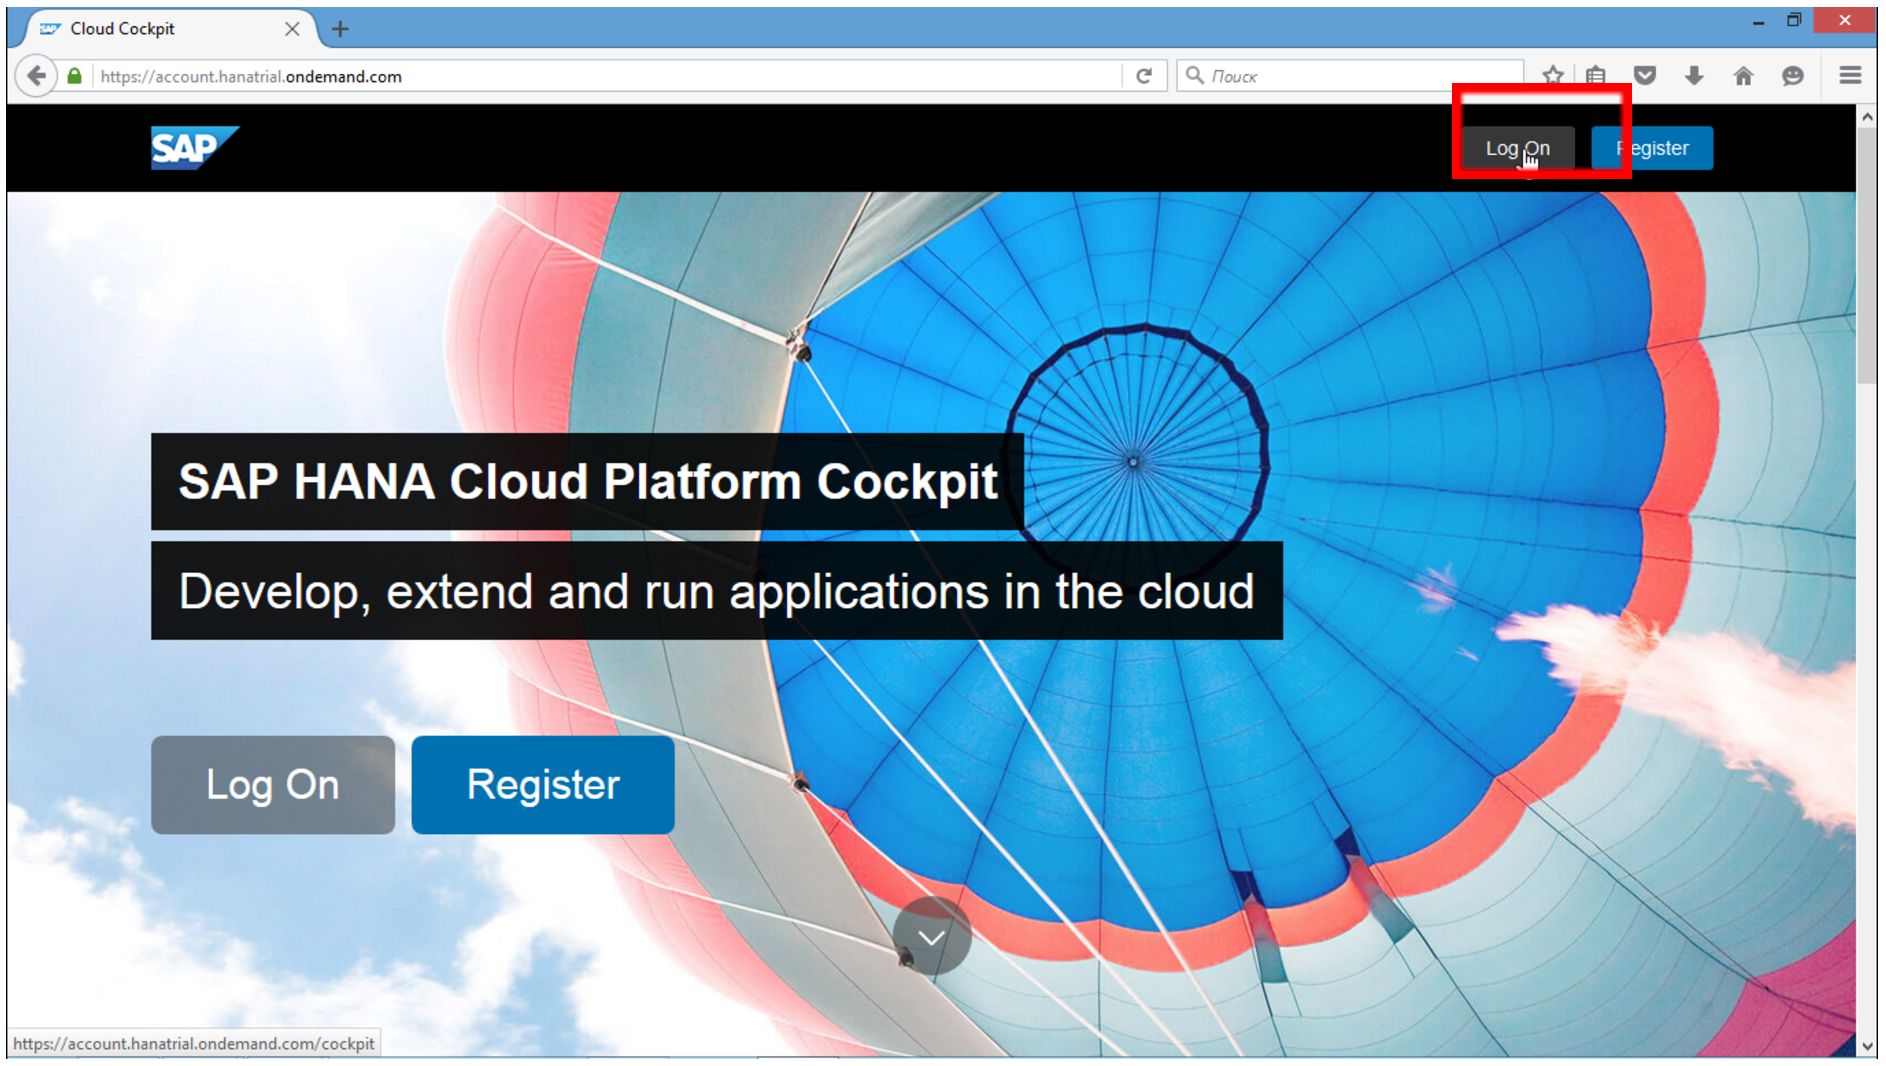
Everything is ready to use the SAP Cloud Platform! Let's go to the control panel and create our first IoT application. Click Log On.
Step 2. Create a database and distribute rights.
You get into the "control panel" of your development on SAP.

It allows you to see all the developed applications, access the database, launch development or activate services.
In principle, the IoT service will be able to automatically create the necessary structure of tables and instances of the database. But in order to understand how it works, and fully manage the database, we will create our own HANA instance. The so-called HANA MDC - Multitenant Database Containers.
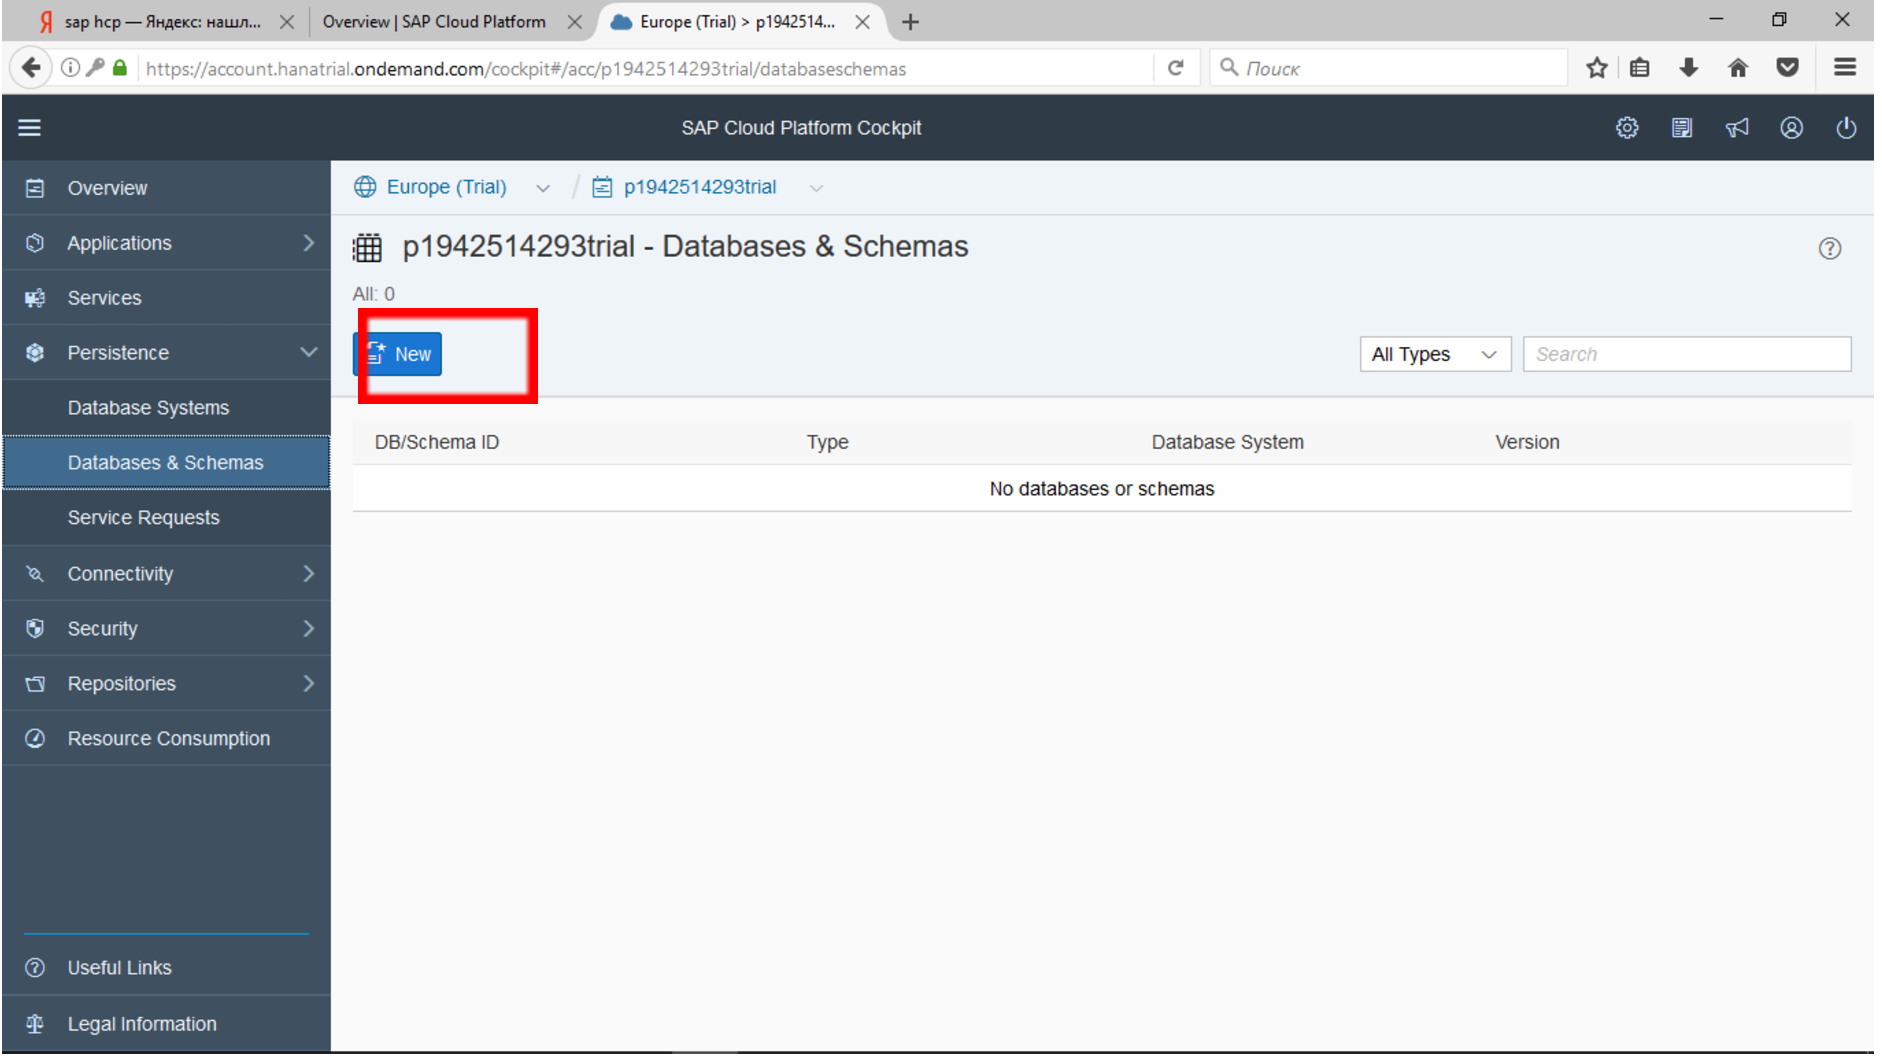
It is in this system that our data will be stored. To do this, we go to the Persistence tab -> Database & Schemas and click the New button.
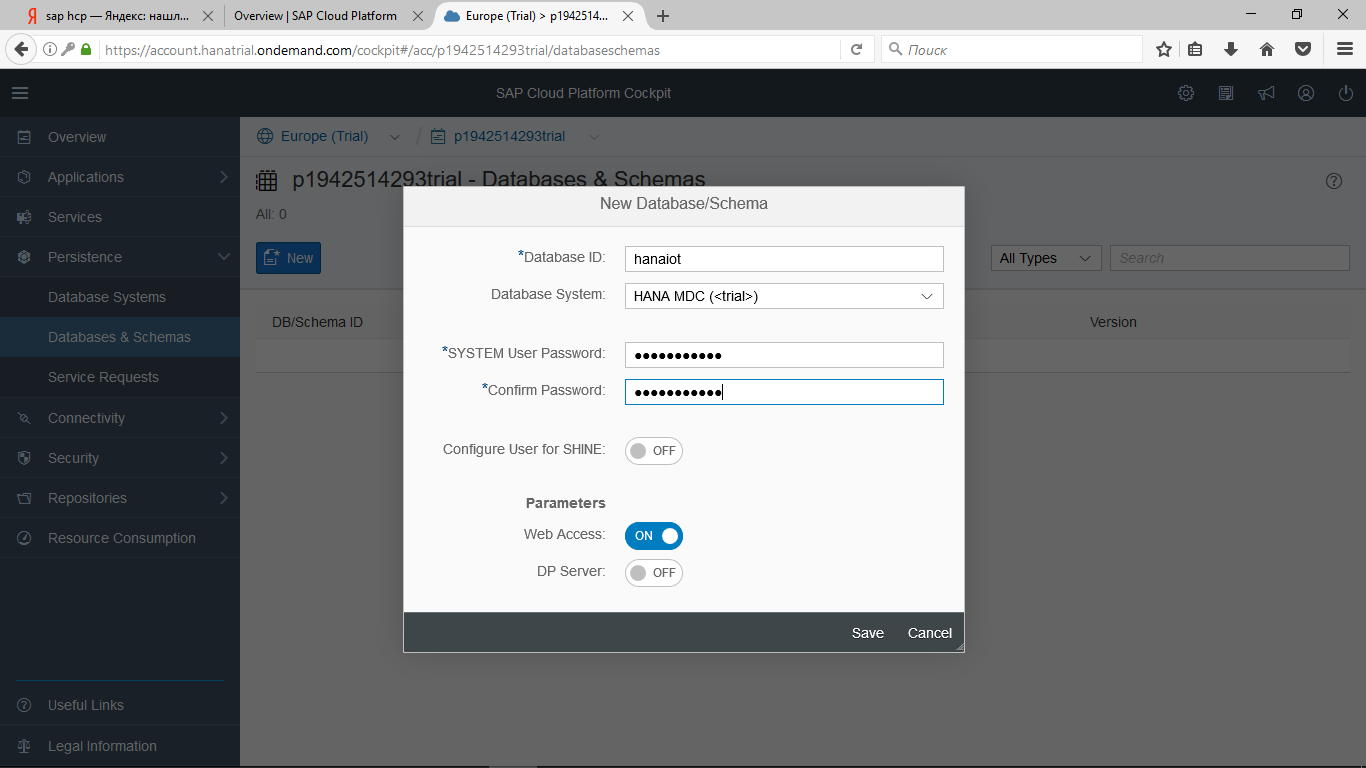
After that, set any name for the HANA instance. The name must be written in small Latin letters without the use of special characters. As the Database System, select HANA MDC and set the password for the SYSTEM user.
In the cloud, a database instance is created, with which we will work. Please note that this took us only a few minutes. This is a huge advantage of cloud technology. Usually, it may take several days for the administrator to install a database on the server and properly configure it. And here - one click and ready!
When the instance is ready, the yellow CREATING icon changes to green CREATED, and we can manage the base structure.

Let's use the web-tools for managing the database structure. In the future, in addition to the built-in database tools, you can set up an Eclipse environment, as described in the article " Creating a HANA application using the Eclipse development environment ."
First, click on the SAP HANA Cockpit line. The system will issue a warning about the absence of rights.

Click OK, and you will automatically be granted rights to work with Cockpit.

In this tool, you can view and configure many options for working with your HANA instance.
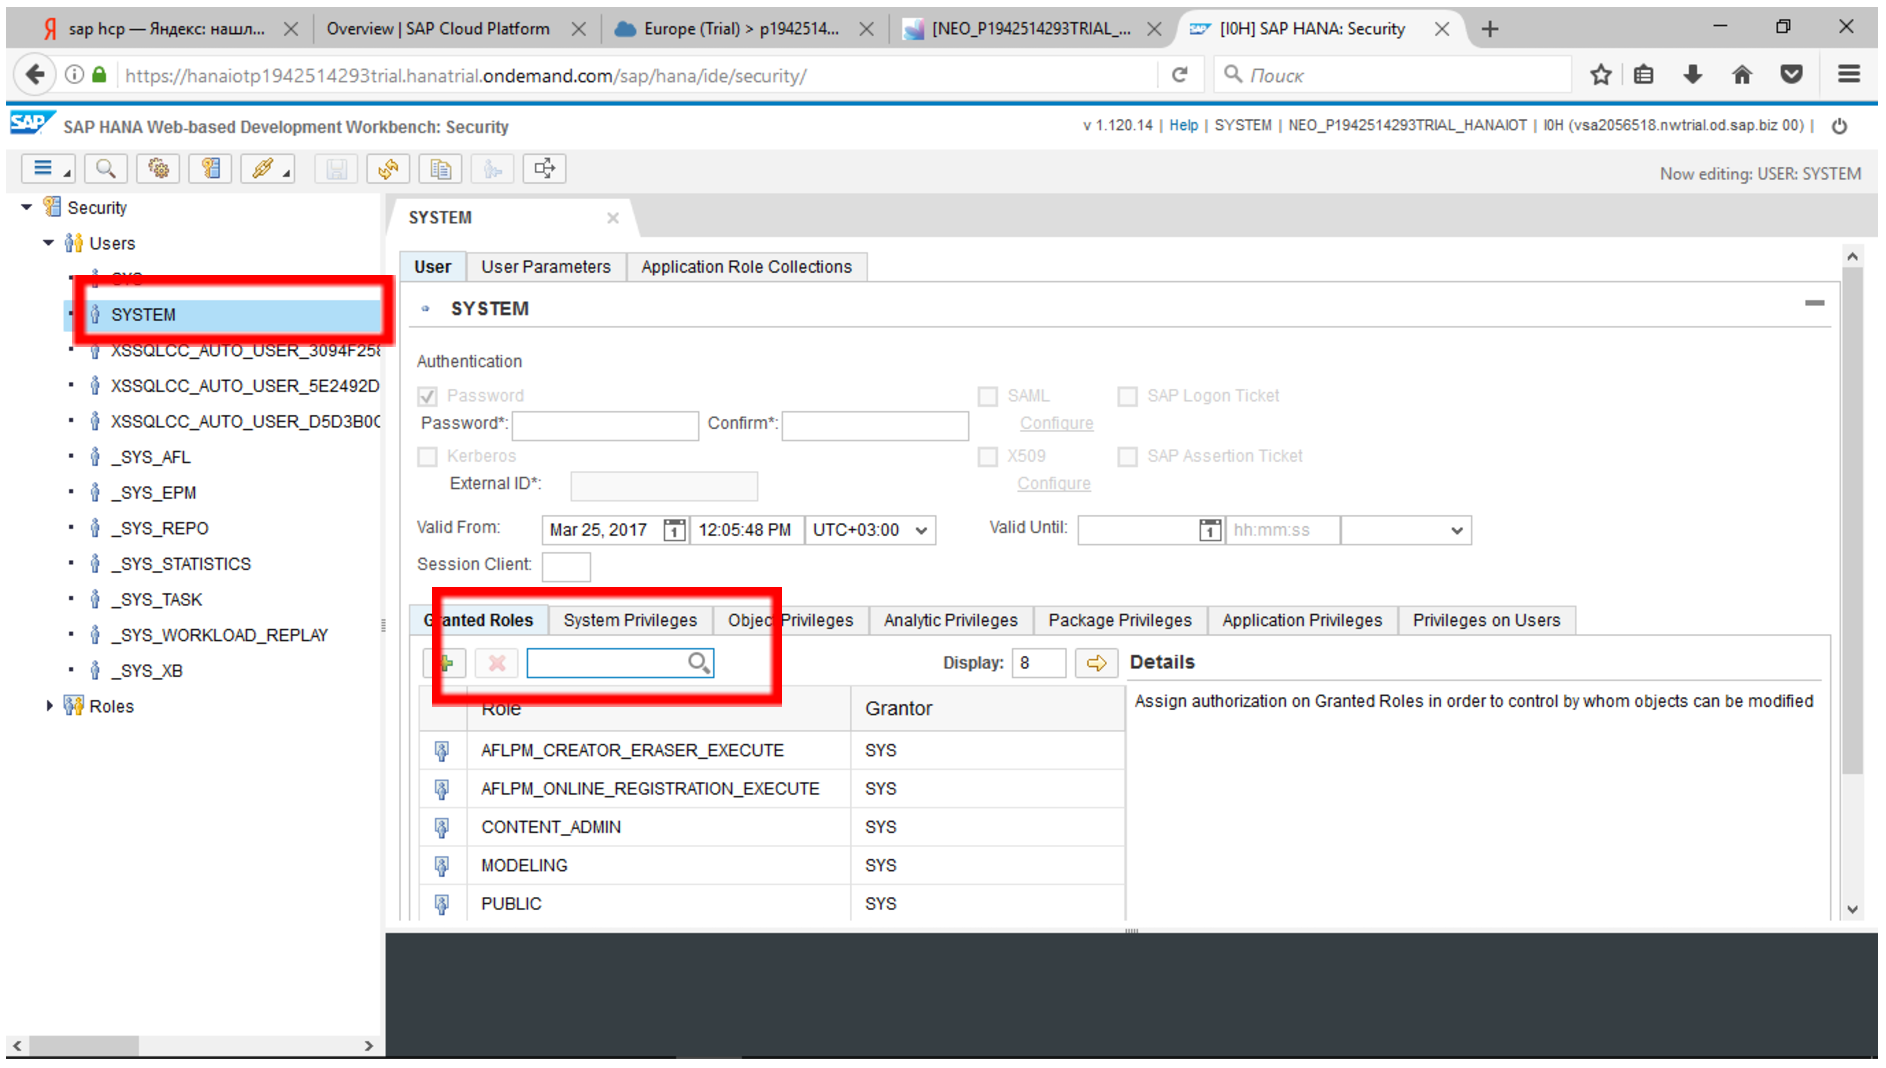
To work with SAP HANA Web-based Development Workbench, you will need to add some rights to the system user. Click on the “Manage Role and Users” tile.

Select the SYSTEM user and on the Granted Roles tab, click the plus button. Of course, for productive systems, you will need to create a new user and grant him the required rights. But now we are making our first application and can retreat a little from the rules.
The rights necessary for the operation of the administration tool are described here .
Give the following rights to your user:
| Role | Description |
| SAP HANA Web-based Development Workbench | |
| sap.hana.xs.ide.roles :: EditorDeveloper or parent roles sap.hana.xs.ide.roles :: Developer | SAP HANA Web-based Development Workbench. |
| sap.hana.xs.debugger :: Debugger | Debug server-side javascript code |
| SAP HANA XS Administration Tool | |
| sap.hana.xs.admin.roles :: HTTPDestViewer | View HTTP destinations. |
| sap.hana.xs.admin.roles :: HTTPDestAdministrator | Full access to HTTP destination configurations (display and edit). |
| sap.hana.xs.admin.roles :: TrustStoreViewer | If you are a client, you must be able to read it. |
| sap.hana.xs.admin.roles :: TrustStoreAdministrator | SAP HANA XS applications. |
After adding the roles, click the "Save" button. Your user will be added the rights necessary for work. Now you can return to the initial SAP Cloud Platform screen and select the SAP HANA Web-based Development Workbench.

A page with a set of services will open.
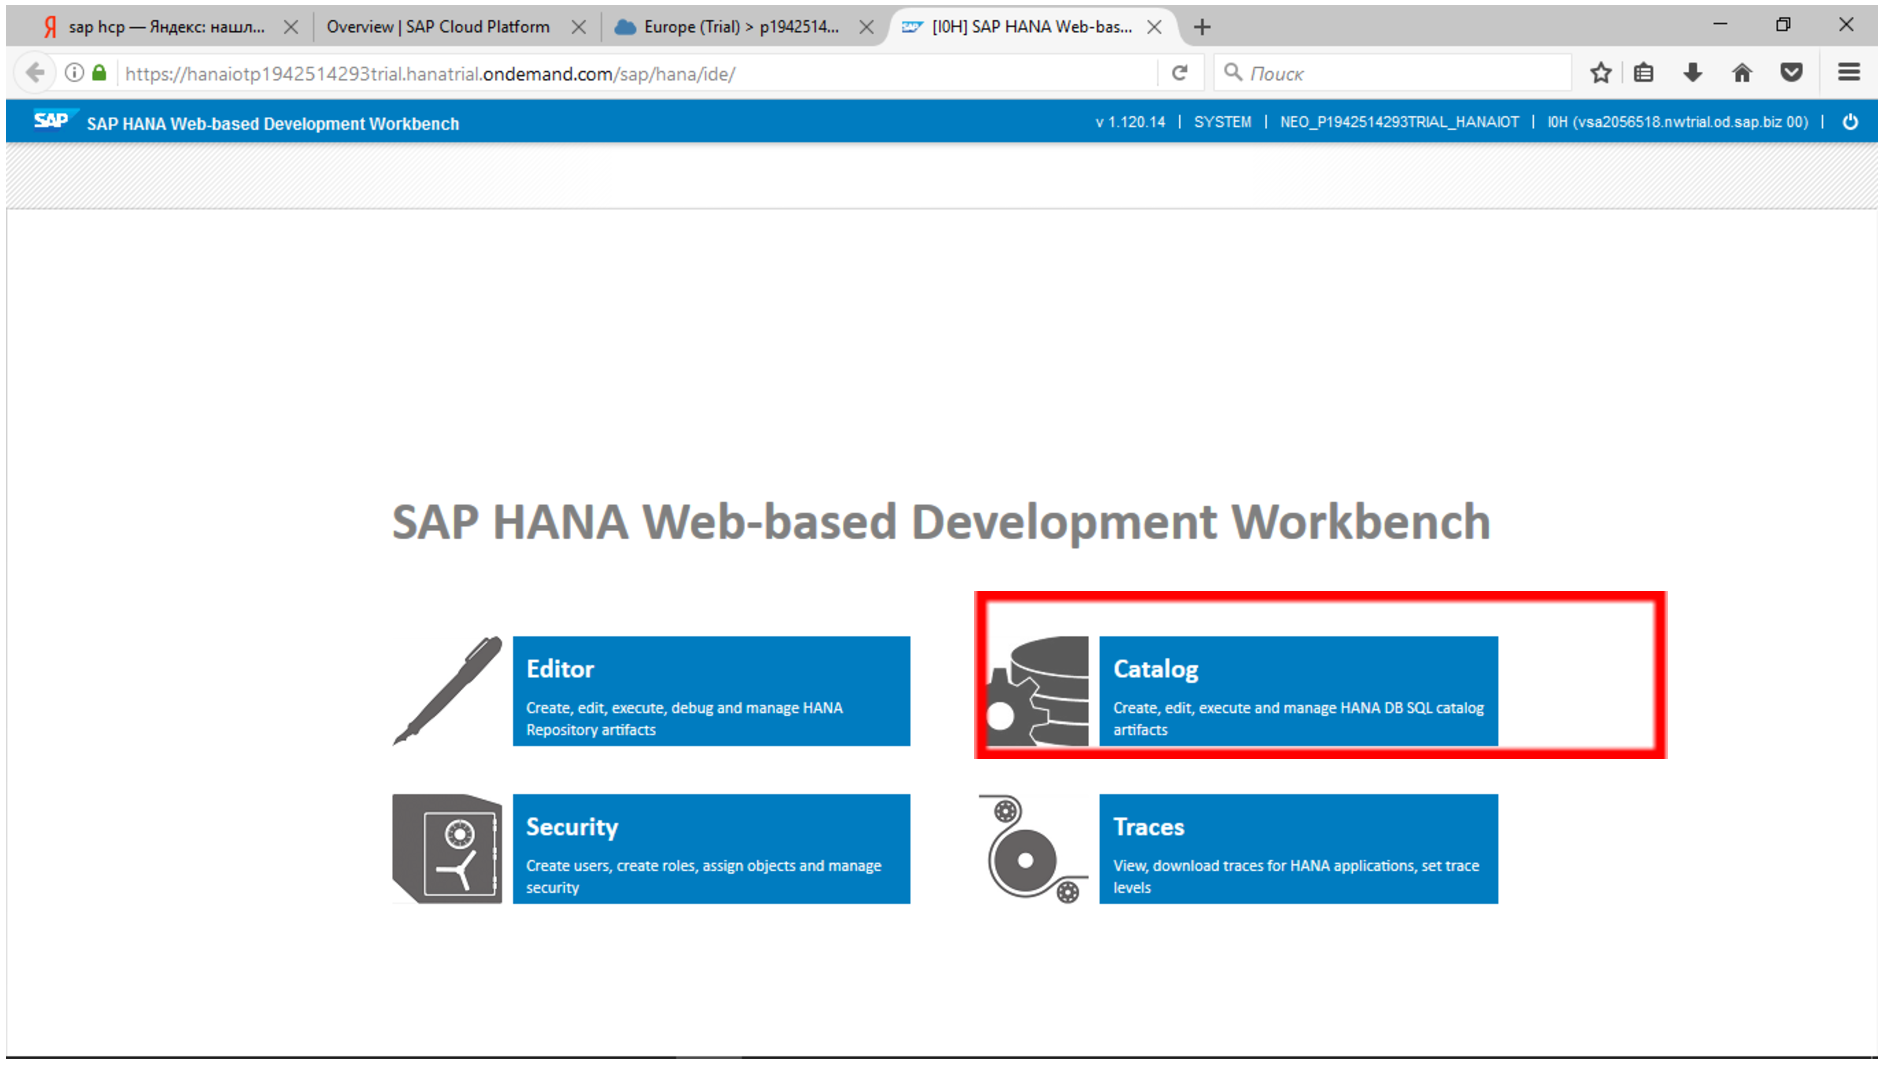
By clicking, for example, the Catalog tile, you can see the structure of the database: tables, view, packages.
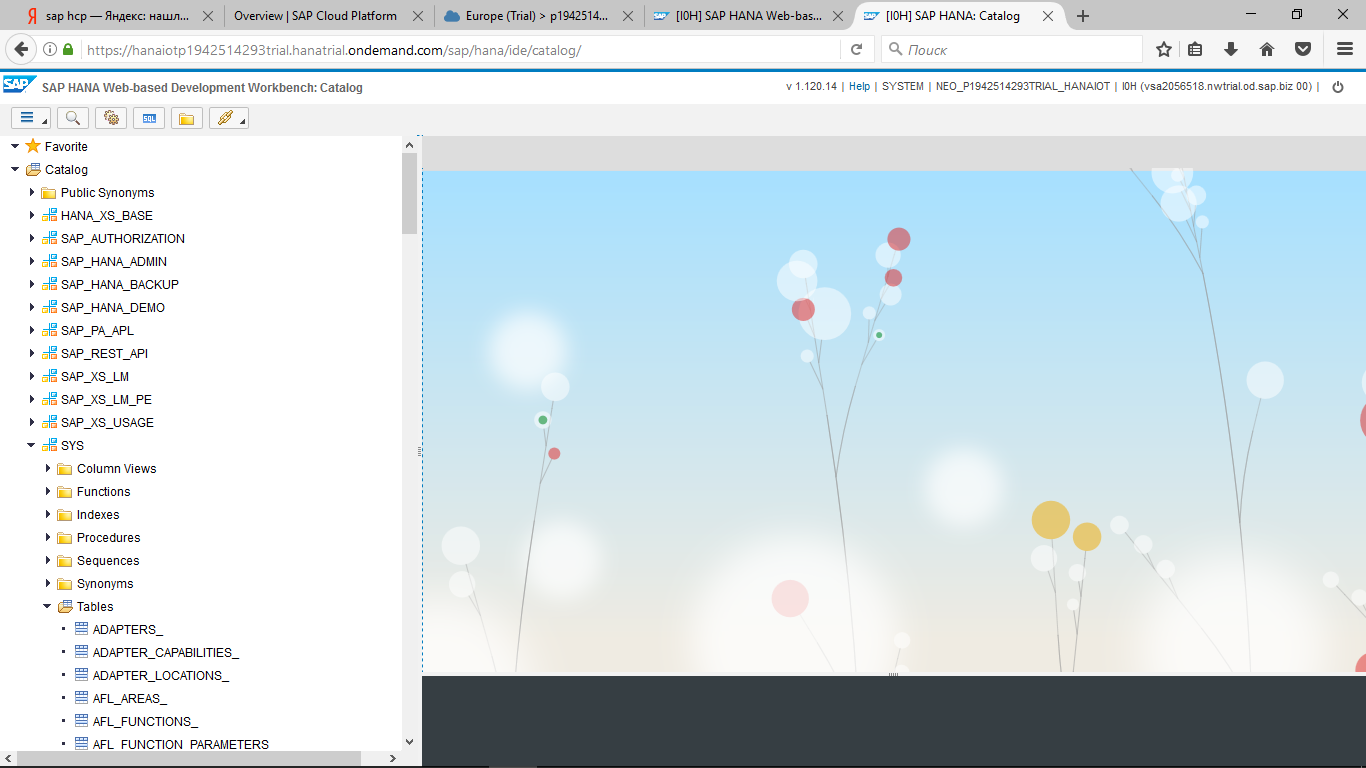
With the help of this tool, we will be able to see later how the data from the connected sensors fall into a special table created by the IoT service.
Step 3. Activate and configure the SAP Cloud Platform for IoT service
Now our newly created database is ready to receive data. Go to the Services tab and, scrolling through the list of services that you can use, find the Internet of Things service.
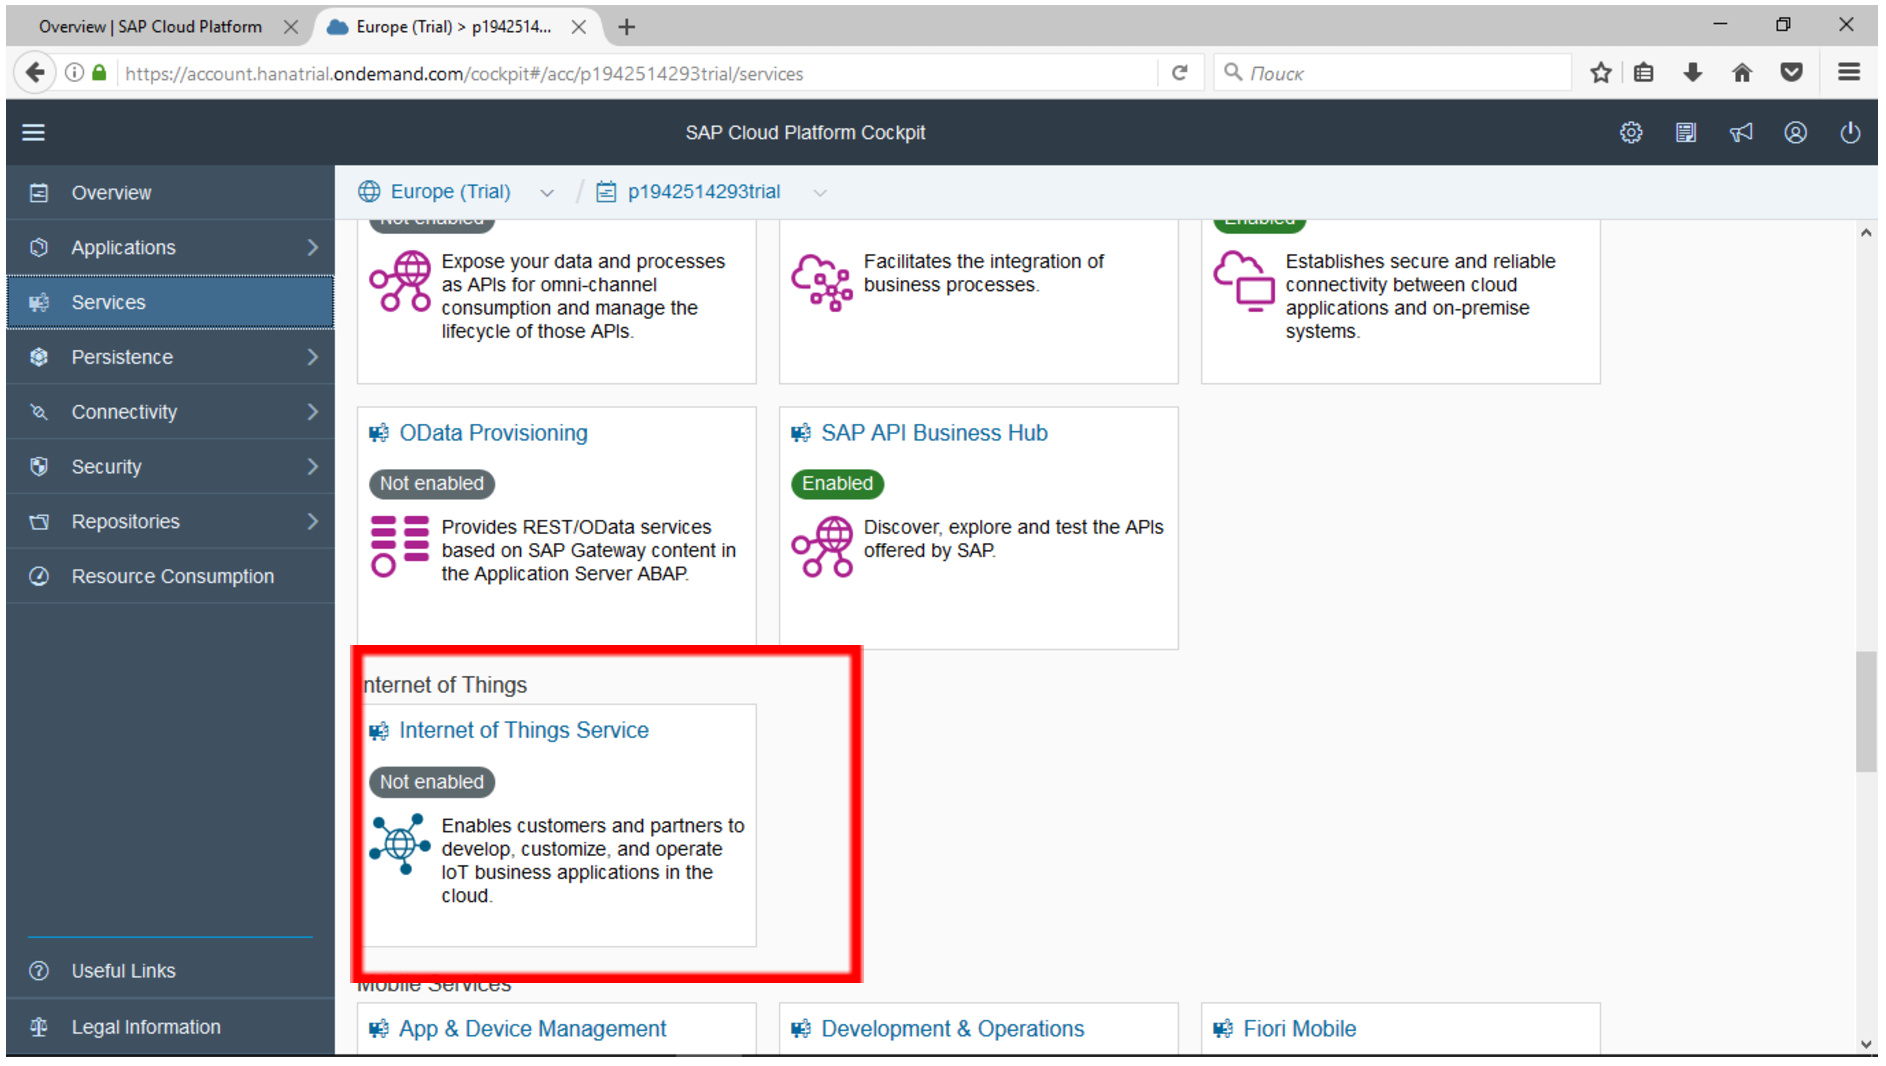
As you can see, it does not work yet. Let's activate it. By clicking on the service, we will get to the settings panel, where we must click the Enable button to start it.
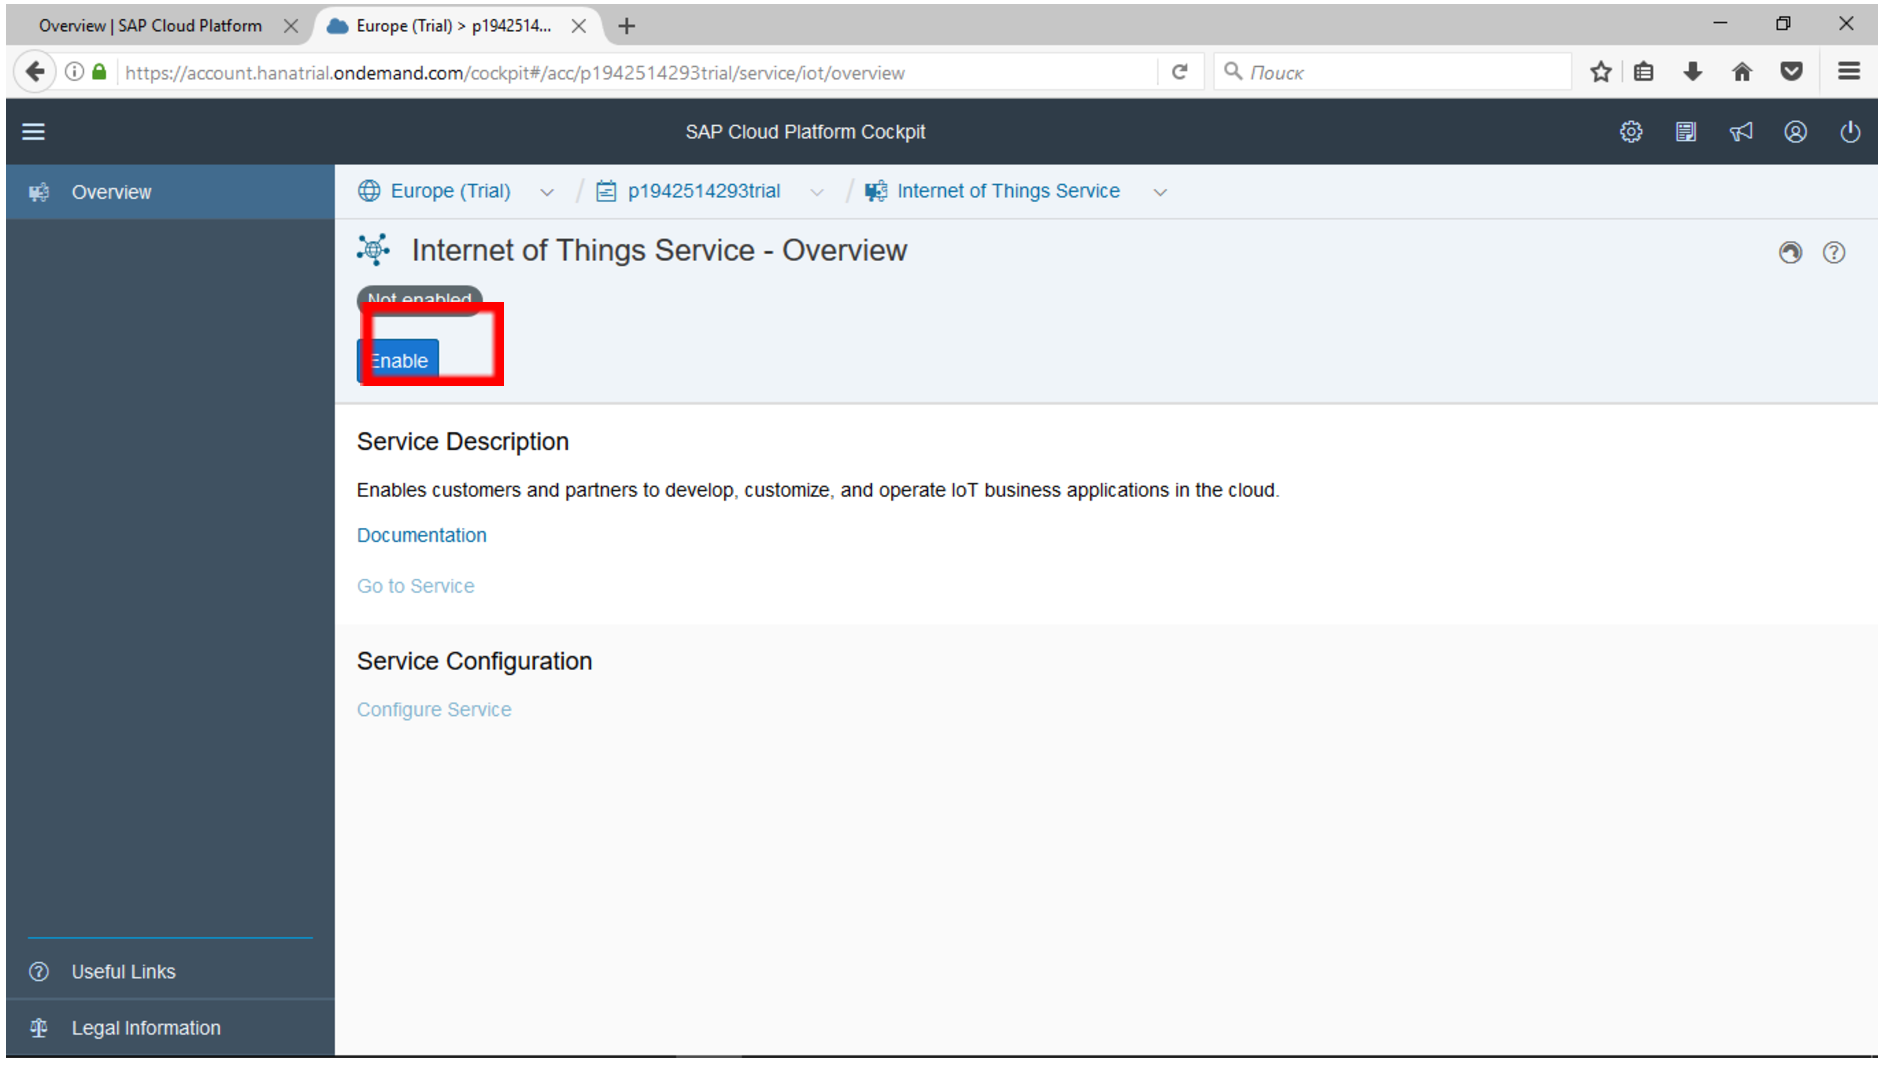
After a while you will see the green label Enabled. This means that the service is ready to go. This service will be engaged in collecting data from sensors and storing them in the database. It will automate most of the work and make it as quick and convenient for the developer as possible.
Let's configure the service to receive data from the sensors. When you click on the IoT service control tab, click the Go to Service link.

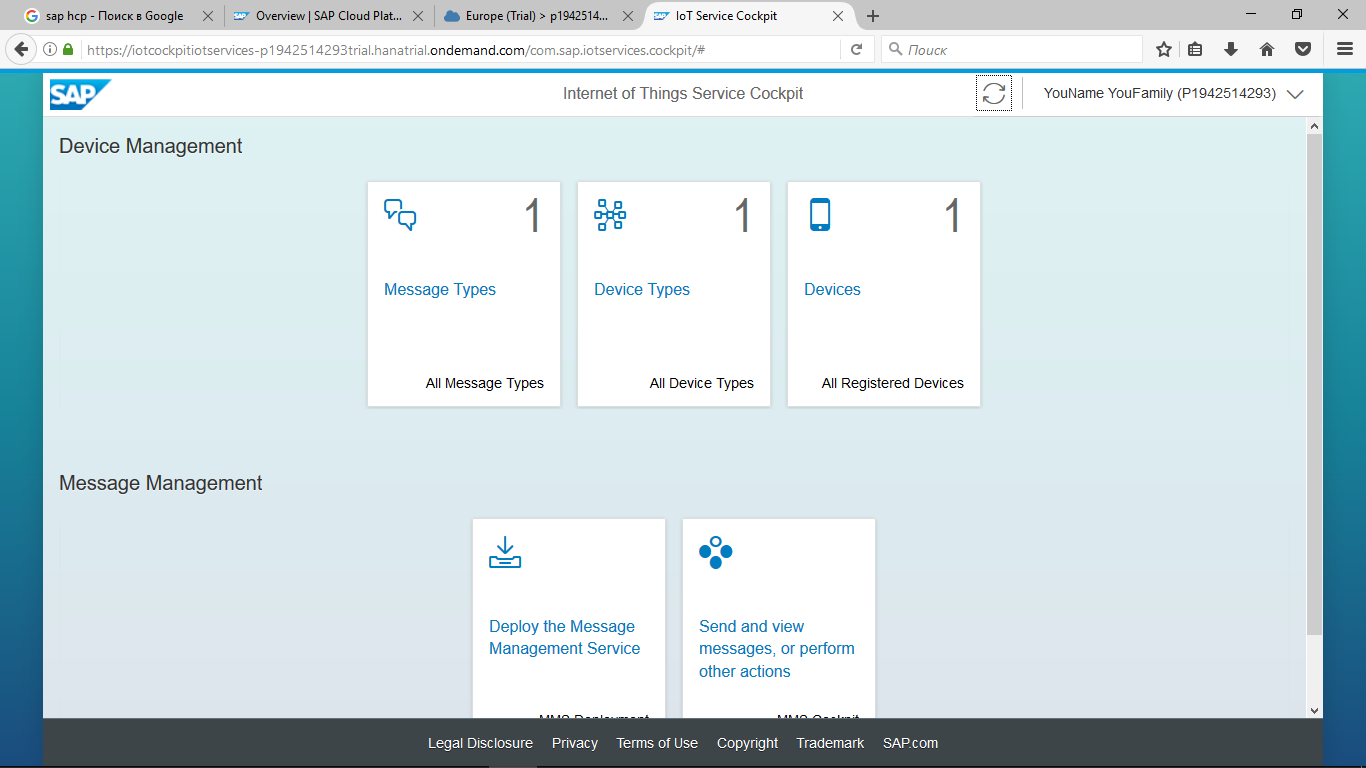
You will see a control panel for connecting external devices and sensors.

As you can see, the number 0 in all sections tells us that no devices have been connected to the service yet. What do the sections mean?
Device Types - device types. This is a general description of the class of devices. For example, “Weather Station” or “Paint Line Control Device”.
Message Type - types of messages or data that can be sent or received by the device. For example, "Weather Data". At the same time, the “Weather Data” type can transmit temperature, humidity, precipitation, atmospheric pressure, and so on.
Devices - a specific device with a specific number that we will connect. For example, "Weather Station №1 VDNH", "Weather Station №2 Vorobyevy Gory".
Deploy Message - Start button, when pressed, the service will be automatically configured and work will be activated.
Send and view messages is a section with which you can test the operation of the IoT service. We will simulate the work of the sensors (even if we don’t have them), transmit the message in the correct format and see the already transmitted data in a table.
Let's configure our device. Select the Message Type section and in the lower left corner of the form that appears click "plus".

Create a TempLightHumidity message type for an Arduino device type with two-way Bidirectional data transfer. Remove the timestamp field, which is displayed by default, and create four custom fields:
Temperature Integer Light Integer Humidity Integer 
Click the Create button. Now we have created four fields in which we will be able to transmit information from sensors about temperature, humidity, and level of illumination.
We return to the main screen. We need to create a type of device that will collect data. Click Device Type and create an Arduino type with a binding to the message type TempLightHumidity.

The final step is to create a device instance in the Devices section.

Fill in the device name - ArduinoForTraining and specify the data that it will transmit - Arduino.
After saving the device, the system will display important information - Token, which will later be required for the device to be able to log in to the SAP Cloud Platform system. Write it down.

If you forget to write token, you can later generate a new one by clicking on the Generate Token button.
In addition to Token, we will need two more parameters: ID Message Type and ID of the device instance. The first parameter can be found on the “Information” tab in the message type.

The second parameter is on the device instance page.

In my case, the following parameters were obtained:
ID Message Type = 3531068190e9d68c4a0a ID = 8a61bdd3-c50b-4585-a3f4-dba7f05af22e Token = e0b0dc97cc4913311a17cfcdb3f9321e Now all settings are made.
You can activate the activation of the service settings by going to the Deploy Message item.
Enter your data and password to the SAP Cloud Platform system and click the Deploy button.

If everything is configured correctly, you will receive a message about successful activation.

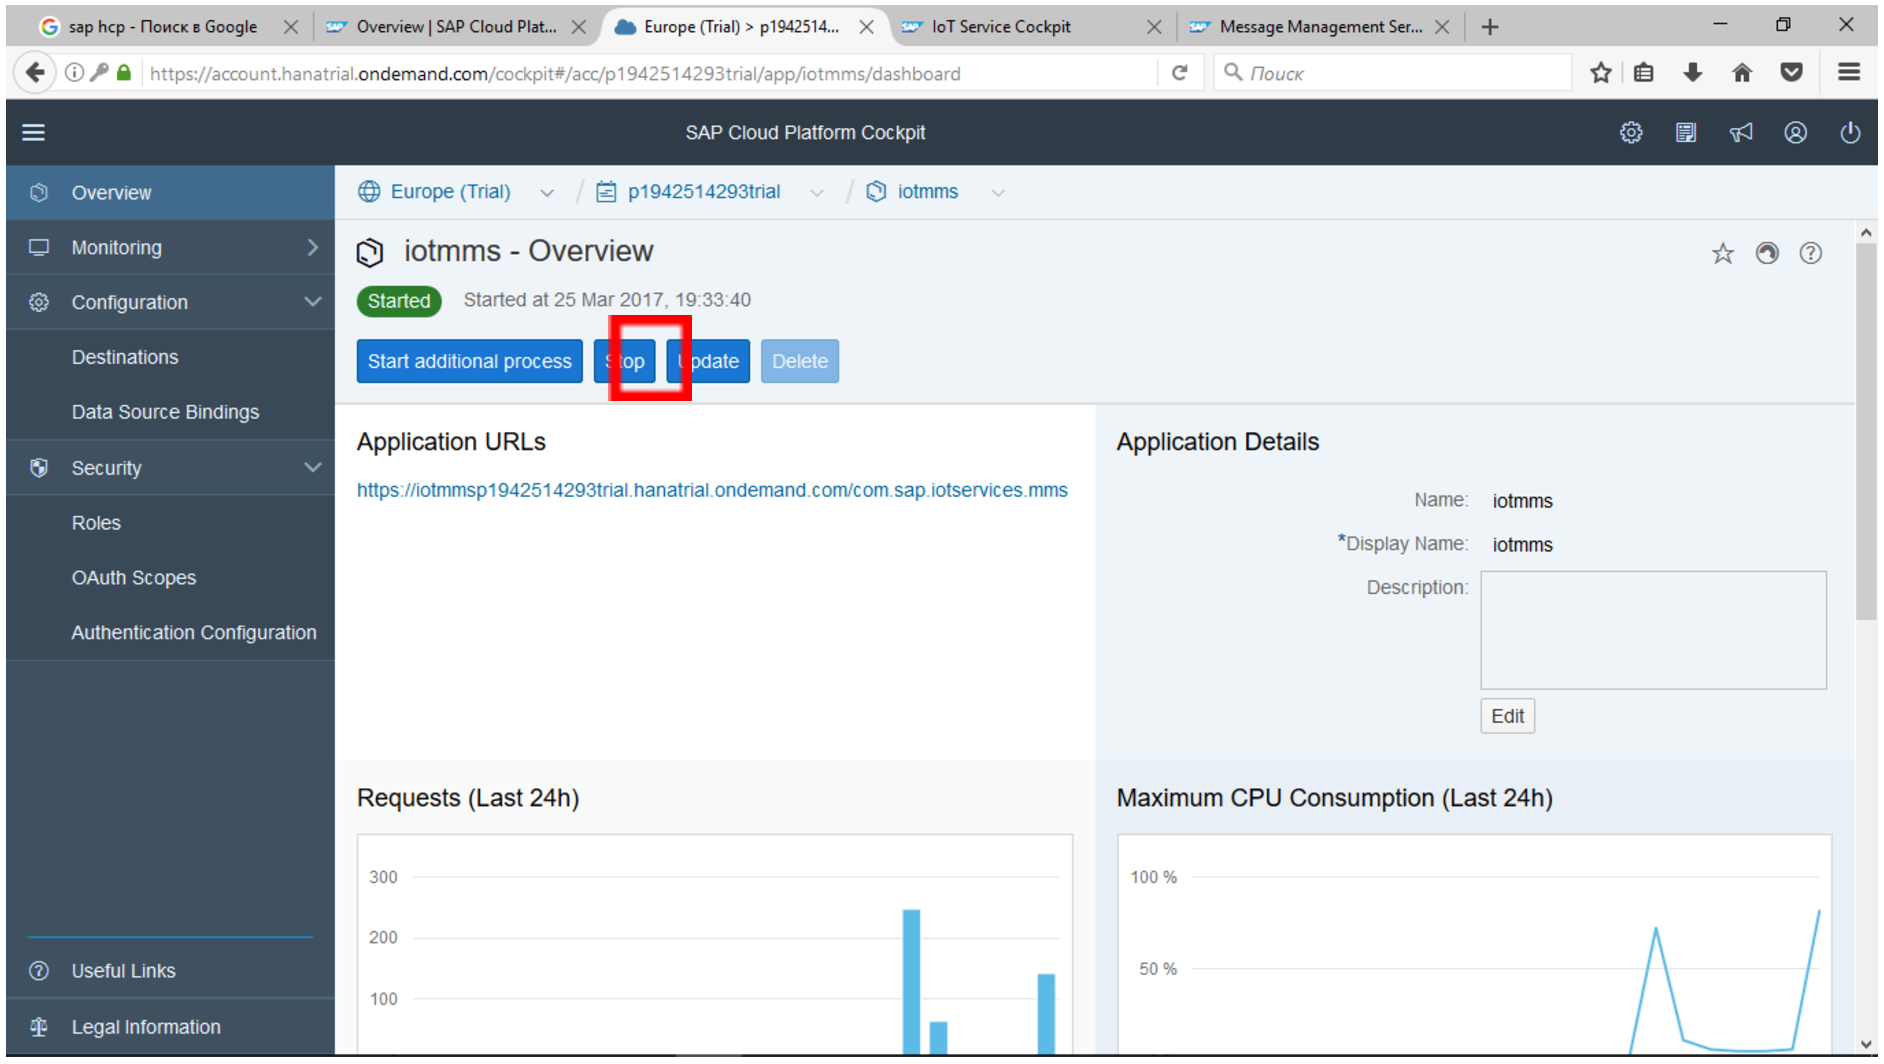
Let's return to the SAP Cloud Platform control panel and go to the Java Application section. There you will see the new iotmms app.
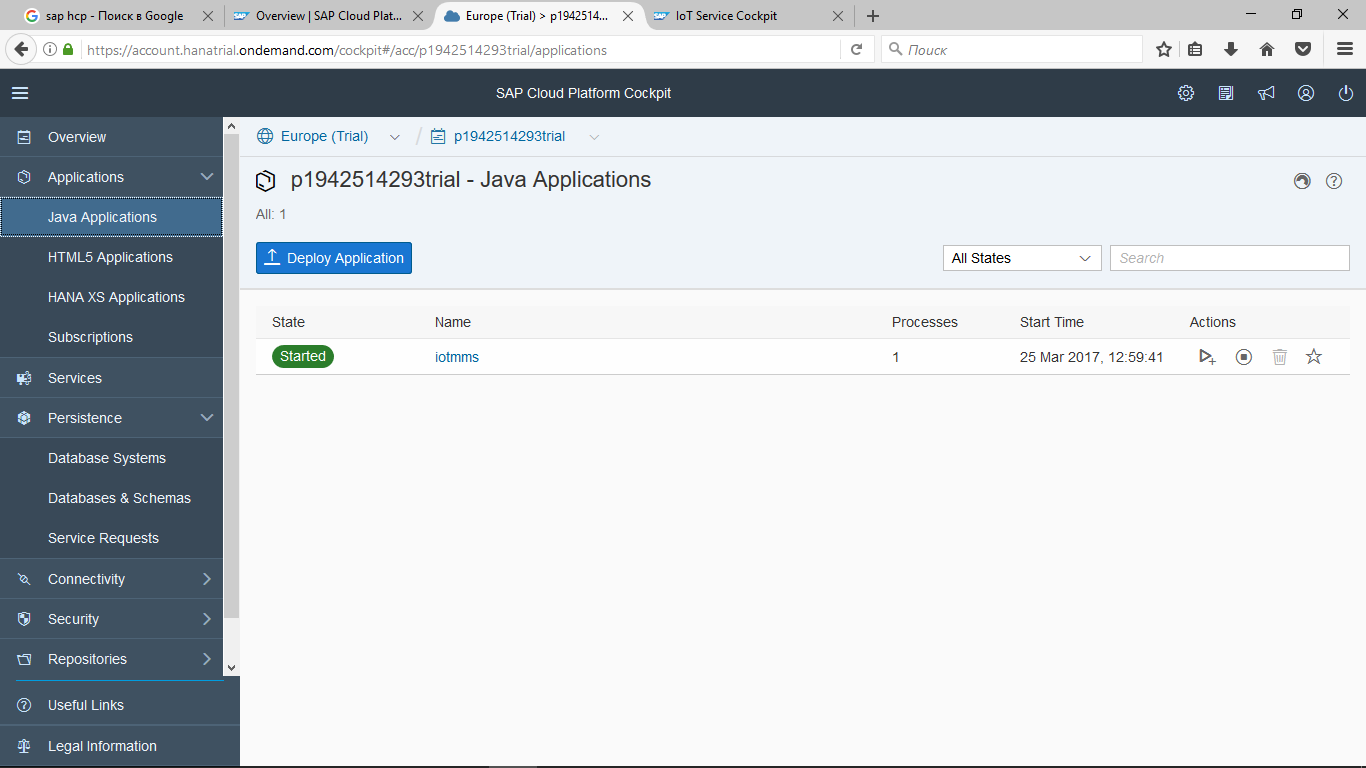
This is a special application that is automatically created by the system for collecting data from sensors on the settings that you just asked. While the status of the application is “yellow” - it takes a little time to launch it. After 1-2 minutes, the application starts completely, which is signaled in green in the State column.
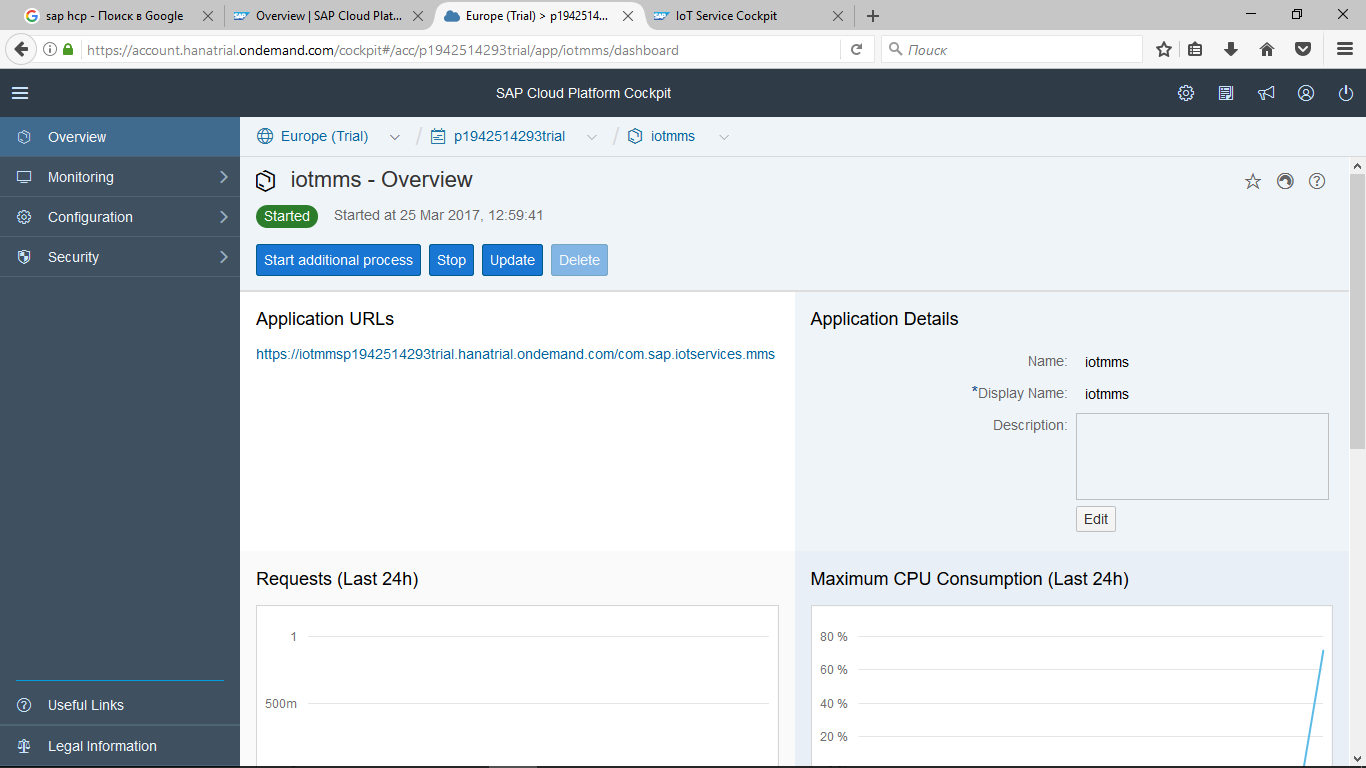
You can enter the application and see how it can be controlled: stop, set permissions, check its operation and test performance. Most of the settings in our example is not required. We will execute only one - we will tie service to our database. By default, the application writes all the data in its own database schema.
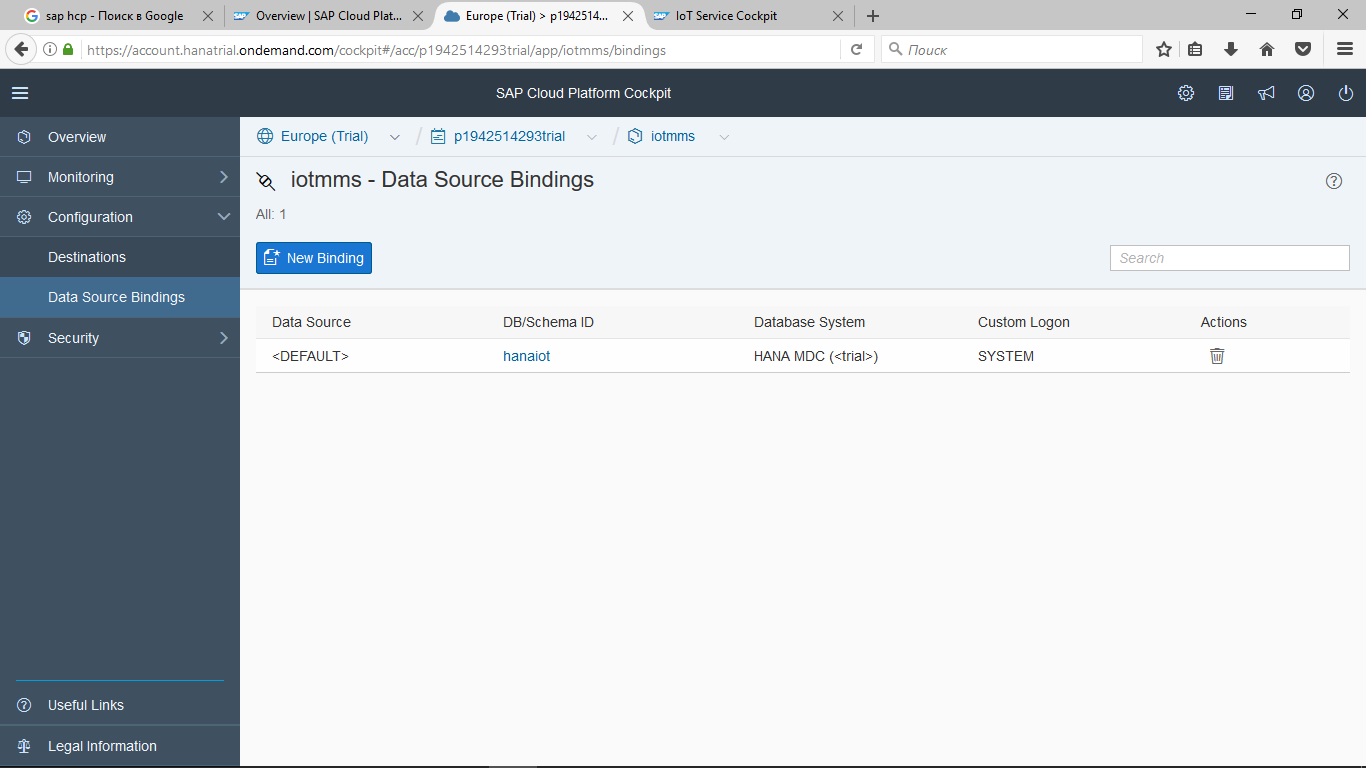
Go to the section Configuration → Data Source Binding in the left toolbar. Delete the default data binding by clicking the Delete button.

Click the New Binding button. The system itself will offer to bind the service to our database. You only need to enter the data to connect: login - SYSTEM (or the name of your user, if you made it earlier) and password. Next, save the entered parameters by clicking the Save button.

The default schema has been replaced with our own.
Another important setting is the issuance of access rights to the IoT application. We need to allow our user to work with the created iotmms program. Go to the tab Security → Roles.
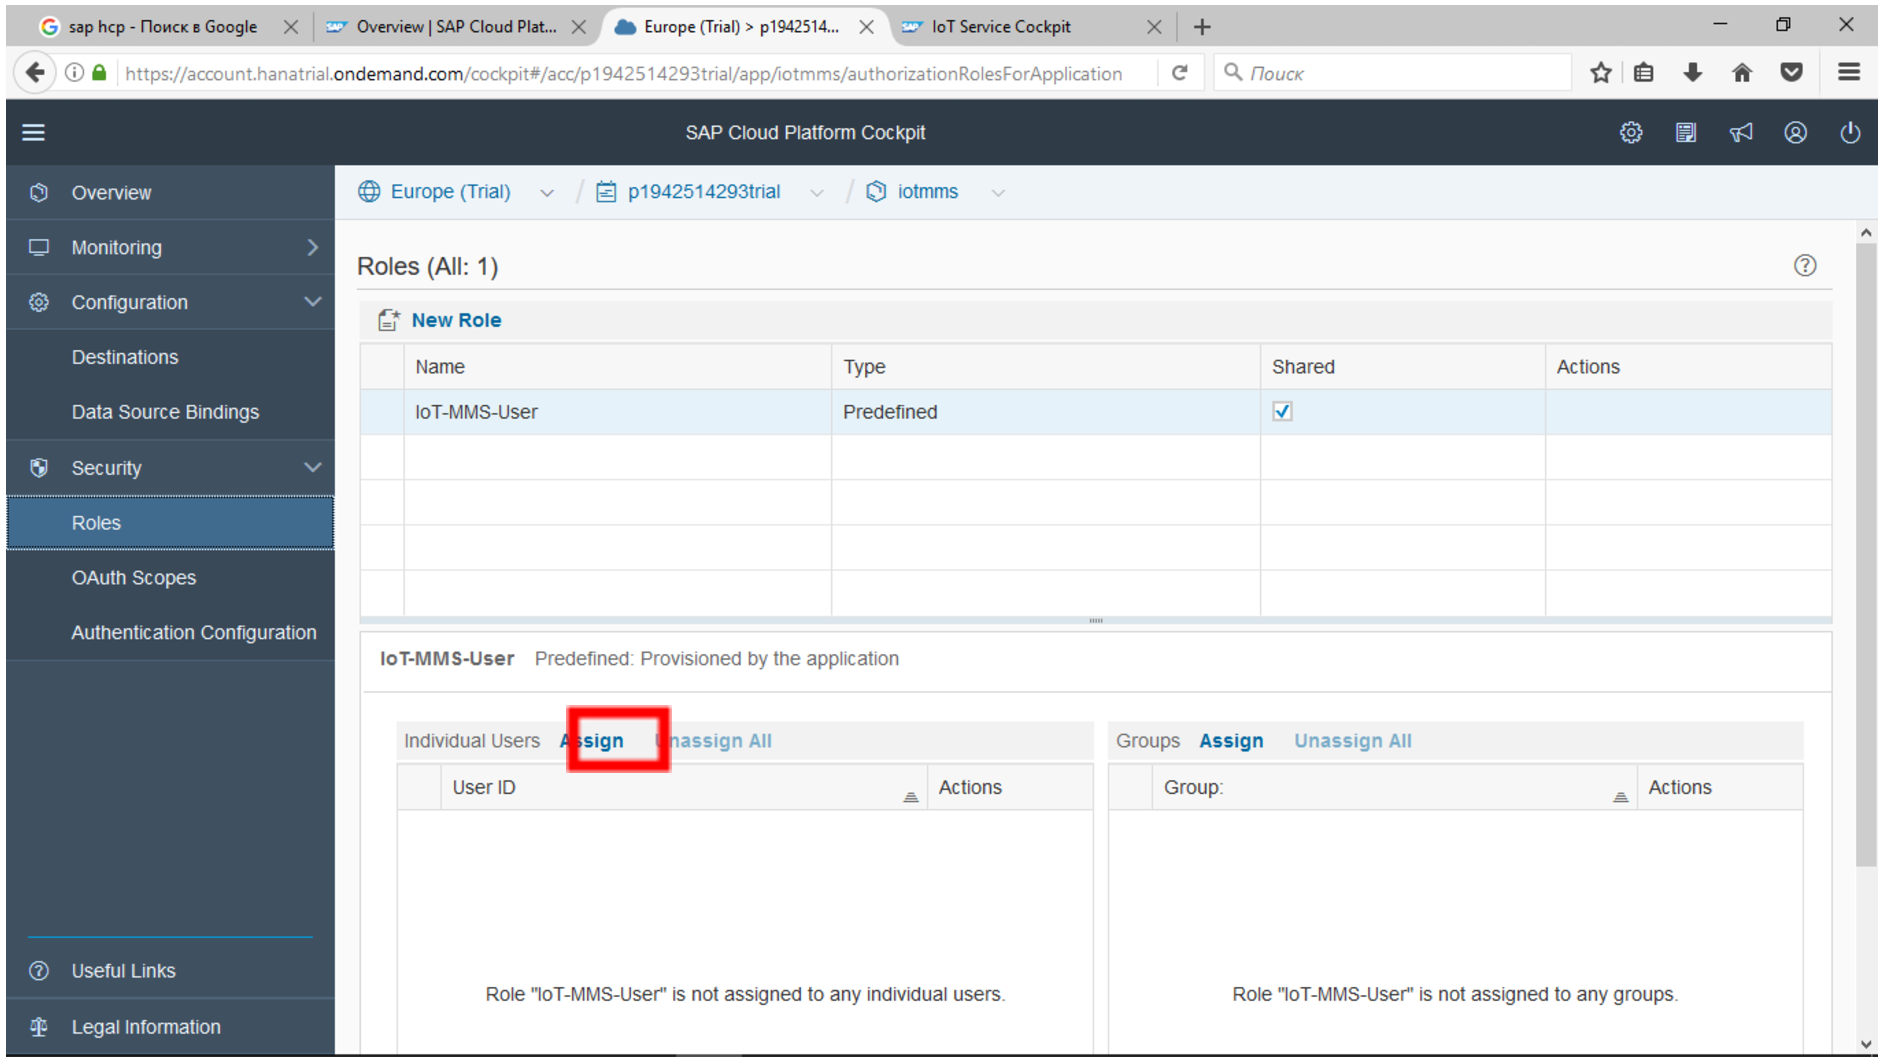
It is seen that there is already a role that allows you to work with this program - IoT-MMS_User. It must be added to our user. Click the Assign button in the lower left table and enter the User ID.

The username can be found in the Account section in the SAP Cloud Platform setup or in the address bar of the browser.

In order for all our settings to take effect and to work with binding to a new database, you need to restart the iotmms service. To do this, go to the iotmms settings and click "Stop", and after - "Start". New settings will take effect, and the data will be recorded in our database.
We return to the Services section. Here you need to select the Internet of Things service and run the go to Service setting. We will check his work.

Step 4. We test the IoT service and transfer the test message to the SAP Cloud Platform
Go to the Send Message section.

Here we can see the messages sent from the device or test the transfer.

Go to the section Display stored message.

Here you will see two technical tables, according to which you can always find out the status of the connected devices: whether it is working or not, when the data was last transmitted, and much more. You can see what data is stored in these tables by simply clicking on them.

But the table with our data on temperature, humidity, light level yet. It will be created automatically as soon as the first data is transferred from the sensor to the SAP Cloud Platform platform.
Let's try to send the first message from the device. For now, we will test the service operation without physically connecting the microcontroller. The message will be transmitted in the form of an HTTP request, which we will form in the control panel. But first, recall the previously saved parameters:
ID Message Type = 3531068190e9d68c4a0a ID = 8a61bdd3-c50b-4585-a3f4-dba7f05af22e Token = e0b0dc97cc4913311a17cfcdb3f9321e Go to the section Send and receive massage through HTTP.

There is a special tool for emulating the transmission of messages from sensors.

It is an ordinary Rest API client to form an HTTP request to a remote service. You can also use any other convenient tool. I will show the variant with Google Chrome extension later.
We add the correct identifiers of our devices and slightly change the format of the transmitted message, according to our settings.

In the HTTP endpoint section, you need to replace the device call with our own (previously saved) device instance ID. So the system will be able to understand that the signal comes exactly from the sensor with the desired number.
iotmms p1942514293 trial.hanatrial.ondemand.com/com.sap.iotservices.mms/v1/api/http/data/ 8a61bdd3-c50b-4585-a3f4-dba7f05af22e
In the Message to Post section, you need to insert our Message ID and add fields:
{"Mode": "sync", "messageType": " 3531068190e9d68c4a0a ", "messages": [{"Temperature": 17, "Light": 23, "Humidity": 65}]}
The red font indicates the parameters - the message ID and the device instance ID. We will not need token yet. Since this is an internal testing tool, the system ignores security settings. But if we try to do this from a third-party application, the system will not allow entering without a token, i.e. without password.
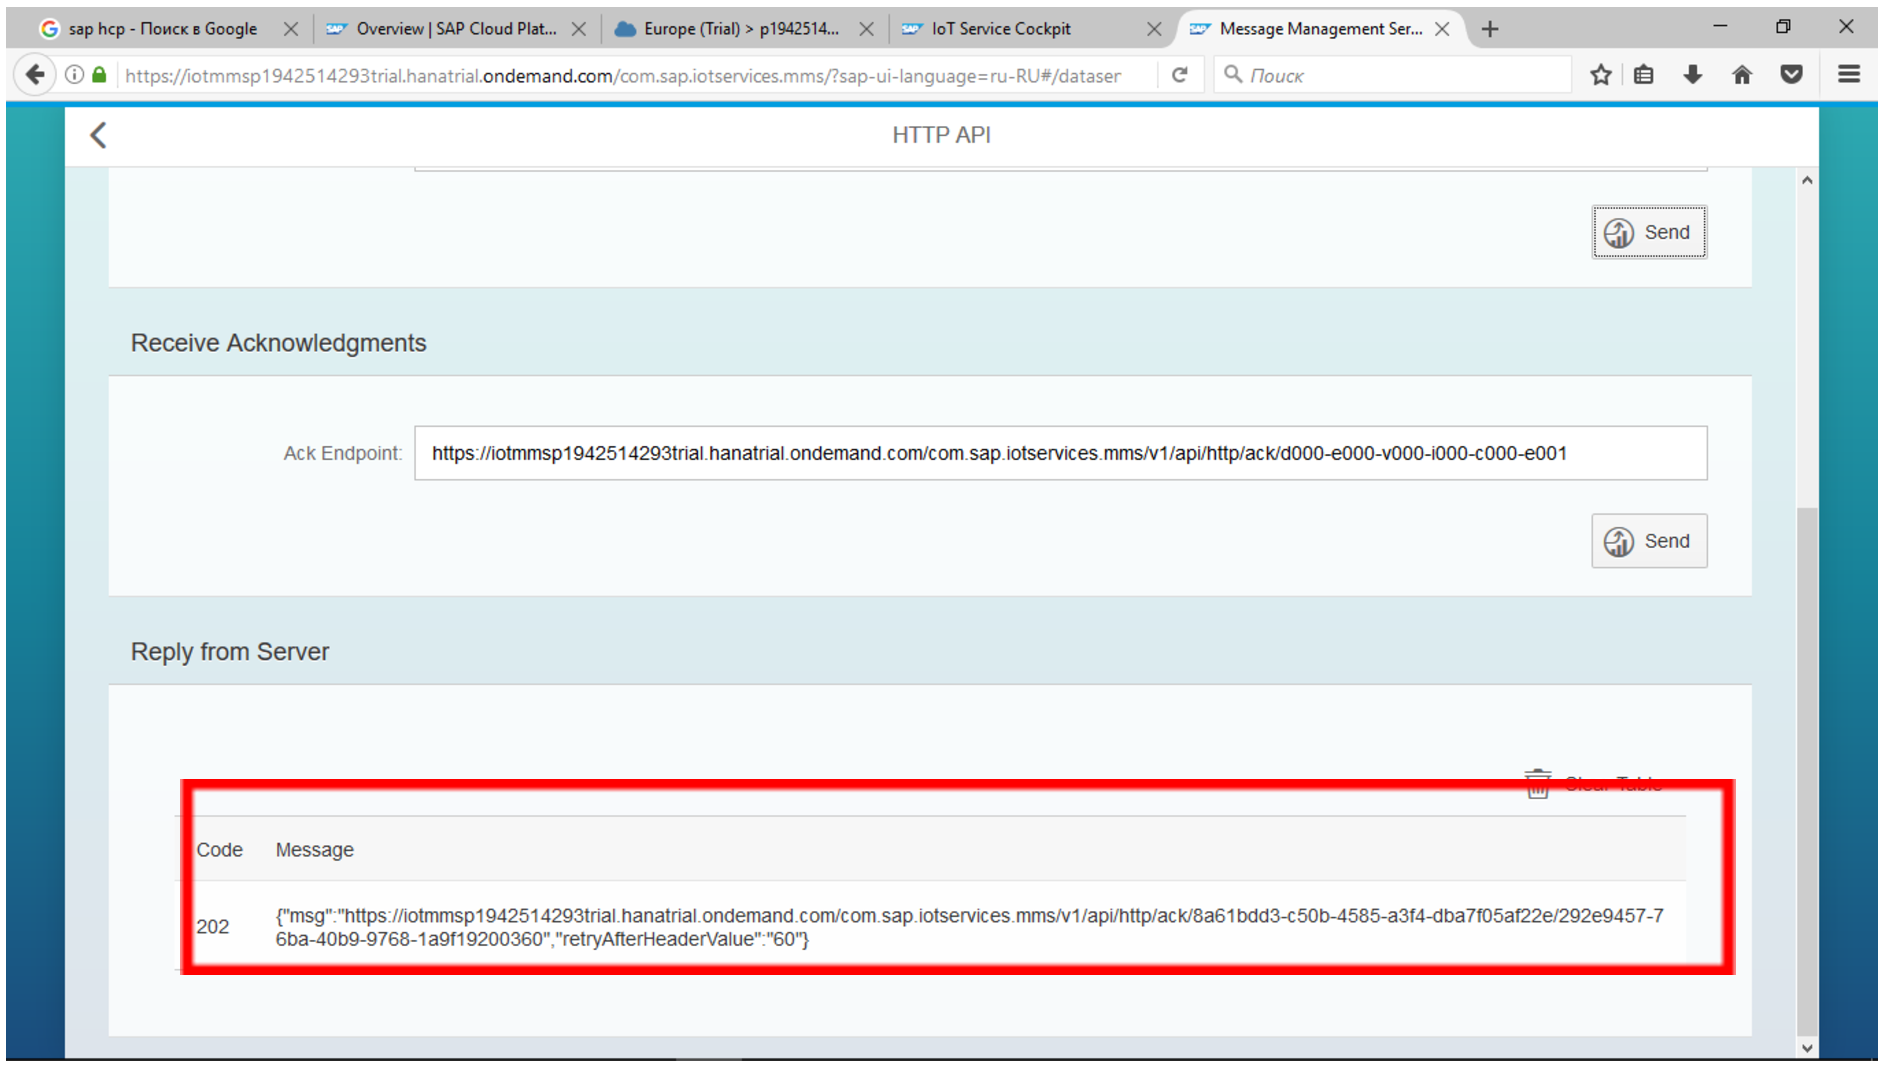
Now everything is ready and you can click Post. Your first message has been sent to the SAP Cloud Platform! You can check this in the Reply from Service section. If something is wrong, the error code that the remote IoT service returned is indicated here. By code, you can understand what happened.
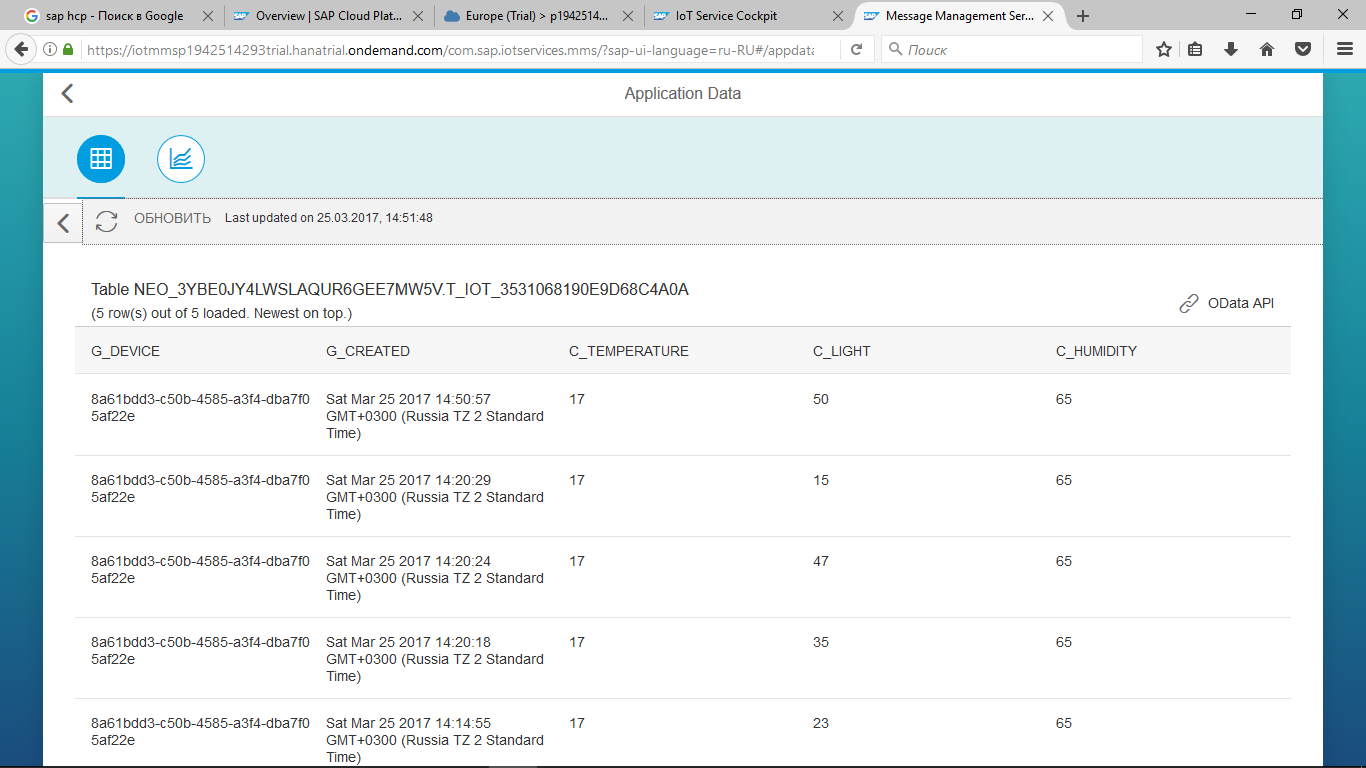
Now go back to the Send and view message section and select Display Stored Messages.

Here you will see two more tables that were created automatically as soon as we transferred the data to the system.

Look at the contents of the table and make sure that this is exactly the data that you passed to the test.

Try changing the test data for temperature or light level and transfer the data again. In our example, we changed the parameter of the light level several times.

Going to the table, we see that the IoT service is ready to receive data from sensors.

All your entries have been saved automatically. And by choosing the icon for displaying data in graphical form and your data type + instance, you will see them as a graph.

Step 5. We test the IoT service using the Advanced Rest Client extension in Google Chrome browser
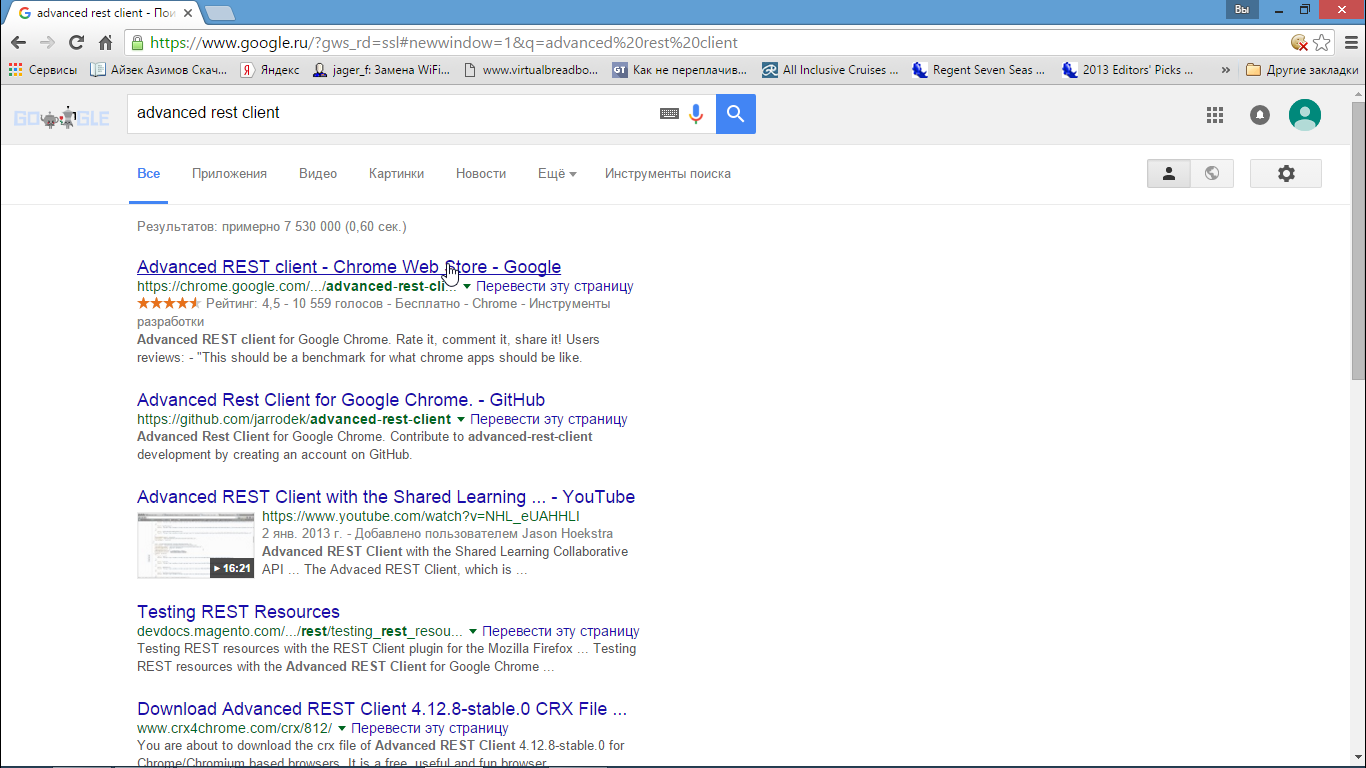
And now let's test our service taking into account all security requirements. To do this, we need a Google Chrome browser. Install the browser. Run it. In the search bar, enter the advanced rest client.
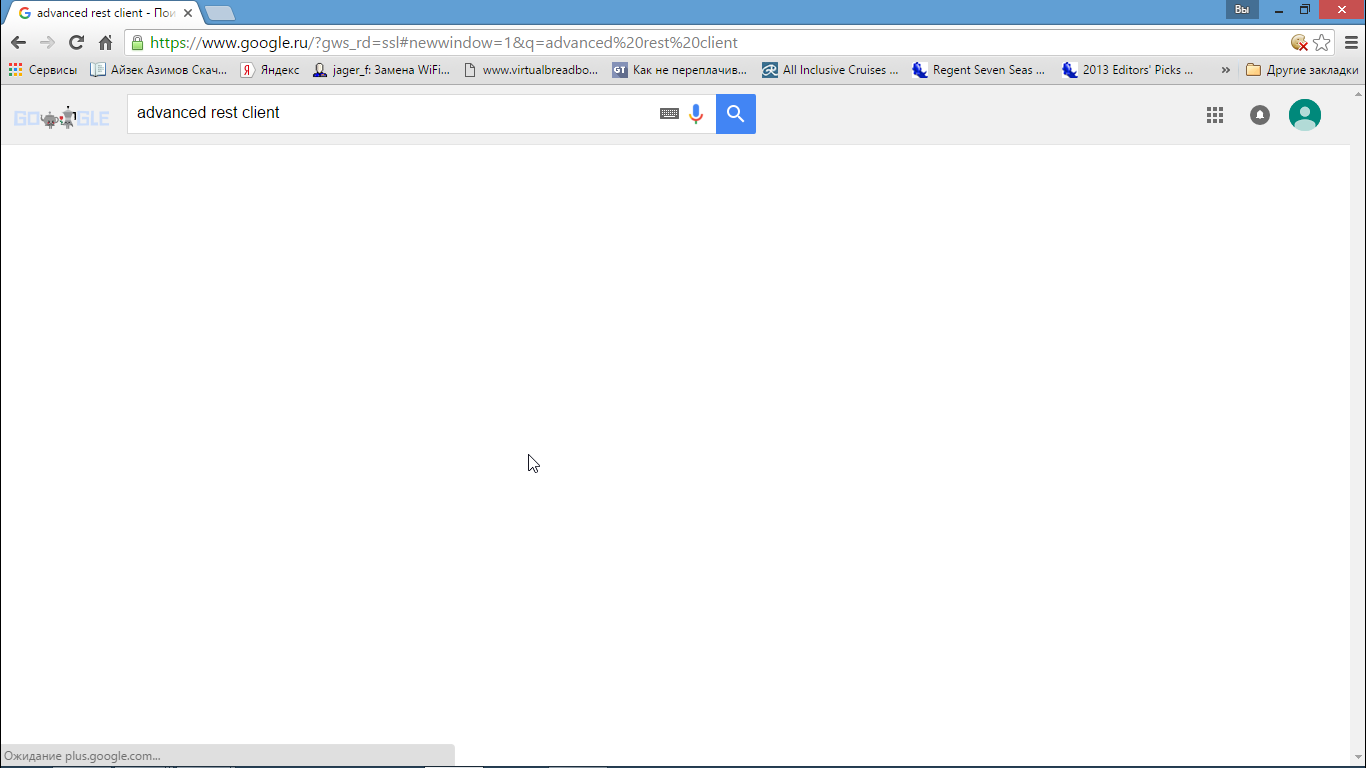
This is a special Google Chrome browser extension that is intended for developers. It helps to test HTTP requests without the need to develop your own programs.
Install the application (the first link in the search results) by clicking the Add to Chrome button.

And run by clicking ARC in the list of services.
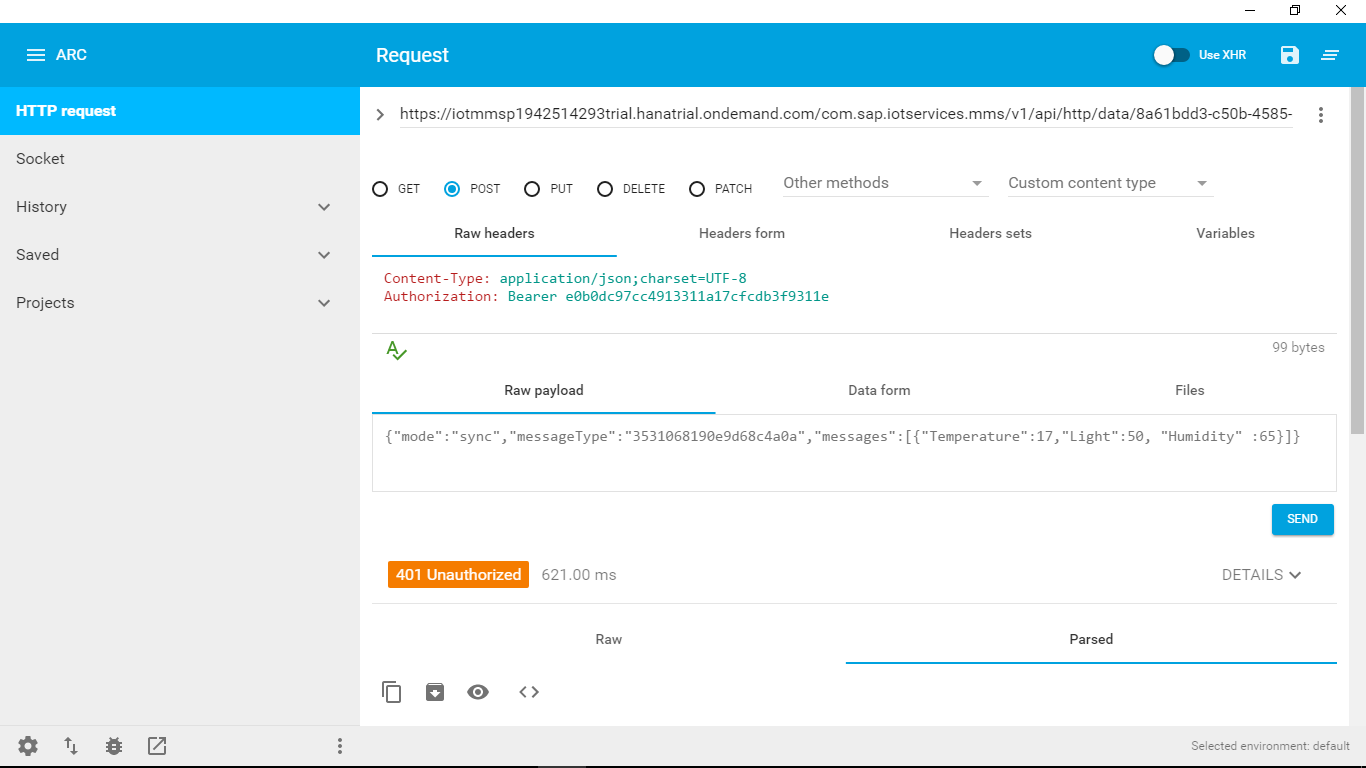
You need to construct a call to the POST method, specifying the necessary parameters, as you already did, testing the service using the SAP Cloud Platform. The only difference is that you need to take care of the transfer of the secret code token in the header of the POST request.
In the URL header, enter the same string with the device ID:
iotmms p1942514293 trial.hanatrial.ondemand.com/com.sap.iotservices.mms/v1/api/http/data/ 8a61bdd3-c50b-4585-a3f4-dba7f05af22e
In the message body, pass the value of the parameters:
{"Mode": "sync", "messageType": " 3531068190e9d68c4a0a ", "messages": [{"Temperature": 17, "Light": 23, "Humidity": 65}]}
We did not fill the Headers header, and it should be in the specified format:
Content-Type: application / json; charset = UTF-8
Authorization: Bearer e0b0dc97cc4913311a17cfcdb3f9321e
Where the red text indicates the parameters that need to be changed (including the token) to those that we recorded earlier. The result should be the following picture:

By clicking Send, you will see the response from the server and you can see the transferred record.
Try an experiment. Remove the line
Authorization: Bearer 58536ee037cf158db4992d5538b8d5b0
The server does not pass such a request, it responds with an authorization error 401. Thus, we are afraid of connecting unauthorized devices.
This is just one example of how the SAP Cloud Platform security system works. In industrial programs, security is taken even more seriously and various methods are used (not only authorization using token) to protect programs and industrial systems.
Alternative: configure IoT service operation using MQTT protocol
If you have carefully studied the application for testing IoT-service, you might notice another way to work with data - via the MQTT protocol.
MQTT (Message Queuing Telemetry Transport) is a simple, open protocol designed specifically for IoT and used to exchange data between devices. An MQTT network includes an MQTT broker that mediates the interaction of MQTT agents — publishers and subscribers. Publishers publish information intended for subscribers.

Broker, publisher and subscriber in the MQTT network
MQTT is designed for low-power embedded devices, so the computational requirements for its implementation are minimal. The protocol is highly efficient even on low bandwidth channels. There is very little overhead information in the structure of the data transmitted with its help. According to measurements made in 3G networks, the bandwidth of MQTT is 93 times higher than the REST (Representational State Transfer) protocol that runs over HTTP.
MQTT uses a limited set of commands, they all boil down to interacting with a broker and working with themes and messages. Agents connect to the broker, and then either publish the topics and posts in them, or subscribe to the threads and receive messages in these topics published. Upon completion, agents disconnect from the broker.
You can read more about the principles of operation of the MQTT protocol in various articles on the Internet, including on Habrahabr. For example here .
In order to start working with the MQTT protocol, we need to choose a broker through which we will exchange data between devices and the SAP Cloud Platform platform. There are many free brokers MQTT, you can also set your own broker. In our case, we use the MQTT broker test.mosca.io. This broker is configured on port 1883 and does not require a username or password to operate.
Let's configure our IoT service to work with this MQTT broker.

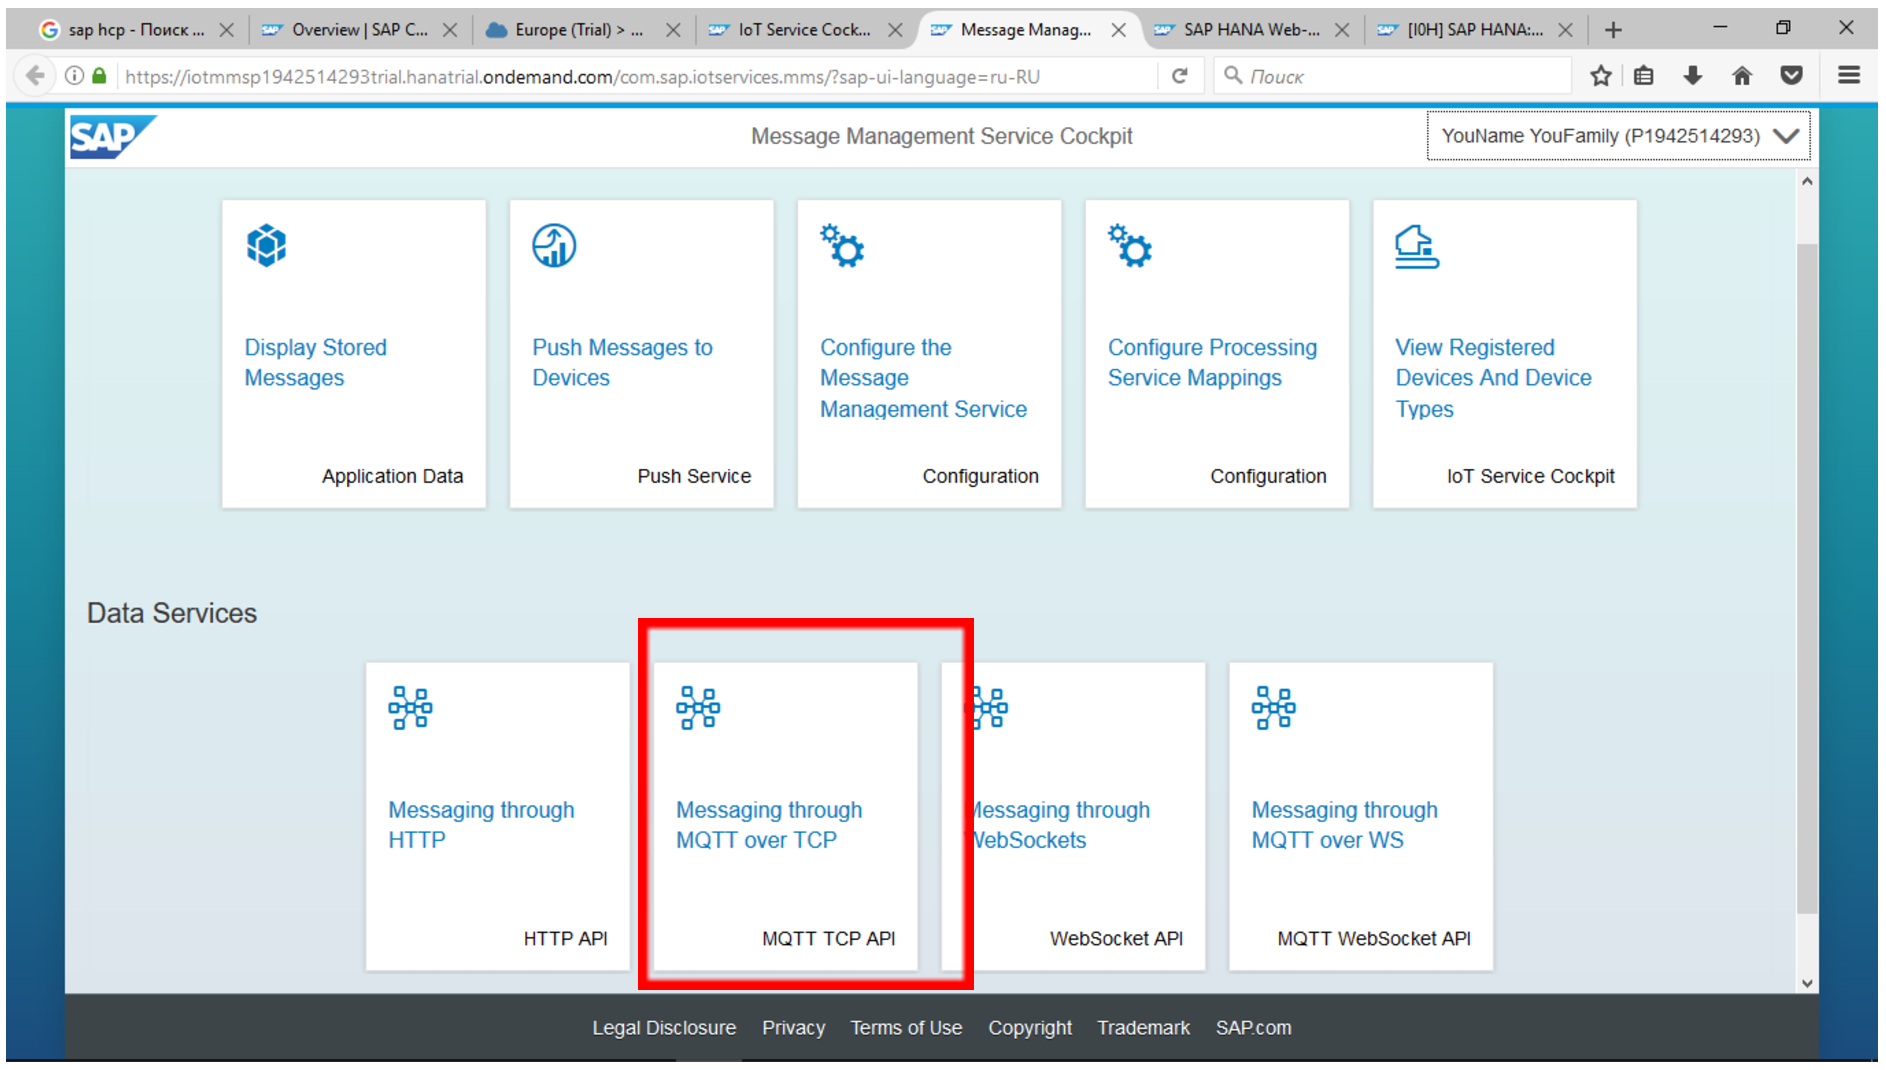
Select Configure the Message Management Service.
In the Data section, enter the settings for your MQTT broker:
tcp://test.mosca.io:1883 
If your MQTT broker uses a username and password for authorization, this data also needs to be entered into the service settings. In our case for the user and password, enter: test \ test
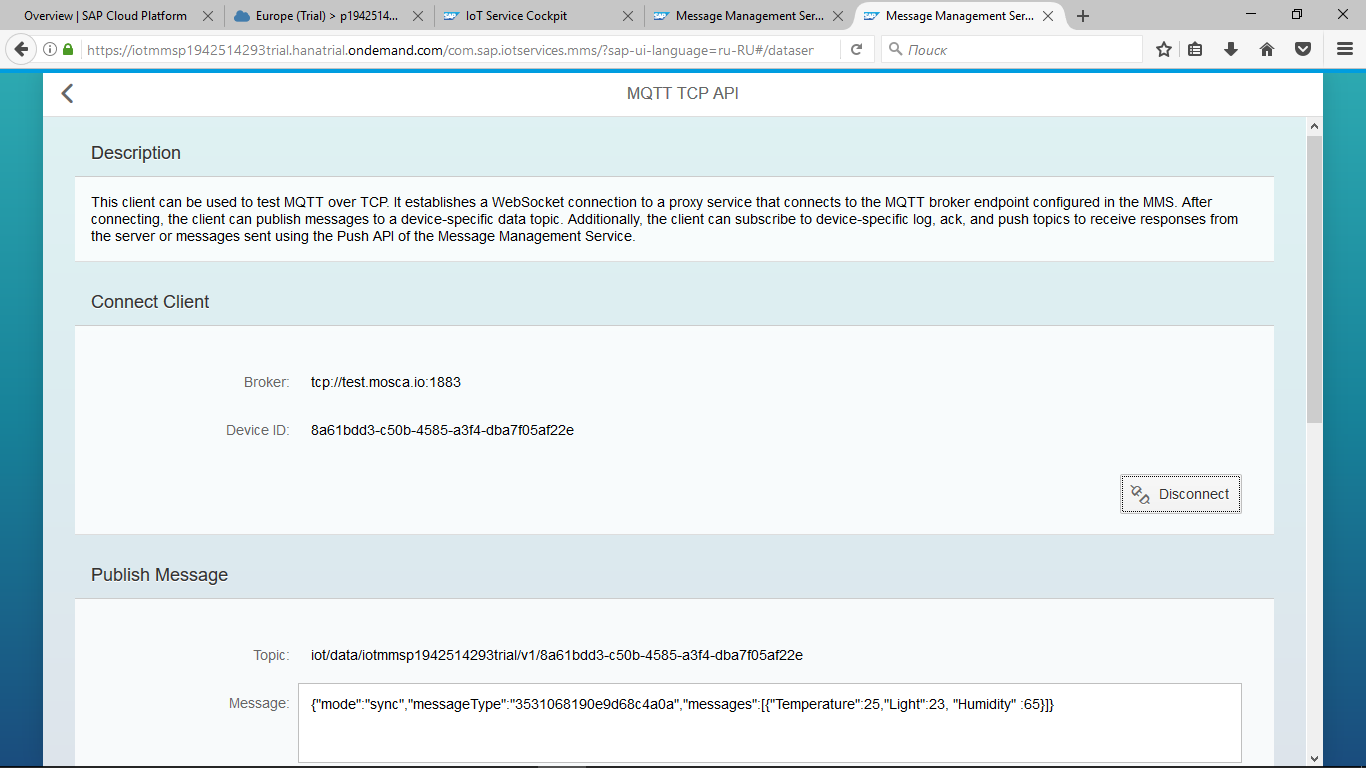
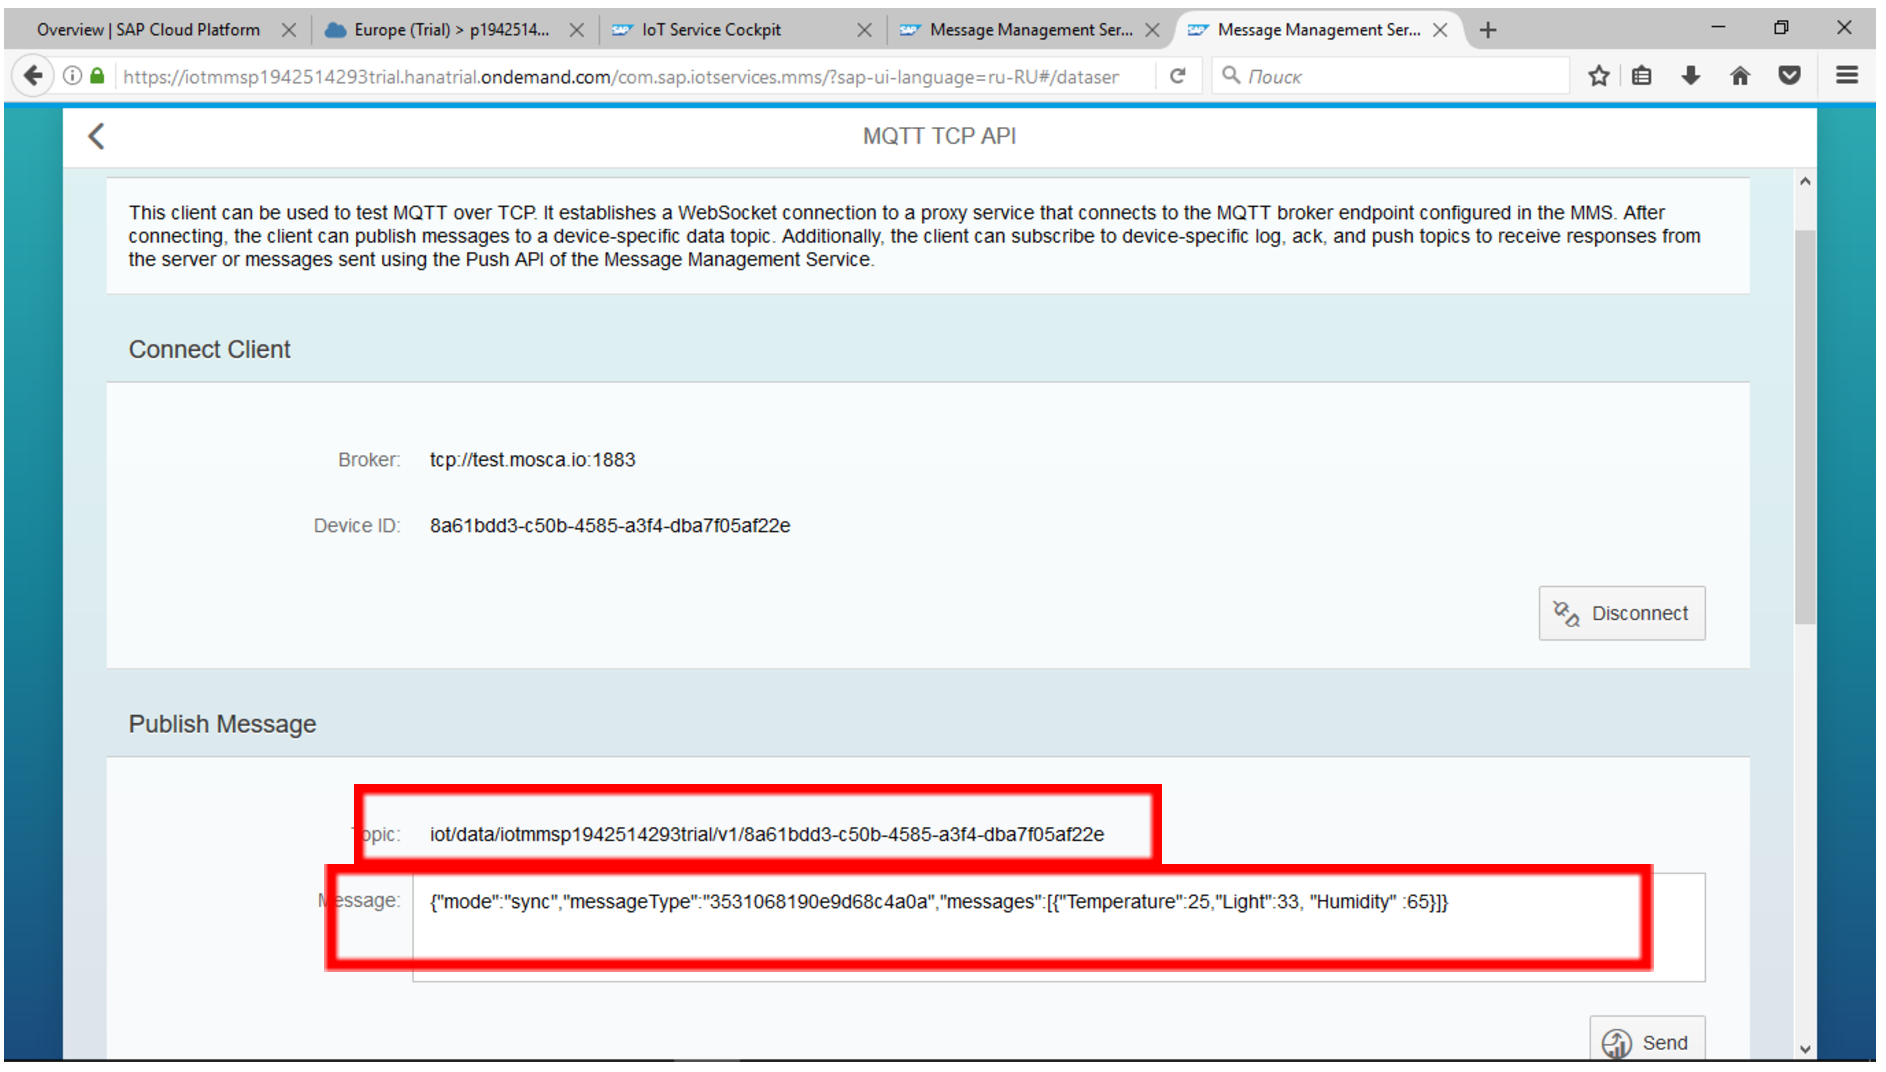
After saving the data, go to the MQTT over TCP Messaging section.


In the Device ID section, enter your data: 8a61bdd3-c50b-4585-a3f4-dba7f05af22e
In the Message field:
{"Mode": "sync", "messageType": " 3531068190e9d68c4a0a ", "messages": [{"Temperature": 25, "Light": 23, "Humidity": 65}]}
And click the "Connect" button to connect to the broker.
Try to send a message by clicking Send on the form.
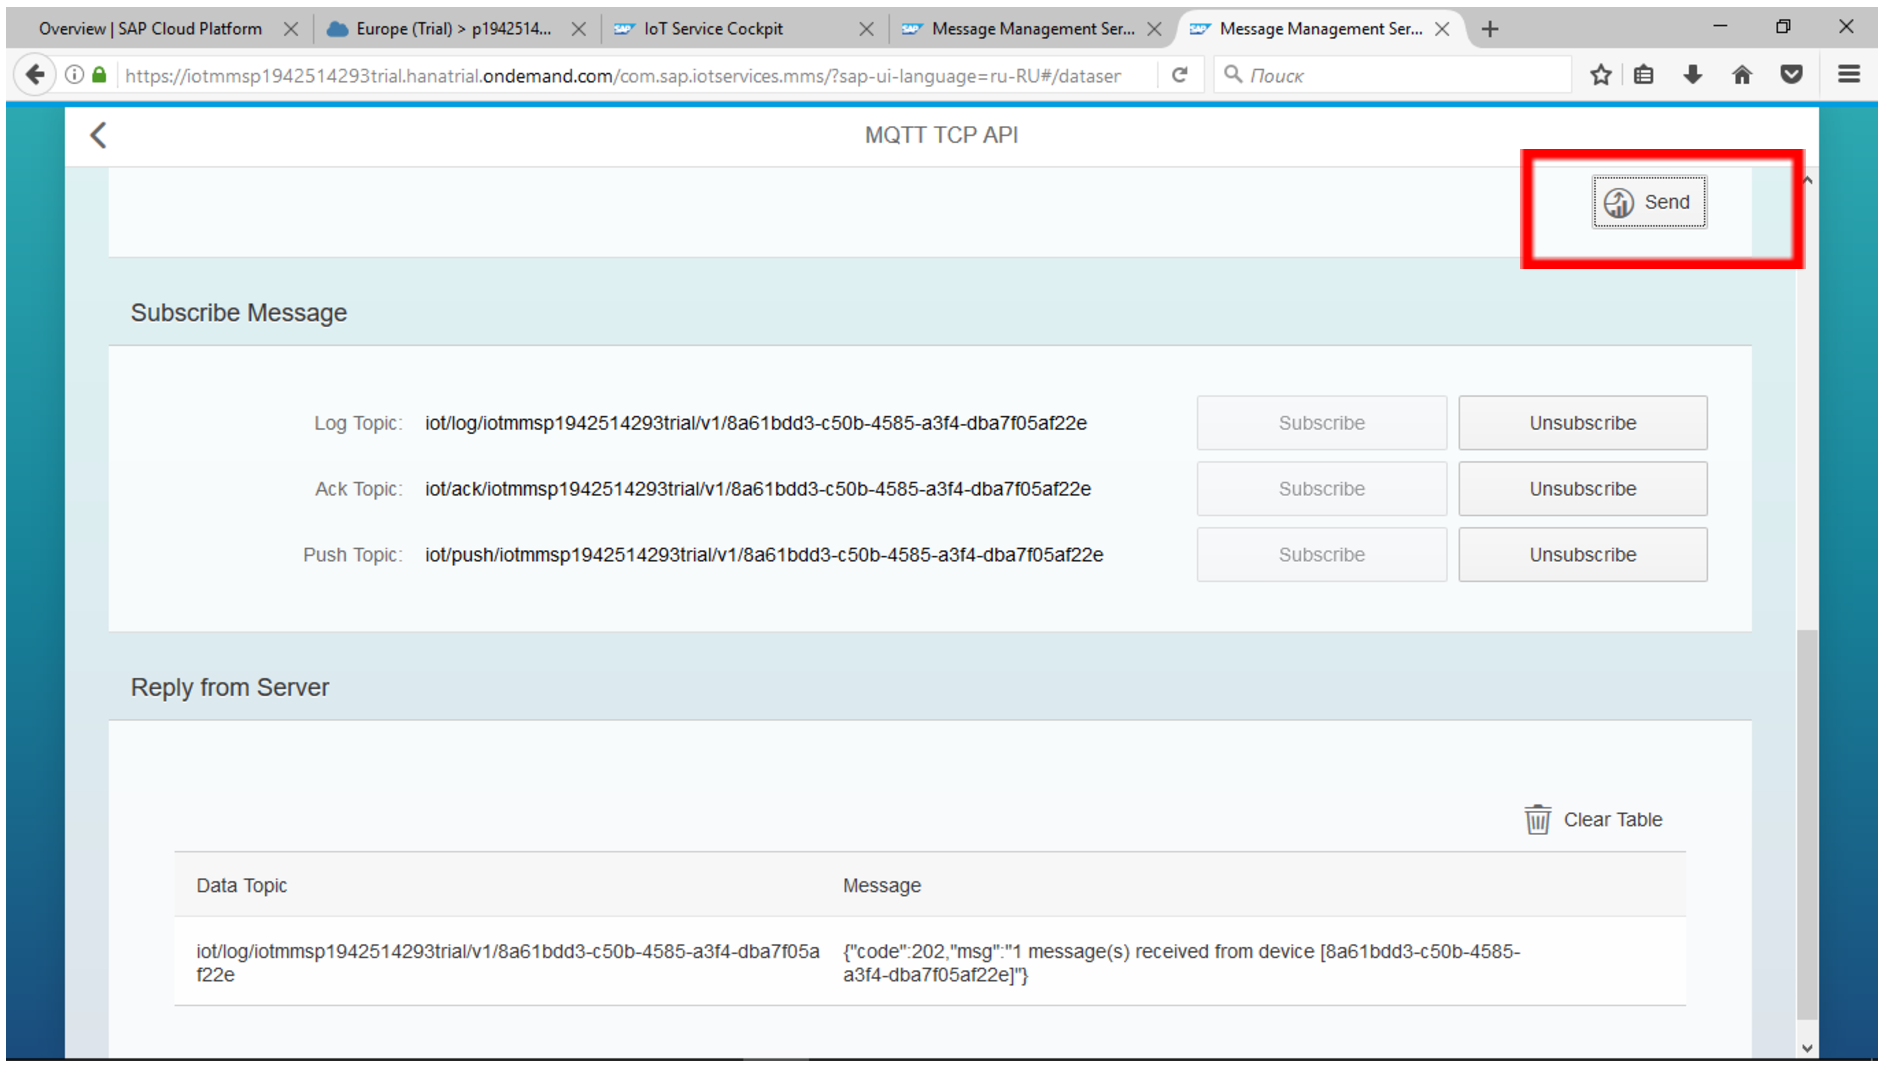
Check that your message has been transferred to the IoT table through an MQTT broker.

You can try to send a message to the SAP Cloud Platform via a third-party MQTT client. For example, through MQTT FX .
Install the program and configure the connection to your MQTT broker.
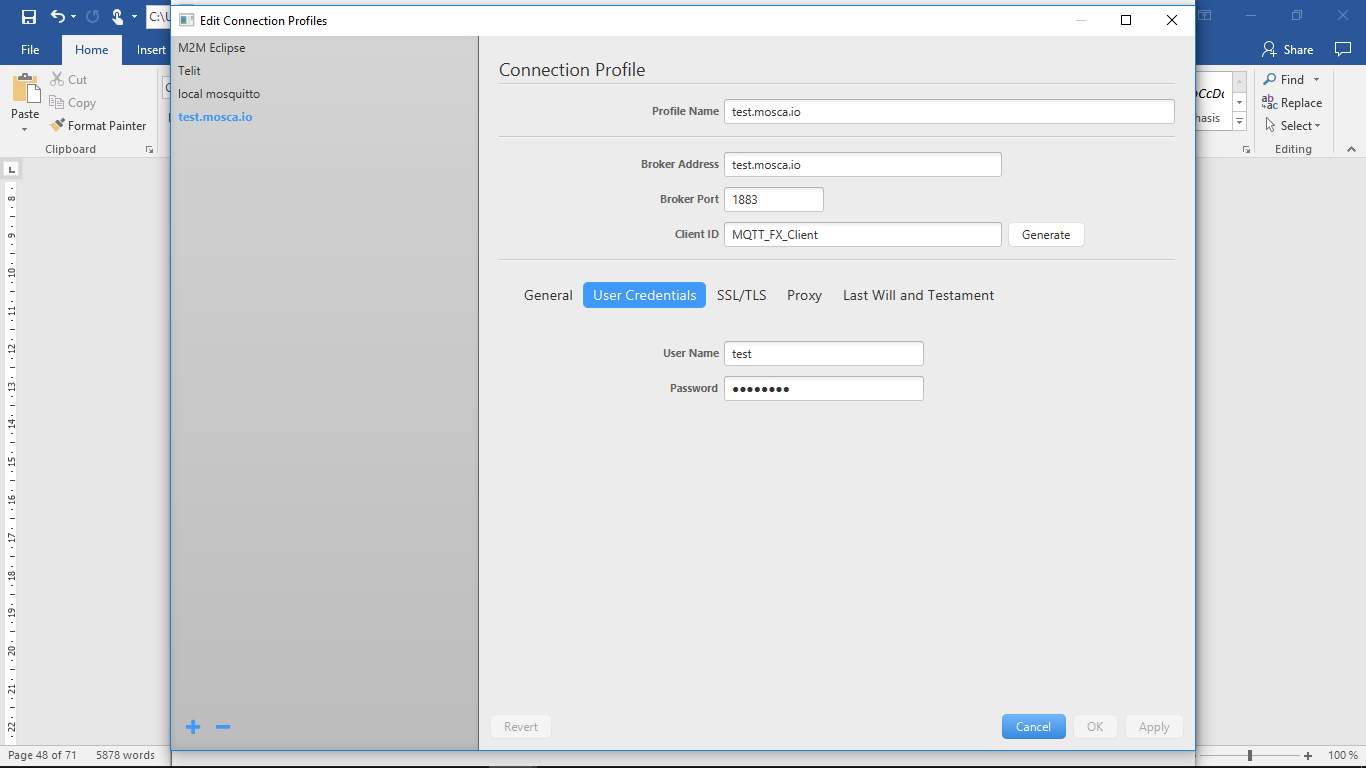
Click Connect and on the Subscribe tab subscribe to the topic that you saw in the configuration of the IoT service:
iot/data/iotmmsp1942514293trial/v1/8a61bdd3-c50b-4585-a3f4-dba7f05af22e 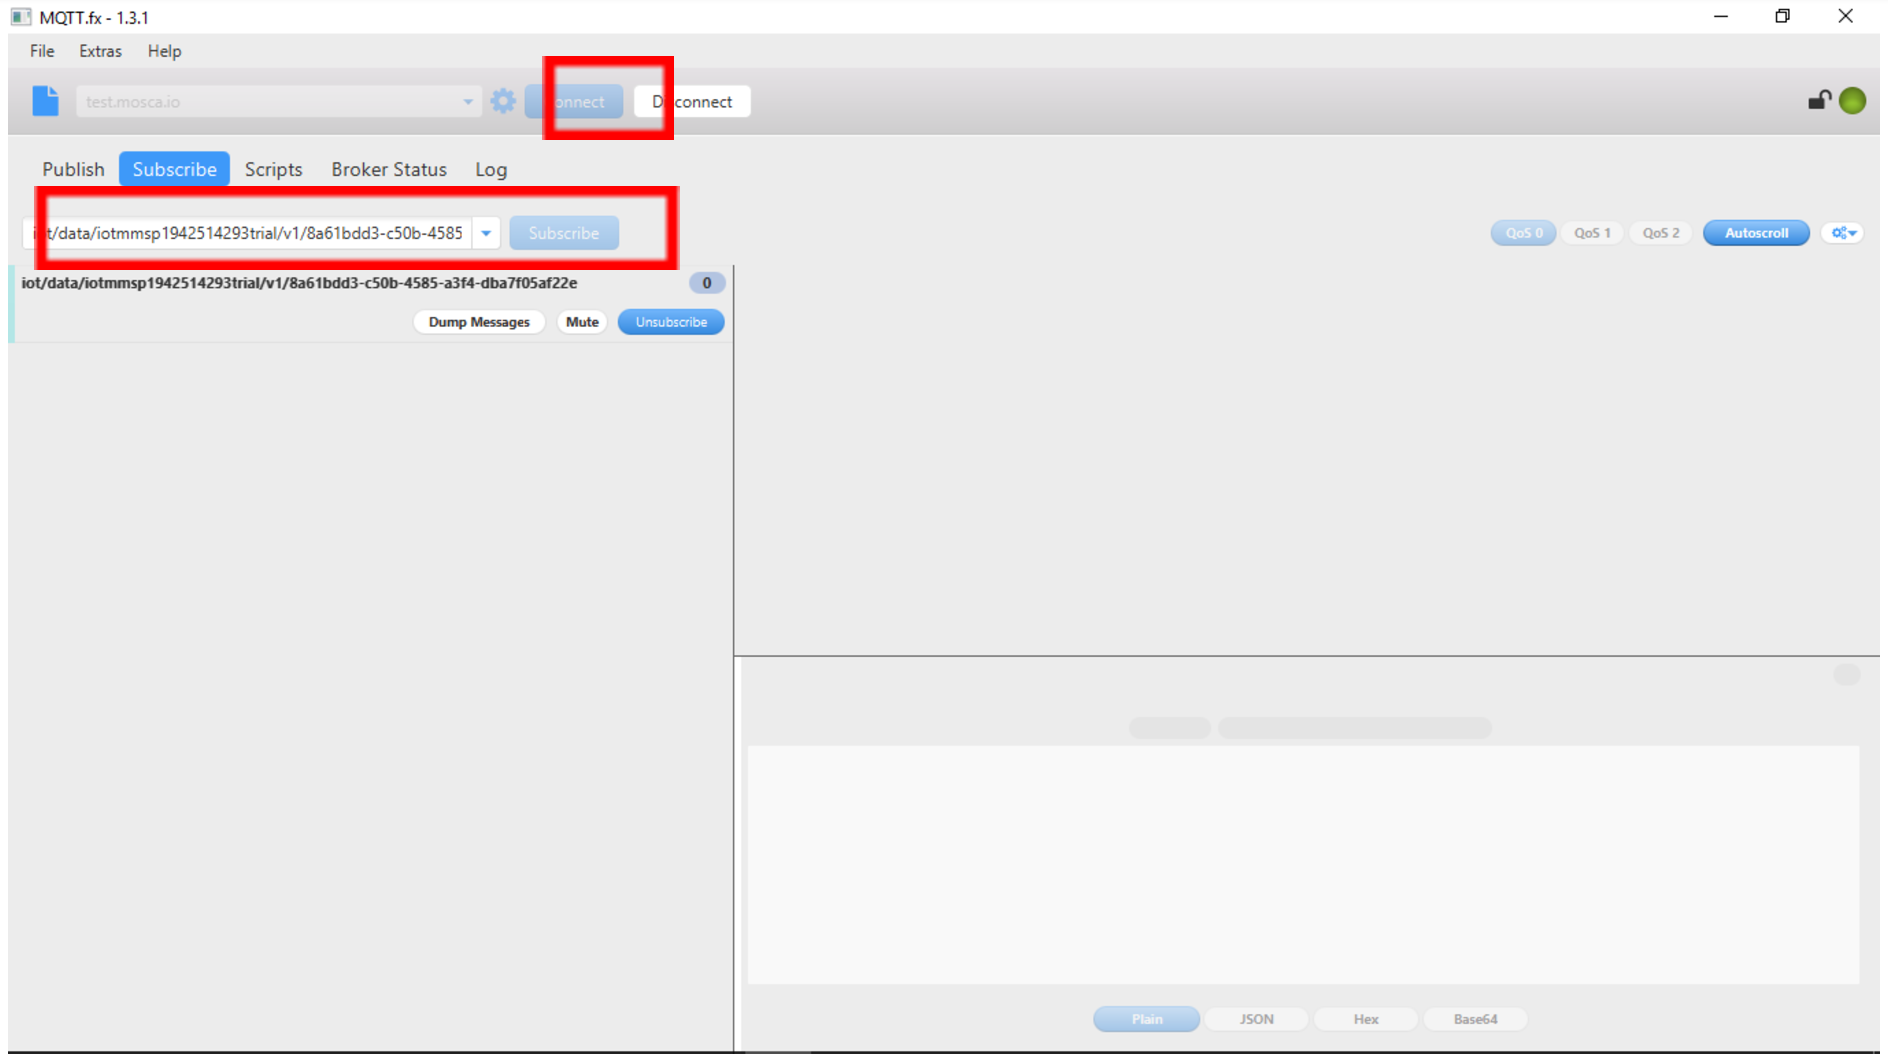
On the Publish tab, you can send messages with the corresponding topic through a broker to the configured IoT service.

Try passing multiple values and verify that data reception is successful.
Step 6. Cooking "iron" on the Arduino
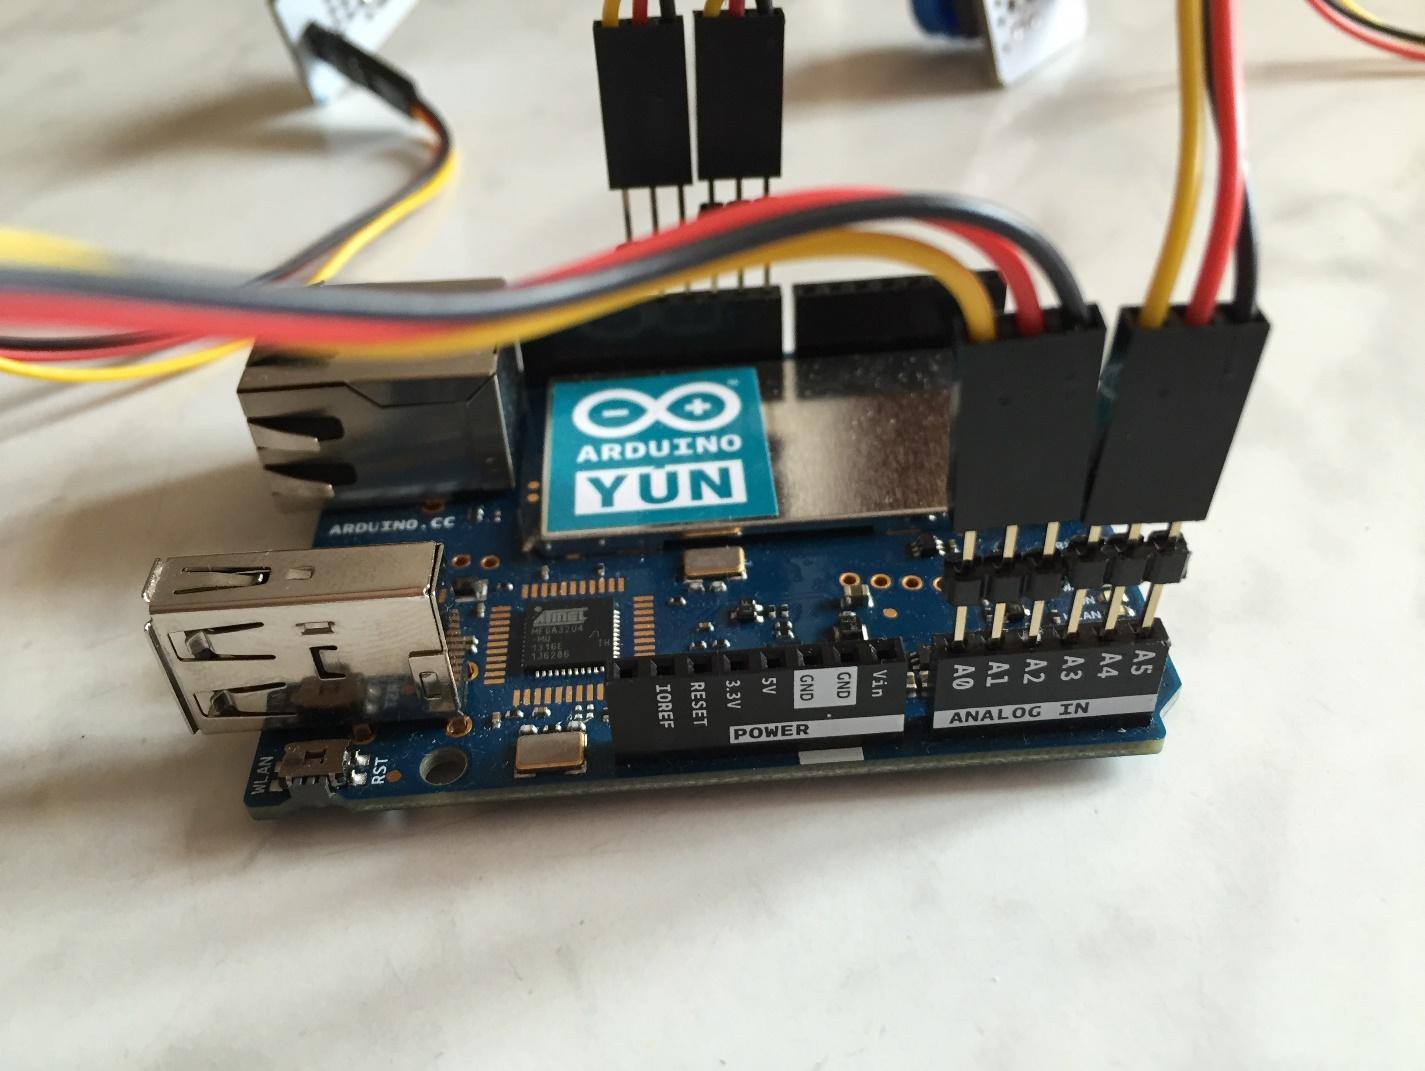
In this section, we will connect a real controller and sensors to the platform. The Arduino Yun microcontroller will act as a control device. Arduino is a very convenient platform for the rapid development of electronic devices for beginners and professionals.

Arduino Yun is convenient because in addition to the main microcontroller, the Atmel ATmega32U4 has an additional Atheros AR9331 processor running Linux with the wireless OpenWrt stack. For our project, this is a suitable device, since it carries “on board” Linux and allows you to connect via the HTTPS protocol to remote services, including the SAP Cloud Platform.
Before we begin, we need to put the development environment for the Arduino, make the initial configuration of the microcontroller and connect it to the network (wired or WiFi).
As sensors and controls for our Arduino we will use:
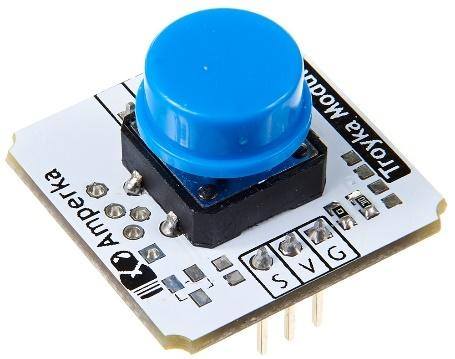
1) Button .
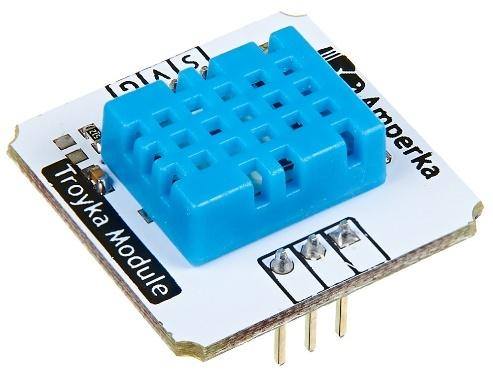
2) Digital temperature and humidity sensor .
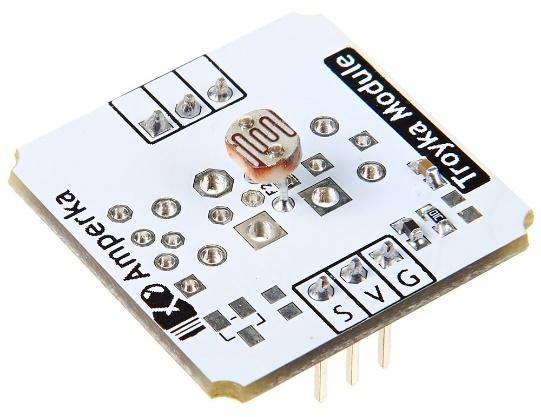
3) Light sensor .
4) LED .

Instead of these sensors, you can use any other, making the appropriate changes to the control program.
Each sensor has three contacts - S, V, G.
Connect the sensors according to the diagram.
Connect button:
8 pin (V - power, red)
9 pin (G - ground, black)
10 contact (S - signal, yellow)
LED connection:
11 pin (V - power, red)
12 pin (G - ground, black)
13 contact (S - signal, yellow)
Photodiode connection:
A0 contact (S - signal, yellow)
A1 contact (V - power, red)
A2 contact (G - ground, black)
Connection of temperature sensor:
A3 contact (S - signal, yellow)
A4 pin (V - power, red)
A5 contact (G - ground, black)

Step 7. Arrange data transfer from Arduino to the cloud via HTTP
Set up data transfer to the SAP Cloud Platform platform by calling the POST request using the HTTP protocol. When you click on the button, data on the level of illumination, humidity and temperature should be transmitted to the SAP Cloud Platform system.
The peculiarity of this program is that the SAP Cloud Platform in the trial version requires the mandatory organization of a secure connection using the HTTPS protocol, which is impossible to do in regular versions of Arduino. Therefore, we have to use a version of Arduino Yun with embedded Linux. The easiest way to do this is with the CURL utility, which is implemented in the script below.
For debugging and checking the script, I recommend trying the CURL utility, directly connecting to Arduino Yun in terminal mode via Putty. To do this, you need to download a utility from Putty.org, with which you can connect to the microcontroller. Or directly use the terminal if you are working in a Linux environment.

Enter the IP address into the utility in the Host Name or IP field

Enter the IP address into the utility in the Host Name or IP field
SSH connection type. Click Open.
In terminal mode, type the username root.
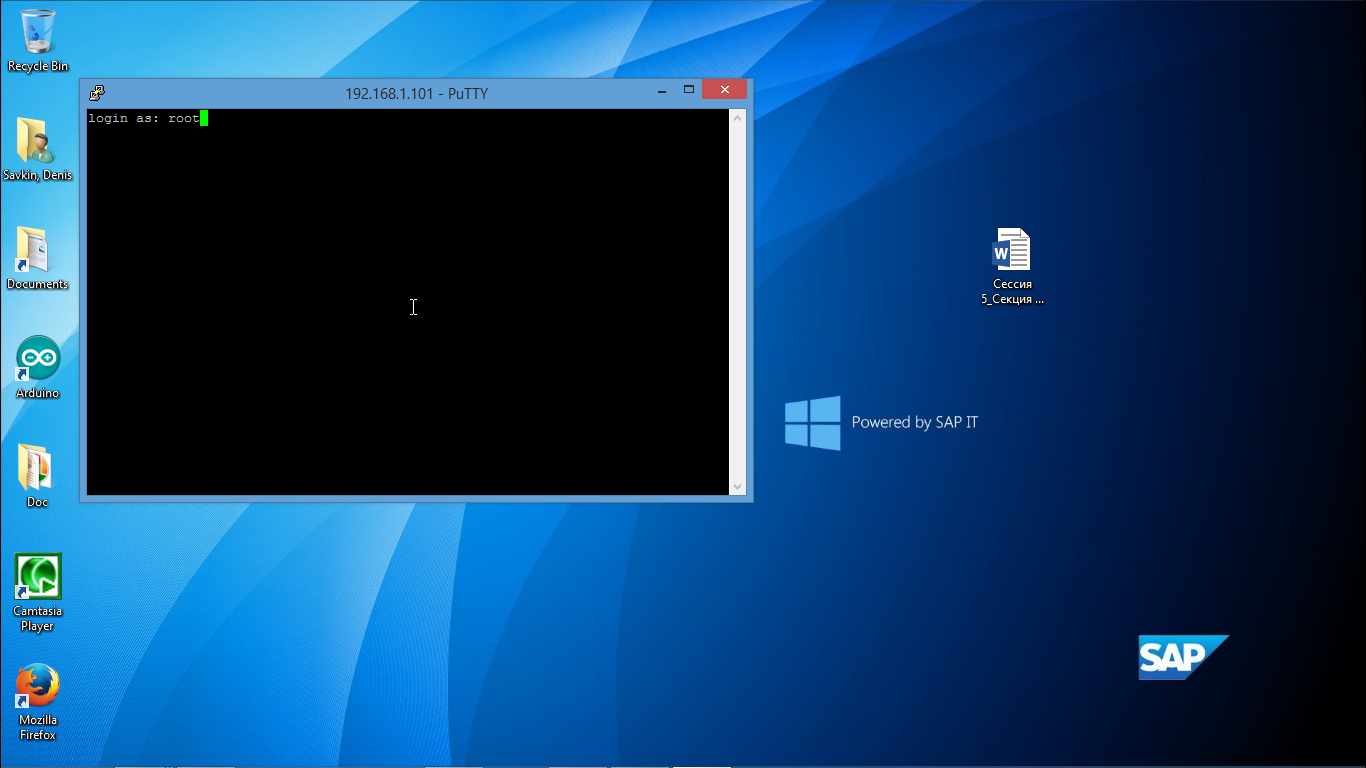
And the password that you set in the connection settings with the Arduino.
The system is connected and ready to execute commands.

Adapt the curl command according to your data:
curl --header "Authorization: Bearer e0b0dc97cc4913311a17cfcdb3f9321e " --header "Content-Type: application / json; charset = UTF-8" -k -X POST iotmms p1942514293 trial.hanatrial.ondemand.com/com.sap.iotservices / v1 / api / http / data / 8a61bdd3-c50b-4585-a3f4-dba7f05af22e - data '' {'' mode '': '' async '', '' messageType '': '' <font color = '' cc0000 ''> 3531068190e9d68c4a0a '', '' messages '': [{'' Temperature '': 23, '' Light ':' 21, '' Humidity '': 65}]} ''
The fragments highlighted in red must be changed according to your parameters. Copy the finished text. In the terminal, click the right mouse button. The text will be copied.
Press Enter.

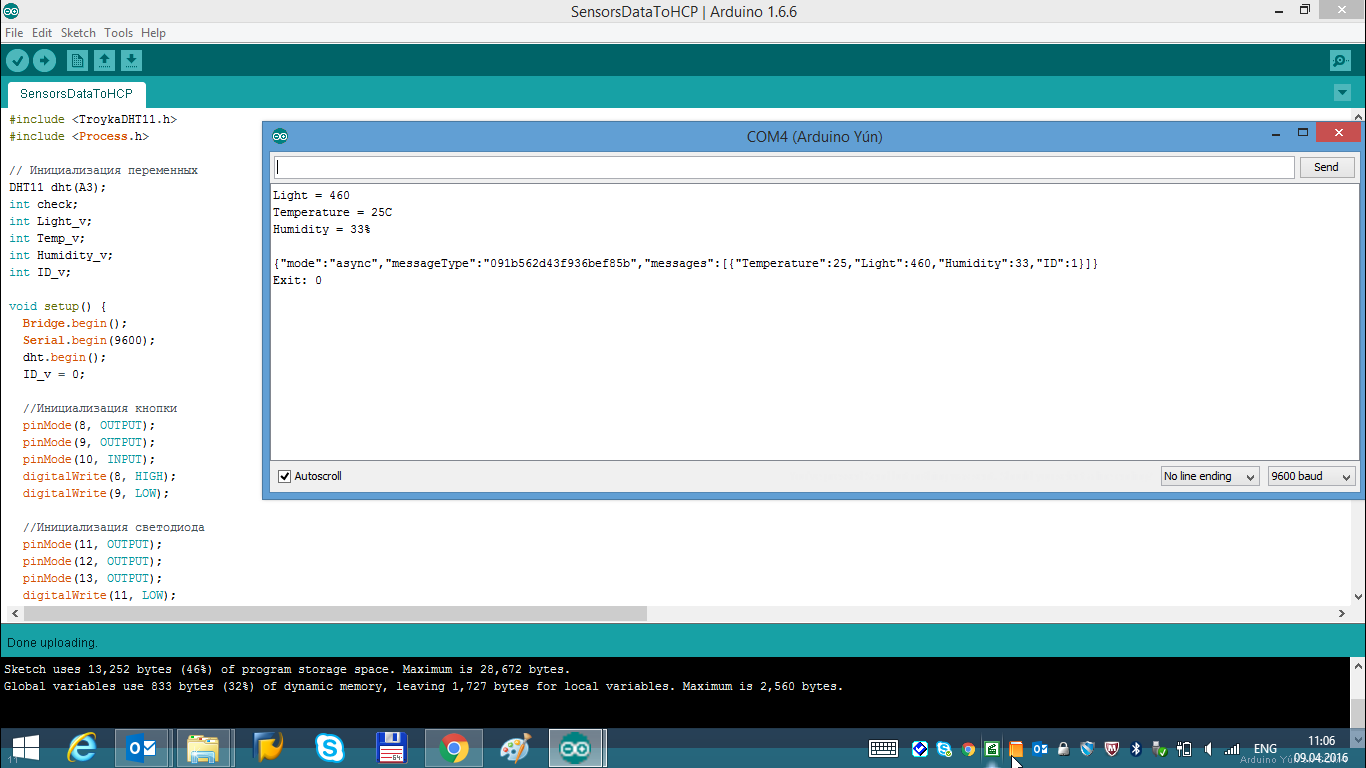
If all the parameters are specified correctly and the Arduino Yun settings are correct, the SAP Cloud Platform server will return an acknowledgment that the IoT service saved the record: 1 message received from device.
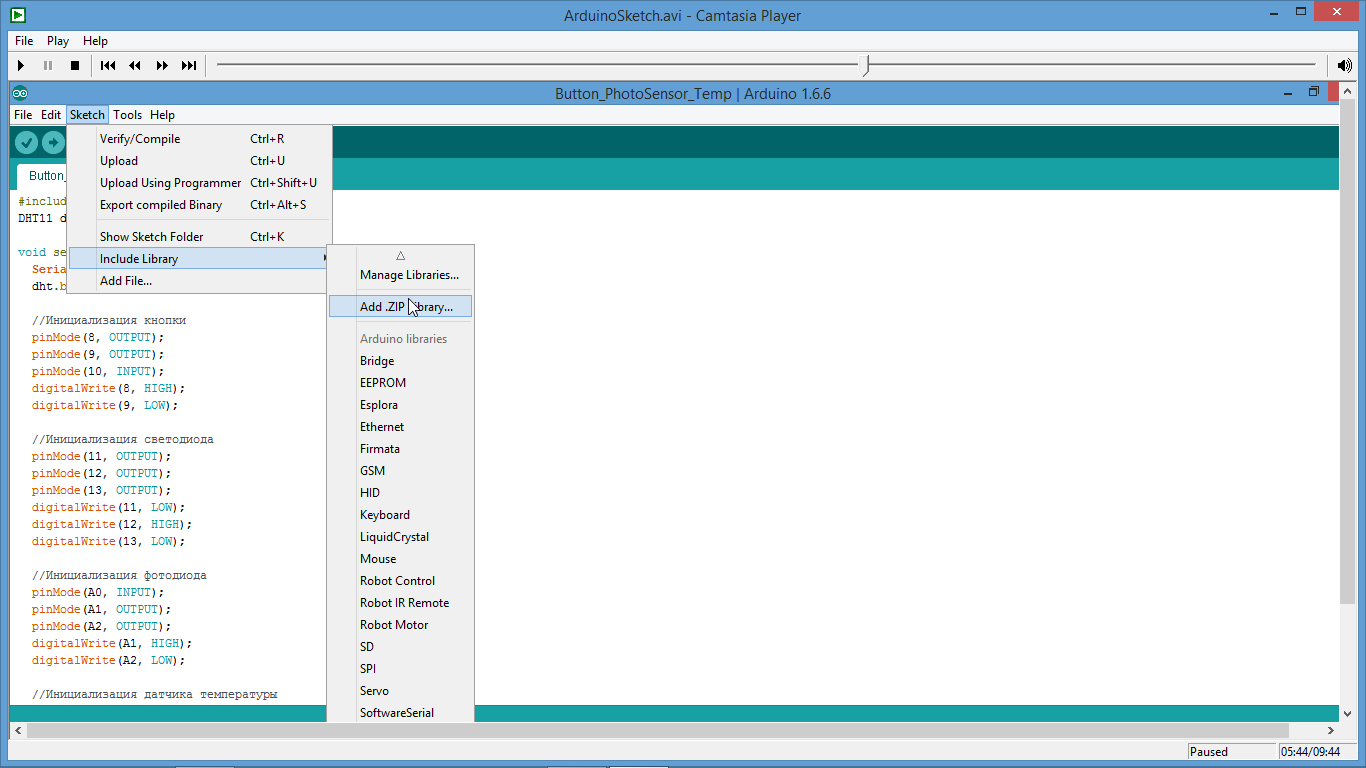
Now you can upload a sketch and adapt it, according to your IoT service settings data in the SAP Cloud Platform (highlighted in red).
#include <TroykaDHT11.h> #include <Process.h> // DHT11 dht(A3); int check; int Light_v; int Temp_v; int Humidity_v; void setup() { Bridge.begin(); Serial.begin(9600); dht.begin(); // pinMode(8, OUTPUT); pinMode(9, OUTPUT); pinMode(10, INPUT); digitalWrite(8, HIGH); digitalWrite(9, LOW); // pinMode(11, OUTPUT); pinMode(12, OUTPUT); pinMode(13, OUTPUT); digitalWrite(11, LOW); digitalWrite(12, HIGH); digitalWrite(13, LOW); // pinMode(A0, INPUT); pinMode(A1, OUTPUT); pinMode(A2, OUTPUT); digitalWrite(A1, HIGH); digitalWrite(A2, LOW); // pinMode(A4, OUTPUT); pinMode(A5, OUTPUT); digitalWrite(A4, HIGH); digitalWrite(A5, LOW); } void pushToCloud(int Temperature_value, int Light_value, int Humidity_value) { // SAP Cloud Platform Linux curl Process p; p.begin("curl"); p.addParameter("-k"); p.addParameter("-f"); p.addParameter("-H"); p.addParameter("Authorization: Bearer e0b0dc97cc4913311a17cfcdb3f9321e"); p.addParameter("-H"); p.addParameter("Content-Type: application/json;charset=UTF-8"); //p.addParameter("-X"); p.addParameter("POST"); p.addParameter("<a href="https://iotmmsp1941889917trial.hanatrial.ondemand.com/com.sap.iotservices.mms/v1/api/http/data/a0e2ed53-f5a4-4aa8-bdac-379b9c2c197e">https://iotmmsp1942514293trial.hanatrial.ondemand.com/com.sap.iotservices.mms/v1/api/http/data/8a61bdd3-c50b-4585-a3f4-dba7f05af22e </a> "); p.addParameter("--data"); String str; str = "{\"mode\":\"async\",\"messageType\":\"<b>3531068190e9d68c4a0a</b>\",\"messages\":[{\"Temperature\":" + String(Temperature_value) + ",\"Light\":" + String(Light_value) + ",\"Humidity\":" + String(Humidity_value) + "}]}"; p.addParameter(str); p.run(); // curl Serial.println(str); Serial.print("Exit: "); Serial.println(p.exitValue()); } void loop() { // check = dht.read(); // , digitalWrite(13, digitalRead(10)); // if (digitalRead(10)) { Light_v = analogRead(0); Serial.print("Light = "); Serial.println(Light_v); // Temp_v = dht.getTemperatureC(); Serial.print("Temperature = "); Serial.print(Temp_v); Serial.println("C \t"); // Humidity_v = dht.getHumidity(); Serial.print("Humidity = "); Serial.print(Humidity_v); Serial.println("%"); Serial.println(""); // SAP Cloud Platform pushToCloud(Temp_v, Light_v, Humidity_v); delay(100); } } Please note that for the temperature sensor to work, you will need a ready-made library TroykaDHT11.h, which you need to connect to the Arduino IDE software development environment.
You can find the library on the Internet at https://github.com/amperka/TroykaDHT11.
.
, , , , , , SAP Cloud Platform.
, IoT.
: Arduino MQTT
MQTT. Arduino, .
#include <TroykaDHT11.h> #include <Process.h> #include <Bridge.h> #include <BridgeClient.h> #include <SPI.h> #include <PubSubClient.h> // DHT11 dht(A3); int check; int Light_v; int Temp_v; int Humidity_v; char message_buff[200]; void callback(char* topic, byte* payload, unsigned int length) { // } // MQTT- BridgeClient ethClient; PubSubClient client("test.mosca.io", 1883, callback, ethClient); void setup() { Bridge.begin(); Serial.begin(9600); dht.begin(); // MQTT if (client.connect("arduinoClient", "test", "test")) // { client.subscribe("iot/data/iotmmsp1942514293trial/v1/8a61bdd3-c50b-4585-a3f4-dba7f05af22e"); } // pinMode(8, OUTPUT); pinMode(9, OUTPUT); pinMode(10, INPUT); digitalWrite(8, HIGH); digitalWrite(9, LOW); // pinMode(11, OUTPUT); pinMode(12, OUTPUT); pinMode(13, OUTPUT); digitalWrite(11, LOW); digitalWrite(12, HIGH); digitalWrite(13, LOW); // pinMode(A0, INPUT); pinMode(A1, OUTPUT); pinMode(A2, OUTPUT); digitalWrite(A1, HIGH); digitalWrite(A2, LOW); // pinMode(A4, OUTPUT); pinMode(A5, OUTPUT); digitalWrite(A4, HIGH); digitalWrite(A5, LOW); } void pushToCloud(int Temperature_value, int Light_value, int Humidity_value) { // SAP Cloud Platform Linux curl if (!client.connected()) { client.connect("arduinoClient", "test", "test"); // } String str = "{\"mode\":\"async\",\"messageType\":\"d8bda569c1340f7ee7fb\",\"messages\":[{\"Temperature\":" + String(Temperature_value) + ",\"Light\":" + String(Light_value) + ",\"Humidity\":" + String(Humidity_value) + "}]}"; str.toCharArray(message_buff, str.length()+1); client.publish("iot/data/iotmmsp1942514293trial/v1/8a61bdd3-c50b-4585-a3f4-dba7f05af22e", message_buff); } void loop() { // check = dht.read(); // , digitalWrite(13, digitalRead(10)); // if (digitalRead(10)) { Light_v = analogRead(0); Serial.print("Light = "); Serial.println(Light_v); // Temp_v = dht.getTemperatureC(); Serial.print("Temperature = "); Serial.print(Temp_v); Serial.println("C \t"); // Humidity_v = dht.getHumidity(); Serial.print("Humidity = "); Serial.print(Humidity_v); Serial.println("%"); Serial.println(""); // SAP Cloud Platform client.loop(); pushToCloud(Temp_v, Light_v, Humidity_v); delay(100); } } PubSubClient, .
Arduino, Yun, Ethernet Shield. , BridgeClient EthernetClient. .
SAP Cloud Platform /. IoT- . Stay with us!
, SAP 2017
SAP Cloud Platform .
Source: https://habr.com/ru/post/326526/
All Articles