N reasons to use the Create React App

The Create React App is a great tool to quickly launch React applications. You do not spend time setting up Webpack, Babel and other familiar tools. They are pre-configured and hidden, so developers can focus on the code and the business logic of the application.
- Create React App on GitHub ;
- Create React App User Guide ;
- Awesome Create React App - a selection of interesting materials, the expected features and FAQ.
Before the release of the Create React App, I had to copy the Webpack-config and other * rc files from previous applications every time I started a new application, or configure everything manually. It did not take long, rather, it was boring. Sometimes I had to be nervous when I did something wrong, and it begins: “Why does it work in that application, but doesn’t it?”. Especially when you have several applications with more or less the same configs. And even more so with the Webpack2 release, it will be necessary to reconfigure everything and spend time again. (Spoiler: with the Create React App you just need to update the version of react-scripts in package.json).
The Create React App provides a CLI interface for building applications with a basic structure, installs all the necessary dependencies, and adds scripts to package.json for running, testing and building the application.
')
npm install -g create-react-app create-react-app my-app cd my-app/ npm start # yarn start Zero configuration! Developers cannot set up a webpack or babel until they make an eject.
If you are an experienced user and you are not comfortable with the standard configuration, you can make an eject. In this case, the Create React App is used as a generator code generator.
The
npm run eject command copies all configs and transitive dependencies (Webpack, Babel, ESLint, etc.) into your project so that you can control them. Commands like npm start and npm run build will not stop working, but will point to copied scripts so that they can be modified. After that you are on your own.Why I want not to do eject
Firstly, because this operation cannot be undone. But it's not only that. Here are some more reasons.
I want to receive updates from the Create React App
Imagine that the Create React App team decides to switch to Webpack 2 (and they already did it) to support tree-shaking and other cool features. In this case, it will be enough for me to update the react-scripts version instead of updating the configs in all applications.
Or suppose the Create React App command releases Plugin System # 670 . I would love to use such a system and even create my own plugins. But, if the eject was made, nothing will come of it.
I don't like when there are a lot of dependencies in package.json
Perhaps this is a trifle, but I don’t want to see in package.json a bunch of babel *, eslint * and webpack * dependencies that I don’t use directly in the code.
Superfluous configs and extra code
I always maintain clean applications. After eject, the scripts and config directories are created. And with them - about ten new files of 50-200 lines of code in each. And in most cases, eject is done to change only about five lines of code (add one new Webpack Loader).
25 again
After I make the eject and edit the configs, I will need to copy them into other applications, because most often the configs of the applications (Babel presets, Webpack loaders and plugins) are the same.
Why I like the Create React App
This is a tool from React developers.
The developers of the Create React App are React developers. I trust them and I am sure that they know how to develop React-applications correctly, implementing all the features with the correct bundle of technologies within the framework of the project Create React App.
There is no configuration and unnecessary files in the application
Since I love order in applications, I definitely like the fact that there are no webpack.config, no heap * rc files and dependencies in package.json.
The entire stack is updated in one line.

The development stack is fixed and stable.
The release of the Create React App contains only stage-3 functions (release candidate). Sometimes it is interesting to play with new features from the draft section, for example, with do-expressions or null-propagation . You can even look at the orthogonal-classes proposal , but using in production is not a good idea at all.
But if you still use the features draft and proposal, the result could be described something like this:

The functionality of this tool is expanding rapidly.
I am sure that the number of tool features will grow rapidly. The community is already quite large, and there are many interesting ideas and suggestions. Here are some of them:
- Plugin System ;
- Runtime error overlay ;
- A global CLI for running a single component ;
- Create git repository with initial commit ;
- Add lint-staged + husky for prettier auto-formatting on commit ;
- Support different .env configs .
Some threads are closed or have already been released. But the bottom line is that there are a lot of ideas. Even third-party tools appeared for the Create React App, like CRA generate: Scaffold a React component or CRAFT .
My experience with the Create React App
Thanks to the Create React App, our team abandoned CSS Modules , React Toolbox, and some other libraries that needed an additional Webpack configuration.
By the way, react-toolbox-themr provides easy integration with the React Toolbox with the Create React App ... But it’s not the best idea to describe the application theme in package.json.
And I still do not want to do eject!
Work with CSS
In the official documentation, in the section Adding a CSS Preprocessor (Sass, Less etc.) , it is described in detail how to set up work with sass or less.
The only restriction is css modules.
Instead of CSS Modules, we started looking towards Glamor , Aphrodite , styled-components , Fela and JSS .
There is also Radium , but I don’t like to use style to style components.
As a result, we use our own, still completely new approach - rockey .
We describe the styles of components using Template Literals and starting from the actual names of the components, instead of the usual CSS classes.
At first glance, the approach is similar to styled-components, but in fact is quite different.
Download from global folders
It is quite difficult to work with code that requires modules from parent directories:
const dateUtils = require('../../../utils/date'); Usually in Webpack this is solved with the help of the configuration resolve.modulesDirectories . As I already wrote, in the CRA application there is no access to the Webpack, but two solutions are possible.
Official - create
node_modules in the src directory ( Document for src / node_modules official solution for absolute imports # 1065 ).Another more “beautiful” way is to use the
NODE_PATH environment NODE_PATH . More information - in the official documentation of Node.js Loading from the global folders .I advise you to use cross-env to set cross- platform environment variables.
"scripts": { "start": "cross-env NODE_PATH=src/scripts react-scripts start" } If you are using .env-config, just add the variable
NODE_PATH : NODE_PATH=src/scripts Environment variables
The Create React App supports .env by default (using the dotenv package). Just create in the root .env folder and run the application. Don't forget to add the REACT_APP_ prefix to each variable. More information - in the official documentation, in the sections Adding Custom Environment Variables and Adding Development Environment Variables In .env .
Support of several .env-configs
Sometimes it is useful to divide configs by environment type (dev / test / prod). For example, here is the .env.development :
REACT_APP_GOOGLE_CLIENT_ID = XXX-YYY-ZZZ.apps.googleusercontent.com REACT_APP_API_PROTOCOL = http: REACT_APP_API_HOST = localhost:3000 NODE_PATH = src/scripts PORT = 9001 But .env.production :
REACT_APP_GOOGLE_CLIENT_ID = ZZZ-YYY-XXX.apps.googleusercontent.com REACT_APP_API_PROTOCOL = https: REACT_APP_API_HOST = api.my-applicaton.com NODE_PATH = src/scripts Now you can do this by installing dotenv and updating the
npm scripts : "scripts": { "start": "node -r dotenv/config ./node_modules/.bin/react-scripts start dotenv_config_path=.env.development", "build": "node -r dotenv/config ./node_modules/.bin/react-scripts build dotenv_config_path=.env.production" } But, most likely, my pull request - Support different env configs # 1343 will get into the release.
What .env * configs can I use?
- .env - standard (common) config;
- .env.development, .env.test, .env.production - depending on the environment;
- .env.local - local config for redefining any variables depending on the developer's environment. Ignored by the version control system;
- .env.development.local, .env.test.local, .env.production.local - local config depending on the environment. Ignored control system version.
Configs priority (step is skipped if the config file does not exist):
- npm test - .env.test.local, env.test, .env.local, .env;
- npm run build - .env.production.local, env.production, .env.local, .env;
- npm start - .env.development.local, env.development, .env.local, .env.
Change the port of the dev server
We, for example, cannot run an application on port 3000, because we are working with Google Auth, which several years ago was configured to localhost ports 9001–9005. Of course, we can change the Google Auth settings, but it’s already familiar to use these ports.
Add the
PORT environment variable using cross-env : "scripts": { "start": "cross-env PORT=9001 react-scripts start" } or .env-config:
PORT=9001 Additional configuration
Here is a list of possible settings using environment variables:
| Variable | Development | Production | Usage |
| BROWSER | + | - | The Create React App opens the default browser, but you can set a specific browser or set none to disable this feature. You can also specify a Node.JS script that will be executed each time the dev server is started. |
| HOST | + | - | The default is localhost. |
| PORT | + | - | The default is 3000. If it is busy, the Creat React App will offer to launch the application on the next available port. Or you can specify a specific port. |
| Https | + | - | If set to true, the local dev server will be launched in https mode. |
| PUBLIC_URL | - | + | Normally, the Create React App expects the application to be located at the root of the web server or the path is defined in package.json (homepage). You can override the link for all assets. This is useful if you use a CDN to host an application. |
| CI | + | + | If set to true, the Create React App will treat warnings as errors. Run tests without the - watch parameter. |
Change Webpack config: add plugins and change entry point
As an example, I will give two situations where I needed it:
- Add Webpack Offline Plugin .
- Make an assembly with only one component from the application.
At first glance it seems that without eject nothing happens. But there is a way out. I do not recommend using it, it is not officially supported and may break with any new version.
Add to
npm-scripts build:custom : "scripts": { "build:custom": "node scripts/customBuild.js" } Then create
scripts/customBuild.js : const webpack = require('react-scripts/node_modules/webpack'); const craWebpackConfig = require('react-scripts/config/webpack.config.prod'); const OfflinePlugin = require('offline-plugin'); const config = { ...craWebpackConfig, plugins: [ ...craWebpackConfig.plugins, new OfflinePlugin() ] }; webpack(config).run(function(err, stats) { if (err !== null) { console.log('done'); } else { console.log(err); } }); In this case, only the Webpack config will expand, not the react-scripts build. There will be no beautiful logs, comparing the size of the current and previous build and other features.
Remember that using non-standard boot loaders (like yaml, markdown, dsv loaders, etc.) and additional plug-ins makes your application more complicated and more difficult. And in some cases it’s not even possible to upgrade to a new Webpack release.
This is why I don’t even like regular css-loaders for webpack. I always try to connect only js or json modules. CSS files are quite suitable for configuring the Webpack entry field. I try to never connect them using the require function. This makes the application as dependent on the current collector as possible.
Babel presets and plugins
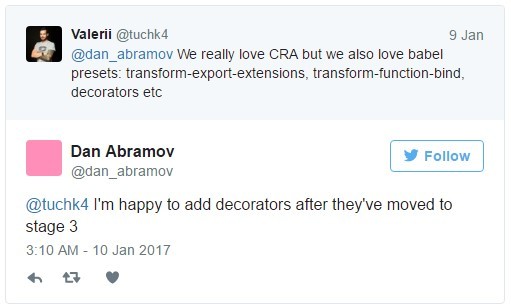
The Create React App does not yet support the babel-config extension. Accordingly, decorators are also not supported .
I even did Pull Request: Adding support for custom babel configuration # 1357 . But it has already been closed, and I fully agree with the Create React App team: you should not clutter up the application with a bunch of settings.
Decorators simply facilitate part of the work and you can do without them , and as soon as they get to stage 3, they will immediately be supported.
React scripts
A feature almost no one knows about. Slightly more information can be found in the official thread on github - Document. # 682 .
React scripts - a package that implements all used scripts (start / test / build) and configuration of all used tools.
That is, you can fork, synchronize it with the current version and add the functionality you need.
create-react-app my-app --scripts-version my-super-react-scripts, where
my-super-react-scripts is your version of react-scripts.For example, there are custom-react-scripts with decorator support, babel-preset-stage-0, LESS / SASS, CSS Modules (described in more detail in the article Configure create-react-app without ejecting ).
Awesome Create React App
Awesome Create React App - a selection of interesting materials, the expected features and FAQ. A list of existing react-scripts versions is also presented.
List of expected features in version 0.10.0
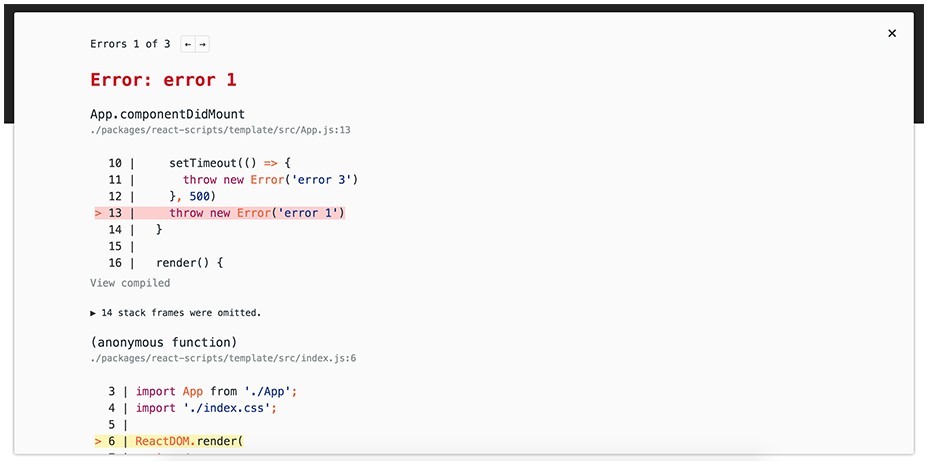
Runtime error overlay # 1101
With unhandled exceptions, a dialog with an error is shown, very similar to the previously added feature, - Syntax error overlay. An error message, call stack and line of code where the error occurred are displayed. The dialogue can be hidden by pressing the Escape. The error, as before, is duplicated in the console.
Upgrade to webpack v2 # 1291
Now all users of the Create React App just need to update the version of react-scripts ( twitter.com/… status / 819634786734112768 ) instead of reading the guides on migration from Webpack 1 to Webpack 2. You can read more about Webpack 2 in the article Webpack 2 and beyond or What's new in webpack 2 .
Dynamic import support # 1538
Very cool feature for asynchronous module loading. Previously, require.ensure was used for this.
import('./path/to/module).then(module => { // module.default }); Add lint-staged + husky for prettier auto-formatting on commit # 1759
Automatically starts eslint for files in the index and formats them with prettier before each commit.
So far, it is implemented only as an internal feature for the Create React App itself, but I really hope that they will add it to the generated application.

And many other cool features:
- Support node scripts in BROWSER # 1590 - the ability to execute any nodejs script when starting local server devs;
- Support multiple .env configs # 1344 ;
- Enable page reloading for files in public / # 1546 , etc.
the end
It is necessary to treat the “lack of configuration” as a feature and in no case as a problem. Opportunities that are present, is enough for any application.
By doing eject (either with self-configuration), you donate all the current CRA features (and features from new releases) in order to add decorators or some other trifle.
Configuring a Webpack, Babel, or any other tool within the Create React App would make the Create React App more fragile. And the Create React App team could not guarantee the perfect performance and stability of the tool. It would also trigger the appearance of the Create React App Issues not related to the Create React App.
Source: https://habr.com/ru/post/326520/
All Articles