Failover Cluster for Load Balancing
Let's talk about horizontal scaling. Suppose your project has grown to a size where one server cannot cope with the load, and there are no longer any possibilities for vertical growth of resources.
In this case, the further development of the project infrastructure usually occurs due to an increase in the number of servers of the same type with load distribution between them. Such an approach not only solves the problem with resources, but also adds to the reliability of the project — if one or more components fail, its overall performance will not be compromised.
An important role in this scheme is played by the balancer - a system that deals with the distribution of requests / traffic. At the design stage, it is important to provide the following key requirements:
- Fault tolerance. You need at least two servers that simultaneously deal with the task of distributing requests / traffic. Without explicit separation of roles into lead and backup.
- Scaling. Adding new servers to the system should give a proportional increase in resources.
In fact, this is a description of a cluster whose nodes are balancer servers.
In this article, we want to share a recipe for such a cluster, simple and unpretentious to resources, the concept of which we successfully apply in our own infrastructure for balancing requests to the servers of our control panel, internal DNS server, Galera cluster and various microservices.
Agree on terms:
- Servers that are part of a cluster will be called nodes or balancers.
- We will call the end servers the hosts to which the traffic through the cluster is proxied.
- Virtual IP will be called the address “floating” between all nodes, and which should indicate the names of the services in the DNS.
What is required:
- To configure the cluster, you will need at least two servers (or virtual machines) with two network interfaces on each.
- The first interface will be used to communicate with the outside world. The real and virtual IP addresses will be configured here.
- The second interface will be used for service traffic to communicate with each other nodes. Here the address from the private (“gray”) network 172.16.0.0/24 will be configured.
The second interfaces of each node must be in the same network segment.
Used technologies:
VRRP, Virtual Router Redundancy Protocol - in the context of this article, the implementation of a "floating" between the cluster nodes of the virtual IP address. At one point in time, such an address can be raised on a single node, called MASTER. The second node is called BACKUP. Both nodes are constantly exchanging special heartbeat messages. Receiving or not receiving such messages within specified intervals gives grounds for reassigning the virtual IP to a “live” server. More details about the protocol can be found here .
LVS, Linux Virtual Server is a balancing mechanism at the transport / session level, embedded in the Linux kernel as an IPVS module. A good description of LVS features can be found here and here .
The essence of the work is reduced to indicating that there is a certain pair of “IP + port” and it is a virtual server. For this pair, addresses of real servers responsible for processing requests are assigned, a balancing algorithm is set, as well as a request redirection mode.
In our system, we will use Nginx as an intermediate between LVS and end servers for which you need to proxy traffic. Nginx will be present on each node.
For VRRP settings and IPVS interaction, we will use the Keepalived daemon, written as part of the Linux Virtual Server project.
CONCEPT
The system will be a bundle of two independent from each other equivalent nodes, balancers, clustered by means of LVS technology and VRRP protocol.
The entry point for traffic will be a virtual IP address, raised either on one or on the second node.
Incoming LVS requests are redirected to one of the running instances of Nginx - local or on the neighboring node. This approach allows you to evenly smear requests between all nodes in the cluster, i.e. more optimal use of the resources of each balancer.
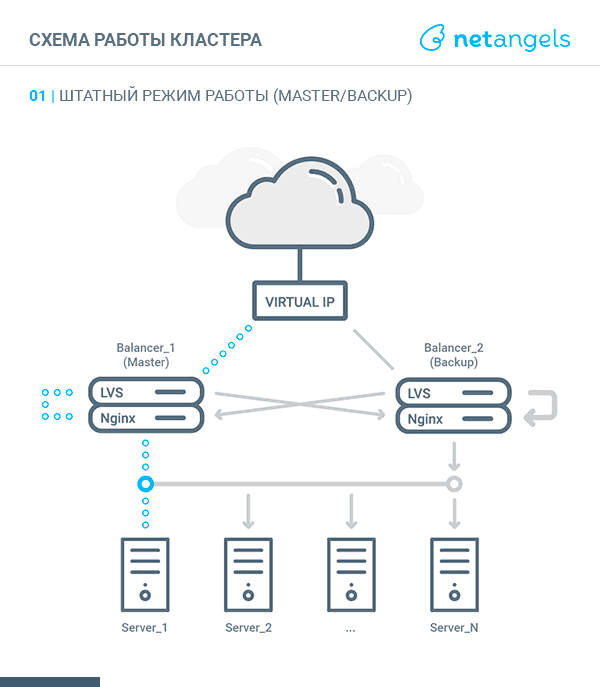
Nginx’s job is to proxying requests to destination servers. Starting from version 1.9.13, proxying functions are available at the tcp and udp transport protocol level.
Each vhost / stream will be configured to receive requests both through the service interface from the neighboring balancer and incoming to the virtual IP. And even if the virtual IP address is not physically raised on this balancer (Keepalived has assigned the server role BACKUP).
Thus, the scheme of traffic walking depending on the state of the balancer (MASTER or BACKUP) looks like this:
MASTER:
- request comes to virtual IP. IPVS routes the packet to the local server;
- since the local Nginx listens including virtual IP, it receives the request;
- according to the proxy settings for this virtual IP, Nginx sends a request to one of the listed upstream;
- the response received is sent to the client.
BACKUP:
- request comes to virtual IP. IPVS routes the packet to a neighboring server;
- on the adjacent balancer, this virtual IP is not raised. Therefore, the dst_ip in the packet must be replaced with the corresponding gray IP from the network of the current balancer. DNAT is used for this;
- after that, the local Nginx receives a request to a gray IP address;
- according to the proxy settings for this virtual IP, Nginx sends a request to one of the listed upstream;
- the received response is sent to the client directly with src_ip equal to the virtual IP (with the participation of conntrack)
REALIZATION:
As an operating system, we will use Debian Jessie with backports repositories connected.
We will install packages with the software required for cluster operation on each balancer node and make several system-wide settings:
apt-get update apt-get install -t jessie-backports nginx apt-get install keepalived ipvsadm On the eth1 interface, we configure addresses from the gray network 172.16.0.0/24 :
allow-hotplug eth1 iface eth1 inet static address 172.16.0.1 # -- 172.16.0.2 netmask 255.255.255.0 You do not need to prescribe a virtual IP address on the eth0 interface. This will keepalived.
Add the following directives to the /etc/sysctl.d/local.conf file:
net.ipv4.ip_nonlocal_bind = 1 net.ipv4.vs.drop_entry = 1 net.nf_conntrack_max = 4194304 The first includes the ability to listen to IPs that are not picked up locally (this is necessary for the work of Nginx). The second includes automatic protection against DDoS at the level of the IPVS balancer (if there is not enough memory for the session table, some of the entries will be automatically cleaned). The third increases the size of the conntrack table.
In /etc/modules enable the loading of the IPVS module at system startup:
ip_vs conn_tab_bits=18 The conn_tab_bits parameter determines the size of the table with connections. Its value is a power of two. The maximum allowed value is 20.
By the way, if the module is not loaded before the start of Keepalived, the latter starts to segfolt.
Now restart both balancer nodes. So we will make sure that at the start the entire configuration will correctly rise.
General settings are made. Further actions will be performed in the context of two tasks:
- Http traffic balancing between three web servers;
- Balancing udp traffic on port 53 of two DNS servers.
Input data:
- We will use
192.168.0.100as the virtual IP address; - Web servers will have addresses
192.168.0.101,192.168.0.102and192.168.0.103respectively, their sequence numbers; - The DNS servers are
192.168.0.201and192.168.0.202.
Let's start with the Nginx configuration.
Add a description of the stream section in /etc/nginx/nginx.conf :
stream { include /etc/nginx/stream-enabled/*; } And create the appropriate directory:
mkdir /etc/nginx/stream-enabled Settings for web servers add to /etc/nginx/sites-enabled/web_servers.conf
upstream web_servers { server 192.168.0.101:80; server 192.168.0.102:80; server 192.168.0.103:80; } server { listen 172.16.0.1:80 default_server; # -- 172.16.0.2 listen 192.168.0.100:80 default_server; location / { proxy_set_header Host $host; proxy_set_header X-Real-IP $remote_addr; proxy_set_header X-Forwarded-For $proxy_add_x_forwarded_for; proxy_pass http://web_servers; proxy_redirect default; } } Settings for DNS servers add to /etc/nginx/stream-enabled/dns_servers.conf
upstream dns_servers { server 192.168.0.201:53; server 192.168.0.202:53; } server { listen 172.16.0.1:53 udp reuseport; # -- 172.16.0.2 listen 192.168.0.100:53 udp reuseport; proxy_pass dns_servers; } Next, it remains to configure Keepalived (VRRP + LVS). This is a bit more complicated, since we will need to write a special script that will be launched when the balancer node transitions between the MASTER / BACKUP states.
All Keepalived settings should be in one file - /etc/keepalived/keepalived.conf . Therefore, all of the following blocks with VRRP and LVS configurations should be consistently saved in this file.
VRRP settings:
vrrp_instance 192.168.0.100 { interface eth1 # VRRP track_interface { # eth0 # , eth1 # FAULT, .. IP # LVS } virtual_router_id 1 # nopreempt # BACKUP # priority 102 # . authentication { auth_type PASS auth_pass secret # } virtual_ipaddress { 192.168.0.100/24 dev eth0 } notify /usr/local/bin/nat-switch } The script mentioned above is /usr/local/bin/nat-switch . It starts every time the current state of the current VRRP instance changes. Its task is to ensure that the balancer, in the BACKUP state, is able to correctly process packets addressed to virtual IP. To solve this situation, DNAT features are used. Namely, the rule of the form:
-A PREROUTING -d 192.168.0.100/32 -i eth1 -j DNAT --to-destination ${IP_on_eth1} When switching to the MASTER state, the script deletes this rule.
Here you can find a variant of the script nat-switch , written for this example.
LVS settings for a group of web servers:
virtual_server 192.168.0.100 80 { lb_algo wlc # # wlc -- - # . lb_kind DR # . Direct routing protocol TCP delay_loop 6 # healthchecker' real_server 172.16.0.1 80 { weight 1 TCP_CHECK { # connect_timeout 2 # Nginx } } real_server 172.16.0.2 80 { weight 1 TCP_CHECK { connect_timeout 2 } } } LVS settings for a group of DNS servers:
virtual_server 192.168.0.100 53 { lb_algo wlc lb_kind DR protocol UDP delay_loop 6 real_server 172.16.0.1 53 { weight 1 MISC_CHECK { connect_timeout 2 misc_path "/bin/nc -zn -u 172.16.0.1 53" } } real_server 172.16.0.2 53 { weight 1 MISC_CHECK { connect_timeout 2 misc_path "/bin/nc -zn -u 172.16.0.2 53" } } } Finally, restart the Nginx and Keepalived configuration:
nginx -s reload && /etc/init.d/keepalived reload TESTING:
Let's see how the balancer distributes requests to destination servers. To do this, on each of the web servers, create index.php with some simple content:
<?php sleep(rand(2, 8)); echo("Hello from ".gethostname()." !"); ?> And we will make several requests via http to the virtual IP 192.168.0.100 :
for i in $(seq 10); do printf 'GET / HTTP/1.0\n\n\n' | nc 192.168.0.100 80 | grep Hello done Result:
Hello from server-1 ! Hello from server-2 ! Hello from server-2 ! Hello from server-3 ! Hello from server-3 ! Hello from server-1 ! Hello from server-1 ! Hello from server-2 ! Hello from server-2 ! Hello from server-3 ! If, during the execution of this cycle, you look at the statistics of the LVS operation (on the MASTER node), then we can see the following picture:
ipvsadm -Ln Result:
IP Virtual Server version 1.2.1 (size=262144) Prot LocalAddress:Port Scheduler Flags -> RemoteAddress:Port Forward Weight ActiveConn InActConn TCP 192.168.0.100:80 wlc -> 172.16.0.1:80 Route 1 1 3 -> 172.16.0.2:80 Route 1 1 3 UDP 192.168.0.100:53 wlc -> 172.16.0.1:53 Route 1 0 0 -> 172.16.0.2:53 Route 1 0 0 Here you can see how requests are distributed between the cluster nodes: there are two active connections that are being processed at the moment and 6 already processed connections.
Statistics on all connections passing through LVS can be viewed as:
ipvsadm -Lnc Result:
IPVS connection entries pro expire state source virtual destination TCP 14:57 ESTABLISHED 192.168.0.254:59474 192.168.0.100:80 172.16.0.1:80 TCP 01:49 FIN_WAIT 192.168.0.254:59464 192.168.0.100:80 172.16.0.1:80 TCP 01:43 FIN_WAIT 192.168.0.254:59462 192.168.0.100:80 172.16.0.1:80 TCP 14:59 ESTABLISHED 192.168.0.254:59476 192.168.0.100:80 172.16.0.2:80 TCP 01:56 FIN_WAIT 192.168.0.254:59468 192.168.0.100:80 172.16.0.1:80 TCP 01:57 FIN_WAIT 192.168.0.254:59472 192.168.0.100:80 172.16.0.2:80 TCP 01:50 FIN_WAIT 192.168.0.254:59466 192.168.0.100:80 172.16.0.2:80 TCP 01:43 FIN_WAIT 192.168.0.254:59460 192.168.0.100:80 172.16.0.2:80 Here, respectively, we see the same thing: 2 active and 6 inactive compounds.
AFTERWORD:
The proposed configuration can serve as a starting point for designing a private solution for a specific project with its own requirements and peculiarities.
If you have any questions about the article or something seemed controversial - please leave your comments, we will be happy to discuss.
')
Source: https://habr.com/ru/post/326400/
All Articles