Implement a custom UI element for timing. Part 2
In the first part of the article, I recreated in detail the process of the implementation of the dial. Now we come to the most interesting and difficult stage of creating our own custom control.
Here I describe the math of rotation, which I used on the advice of a report voiced on MBLTdev .
The main coordinate component here is the
We introduce several properties that will store information about the current position of the twister.
')
We also need the value of the circumference.
We make it when we set the radius of the circle. Override the
We initialize
Preparations are made. Now it's time to move on to math. First we need to measure the distance between two points. We use a simple formula - the root of the sum of squares of the differences of the corresponding coordinates.
In code, it looks like this:
Now we define the direction of motion, that is, the sign of the length. To do this, determine where in the center of the circle is the touch point. Why is it important? Notice how the same gesture leads to a different direction of movement. It is necessary to take into account this moment.
We define a new type in which we describe the position of the point to the left and right of the center of the circle,
and a method that calculates the position by a point:
Is done. Now we know in which half of the circle is the point.
Based on this information, we calculate the “sign” of the rotation.
Based on the sign and length, we now calculate the angle of rotation. Let delta be the number of circle lengths in our offset. Then the angle is the product of 2 radian on
Now we define a method that will take away extra periods from corners. For example, an angle of 3 before . We need it to work with negative angles.
Done, we have a mathematical basis for turning our circle.
Now we realize the turn of our entire hierarchy. To do this, use the method over
In this case, we do not weaken the link, because when the animation ends, the link to
We define the delegate method
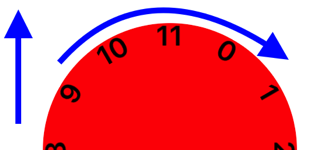
Is done. See how it looks.

Now we implement this control behavior, so that after a strong scroll, it later stops exactly on any number. To do this, we need to calculate and change the
First of all, we normalize the angle to a multiple of the
Let us dwell on the description of the method for calculating the “normalized”
Let
To do this, we calculate the “normalized” length and, knowing the angle of inclination of the initial displacement, we find the coordinates of the end of this displacement. Changing the coordinates, change the stopping point.
So, the algorithm for finding:
- find the length of the current values of
- find the angle of rotation along the length,
- normalize the angle
- find the normalized length,
- find the end point on the new length.
On the last point we will stop in addition. To obtain the coordinates of the end point, it is necessary to find the projections of the normalized displacement on the Ox and Oy axes. This can be done, knowing the angle of inclination of the displacement. Calculate the slope tangent as the ratio
Using this data, we can easily find the coordinates of the end of the “normalized” segment.
Method for calculating the angle of our offset:
We use the function atan2 , since she correctly leads angles depending on the quarter.
Is done. Now we define the delegate method in which we perform the calculations:
There are situations when the user scrolled so little that he did not reach the next or previous number. Then the control should jump to the nearest one. To do this, we implement the following delegate method:
Result:

We will create delegate methods for our coolizer so that class users can assign a controller to be its delegate and receive information from it. But first we create a property that will return the value on the dial:
We define a getter for it:
Is done. Now you can find out the current value on the dial.
We are engaged in the delegate.
To start these two methods is enough. We are more interested in the second method, in which we get the value of the spinner at the current moment.
Create a delegate property on an
We define the places where these methods will be called.
Since these methods are associated with rotation, we are interested in the method
How it looks with method calls:
Is done. Implement delegate methods in our
Do not forget to make yourself a delegate to this twist:
Now we implement one of the methods. First, in the
We proceed to the implementation.
The result is ready.

In such a simple way, I invented my custom control. The whole project is available on the gita .
Clock face rotation
Here I describe the math of rotation, which I used on the advice of a report voiced on MBLTdev .
The main coordinate component here is the
contentOffset the scrollView . On this basis, we consider the angle of rotation.We introduce several properties that will store information about the current position of the twister.
')
@property (assign, nonatomic) CGFloat currentAngle; @property (assign, nonatomic) CGPoint startPoint; @property (assign, nonatomic) CGFloat previousAngle; We also need the value of the circumference.
@property (assign, nonatomic, readonly) CGFloat circleLength; We make it when we set the radius of the circle. Override the
setter . - (void)setCircleRadius:(CGFloat)circleRadius { _circleRadius = circleRadius; _circleLength = 2 * M_PI * circleRadius; } We initialize
startPoint in the method - (void)commonInit as the middle of contentOffset , so that we can rotate in both directions. self.startPoint = self.scrollView.contentOffset; Preparations are made. Now it's time to move on to math. First we need to measure the distance between two points. We use a simple formula - the root of the sum of squares of the differences of the corresponding coordinates.
In code, it looks like this:
- (CGFloat)deltaWithOffset:(CGPoint)offset { return sqrt(pow(self.startPoint.x - offset.x, 2) + pow(self.startPoint.y - offset.y, 2)); } Now we define the direction of motion, that is, the sign of the length. To do this, determine where in the center of the circle is the touch point. Why is it important? Notice how the same gesture leads to a different direction of movement. It is necessary to take into account this moment.
We define a new type in which we describe the position of the point to the left and right of the center of the circle,
typedef NS_ENUM(NSUInteger, AYNCircleViewHalf) { AYNCircleViewHalfLeft, AYNCircleViewHalfRight, }; and a method that calculates the position by a point:
- (AYNCircleViewHalf)halfWithPoint:(CGPoint)point { return point.x > self.contentView.center.x ? AYNCircleViewHalfRight : AYNCircleViewHalfLeft; } Is done. Now we know in which half of the circle is the point.
Based on this information, we calculate the “sign” of the rotation.
- (CGFloat)signWithOffset:(CGPoint)offset half:(AYNCircleViewHalf)half { CGFloat sign = offset.x > self.startPoint.x ? -1 : 1; BOOL isYDominant = fabs(offset.y - self.startPoint.y) > fabs(offset.x - self.startPoint.x); if (isYDominant) { sign = offset.y > self.startPoint.y ? -1 : 1; sign *= half == AYNCircleViewHalfLeft ? -1 : 1; } return sign; } Based on the sign and length, we now calculate the angle of rotation. Let delta be the number of circle lengths in our offset. Then the angle is the product of 2 radian on
delta . - (CGFloat)angleWithOffset:(CGPoint)offset half:(AYNCircleViewHalf)half { CGFloat delta = [self deltaWithOffset:offset] / self.circleLength; CGFloat sign = [self signWithOffset:offset half:half]; return sign * delta * 2 * M_PI; } Now we define a method that will take away extra periods from corners. For example, an angle of 3 before . We need it to work with negative angles.
- (CGFloat)floorAngle:(CGFloat)angle { NSInteger times = floorf(fabs(angle) / (2 * M_PI)); NSInteger sign = angle > 0 ? -1 : 1; return angle + sign * times * 2 * M_PI; } Done, we have a mathematical basis for turning our circle.
Now we realize the turn of our entire hierarchy. To do this, use the method over
UIView + - (void)animateWithDuration:animations: - (void)rotateWithAngle:(CGFloat)angle { [UIView animateWithDuration:0.1 animations:^{ self.contentView.transform = CGAffineTransformMakeRotation(angle); }]; } In this case, we do not weaken the link, because when the animation ends, the link to
self disappear.We define the delegate method
- (void)scrollViewDidScroll: in which we will perform all calculations and state changes: - (void)scrollViewDidScroll:(UIScrollView *)scrollView { CGPoint point = [scrollView.panGestureRecognizer locationInView:self]; CGFloat tickOffset = [self angleWithOffset:scrollView.contentOffset half:[self halfWithPoint:point]]; self.currentAngle = [self floorAngle:(self.previousAngle + tickOffset)]; [self rotateWithAngle:self.currentAngle]; self.previousAngle = self.currentAngle; self.startPoint = scrollView.contentOffset; } Is done. See how it looks.
Now we implement this control behavior, so that after a strong scroll, it later stops exactly on any number. To do this, we need to calculate and change the
targetContentOffset in the delegate method - (void)scrollViewWillEndDragging:withVelocity:targetContentOffset: Let's add our mathematical apparatus.First of all, we normalize the angle to a multiple of the
angleStep . We define for this method. - (CGFloat)normalizeAngle:(CGFloat)angle { return lroundf(angle / self.angleStep) * self.angleStep; } Let us dwell on the description of the method for calculating the “normalized”
scrollView stopping scrollView . Method - (void)scrollViewWillEndDragging:withVelocity:targetContentOffset: returns the contentOffset that will scrollView when scrollView . Our goal is to change this CGPoint . We start from the normalized offset length value.Let
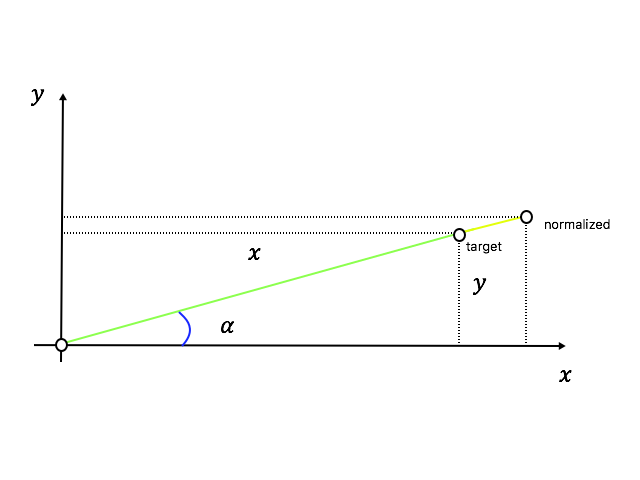
target be targetContentOffset . We calculate such a point normalizedContentOffset so that the resulting length translates into a multiple of a angleStep . Then the control will stop the rotation exactly on the number.To do this, we calculate the “normalized” length and, knowing the angle of inclination of the initial displacement, we find the coordinates of the end of this displacement. Changing the coordinates, change the stopping point.
So, the algorithm for finding:
- find the length of the current values of
startPoint , targetPoint ,- find the angle of rotation along the length,
- normalize the angle
- find the normalized length,
- find the end point on the new length.
On the last point we will stop in addition. To obtain the coordinates of the end point, it is necessary to find the projections of the normalized displacement on the Ox and Oy axes. This can be done, knowing the angle of inclination of the displacement. Calculate the slope tangent as the ratio
Using this data, we can easily find the coordinates of the end of the “normalized” segment.
- (CGPoint)endPointWithTargetPoint:(CGPoint)targetPoint scrollView:(UIScrollView *)scrollView { CGPoint point = [scrollView.panGestureRecognizer locationInView:self]; CGFloat tickOffset = [self angleWithOffset:targetPoint half:[self halfWithPoint:point]]; CGFloat rotationAngle = self.previousAngle + tickOffset; CGFloat delta = [self deltaWithAngle:rotationAngle]; CGFloat normalizedRotationAngle = [self normalizeAngle:rotationAngle]; CGFloat normalizedDelta = [self deltaWithAngle:normalizedRotationAngle]; CGFloat inclination = [self inclinationWithOffset:targetPoint startPoint:self.startPoint]; CGFloat sign = normalizedRotationAngle <= 0 ? -1 : 1; CGPoint result = CGPointMake(targetPoint.x + sign * (normalizedDelta - delta) * cos(inclination), targetPoint.y + sign * (normalizedDelta - delta) * sin(inclination)); return result; } Method for calculating the angle of our offset:
- (CGFloat)inclinationWithOffset:(CGPoint)offset startPoint:(CGPoint)startPoint { CGFloat y = (offset.y - self.startPoint.y); CGFloat x = (offset.x - self.startPoint.x); if (!isnan(x) && x != 0) { return atan2(y, x); } return 0; } We use the function atan2 , since she correctly leads angles depending on the quarter.
Is done. Now we define the delegate method in which we perform the calculations:
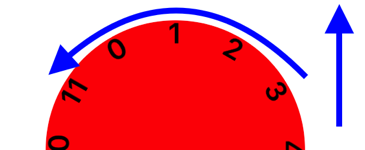
- (void)scrollViewWillEndDragging:(UIScrollView *)scrollView withVelocity:(CGPoint)velocity targetContentOffset:(inout CGPoint *)targetContentOffset { *targetContentOffset = [self endPointWithTargetPoint:*targetContentOffset scrollView:scrollView]; } There are situations when the user scrolled so little that he did not reach the next or previous number. Then the control should jump to the nearest one. To do this, we implement the following delegate method:
- (void)scrollViewDidEndDragging:(UIScrollView *)scrollView willDecelerate:(BOOL)decelerate { if (!decelerate) { self.currentAngle = [self normalizeAngle:self.previousAngle]; [self rotateWithAngle:self.currentAngle]; } } Result:
Delegate methods
We will create delegate methods for our coolizer so that class users can assign a controller to be its delegate and receive information from it. But first we create a property that will return the value on the dial:
@property (nonatomic, readonly) NSInteger value; We define a getter for it:
- (NSInteger)value { NSInteger value = self.currentAngle > 0 ? floorf(self.currentAngle / self.angleStep) - self.numberOfLabels : floorf(self.currentAngle / self.angleStep); return labs(value) % self.numberOfLabels; } Is done. Now you can find out the current value on the dial.
We are engaged in the delegate.
@protocol AYNCircleViewDelegate <NSObject> @optional - (void)circleViewWillRotate:(AYNCircleView *)circleView; - (void)circleView:(AYNCircleView *)circleView didRotateWithValue:(NSUInteger)value; @end To start these two methods is enough. We are more interested in the second method, in which we get the value of the spinner at the current moment.
Create a delegate property on an
AYNCircleView : @property (weak, nonatomic) id<AYNCircleViewDelegate> delegate; We define the places where these methods will be called.
Since these methods are associated with rotation, we are interested in the method
- (void)rotateWithAngle:How it looks with method calls:
- (void)rotateWithAngle:(CGFloat)angle { if (self.delegate && [self.delegate respondsToSelector:@selector(circleViewWillRotate:)]) { [self.delegate circleViewWillRotate:self]; } [UIView animateWithDuration:0.1 animations:^{ self.contentView.transform = CGAffineTransformMakeRotation(angle); } completion:^(BOOL finished) { if (self.delegate && [self.delegate respondsToSelector:@selector(circleView:didRotateWithValue:)]) { [self.delegate circleView:self didRotateWithValue:self.value]; } }]; } Is done. Implement delegate methods in our
AYNViewController .Do not forget to make yourself a delegate to this twist:
self.circleView.delegate = self; Now we implement one of the methods. First, in the
Interface Builder label , which displays the value. @property (weak, nonatomic) IBOutlet UILabel *valueLabel; We proceed to the implementation.
#pragma mark - Circle View Delegate - (void)circleView:(AYNCircleView *)circleView didRotateWithValue:(NSUInteger)value { self.valueLabel.text = [NSString stringWithFormat:@"%ld", value]; } The result is ready.
In such a simple way, I invented my custom control. The whole project is available on the gita .
Source: https://habr.com/ru/post/326388/
All Articles