Prototype table in Axure, part two
Hello. Today I will talk a little more about the functionality of repeaters and how to prototype tables based on them.
Last time we drew a table, protypotyped scrolling of content, sorting and filtering. But this is not all that can be done with the help of a repeater. Below I will talk about how to make the table add and delete rows, as well as pagination.
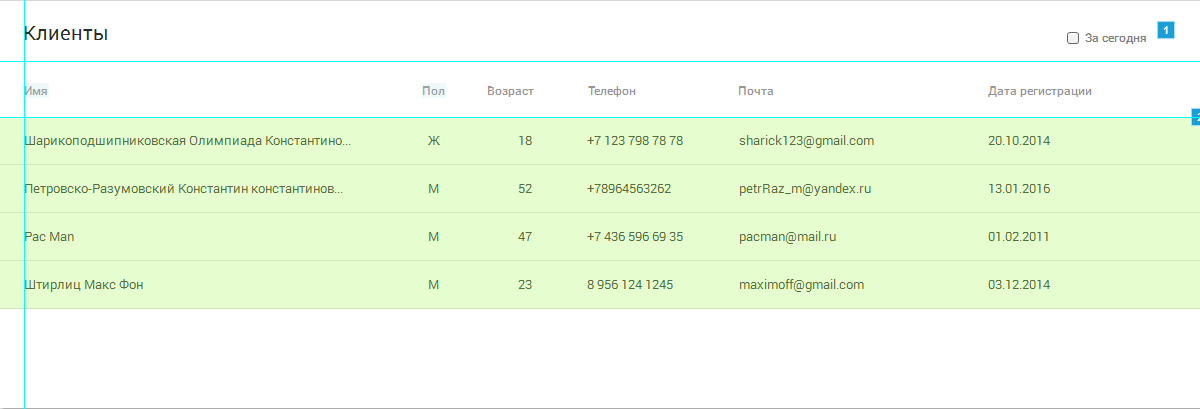
Fig. one
Let's start with pagination. Select the repeater and go to the Style tab, this is where the main display settings of the repeater are located. In the 'Pagination' group put the flag 'Multiple pages', set the number of lines that we want to simultaneously display (Items per page) and from which page to display by default (Starting page).
')
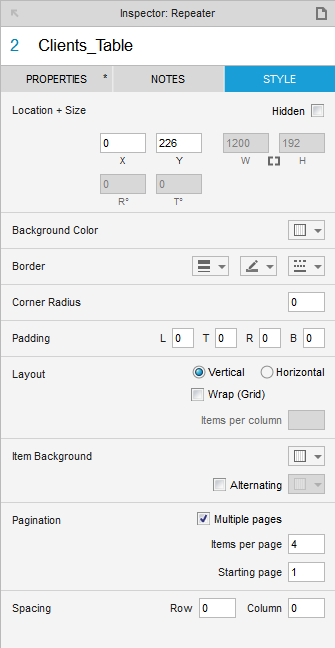
Fig. 2
Next, draw the buttons that we will walk through the pages. For simplicity, I will take two any arrows from the same awesome Font and the numbers “1” and “2”. These will be controls to navigate through the pages of the repeater.
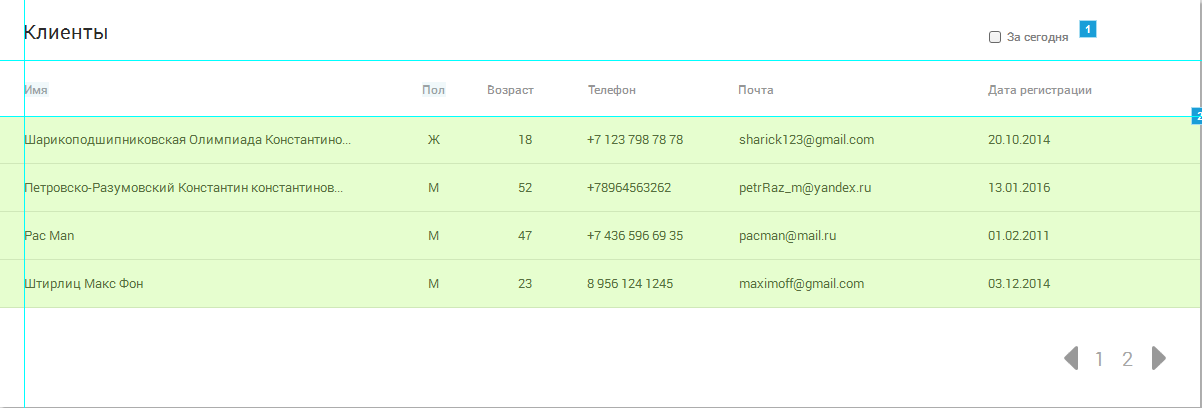
Fig. 3
Select the “Back” arrow and click on it to set the action 'Set Current Page', in the 'Select the page' field, select the 'Previous' option. Now when you click on the button, the repeater will show the previous page.
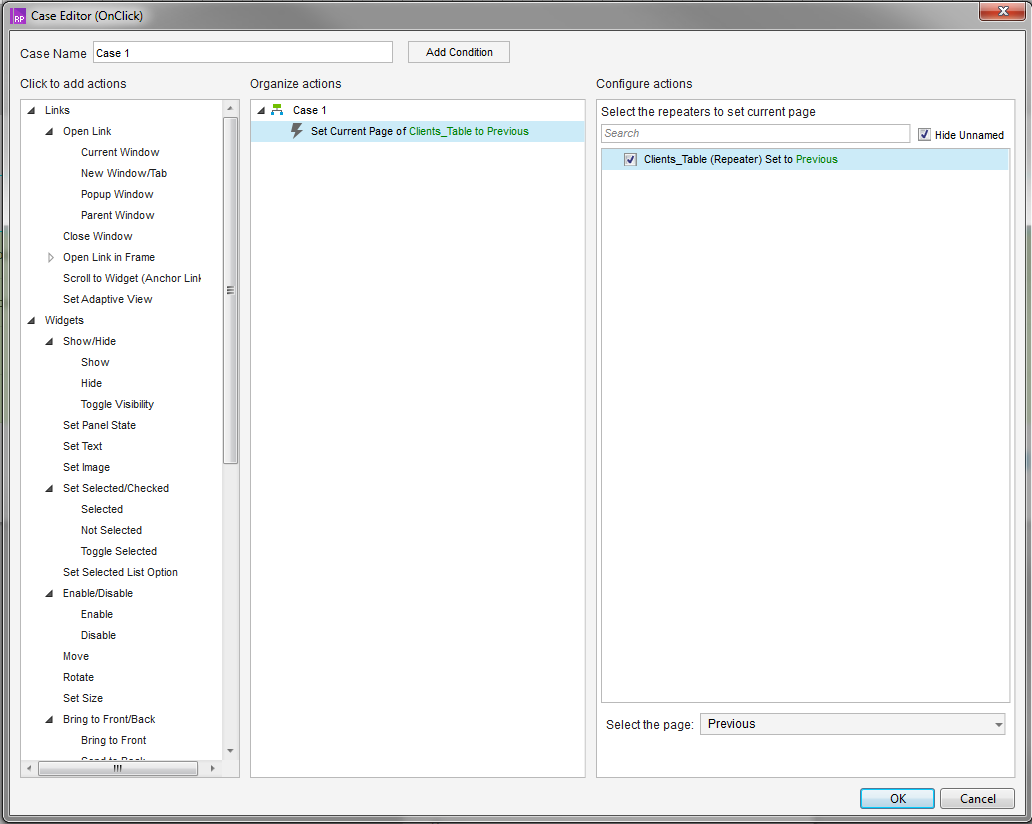
Fig. four
We do the same for the “Forward” arrow, but we indicate, accordingly, not 'Previous', but 'Next'. Done, now we can walk the arrows through the pages of the repeater.
Buttons with page numbers are prototyped in the same way, only in the 'Set Current Page' field the 'Value' item is selected, and in the 'Page #' field the page number is entered or the function defining it is written.
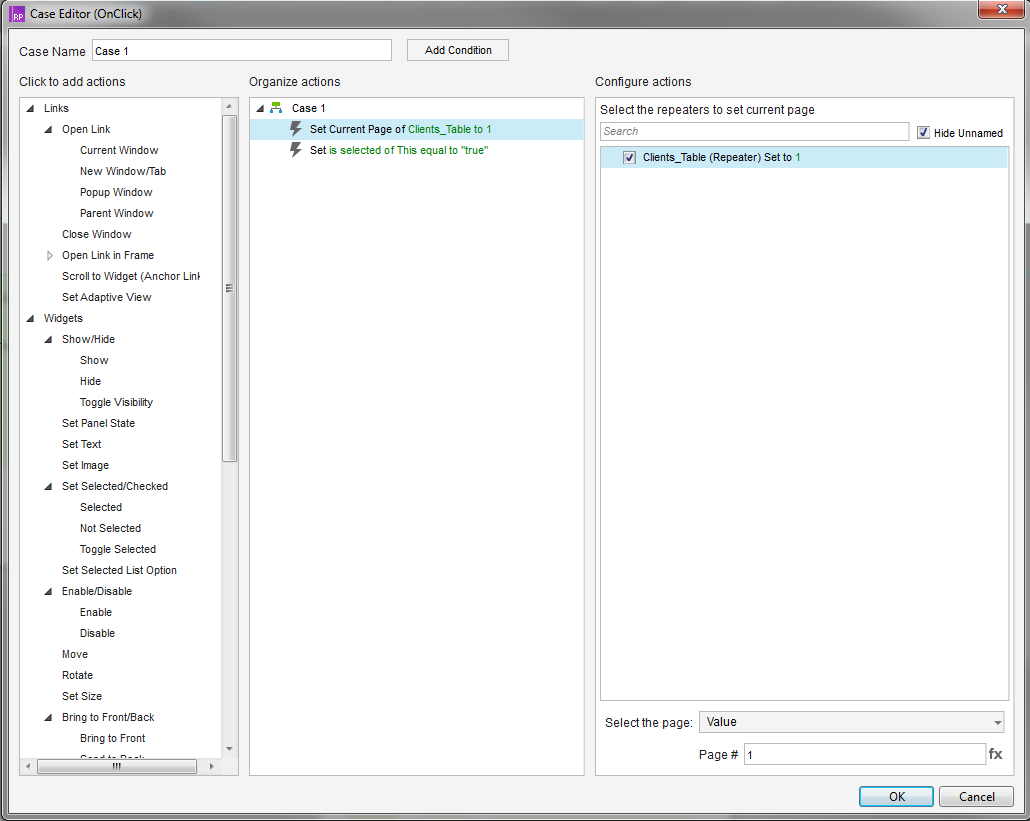
Fig. five
Do not forget that when you click on the page number, it should be in the 'Selected' position.
Next, add a new row to the table. First we need to make a form to add a new line. In other words, we need to create a form with fields similar to our items in the table and bind them to repeater containers. Draw a widget and monitor the types of inputs. Name, mail and phone are implemented with text input fields, gender - dropbox or radio buttons, and age as datapicer.
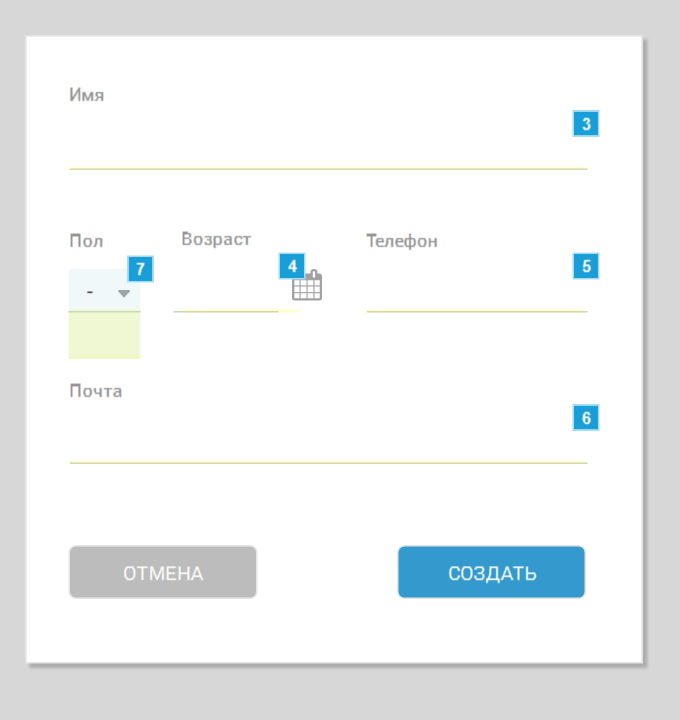
Fig. 6
Is done. To add a new line, we will use the “Plus Circle” icon from the Awesome Font. Give it the Interaction style. For the OnClick event, it will show our form for adding a new client. Be sure to call all input fields in the form (input). A new row will be added using the “Create” button, respectively, we set the 'OnClick' action to it, in the 'Case Editor' we find the 'Datasets' tab and select the 'Add Rows' action in it. Click on the 'Add Rows' button in the event panel and see a table in which each column corresponds to an item from our repeater. In order for the text from our inputs to be displayed in the columns we need, we will have to resort to using local variables. If we speak as simply as possible, the process will look like this: we start a new local variable (for example, 'Name_Var'), assign it a value from the corresponding input (for example, 'Name_Input') and then say that the value of the 'Name' item will be equal to the local variable ' Name_Var '.
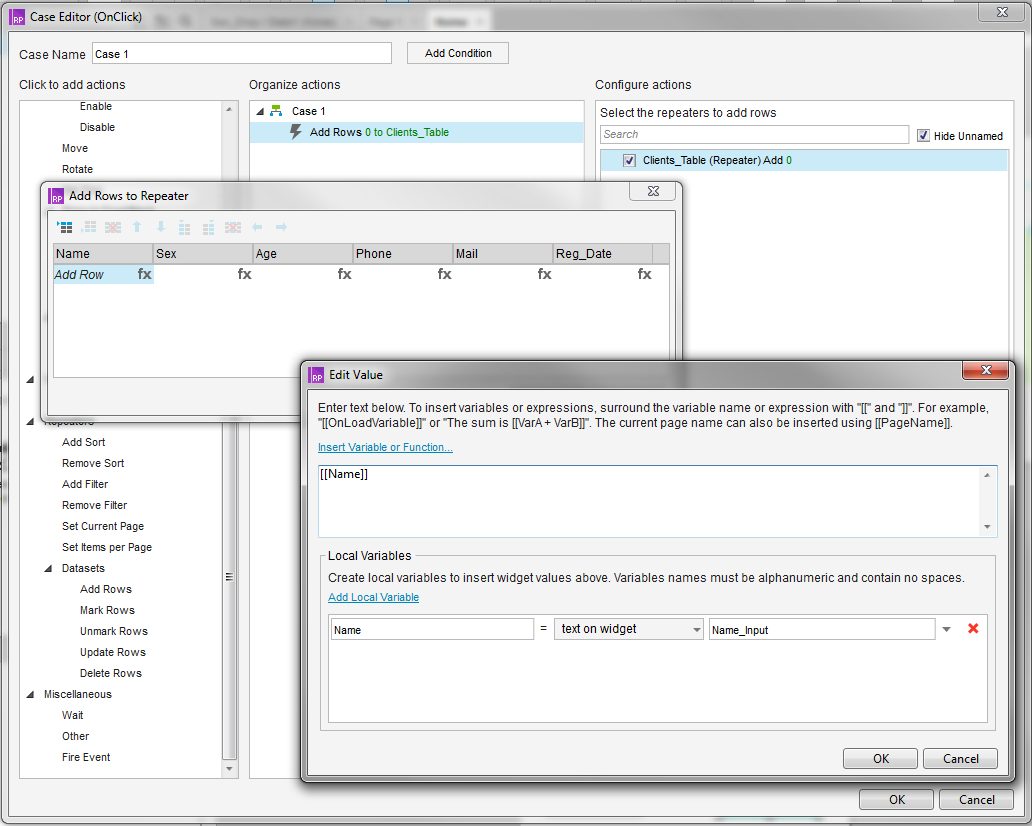
Fig. 7
Fill the table to the end.
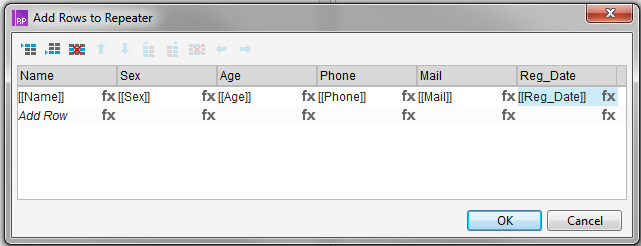
Fig. eight
Next, place the form to add a new client on the screen and hide it. When you click on the “Add” button, it should appear, when you click on the “Create” button, it should close and a new line should appear in our tablet. Check, added. Do not forget that when you add a new line, it will go to the very end of the list and you will most likely just not see it. To avoid this problem, assign an additional action to table creation, which will sort the table so that adding a new row is visible (see how to do sorting in the first part of this article).
Now we will make it possible to delete rows. To do this, go to the repeater and add an icon to it, by clicking on which we will delete the line. I will use the Trash icon from Awesome Font. Call it 'Delete' and tick 'Hiden'. Add an icon to the general group (so that the Interaction Style works) and upon the event 'OnMouseHover' we set the action 'Show' to this group, by which we will show this icon. In other words, when you hover on the line icon will appear. Now we will make the icon disappear when the cursor is removed from the line. To do this, select the repeater and the event 'OnMouseOut' set the action 'Hide' for our icon. Now we will make it so that by clicking on the icon, the line will be deleted. Go to the repeater, select the icon and the event 'OnClick' set the action 'Delete Rows' (Repeaters \ Datasets \ Delete Rows), select the repeater and turn on the radio button opposite 'This', this means that this line will be deleted specifically. You can also set the deletion rules - 'Rule' and delete the selected row or rows - 'Marked' (for example, in a situation when the control for deletion is located in the table header, and does not appear in a specific row).
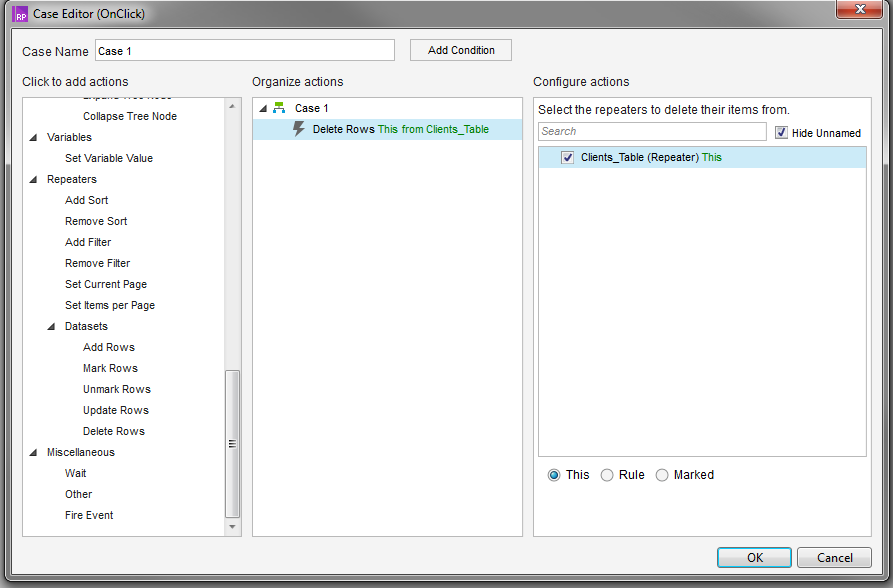
Fig. 9
We check, everything works.
In general, with the help of repeaters, you can do many things, not only a tabular display of data, but also card systems and whole pages that will contain dynamically loaded information. In two parts of this article we touched upon the main functionality, on the basis of which you can make your prototypes much richer and more elaborate. Next time I will tell you about some tricks that personally help me in my work.
And that's it for today. Thanks for attention.
Last time we drew a table, protypotyped scrolling of content, sorting and filtering. But this is not all that can be done with the help of a repeater. Below I will talk about how to make the table add and delete rows, as well as pagination.
Fig. one
Let's start with pagination. Select the repeater and go to the Style tab, this is where the main display settings of the repeater are located. In the 'Pagination' group put the flag 'Multiple pages', set the number of lines that we want to simultaneously display (Items per page) and from which page to display by default (Starting page).
')
Fig. 2
Next, draw the buttons that we will walk through the pages. For simplicity, I will take two any arrows from the same awesome Font and the numbers “1” and “2”. These will be controls to navigate through the pages of the repeater.
Fig. 3
Select the “Back” arrow and click on it to set the action 'Set Current Page', in the 'Select the page' field, select the 'Previous' option. Now when you click on the button, the repeater will show the previous page.
Fig. four
We do the same for the “Forward” arrow, but we indicate, accordingly, not 'Previous', but 'Next'. Done, now we can walk the arrows through the pages of the repeater.
Buttons with page numbers are prototyped in the same way, only in the 'Set Current Page' field the 'Value' item is selected, and in the 'Page #' field the page number is entered or the function defining it is written.
Fig. five
Do not forget that when you click on the page number, it should be in the 'Selected' position.
Next, add a new row to the table. First we need to make a form to add a new line. In other words, we need to create a form with fields similar to our items in the table and bind them to repeater containers. Draw a widget and monitor the types of inputs. Name, mail and phone are implemented with text input fields, gender - dropbox or radio buttons, and age as datapicer.
Fig. 6
Is done. To add a new line, we will use the “Plus Circle” icon from the Awesome Font. Give it the Interaction style. For the OnClick event, it will show our form for adding a new client. Be sure to call all input fields in the form (input). A new row will be added using the “Create” button, respectively, we set the 'OnClick' action to it, in the 'Case Editor' we find the 'Datasets' tab and select the 'Add Rows' action in it. Click on the 'Add Rows' button in the event panel and see a table in which each column corresponds to an item from our repeater. In order for the text from our inputs to be displayed in the columns we need, we will have to resort to using local variables. If we speak as simply as possible, the process will look like this: we start a new local variable (for example, 'Name_Var'), assign it a value from the corresponding input (for example, 'Name_Input') and then say that the value of the 'Name' item will be equal to the local variable ' Name_Var '.
Fig. 7
Fill the table to the end.
Fig. eight
Next, place the form to add a new client on the screen and hide it. When you click on the “Add” button, it should appear, when you click on the “Create” button, it should close and a new line should appear in our tablet. Check, added. Do not forget that when you add a new line, it will go to the very end of the list and you will most likely just not see it. To avoid this problem, assign an additional action to table creation, which will sort the table so that adding a new row is visible (see how to do sorting in the first part of this article).
Now we will make it possible to delete rows. To do this, go to the repeater and add an icon to it, by clicking on which we will delete the line. I will use the Trash icon from Awesome Font. Call it 'Delete' and tick 'Hiden'. Add an icon to the general group (so that the Interaction Style works) and upon the event 'OnMouseHover' we set the action 'Show' to this group, by which we will show this icon. In other words, when you hover on the line icon will appear. Now we will make the icon disappear when the cursor is removed from the line. To do this, select the repeater and the event 'OnMouseOut' set the action 'Hide' for our icon. Now we will make it so that by clicking on the icon, the line will be deleted. Go to the repeater, select the icon and the event 'OnClick' set the action 'Delete Rows' (Repeaters \ Datasets \ Delete Rows), select the repeater and turn on the radio button opposite 'This', this means that this line will be deleted specifically. You can also set the deletion rules - 'Rule' and delete the selected row or rows - 'Marked' (for example, in a situation when the control for deletion is located in the table header, and does not appear in a specific row).
Fig. 9
We check, everything works.
In general, with the help of repeaters, you can do many things, not only a tabular display of data, but also card systems and whole pages that will contain dynamically loaded information. In two parts of this article we touched upon the main functionality, on the basis of which you can make your prototypes much richer and more elaborate. Next time I will tell you about some tricks that personally help me in my work.
And that's it for today. Thanks for attention.
Source: https://habr.com/ru/post/326344/
All Articles