Getting Started Python + Qt5 + QML Lesson # 1
Hello. Today we will get acquainted with QML. We learn what it is and what it eats. Create a small application using this technology.
A small digression:
QML (Qt Meta Language) is a declarative JavaScript-based programming language for creating application design. It is part of the Qt Quick UI development environment that comes with Qt.
Examples of declarative languages include SQL and HTML. Read more about QML here: documentation .
Let's start with the simplest: creating a window. Create two files base.qml and test.py with the following content:
base.qml
import QtQuick 2.0 Rectangle { // id:green_rectangle width: 250; height: 250 // color:"green" // border-radius radius: 7 } test.py
import sys # QUrl Urls from PyQt5.QtCore import QUrl from PyQt5.QtWidgets import QApplication, QWidget # QQuickView QML . from PyQt5.QtQuick import QQuickView if __name__ == '__main__': app = QApplication(sys.argv) # QQuickView, UI view = QQuickView() view.setSource(QUrl('base.qml')) view.show() app.exec_() sys.exit() The code of the test.py file should be completely clear to you, but if it still causes you difficulties, I recommend to take a course on PyQt5 here: https://pythonworld.ru/gui/pyqt5-firstprograms.html
Actually, this is the simplest example of working with qml, at the output we get a window with a size of 250X250 and filled with green:

In QML, the main visible element is the Rectangle element. The Rectangle element has properties for controlling the appearance and location of the element, which we can set for it, for example:
id: ( , ) x: y: ( px) width: height: ( ) color: ( ) border.color: ( ) border.width: ( ) radius: ( border-radius) Other properties will be discussed later.
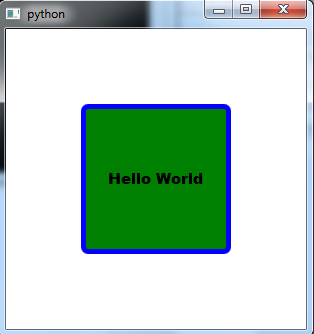
Let's slightly complicate the task: create a window in which there will be a rectangle with the inscription: "Hello World":
Rectangle { id:rec_main width: 300; height: 300 color:"#fff" radius: 7 Rectangle { id:rec_green width: 150; height: 150 color:"green" radius: 7 border.color: "#0000FF" border.width: 5 anchors.verticalCenter: parent.verticalCenter anchors.horizontalCenter: parent.horizontalCenter Text { id: helloText text: "Hello world!" anchors.verticalCenter: parent.verticalCenter anchors.horizontalCenter: parent.horizontalCenter font.pointSize: 10; font.bold: true } } } Now we get the following result:
Here we center our object vertically and horizontally relative to the parent anchors.verticalCenter: parent.verticalCenter, anchors.horizontalCenter: parent.horizontalCenter. Parent allows you to call the parent, in our case the parent of the Text object is a Rectangle with id: rec_green.
In general, now you need to understand that the QML interface is built on a hierarchy of objects. In our case, it looks like this:

Made a rectangle with the inscription. Hmm ... As long as it doesn’t look like a useful interface, let's add a button by clicking on which the inscription will be displayed in the console: "Hey Programmer".
Let's change the code a bit, now it will look like this:
import QtQuick 2.0 Rectangle { id:rec_white width: 300 height: 300 Rectangle { id:btn_green width: 80 height: 40 color:"green" radius: 7 border.color: "#0000FF" border.width: 1 anchors.verticalCenter: parent.verticalCenter anchors.horizontalCenter: parent.horizontalCenter Text { id: btn_green_label text: "Click me" anchors.horizontalCenter: parent.horizontalCenter anchors.verticalCenter: parent.verticalCenter } MouseArea { anchors.fill: parent onClicked: { console.log("Hey Programmer"); } } } } As a result, we obtain:

Here we add a MouseArea object that allows us to work with the mouse.
anchors.fill: parent - we say that the entire area of the parent will be involved.
onClicked - button click event. In our case, the function that calls up to the console is called: 'Hey Programmer'.
On this, perhaps, today and finish. In the following articles we will analyze qml in more detail.
While you may not see the benefits of using qml, but when we get to know this wonderful tool in more detail, you will understand how comfortable and functional it is.
Thanks for attention. If you have any questions, ask them in the comments. I hope the article was useful to you.
')
Source: https://habr.com/ru/post/326268/
All Articles