APS technology: control panel frontend and JS SDK features
Last time, we talked about APS (Application Packaging Standard) - our open technology for integrating applications into the OaDin Automation (SaaS marketplace) cloud services platform. Our platform connects developers and consumers of cloud services through the infrastructure of major service providers (providers of telecommunications and hosting services), while simultaneously providing an entry point for end users: a control panel or portal, with which you can create a website, set up mail, buy antivirus or virtual car in the cloud. In this post, we will discuss in more detail how the frontend of the control panel and APS applications is arranged and what features the APS JavaScript SDK provides.

For application management, additional purchases (upsell) and cross-sell (cross-sell) services, end users can use the control panel. It provides a common interface into which APS application developers embed their user interface.
Each service provider brand Odin Automation installation in their own colors. Therefore, we abandoned the use of proprietary markup and use the popular Twitter Bootstrap markup with the LESS CSS preprocessor. Since all applications use the APS JS SDK, the theme developer only needs to specify a few parameters in order to obtain a design corresponding to the brand book of the service provider or reseller.
')
In support of mobile devices, we did not limit ourselves to adaptive markup and a grid from Bootstrap, which an application developer can use to determine the size of widgets on various devices, but went further. Some complex widgets completely change their display on mobile devices. For example, a table is displayed as tiles; and a slider with a slider, which is obviously inconvenient to use on touch devices, turns into a spinner consisting of an input and the "+" / "-" buttons.

The panel itself, and each application are Single Page Applications. In the simplest case, each APS application is isolated in its IFrame, which the control panel’s router does not remove, but hides and shows. Similarly, inside the IFrame, the screens are not removed during the change, but are hidden and shown. Iframe needed to isolate applications from each other, because Applications are written by various vendors. At the same time, the isolation between the screens of one application is weaker: each screen is just a JavaScript module inherited from the corresponding class, and its display widgets are placed in a div. Thus, we have a SPA over SPA.
Let us consider in more detail our SPA. Each APS application is described by a special APP-Meta file. In particular, this file contains a description of all the screens of the application and its associated data. It also describes the relationship of applications. For example, if application A provides a wizard into which application B wants to integrate, application A declares support for embedding, declaring a so-called placeholder, and application B declares a desire to embed its screen into this placeholder.
In this case, the placeholder is not tied to a specific application. Multiple applications can declare the same placeholder, and then the application B screen will be embedded in all these applications.
Let's go back to the browser and explain how the SPA works on a small example.
Then everything is exactly the same as in Appendix A.
Let us dwell on the life cycle of the application screen. It consists of the following phases:
Above was described the simplest method of integration. But there are more difficult situations. Take this example: there is a dashboard application A, and application B wants to display some information using the widget. For such point integration, we have developed view-plugins. Embedding the view plugin is completely analogous to the placeholder mechanism described above. To maintain the isolation between A and B, all communication between them is carried out through a mediator. This is a special object that contains the description of the API view-plugin as a JSON-scheme, and first checks the plugin for all the required properties and methods, and then controls all communication between the host screen and the view plugin.
Let us consider an example. The mediator provides
View plug-ins can provide not only UI, but also logic. In this case, a certain API is placed in the mediator, which hides the logic from the external system, for example, the billing system. The application should not know which billing system is deployed with the service provider. Therefore, the specifics of working with it is hidden behind the unified API described in the standard, and the implementation of this API in each specific system is done in the form of a plug-in view plugin.
The first version of the APS JS SDK was developed more than five years ago and has since been continuously developed along with the APS standard. The framework was taken Dojo framework. Now it may seem strange, but by the standards of the Web-world it was a whole era ago. Then Angular was just beginning, and React didn’t exist at all.
What we liked about Dojo:
Now our framework provides APS application developers with the following modules:
Also, developers can connect third-party libraries either directly in the AMD-format, or as ES2015 modules, which will be converted to AMD.
Widgets are the building blocks of a user interface. In the APS JS SDK, they are logically separated from the HTML representation and can:
It is possible to add child widgets, both dynamically and in the description of the screen. There are two ways to describe widgets, and as needed, these methods can be combined on one screen in any combination. Consider these methods in more detail.
Creating widgets using constructors . First, you need to connect the required modules using the
Creating widgets using the declaration. The hierarchy of widgets and their properties are defined as a JSON-like structure, which is passed to the load function. The declaration of each widget is a JavaScript array, which can contain three elements:
The
When using
Obviously, widgets may not be enough to create a UI - they need data. Data sources for widgets come in the form of two types of modules: modules of type Model and modules of type Store.
Modules of the
An example of initializing a
Binding
Queries to any data sources are ultimately made using the Resource Query Language (RQL). RQL is a query language developed for use in URIs for working with object-like data structures. In more detail we will tell about it in the following posts.
Sample
Binding
Our APS platform is focused on third-party developers, so we must ensure stability and ease of development. Without well-developed documentation that would be impossible.
We have created a portal for developers, on which all the necessary documentation for creating a UI with code samples is available. This is a complete reference book: first, a certain general description of the interface, module or method is given, and in the nested levels more detailed information is given. In this part of the documentation is generated automatically based on the current code of our platform. Inside, properties, methods, and return values are described.
Another "chip" is a sandbox, integrated into the portal for developers. To get into it is very simple: click the “Run demo” button, which is in each code example:
Our APS Fiddle:
A detailed description of working with the sandbox is available here: Development Tools -> APS Fiddle .
We provide a public API on which the performance of over 500 applications with a total audience of several million users depends. This is a great responsibility. To facilitate the work of third-party developers and simplify the work with our platform as much as possible, we have made detailed documentation and a sandbox. And in order to not accidentally break anything, we provided a very high code coverage with tests. How we achieved this - read about it in the next post.
Control panel and application screens
For application management, additional purchases (upsell) and cross-sell (cross-sell) services, end users can use the control panel. It provides a common interface into which APS application developers embed their user interface.
Each service provider brand Odin Automation installation in their own colors. Therefore, we abandoned the use of proprietary markup and use the popular Twitter Bootstrap markup with the LESS CSS preprocessor. Since all applications use the APS JS SDK, the theme developer only needs to specify a few parameters in order to obtain a design corresponding to the brand book of the service provider or reseller.
')
In support of mobile devices, we did not limit ourselves to adaptive markup and a grid from Bootstrap, which an application developer can use to determine the size of widgets on various devices, but went further. Some complex widgets completely change their display on mobile devices. For example, a table is displayed as tiles; and a slider with a slider, which is obviously inconvenient to use on touch devices, turns into a spinner consisting of an input and the "+" / "-" buttons.
The panel itself, and each application are Single Page Applications. In the simplest case, each APS application is isolated in its IFrame, which the control panel’s router does not remove, but hides and shows. Similarly, inside the IFrame, the screens are not removed during the change, but are hidden and shown. Iframe needed to isolate applications from each other, because Applications are written by various vendors. At the same time, the isolation between the screens of one application is weaker: each screen is just a JavaScript module inherited from the corresponding class, and its display widgets are placed in a div. Thus, we have a SPA over SPA.
Single page application
Let us consider in more detail our SPA. Each APS application is described by a special APP-Meta file. In particular, this file contains a description of all the screens of the application and its associated data. It also describes the relationship of applications. For example, if application A provides a wizard into which application B wants to integrate, application A declares support for embedding, declaring a so-called placeholder, and application B declares a desire to embed its screen into this placeholder.
<!— --> <wizard id="addUser" label="Add New Users" …> <placeholder id="http://www.aps-standard.org/ui/service/suwizard.new/2"/> … </wizard> <!— B --> <view id="signupfilesharing" label="File Sharing" … > <plugs-to id="http://www.aps-standard.org/ui/service/suwizard.new/2"/> </view> In this case, the placeholder is not tied to a specific application. Multiple applications can declare the same placeholder, and then the application B screen will be embedded in all these applications.
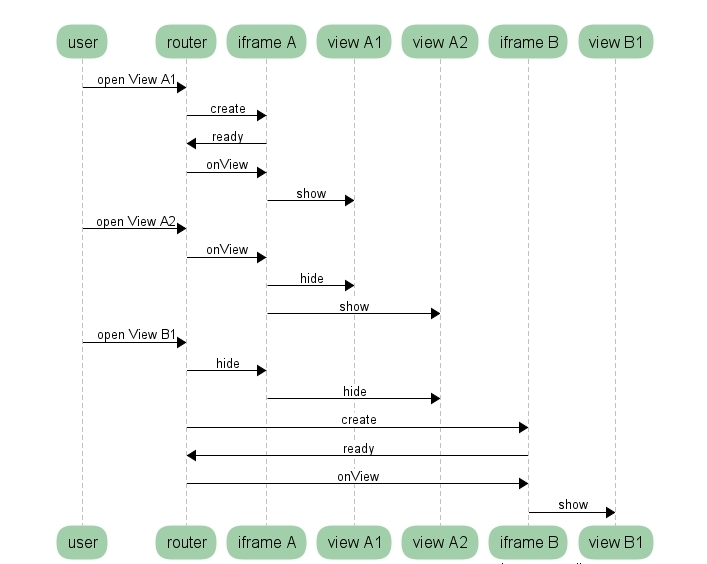
Let's go back to the browser and explain how the SPA works on a small example.
- The user opens the application view-11 screen in the control panel.
- The router of the control panel creates an IFrame and loads into it the starting bootstrapApp.html, common for all applications. Then connects the module view A1 . The instance of this module will remain in the IFrame, even if the user switches to another screen.
- In the same application, the user switches to the view A2 screen.
- The router connects the view A2 module to the IFrame. Now all transitions between these screens will occur in one IFrame.
- The user switches to the view B1 screen of the application B.
- The router creates a new IFrame and loads bootstrapApp.html into it with the source code view B1 . Now this code will remain in the IFrame, even if the user switches to another screen.
Then everything is exactly the same as in Appendix A.
Let us dwell on the life cycle of the application screen. It consists of the following phases:
- Initialization (init method). In it, the application must declare the widgets and associate them with the model.
- Preparing for the show (onShow method). Here the application can perform preparatory actions that do not require data acquisition.
- Show (onContext method). In this phase, the screen received data from the control panel that was previously described in the APP-Meta file. Of course, the screen can go to the server itself for the data, but we advise you to use the declaration, as this saves loading time. The fact is that to show each screen, the front-end makes a request to the server, because the structure of the screens could change. If the data was previously described, they will be received in the same request. If the screen itself goes after the data, then the end user will have to wait until the first request is received, and then wait for the second and subsequent ones. After the screen has received data, it puts them in the model, and the widgets change their state.
- Hiding (onHide method). Here the application clears the widgets and returns them to the neutral state. For this, the screen has a special method.
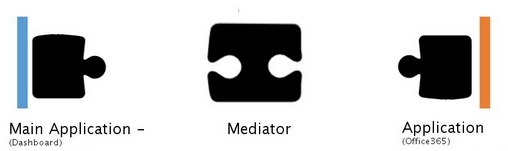
Above was described the simplest method of integration. But there are more difficult situations. Take this example: there is a dashboard application A, and application B wants to display some information using the widget. For such point integration, we have developed view-plugins. Embedding the view plugin is completely analogous to the placeholder mechanism described above. To maintain the isolation between A and B, all communication between them is carried out through a mediator. This is a special object that contains the description of the API view-plugin as a JSON-scheme, and first checks the plugin for all the required properties and methods, and then controls all communication between the host screen and the view plugin.
Let us consider an example. The mediator provides
resourceUsage data and a custom getWidget operation, which takes an optional argument in the form of a boolean value: { "properties": { "resourceUsage": { // type , resourceUsage // URI- APS , post-noSQL APS, "type": "http://aps-standard.org/types/core/subscription/1.0#SubscriptionResource", } }, "operations": { "getWidget": { "parameters": { "withData": { "type": "boolean", "required": false } }, "response": { "type": "string", "required": false } } } } View plug-ins can provide not only UI, but also logic. In this case, a certain API is placed in the mediator, which hides the logic from the external system, for example, the billing system. The application should not know which billing system is deployed with the service provider. Therefore, the specifics of working with it is hidden behind the unified API described in the standard, and the implementation of this API in each specific system is done in the form of a plug-in view plugin.
Sdk
The first version of the APS JS SDK was developed more than five years ago and has since been continuously developed along with the APS standard. The framework was taken Dojo framework. Now it may seem strange, but by the standards of the Web-world it was a whole era ago. Then Angular was just beginning, and React didn’t exist at all.
What we liked about Dojo:
- ready loader and modular system based on AMD;
- native support for classes with multiple inheritance;
- implementation of promises;
- a large number of different auxiliary modules;
- well thought-out APIs and extensive documentation.
Now our framework provides APS application developers with the following modules:
- a large number of different widgets (spinner, slider, grid, password, etc.);
- modules for working with data (both client and server storages) and modules for two-way data binding and display;
- various auxiliary modules: API for working with billing systems, localization and internationalization utilities, a password generator for a given security policy, and much more.
Also, developers can connect third-party libraries either directly in the AMD-format, or as ES2015 modules, which will be converted to AMD.
Widgets
Widgets are the building blocks of a user interface. In the APS JS SDK, they are logically separated from the HTML representation and can:
- dynamically change the values of their properties;
- inherit from each other;
- include other widgets at the template level.
It is possible to add child widgets, both dynamically and in the description of the screen. There are two ways to describe widgets, and as needed, these methods can be combined on one screen in any combination. Consider these methods in more detail.
Creating widgets using constructors . First, you need to connect the required modules using the
require() function or use the import keyword if you are using a transpiler, and then create widgets by calling the constructor with the necessary parameters. Their hierarchy is determined by the addChild method, which adds child widgets. import Button from "aps/Button"; var btn = new Button({ id: "example1", label: "I am simple button" }); Creating widgets using the declaration. The hierarchy of widgets and their properties are defined as a JSON-like structure, which is passed to the load function. The declaration of each widget is a JavaScript array, which can contain three elements:
- widget name;
- (optional) widget property set,
- (optional) an array containing child elements.
import load from "aps/load"; load([ "aps/ProgressBar", { value: "35%" } ]); The
load method itself connects the required modules, so it works asynchronously and returns a promise that will be resolved by the widget declared in the root of the passed structure. load([ "aps/ProgressBar", { id: "myProgBar", value: 0 } ]) .then(function(pb) { pb.set("value", 41); }); When using
load -a, the code is more logical and readable: first comes the parent widget, and then the children. Large structures can be divided into sections and decomposed into separate variables with understandable names, and then combined into one structure.Work with data
Obviously, widgets may not be enough to create a UI - they need data. Data sources for widgets come in the form of two types of modules: modules of type Model and modules of type Store.
Modules of the
Model type - a set of modules for two-way or one-sided linking of widgets and data. Using the at() method, a link is executed with the widget. The watch() method is used to track changes to the Model. To work with Model properties, get() and set() methods are used.An example of initializing a
Model from a JSON representation: require([ "dojox/mvc/getStateful", ... "aps/json!./newoffer.json" ], function (getStateful, ..., newOffer) { /* Declare the data source */ var model = getStateful(JSON.parse(newOffer)); ... }); Binding
Model to widgets: var widgets = ["aps/PageContainer", { id: "page"}, [ ["aps/FieldSet", { title: true}, [ ["aps/TextBox", { id: "offerName", label: _("Offer Name"), value: at(model, "name"), required: true }], ["aps/TextBox", { label: _("Description"), value: at(model, "description") }] ]], ... ]]; load(widgets); Store type modules are designed to work with various data sources. Sources are local when all data is on the client and remote when data is on the backend. Since the remote source is usually an APS controller, the module for working with it provides the transfer of authentication information and supports properties associated with the specificity of the APS, for example, apsType. Regardless of the type of data source, interaction with widgets that display data goes unilaterally. To reflect changes in widgets, you must explicitly trigger data updates.Queries to any data sources are ultimately made using the Resource Query Language (RQL). RQL is a query language developed for use in URIs for working with object-like data structures. In more detail we will tell about it in the following posts.
Sample
Store ad: import Store from "aps/ResourceStore"; var offerStore = new Store({ apsType: "http://aps-standard.org/samples/vpscloud/offer/1.0", target: "/aps/2/resources/" + aps.context.vars.cloud.aps.id + "/offers" ... }); Binding
Store to a table displaying widget: load(["aps/PageContainer", { id: "page" }, [ ["aps/Grid", { id: "grid", columns: [ { field: "offername", name: "Name", type: "resourceName" }, { field: "hardware.memory", name: "RAM, MB" }, ... ], store: offerStore }, ... ] ]]); Documentation and sandbox
Our APS platform is focused on third-party developers, so we must ensure stability and ease of development. Without well-developed documentation that would be impossible.
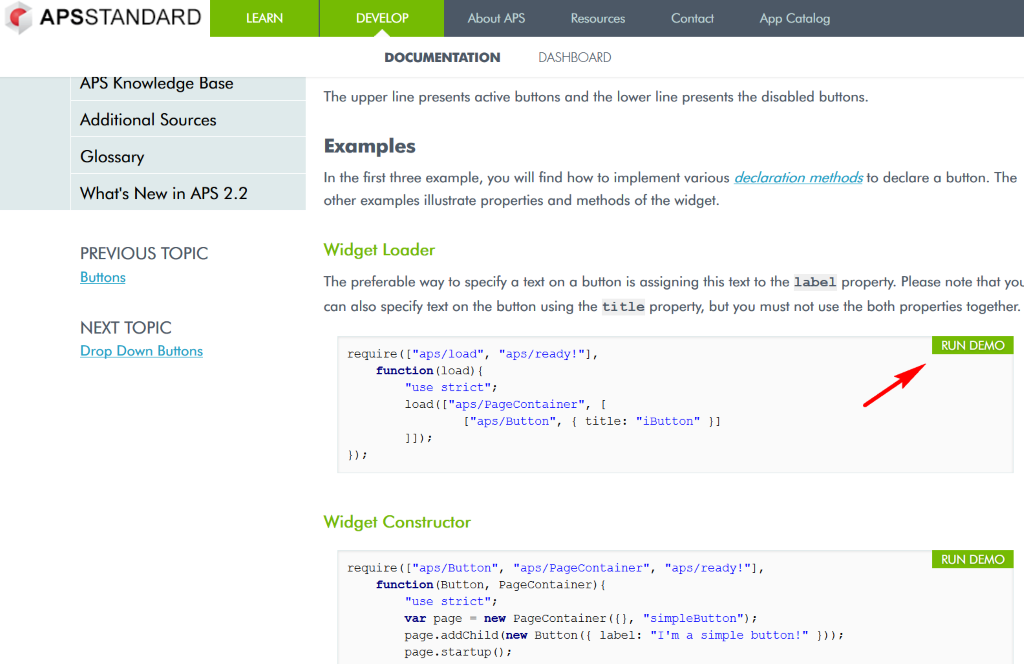
We have created a portal for developers, on which all the necessary documentation for creating a UI with code samples is available. This is a complete reference book: first, a certain general description of the interface, module or method is given, and in the nested levels more detailed information is given. In this part of the documentation is generated automatically based on the current code of our platform. Inside, properties, methods, and return values are described.
Another "chip" is a sandbox, integrated into the portal for developers. To get into it is very simple: click the “Run demo” button, which is in each code example:
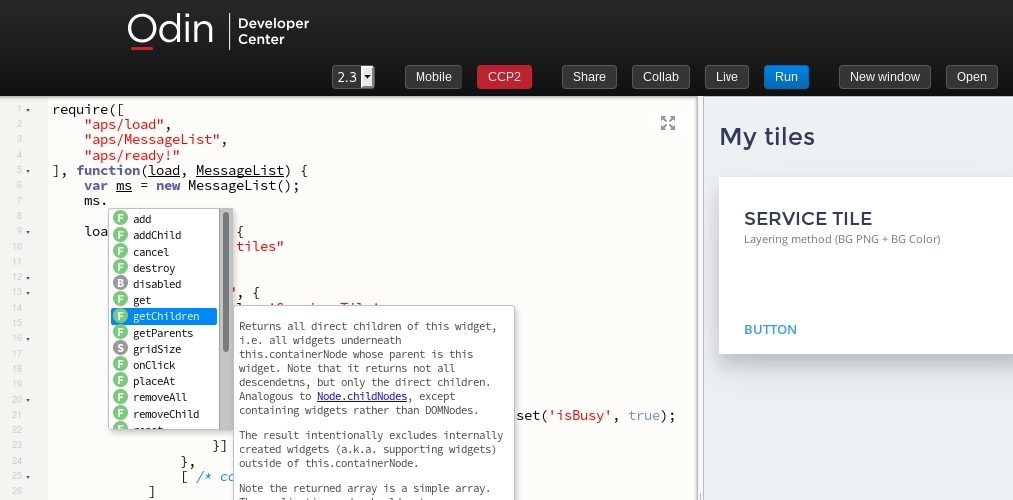
Our APS Fiddle:
- knows all the APIs of our widgets and can prompt the names of properties and method signatures;
- allows you to compare the behavior of the code in different versions of the standard APS;
- can switch from mobile to desktop view;
- provides links to code snippets that can be sent to your colleagues or support service (Share);
- allows you to work on code together (Collab);
- can generate a finished file with your code, as if it were a separate application screen, and this file can be immediately thrown into a real project and tested.
A detailed description of working with the sandbox is available here: Development Tools -> APS Fiddle .
Finally
We provide a public API on which the performance of over 500 applications with a total audience of several million users depends. This is a great responsibility. To facilitate the work of third-party developers and simplify the work with our platform as much as possible, we have made detailed documentation and a sandbox. And in order to not accidentally break anything, we provided a very high code coverage with tests. How we achieved this - read about it in the next post.
Source: https://habr.com/ru/post/326232/
All Articles