Setting up remote access to Windows using noVNC
This guide is about how to configure noVNC for remote access to computers on Windows.
- Windows has a “native” tool for remote access - Remote Desktop Connection. But it is not in all versions of Windows - for example, not in the Home edition.
- There are also many VNC servers and clients for any version of Windows. But to use them, you need to install a VNC client. And there are cases when you can not put anything (restriction of rights), or it is undesirable, so as not to leave traces on someone else's computer.
- There is also Chrome Remote Desktop, which on the client side only needs an extension in the browser. But I had a case when the Chrome protocol was blocked by the organization (almost everything was blocked there), and noVNC uses plain HTTP and therefore worked.
As far as I know, noVNC is the only tool that allows you to connect to a remote computer without installing any client - only a browser is used.
There is still SPICE , but for it I did not find the server under Windows.
')
As a result of this manual, we can simply open a link in the browser, enter a password and use a remote system.
A prerequisite is port forwarding, or the white IP of the remote computer. You can also use the VNC repeater. But this is already beyond the scope of this article.
First, we will put the normal VNC server on port 5900.
Then put noVNC and WebSockify on port 5901.
WebSockify is a kind of proxy, which on the one hand can talk to VNC, which we have on port 5900, and on the other, can broadcast it to the browser via the web socket, which we will have on port 5901.
noVNC is just an html-application, or as it is called today Single Page Application, which will work in the client browser and “talk” with WebSockify on the server.
In fact, in nature there are VNC servers that can immediately connect via web sockets:
- MobileVNC , but it is paid (10 Euro per device)
- There is a library LibVNCServer , which supports web sockets, and theoretically works under Windows, but I did not find any ready server under Windows with this library.
In this case, WebSockify will no longer be needed.
The VNC protocol itself is standardized, so theoretically any VNC server can be used.
At first I tried to put TightVNC, but noVNC had some authentication problems with it. I think that it was possible to figure it out, but I put UltraVNC (carefully, they have tons of advertising there, real links are at the bottom of the page) and it all worked.
Most likely, most VNC servers that support Windows will work.
I set the VNC server on port 5900. Don't forget to set the password for the VNC connection. UltraVNC will not connect until you set a password.
Check that the VNC server is working by connecting to it using the VNC client from another computer or smartphone.
Create a folder in a convenient place, and upload it there:
- unpack zip archive noVNC
- unpack zip archive WebSockify
The goal is to get something like this:
Now run the command prompt with administrator rights:
Launch WebSockify:
The first parameter above is the port on which noVNC will listen: 5901 . This port needs to be made available to clients.
The second parameter is the IP and port where the VNC server is located: 127.0.0.1:5900
The third parameter --web instructs noVNC to give the contents of the c: \ noVNC \ noVNC-master directory over HTTP (s). By default, noVNC gives only VNC web sockets, but this option allows you to have an HTTP server on the same port.
In the c: \ noVNC \ noVNC-master directory, rename the vnc.html file to index.html so that it is given by default.
Now the noVNC client should be available on port 5901:

Also try opening the noVNC page from another computer / smartphone to make sure it is accessible from the outside. If not, check:
- that your Windows Firewall does not block external connections to this port,
- that your router correctly redirects requests to this port to the desired computer; if you need to google "port forwarding".
Connect (Connect), enter the VNC password and see the desktop of the remote computer!
If something went wrong, the errors should appear in our console.
You can stop the noVNC server by pressing Ctrl-C in the console. The configuration described above works on HTTP (and on WS).
Adding SSL is optional. You can create a self-signed certificate like this:
For Windows, openssl can be found here .
As a result, we get the self.pem file, which must be indicated at the start of noVNC:
Now we have HTTPS and WSS (WebSocket Secure). For WSS, you must specify Encrypt in the Settings. Interestingly, noVNC uses the same port for HTTP and HTTPS — it “knows” to distinguish requests and respond correctly.
Since the certificate is self-signed, you will need to accept this certificate in the browser.
I do not have instructions on how to configure the system, so that Let's Encrypt automatically generate a certificate specifically for our system. This would require noVNC to work on port 80, which of course is possible, but may be inconvenient, and find a way to integrate certbot so that these files are published in the correct directory. I think it is possible, but I did not. If you finish - share in the comments.
In my case, I already have a home servac with NGINX and DDNS name, which is configured to automatically receive a certificate from Lets Encrypt.
You can run something similar on your own. Here are instructions on how to configure Let's Encrypt for Linux and Windows.
Therefore, for noVNC, I simply use existing pem files generated for nginx .
Let's Encrypt creates the following files:
On Ubuntu, you can find them in this way: / etc / letsencrypt / live / your_domain_name
We need to copy (merge) fullchain.pem and privkey.pem into one file, for example, let's call it encrypt.pem , and we will use this file for noVNC .
Of course, this will only work if the nginx server and noVNC are on the same domain. Ports may be different.
And we must not forget that certificates are only valid for a few months, and then you need to copy the updated files.
Download the zip-archive , and unpack the files from there so that they are in the same folder as the websockify.exe file, that is, in our case, in c: \ noVNC \ websockify .
At startup, the service will use the parameters from the noVNCConfig.ini file. Here is an example of my config:
In the console running with administrator privileges we create a new service:
If you need to remove the service, then this:
Open services (Control Panel → Administrative Tools → Services) and launch noVNC Websocket Server. Also here you can configure the service to start every time along with Windows:
I found that the Russian keyboard layout works in a rather unusual way:
If the client has Russian selected, then keystrokes are not transmitted to the remote computer at all.
Therefore, to print in Russian on a remote computer:
- the English layout must be selected on the client
- the Russian layout must be selected on the remote system

The clipboard (clipboard) works through a button in the browser (in the screenshot above), that is, you can put something in there and pick it up on a remote system, or vice versa. And it (I) does not know how to work with Russian letters.
Why noVNC?
- Windows has a “native” tool for remote access - Remote Desktop Connection. But it is not in all versions of Windows - for example, not in the Home edition.
- There are also many VNC servers and clients for any version of Windows. But to use them, you need to install a VNC client. And there are cases when you can not put anything (restriction of rights), or it is undesirable, so as not to leave traces on someone else's computer.
- There is also Chrome Remote Desktop, which on the client side only needs an extension in the browser. But I had a case when the Chrome protocol was blocked by the organization (almost everything was blocked there), and noVNC uses plain HTTP and therefore worked.
As far as I know, noVNC is the only tool that allows you to connect to a remote computer without installing any client - only a browser is used.
There is still SPICE , but for it I did not find the server under Windows.
')
As a result of this manual, we can simply open a link in the browser, enter a password and use a remote system.
A prerequisite is port forwarding, or the white IP of the remote computer. You can also use the VNC repeater. But this is already beyond the scope of this article.
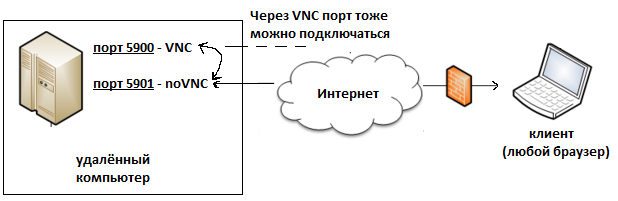
General scheme
First, we will put the normal VNC server on port 5900.
Then put noVNC and WebSockify on port 5901.
WebSockify is a kind of proxy, which on the one hand can talk to VNC, which we have on port 5900, and on the other, can broadcast it to the browser via the web socket, which we will have on port 5901.
noVNC is just an html-application, or as it is called today Single Page Application, which will work in the client browser and “talk” with WebSockify on the server.
In fact, in nature there are VNC servers that can immediately connect via web sockets:
- MobileVNC , but it is paid (10 Euro per device)
- There is a library LibVNCServer , which supports web sockets, and theoretically works under Windows, but I did not find any ready server under Windows with this library.
In this case, WebSockify will no longer be needed.
We put VNC
The VNC protocol itself is standardized, so theoretically any VNC server can be used.
At first I tried to put TightVNC, but noVNC had some authentication problems with it. I think that it was possible to figure it out, but I put UltraVNC (carefully, they have tons of advertising there, real links are at the bottom of the page) and it all worked.
Most likely, most VNC servers that support Windows will work.
I set the VNC server on port 5900. Don't forget to set the password for the VNC connection. UltraVNC will not connect until you set a password.
Check that the VNC server is working by connecting to it using the VNC client from another computer or smartphone.
noVNC and WebSockify
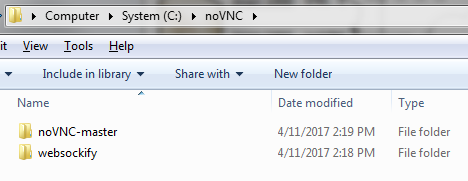
Create a folder in a convenient place, and upload it there:
- unpack zip archive noVNC
- unpack zip archive WebSockify
The goal is to get something like this:
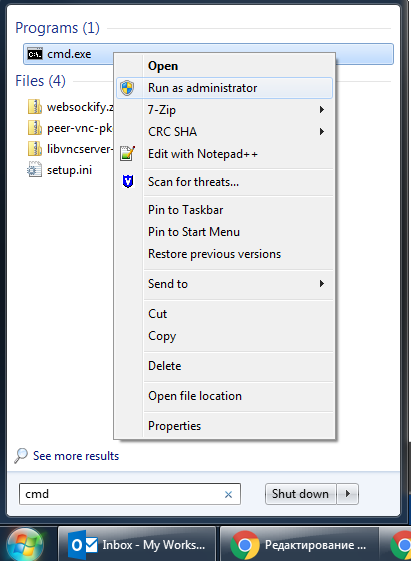
Now run the command prompt with administrator rights:
Launch WebSockify:
c:\> cd c:\noVNC\websockify c:\noVNC\websockify> websockify.exe 5901 127.0.0.1:5900 --web c:\noVNC\noVNC-master WARNING: no 'resource' module, daemonizing support disabled WebSocket server settings: - Listen on :5901 - Flash security policy server - Web server. Web root: c:\noVNC\noVNC-master - No SSL/TLS support (no cert file) - proxying from :5901 to 127.0.0.1:5900 The first parameter above is the port on which noVNC will listen: 5901 . This port needs to be made available to clients.
The second parameter is the IP and port where the VNC server is located: 127.0.0.1:5900
The third parameter --web instructs noVNC to give the contents of the c: \ noVNC \ noVNC-master directory over HTTP (s). By default, noVNC gives only VNC web sockets, but this option allows you to have an HTTP server on the same port.
In the c: \ noVNC \ noVNC-master directory, rename the vnc.html file to index.html so that it is given by default.
Now the noVNC client should be available on port 5901:
Also try opening the noVNC page from another computer / smartphone to make sure it is accessible from the outside. If not, check:
- that your Windows Firewall does not block external connections to this port,
- that your router correctly redirects requests to this port to the desired computer; if you need to google "port forwarding".
Connect (Connect), enter the VNC password and see the desktop of the remote computer!
If something went wrong, the errors should appear in our console.
You can stop the noVNC server by pressing Ctrl-C in the console. The configuration described above works on HTTP (and on WS).
Add SSL with self-signed certificate
Adding SSL is optional. You can create a self-signed certificate like this:
openssl req -new -x509 -days 365 -nodes -out self.pem -keyout self.pem For Windows, openssl can be found here .
As a result, we get the self.pem file, which must be indicated at the start of noVNC:
c:\noVNC\websockify> websockify.exe 5901 127.0.0.1:5900 --web c:\noVNC\noVNC-master --cert=c:\noVNC\self.pem Now we have HTTPS and WSS (WebSocket Secure). For WSS, you must specify Encrypt in the Settings. Interestingly, noVNC uses the same port for HTTP and HTTPS — it “knows” to distinguish requests and respond correctly.
Since the certificate is self-signed, you will need to accept this certificate in the browser.
Let's Encrypt
I do not have instructions on how to configure the system, so that Let's Encrypt automatically generate a certificate specifically for our system. This would require noVNC to work on port 80, which of course is possible, but may be inconvenient, and find a way to integrate certbot so that these files are published in the correct directory. I think it is possible, but I did not. If you finish - share in the comments.
In my case, I already have a home servac with NGINX and DDNS name, which is configured to automatically receive a certificate from Lets Encrypt.
You can run something similar on your own. Here are instructions on how to configure Let's Encrypt for Linux and Windows.
Therefore, for noVNC, I simply use existing pem files generated for nginx .
Let's Encrypt creates the following files:
cert.pem: Your domain's certificate chain.pem: The Let's Encrypt chain certificate fullchain.pem: cert.pem and chain.pem combined privkey.pem: Your certificate's private key On Ubuntu, you can find them in this way: / etc / letsencrypt / live / your_domain_name
We need to copy (merge) fullchain.pem and privkey.pem into one file, for example, let's call it encrypt.pem , and we will use this file for noVNC .
Of course, this will only work if the nginx server and noVNC are on the same domain. Ports may be different.
And we must not forget that certificates are only valid for a few months, and then you need to copy the updated files.
Add noVNC as a Windows service
Download the zip-archive , and unpack the files from there so that they are in the same folder as the websockify.exe file, that is, in our case, in c: \ noVNC \ websockify .
At startup, the service will use the parameters from the noVNCConfig.ini file. Here is an example of my config:
5901 127.0.0.1:5900 --web C:\noVNC\noVNC-master --cert=c:\noVNC\encrypt.pem In the console running with administrator privileges we create a new service:
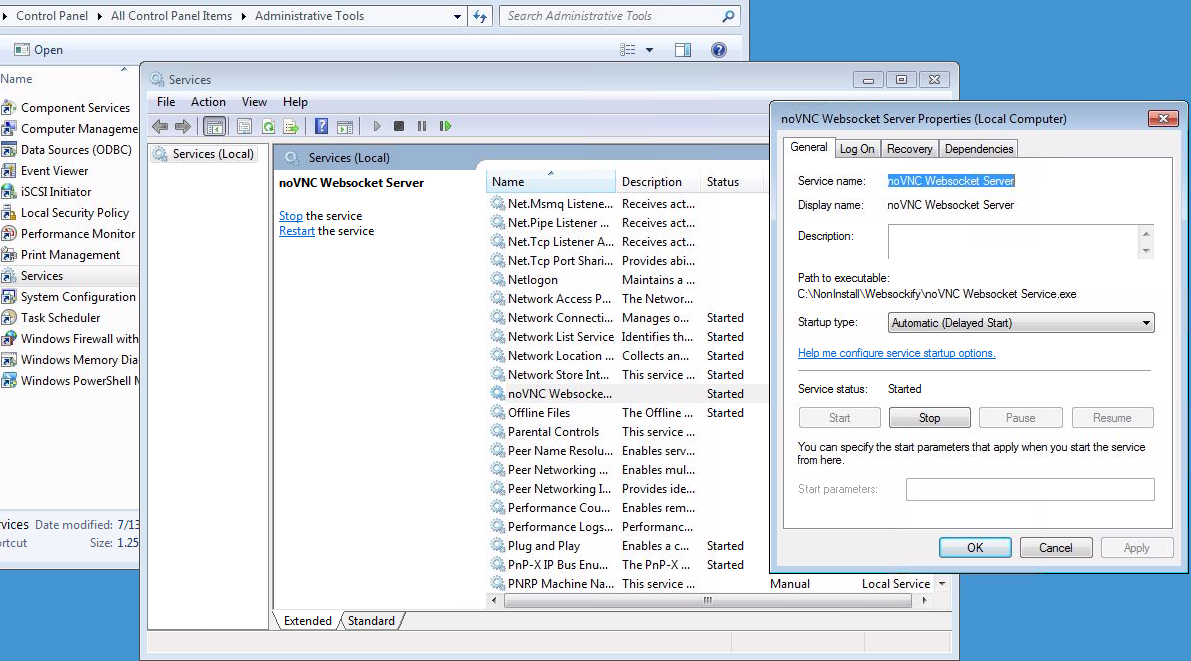
sc create "noVNC Websocket Server" binPath= "c:\noVNC\websockify\noVNC Websocket Service.exe" DisplayName= "noVNC Websocket Server" If you need to remove the service, then this:
sc delete "noVNC Websocket Server" Open services (Control Panel → Administrative Tools → Services) and launch noVNC Websocket Server. Also here you can configure the service to start every time along with Windows:
Known flaws
Keyboard layout
I found that the Russian keyboard layout works in a rather unusual way:
If the client has Russian selected, then keystrokes are not transmitted to the remote computer at all.
Therefore, to print in Russian on a remote computer:
- the English layout must be selected on the client
- the Russian layout must be selected on the remote system
Clipboard
The clipboard (clipboard) works through a button in the browser (in the screenshot above), that is, you can put something in there and pick it up on a remote system, or vice versa. And it (I) does not know how to work with Russian letters.
Source: https://habr.com/ru/post/326164/
All Articles