The dark side of using CSS polyfills
Last year, I wrote an article about Houdini for Smashing Magazine and called it "the most awesome CSS project you've never heard of." In this article I will explain that the Houdini API set will allow (among other things) to extend CSS functions through polyfills in a way that is simply impossible today.
Although that article was generally well received, the same question was constantly asked me in letters and twitter. The main essence of the question:
And I understood - of course, people have such questions. If you have never tried to write a CSS polyfill yourself, you probably never experienced this pain.
So the best way to answer this question — and to explain why Houdini impresses me so much — is to show clearly why it is so difficult to use CSS polyfills.
')
And the best way to do this is to write a polyfill yourself.
Note: This article is a text version of the lecture , which I read at dotCSS on December 2, 2016. The article covers a bit more details, but if you prefer to watch the video, I also inserted it here.
Keyword
The function from which we want to make a polyfill is the new (suppose it is new) keyword
Here is an example of using random:
As you can see, since
Throughout the rest of the article we will work with the demo page , which I showed in my lecture. Here's what she looks like:
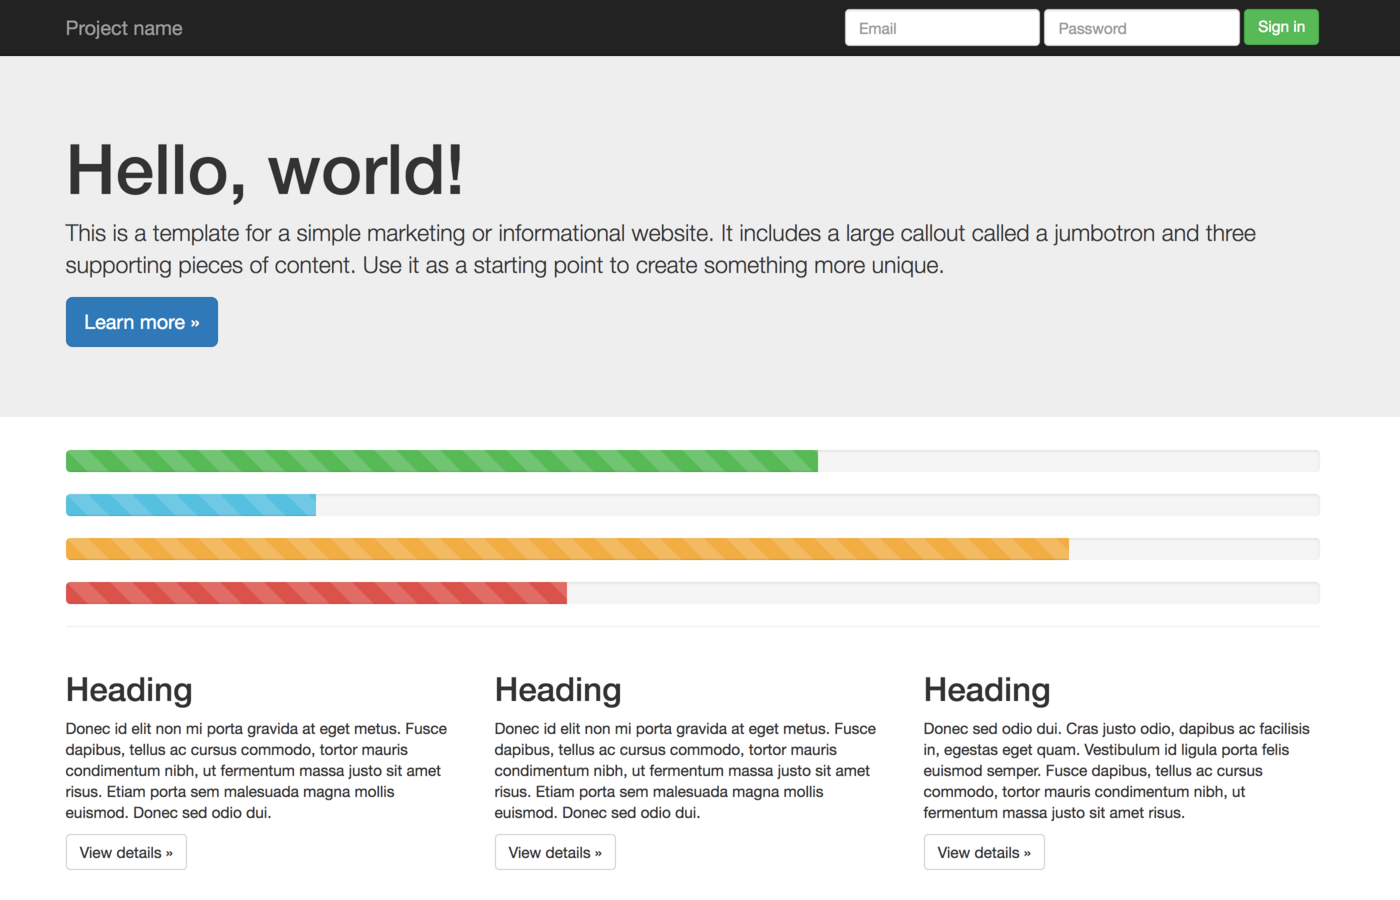
An example of what a site might look like where the
This is the basic “Hello World” page from the Bootstrap start template, where four
In addition to
Although my demo page clearly indicates the widths of the progress bars, the idea is that when using polyfills, each time the page loads, these indicators will have a different, random width.
In JavaScript, polyfills are relatively easy to write, because the language is so dynamic and allows you to change embedded objects in real time.
For example, if you want to make a polyfill from
CSS, on the other hand, is not so dynamic. It is impossible (at least for the time being) to change the execution environment in such a way as to inform the browser about a new function that it does not natively support.
This means that in order to use a polyfill with a function in CSS that the browser does not support, you have to dynamically change the CSS in order to fake the behavior of the function with the help of CSS functions that the browser supports .
In other words, you need to turn it:
into something like this that is randomly generated during the execution of the code in the browser:
Now we know that we need to change the existing CSS and add new style rules that mimic the behavior of the function from the polyfill.
The most natural place where you could suggest such an action would be the CSS Object Model (CSSOM), available through
Note: in this polyfill, you will not use the simple search and replace function of the word
If you load demo No. 2 , insert the above code into the JavaScript console and run it, it will actually do what it should do, but after executing it, you will not see any progress indicators of a random width.
The reason is that in CSSOM there are no rules with the keyword
As you probably already know, if a browser encounters a CSS rule that does not understand, then simply ignore it. In most cases, this is good, because this way you can load CSS into old browsers and don’t break the page. Unfortunately, this also means that if you need access to the original, unmodified CSS, you will have to get it yourself.
You can add CSS rules to a page using either the
The following code defines the
If you open demo No. 3 and paste the above code into the JavaScript console to install the
When you get the original CSS text, you need to parse.
You might think that if the browser already has a built-in parser, then you can call some function and parse the CSS. Unfortunately, this will not work. And even if the browser had access to the
There are some good open source CSS parsers, and for the purposes of this demo we will use PostCSS (since it works as a browser and supports a plugin system, which will come in handy later).
If you run
then we get something like this:
This is what is known as an abstract syntax tree (ASD), and you can present it as your own version of CSSOM.
Now we have a utility function for getting the full text of CSS and a function for parsing it, then this is what our polyfill looks like at the moment:
If you open the demo number 4 and look in the JavaScript console, you will see the object log containing the full ASD for PostCSS for all styles on the page.
So far we have written a lot of code, but surprisingly, it is completely unrelated to the actual functionality of our polyfill. It was just a necessary platform for manually doing a lot of things that the browser had to do for us.
To actually implement the logic of a polyfill, we need:
PostCSS comes with a good plugin system with many helper functions for modifying the abstract CSS syntax tree. We can use these functions to replace the
Another nice feature of using PostCSS plugins is that they already have built-in logic for inserting an ASD in string form back into CSS. All you need to do is create a PostCSS instance, pass it to the plugin (or plugins) that you want to use, and run
To replace page styles, we can write a utility function (similar to
Armed with our PostCSS plugin to change the CSS CSS and two utility functions to retrieve and update page styles, our polyfill code now looks like this:
If you open demo number 5 , you can see it in action. Refresh the page several times to feel the real chance!
... hmmmmmm, not exactly what you expected, is it?
Although the plugin works technically, it inserts the same random value for each element that corresponds to the replacement function.
This is completely logical, if we think about what we have done - we simply replaced the only property with a single rule.
The truth is that even the simplest CSS polyfills require more than rewriting individual property values. Most of them require more knowledge of the DOM, as well as specific details (size, contents, order, etc.) of individual elements that meet the requirements. That is why preprocessors and server solutions for this problem will never be enough in themselves.
But an important question arises: how do we update the polyfill to identify individual elements? .
In my experience, there are three options for defining individual DOM elements, but they are not good enough.
As practice shows, most often the authors of polyfills define the problem of defining individual elements using the CSS rules selector in order to find suitable elements on the page and directly apply inline styles to them.
Here's how to change our PostCSS plugin in this way:
Demo number 6 shows this code in action.
At first, it seems to be working fine, but, unfortunately, it is easy to knock him down. Suppose we have updated CSS and added another rule after our
The code at the top declares that the elements of all loading indicators on the pages should have a random width, except for those loading indicators elements that depend on the element with the identifier
Of course, this does not work, because we apply inline styles directly to the element. This means that these styles will be more specific than the styles defined in
This means that our polyfill does not correspond to some fundamental assumptions about working with CSS (so I personally find this method unacceptable).
The second option assumes that in many cases of real use the first option does not work, so he tries to correct the situation. In particular, in the second version we update our implementation in order to:
Yes, if you do not understand, I just described the cascade, the execution of which implies a dependence on the browser.
Although it is definitely possible to re-implement such a cascade in JavaScript, there will be a lot of work, so I would definitely look at what is in option 3.
The third option - which I consider the best among the worst - is to rewrite the CSS and convert the rules with one selector, which matches many elements, into several rules, each of which will correspond only to one element, without changing the final set of elements.
Since the last sentence does not look very meaningful, let me illustrate this with an example. Consider a CSS file that is included in the page and contains three paragraph elements:
If we add a unique data attribute to each paragraph in the DOM, we can rewrite the CSS as follows to define each paragraph with our own, individual rule:
Of course, if you notice, this option still does not work very well, because it affects the specificity of these selectors, which is likely to lead to unintended side effects. However , we can ensure the preservation of the correct cascade order by increasing the specificity of all the other selectors on the page by the same amount, using such a smart hack:
The changes above apply the pseudo-class function selector
Demo number 7 shows the result of the implementation of such a strategy, and you can view the source code of the demo and examine the complete set of changes in the
The best thing about the third option is that it continues to give the browser a cascade, which is really good for the browser. This means that you can use media queries
It may seem that the way number 3, I solved all the problems with CSS polyfills, but this is very far from the truth. There are still many problems, some of which can be solved (by spending a lot of extra time), while others are impossible, and therefore they are inevitable.
First of all, I deliberately ignored some parts of CSS that may exist on the page, but are not available for DOM requests for the
We can update our polyfill for these cases, but this will require a lot of additional work, which I would not like to discuss in this article.
We also didn’t even consider what happens when the DOM changes. In the end, we rewrite our CSS according to the DOM structure. This means that we have to rewrite every time the DOM changes.
In addition to the problems described above (which are difficult but solvable), there are some problems that cannot be avoided:
Our polyfill for the
One solution that I missed in my lecture (due to time constraints) can potentially mitigate the first two of the above three problems. This is parsing and fetching CSS on the server side during the build phase.
Then, instead of loading a CSS file with styles, you load a JavaScript file that contains an ASD. Then the first thing you do is translate the SDA into a string view and add styles to the page. You can even enable the
For example, instead of this:
you will have this:
As I mentioned, this solves the problem of having to include a full CSS parser in your JavaScript suite and also allows you to parse CSS in advance, but does not solve all performance problems.
But in any case, you always have to rewrite the CSS as soon as changes are required.
To understand why polyfill performance is so low, you really need to understand the browser rendering pipeline — especially those rendering steps that you have access to as a developer.
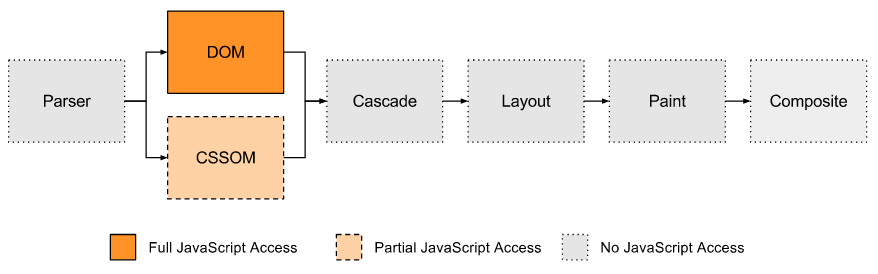
JavaScript access to the rendering pipeline in the browser
As you can see, the only real entry point is the DOM, which our polyfill used by querying elements corresponding to the CSS selector, as well as by updating the CSS text in the tag
But given the current mechanism for accessing JavaScript to the rendering pipeline in the browser, this is the way to choose our polyfill.
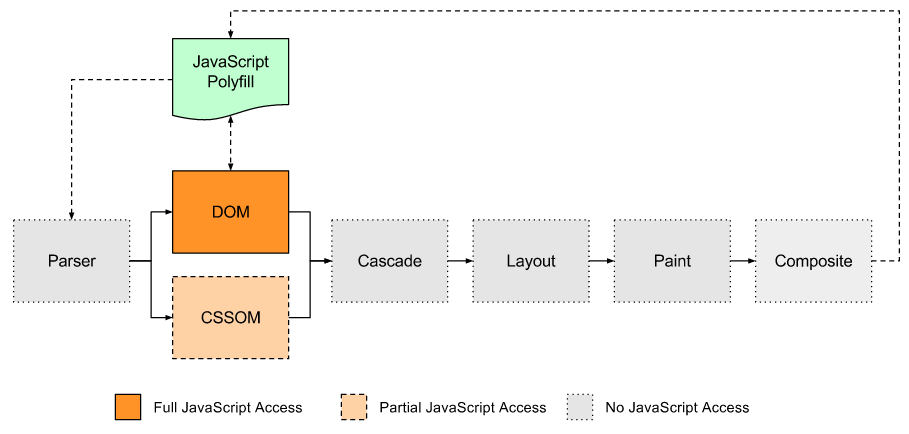
Polyfill entry points to browser rendering pipeline
As you can see, JavaScript cannot interfere with the source rendering pipeline after creating the DOM, so any changes made by the polyfill will force the rendering process to start over.
This means that the CSS polyfills cannot work at 60 fps at all, since all updates lead to subsequent rendering and therefore to a subsequent frame.
I would like you to understand from this article that creating CSS polyfills is especially difficult, because all our work as developers consists in circumventing the limitations of the styles and layout of the modern web.
Here is a list of things that our polyfill should do on its own - these are things that the browser already does, but we, as developers, do not have access to these functions:
And this is exactly what fascinates me in Houdini . Without Houdini software interfaces, developers will have to resort to hacks and workarounds, which leads to lower productivity and user convenience.
And this means that polyfills will definitely be either:
Unfortunately, we cannot get rid of all three shortcomings. You have to choose.
Without low-level styling primitives, innovation will move at the speed of the slowest browser.
Developers from the JavaScript community complain about the greater rate of innovation. But you will never hear that in CSS. And partly due to the limitations described in the article.
I think we need to change this. I think we need #makecssfatigueathing .
Although that article was generally well received, the same question was constantly asked me in letters and twitter. The main essence of the question:
What's so complicated about CSS polyfills? I use a lot of CSS polyfills, and they work fine for me.
And I understood - of course, people have such questions. If you have never tried to write a CSS polyfill yourself, you probably never experienced this pain.
So the best way to answer this question — and to explain why Houdini impresses me so much — is to show clearly why it is so difficult to use CSS polyfills.
')
And the best way to do this is to write a polyfill yourself.
Note: This article is a text version of the lecture , which I read at dotCSS on December 2, 2016. The article covers a bit more details, but if you prefer to watch the video, I also inserted it here.
Keyword random
The function from which we want to make a polyfill is the new (suppose it is new) keyword
random , which returns a number between 0 and 1 (just like Math.random() in JavaScript).Here is an example of using random:
.foo { color: hsl(calc(random * 360), 50%, 50%); opacity: random; width: calc(random * 100%); } As you can see, since
random returns a dimensionless number, you can use it with calc() to turn it into almost any value. And since it can have any value, it can be applied with any property (for example, color , opacity , width , etc.).Throughout the rest of the article we will work with the demo page , which I showed in my lecture. Here's what she looks like:
An example of what a site might look like where the
random keyword is used.This is the basic “Hello World” page from the Bootstrap start template, where four
.progress-bar elements are added to the top of the content area.In addition to
bootstrap.css , it contains another CSS file with the following rule: .progress-bar { width: calc(random * 100%); } Although my demo page clearly indicates the widths of the progress bars, the idea is that when using polyfills, each time the page loads, these indicators will have a different, random width.
How polyfills work
In JavaScript, polyfills are relatively easy to write, because the language is so dynamic and allows you to change embedded objects in real time.
For example, if you want to make a polyfill from
Math.random() , then write something like this: if (typeof Math.random != 'function') { Math.random = function() { // Implement polyfill here... }; } CSS, on the other hand, is not so dynamic. It is impossible (at least for the time being) to change the execution environment in such a way as to inform the browser about a new function that it does not natively support.
This means that in order to use a polyfill with a function in CSS that the browser does not support, you have to dynamically change the CSS in order to fake the behavior of the function with the help of CSS functions that the browser supports .
In other words, you need to turn it:
.foo { width: calc(random * 100%); } into something like this that is randomly generated during the execution of the code in the browser:
.foo { width: calc(0.35746 * 100%); } CSS change
Now we know that we need to change the existing CSS and add new style rules that mimic the behavior of the function from the polyfill.
The most natural place where you could suggest such an action would be the CSS Object Model (CSSOM), available through
document.styleSheets . The code might look something like this: for (const stylesheet of document.styleSheets) { // Flatten nested rules (@media blocks, etc.) into a single array. const rules = [...stylesheet.rules].reduce((prev, next) => { return prev.concat(next.cssRules ? [...next.cssRules] : [next]); }, []); // Loop through each of the flattened rules and replace the // keyword `random` with a random number. for (const rule of rules) { for (const property of Object.keys(rule.style)) { const value = rule.style[property]; if (value.includes('random')) { rule.style[property] = value.replace('random', Math.random()); } } } } Note: in this polyfill, you will not use the simple search and replace function of the word
random , because it can be present in different forms, and not only in the keyword (for example, in the URL, in the name of a property, in the quoted text in the property content , etc.). The real code in the final demo version uses a more reliable replacement mechanism, but for simplicity I use the simplified version here.If you load demo No. 2 , insert the above code into the JavaScript console and run it, it will actually do what it should do, but after executing it, you will not see any progress indicators of a random width.
The reason is that in CSSOM there are no rules with the keyword
random !As you probably already know, if a browser encounters a CSS rule that does not understand, then simply ignore it. In most cases, this is good, because this way you can load CSS into old browsers and don’t break the page. Unfortunately, this also means that if you need access to the original, unmodified CSS, you will have to get it yourself.
Manually Retrieving Page Styles
You can add CSS rules to a page using either the
<style> or <link rel="stylesheet"> elements, so you can use querySelectorAll() on the document to get the original, unchanged CSS and manually extract the contents of any <style> tags or apply fetch() , getting the resource URL for all <link rel="stylesheet"> tags.The following code defines the
getPageStyles function, which should return the full CSS code for all page styles: const getPageStyles = () => { // Query the document for any element that could have styles. var styleElements = [...document.querySelectorAll('style, link[rel="stylesheet"]')]; // Fetch all styles and ensure the results are in document order. // Resolve with a single string of CSS text. return Promise.all(styleElements.map((el) => { if (el.href) { return fetch(el.href).then((response) => response.text()); } else { return el.innerHTML; } })).then((stylesArray) => stylesArray.join('\n')); } If you open demo No. 3 and paste the above code into the JavaScript console to install the
getPageStyles() function, then you can run the code below to get the full text CSS log: getPageStyles().then((cssText) => { console.log(cssText); }); Parsing extracted styles
When you get the original CSS text, you need to parse.
You might think that if the browser already has a built-in parser, then you can call some function and parse the CSS. Unfortunately, this will not work. And even if the browser had access to the
parseCSS() function, this does not negate the fact that the browser does not understand the random keyword, so the parseCSS() function parseCSS() probably not work anyway (there is hope that future parsing specifications allow processing unfamiliar keywords that are otherwise compatible with the existing syntax).There are some good open source CSS parsers, and for the purposes of this demo we will use PostCSS (since it works as a browser and supports a plugin system, which will come in handy later).
If you run
postcss.parse() on the following CSS text: .progress-bar { width: calc(random * 100%); } then we get something like this:
{ "type": "root", "nodes": [ { "type": "rule", "selector": ".progress-bar", "nodes": [ { "type": "decl", "prop": "width", "value": "calc(random * 100%)" } ] } ] } This is what is known as an abstract syntax tree (ASD), and you can present it as your own version of CSSOM.
Now we have a utility function for getting the full text of CSS and a function for parsing it, then this is what our polyfill looks like at the moment:
import postcss from 'postcss'; import getPageStyles from './get-page-styles'; getPageStyles() .then((css) => postcss.parse(css)) .then((ast) => console.log(ast)); If you open the demo number 4 and look in the JavaScript console, you will see the object log containing the full ASD for PostCSS for all styles on the page.
Polyfill implementation
So far we have written a lot of code, but surprisingly, it is completely unrelated to the actual functionality of our polyfill. It was just a necessary platform for manually doing a lot of things that the browser had to do for us.
To actually implement the logic of a polyfill, we need:
- Change CSS CSS, replace
randommetrandomnumber. - Insert the modified ASD in string form back into CSS.
- Replace existing page styles with changed styles.
Modifying the abstract CSS syntax tree
PostCSS comes with a good plugin system with many helper functions for modifying the abstract CSS syntax tree. We can use these functions to replace the
random encountered with random numbers: const randomKeywordPlugin = postcss.plugin('random-keyword', () => { return (css) => { css.walkRules((rule) => { rule.walkDecls((decl, i) => { if (decl.value.includes('random')) { decl.value = decl.value.replace('random', Math.random()); } }); }); }; }); Insert an ASD in string form back into CSS
Another nice feature of using PostCSS plugins is that they already have built-in logic for inserting an ASD in string form back into CSS. All you need to do is create a PostCSS instance, pass it to the plugin (or plugins) that you want to use, and run
process() , which should return an object with CSS in string form: postcss([randomKeywordPlugin]).process(css).then((result) => { console.log(result.css); }); Replacing page styles
To replace page styles, we can write a utility function (similar to
getPageStyles() ) that finds all <style> and <link rel="stylesheet"> elements and deletes them. It also creates a new <style> and sets the style content to any CSS text that is passed to the function: const replacePageStyles = (css) => { // Get a reference to all existing style elements. const existingStyles = [...document.querySelectorAll('style, link[rel="stylesheet"]')]; // Create a new <style> tag with all the polyfilled styles. const polyfillStyles = document.createElement('style'); polyfillStyles.innerHTML = css; document.head.appendChild(polyfillStyles); // Remove the old styles once the new styles have been added. existingStyles.forEach((el) => el.parentElement.removeChild(el)); }; Putting it all together
Armed with our PostCSS plugin to change the CSS CSS and two utility functions to retrieve and update page styles, our polyfill code now looks like this:
import postcss from 'postcss'; import getPageStyles from './get-page-styles'; import randomKeywordPlugin from './random-keyword-plugin'; import replacePageStyles from './replace-page-styles'; getPageStyles() .then((css) => postcss([randomKeywordPlugin]).process(css)) .then((result) => replacePageStyles(result.css)); If you open demo number 5 , you can see it in action. Refresh the page several times to feel the real chance!
... hmmmmmm, not exactly what you expected, is it?
Something went wrong
Although the plugin works technically, it inserts the same random value for each element that corresponds to the replacement function.
This is completely logical, if we think about what we have done - we simply replaced the only property with a single rule.
The truth is that even the simplest CSS polyfills require more than rewriting individual property values. Most of them require more knowledge of the DOM, as well as specific details (size, contents, order, etc.) of individual elements that meet the requirements. That is why preprocessors and server solutions for this problem will never be enough in themselves.
But an important question arises: how do we update the polyfill to identify individual elements? .
Definition of individual relevant elements
In my experience, there are three options for defining individual DOM elements, but they are not good enough.
Option number 1: inline styles
As practice shows, most often the authors of polyfills define the problem of defining individual elements using the CSS rules selector in order to find suitable elements on the page and directly apply inline styles to them.
Here's how to change our PostCSS plugin in this way:
// ... rule.walkDecls((decl, i) => { if (decl.value.includes('random')) { const elements = document.querySelectorAll(rule.selector); for (const element of elements) { element.style[decl.prop] = decl.value.replace('random', Math.random()); } } }); // ... Demo number 6 shows this code in action.
At first, it seems to be working fine, but, unfortunately, it is easy to knock him down. Suppose we have updated CSS and added another rule after our
.progress-bar rule. .progress-bar { width: calc(random * 100%); } #some-container .progress-bar { width: auto; } The code at the top declares that the elements of all loading indicators on the pages should have a random width, except for those loading indicators elements that depend on the element with the identifier
#some-container . In this case, the width should not be random.Of course, this does not work, because we apply inline styles directly to the element. This means that these styles will be more specific than the styles defined in
#some-container .progress-bar .This means that our polyfill does not correspond to some fundamental assumptions about working with CSS (so I personally find this method unacceptable).
Option number 2: inline styles
The second option assumes that in many cases of real use the first option does not work, so he tries to correct the situation. In particular, in the second version we update our implementation in order to:
- Check the rest of the CSS for relevant rules, then replace the random keyword with a random number and apply these declarations as inline styles only if this is the last matching rule.
- Wait, it doesn't work, because you need to take into account the specificity, so you have to manually parse each selector for the calculation. Then we can sort the relevant rules in ascending order of specificity and apply declarations only from the specific selector itself.
- Oh, and there are still
@mediaelements, so here you also need to manually check the match. - And if we talk about violations of the rules, then there are
@supports- let's not forget about it. - One last thing: you need to take into account the inheritance of properties, so for each element you have to walk through the DOM tree and check all parent elements to get the full set of calculated properties.
- Oh, sorry, one more thing: you must also take into account the declaration
!important, which is calculated for each property, and not for each rule. Therefore, it is required to save a separate card for them in order to find out which declaration will ultimately win.
Yes, if you do not understand, I just described the cascade, the execution of which implies a dependence on the browser.
Although it is definitely possible to re-implement such a cascade in JavaScript, there will be a lot of work, so I would definitely look at what is in option 3.
Option number 3: rewrite the CSS to define the individual corresponding elements, preserving the cascade order
The third option - which I consider the best among the worst - is to rewrite the CSS and convert the rules with one selector, which matches many elements, into several rules, each of which will correspond only to one element, without changing the final set of elements.
Since the last sentence does not look very meaningful, let me illustrate this with an example. Consider a CSS file that is included in the page and contains three paragraph elements:
* { box-sizing: border-box; } p { /* Will match 3 paragraphs on the page. */ opacity: random; } .foo { opacity: initial; } If we add a unique data attribute to each paragraph in the DOM, we can rewrite the CSS as follows to define each paragraph with our own, individual rule:
* { box-sizing: border-box; } p[data-pid="1"] { opacity: .23421; } p[data-pid="2"] { opacity: .82305; } p[data-pid="3"] { opacity: .31178; } .foo { opacity: initial; } Of course, if you notice, this option still does not work very well, because it affects the specificity of these selectors, which is likely to lead to unintended side effects. However , we can ensure the preservation of the correct cascade order by increasing the specificity of all the other selectors on the page by the same amount, using such a smart hack:
*:not(.z) { box-sizing: border-box; } p[data-pid="1"] { opacity: .23421; } p[data-pid="2"] { opacity: .82305; } p[data-pid="3"] { opacity: .31178; } .foo:not(.z) { opacity: initial; } The changes above apply the pseudo-class function selector
:not() and pass it the name of a class that is definitely not in the DOM (in this case, I chose .z; so if you use the class .z; in the DOM, you will have to choose another name). And since :not() always corresponds to a non-existent element, it can be used to increase the specificity of a selector without changing its conformity.Demo number 7 shows the result of the implementation of such a strategy, and you can view the source code of the demo and examine the complete set of changes in the
random-keyword plugin.The best thing about the third option is that it continues to give the browser a cascade, which is really good for the browser. This means that you can use media queries
@support declarations, non-standard properties, @support rules or any CSS functions, and everything will work fine.disadvantages
It may seem that the way number 3, I solved all the problems with CSS polyfills, but this is very far from the truth. There are still many problems, some of which can be solved (by spending a lot of extra time), while others are impossible, and therefore they are inevitable.
Unsolved problems
First of all, I deliberately ignored some parts of CSS that may exist on the page, but are not available for DOM requests for the
<style> and <link rel="stylesheet"> tags:- Inline styles
- Shadow DOM
We can update our polyfill for these cases, but this will require a lot of additional work, which I would not like to discuss in this article.
We also didn’t even consider what happens when the DOM changes. In the end, we rewrite our CSS according to the DOM structure. This means that we have to rewrite every time the DOM changes.
Inevitable problems
In addition to the problems described above (which are difficult but solvable), there are some problems that cannot be avoided:
- A huge amount of additional code is required.
- The method does not work with cross-origin style sheets (non-CORS).
- A polyfill works terribly when / when changes are needed (for example, DOM changes, scroll / resize handlers, etc.).
Our polyfill for the
random keyword is a fairly simple example. But I am sure that you can easily imagine polyfills for something like position: sticky , and then all the logic described here will need to be restarted every time the user scrolls the page, which will have a terrible effect on performance.Opportunities for improvement
One solution that I missed in my lecture (due to time constraints) can potentially mitigate the first two of the above three problems. This is parsing and fetching CSS on the server side during the build phase.
Then, instead of loading a CSS file with styles, you load a JavaScript file that contains an ASD. Then the first thing you do is translate the SDA into a string view and add styles to the page. You can even enable the
<noscript> , which refers to the original CSS file if the user has disabled JavaScript.For example, instead of this:
<link ref="stylesheet" href="styles.css"> you will have this:
<script src="styles.css.js"></script> <noscript><link ref="stylesheet" href="styles.css"></noscript> As I mentioned, this solves the problem of having to include a full CSS parser in your JavaScript suite and also allows you to parse CSS in advance, but does not solve all performance problems.
But in any case, you always have to rewrite the CSS as soon as changes are required.
Understanding Performance Implications
To understand why polyfill performance is so low, you really need to understand the browser rendering pipeline — especially those rendering steps that you have access to as a developer.
JavaScript access to the rendering pipeline in the browser
As you can see, the only real entry point is the DOM, which our polyfill used by querying elements corresponding to the CSS selector, as well as by updating the CSS text in the tag
<style>.But given the current mechanism for accessing JavaScript to the rendering pipeline in the browser, this is the way to choose our polyfill.
Polyfill entry points to browser rendering pipeline
As you can see, JavaScript cannot interfere with the source rendering pipeline after creating the DOM, so any changes made by the polyfill will force the rendering process to start over.
This means that the CSS polyfills cannot work at 60 fps at all, since all updates lead to subsequent rendering and therefore to a subsequent frame.
Summarizing
I would like you to understand from this article that creating CSS polyfills is especially difficult, because all our work as developers consists in circumventing the limitations of the styles and layout of the modern web.
Here is a list of things that our polyfill should do on its own - these are things that the browser already does, but we, as developers, do not have access to these functions:
- CSS sample
- CSS parsing
- Creating CSSOM
- Cascade processing
- Style Invalidation
- Repeated style validation
And this is exactly what fascinates me in Houdini . Without Houdini software interfaces, developers will have to resort to hacks and workarounds, which leads to lower productivity and user convenience.
And this means that polyfills will definitely be either:
- Too big
- Too slow
- Too wrong
Unfortunately, we cannot get rid of all three shortcomings. You have to choose.
Without low-level styling primitives, innovation will move at the speed of the slowest browser.
Developers from the JavaScript community complain about the greater rate of innovation. But you will never hear that in CSS. And partly due to the limitations described in the article.
I think we need to change this. I think we need #makecssfatigueathing .
Source: https://habr.com/ru/post/326056/
All Articles