Inkscape in action: sunset with stars
Having completed another project with the sunset, we do not show fears caused by a return to a similar project. In it, the stars are added in an excellent way, so we will not lose time and deal with them. On the cover of our magazine this month, it is possible to observe a picture drawn accordingly.
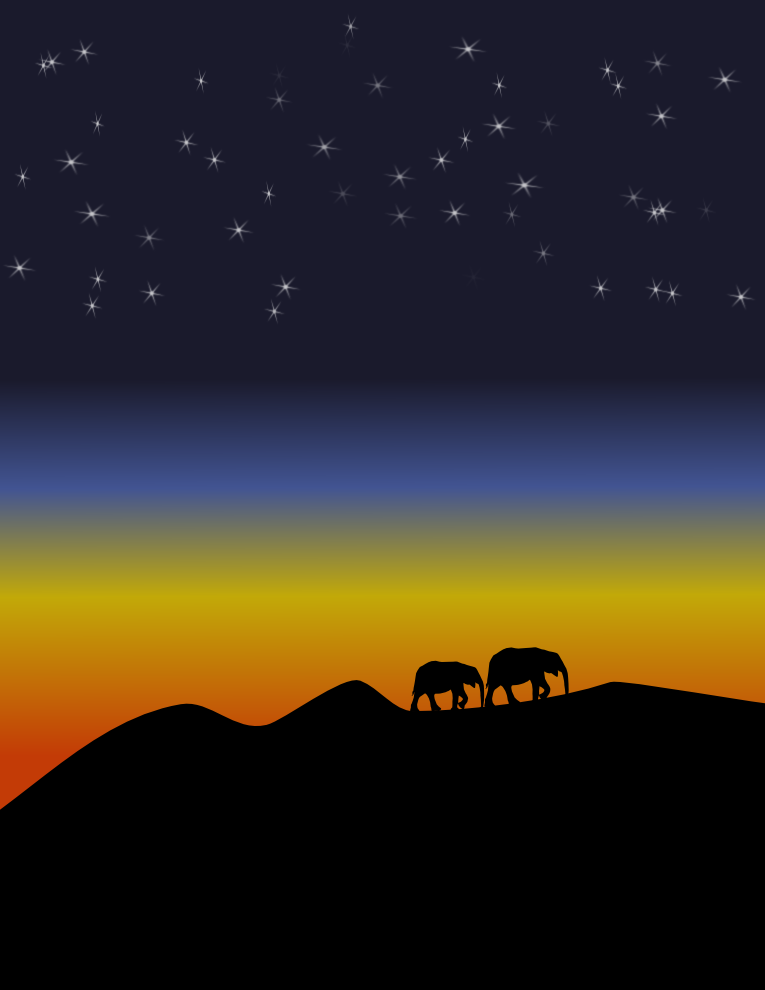
Since looking at this picture is accompanied by attention to the silhouettes of two elephants, which are terribly difficult to repeat, it becomes easier to draw it when I call the source from where this picture can be downloaded - the Internet. . Do this in advance so that you can export it to the project.
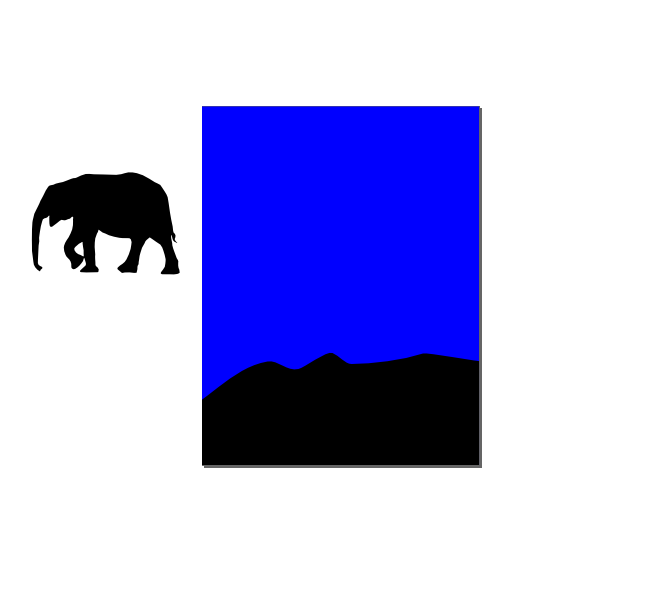
Open the Inkscape window and start drawing. I used the US Letter page size and portrait orientation (990 pixels in height and 765 pixels in width). Create a rectangle of the same size, without stroke, painted in blue color (so that it looks blue, we will repaint it later). Add another rectangle, also the width of the whole page, and about 1/3 of the page height, fill it with black.

Taking a pencil, draw a rough line through the black rectangle, then surround it with your bottom page, and connect the end of this line with its beginning. This will be the outline of the earth. Select the resulting shape and hold down the SHIFT key, and also mark the black rectangle. To finish with drawing the ground, select the Set command in the Object → Clipping Path menu.
')

At this point I imported a picture from clip-art, resized it and placed it on the picture. Now we have reached the moment when it would be nice to save work.
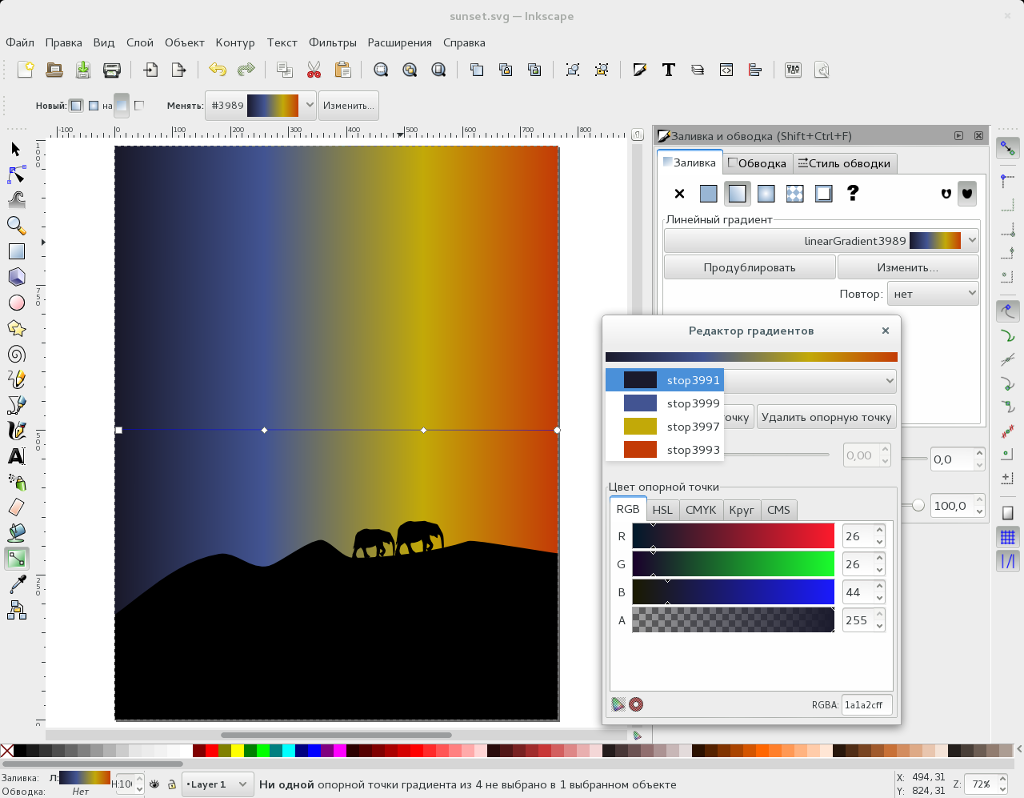
Gradually, we came to heaven. The sunset causes what we illustrate with a gradient. Next, you should take the following actions: click on the blue rectangle, make sure that the “Properties” window is open, and change the accompanying solid fill to a linear gradient fill. In the Properties window, click the Edit button and, in order to make four colors, double-click on the Add Anchor Point button. In this situation, the colors dark blue (almost black), light blue, yellow and orange will go from top to bottom. With this color combination, close the gradient editor and click the Gradient Fill tool offered by Inkscape in the left toolbar. Choose the colors that are right for your situation, but I used the following colors in this picture: 1a1a2cff (dark blue), 425495ff (blue), c2a908ff (yellow) and c33b06ff (orange).
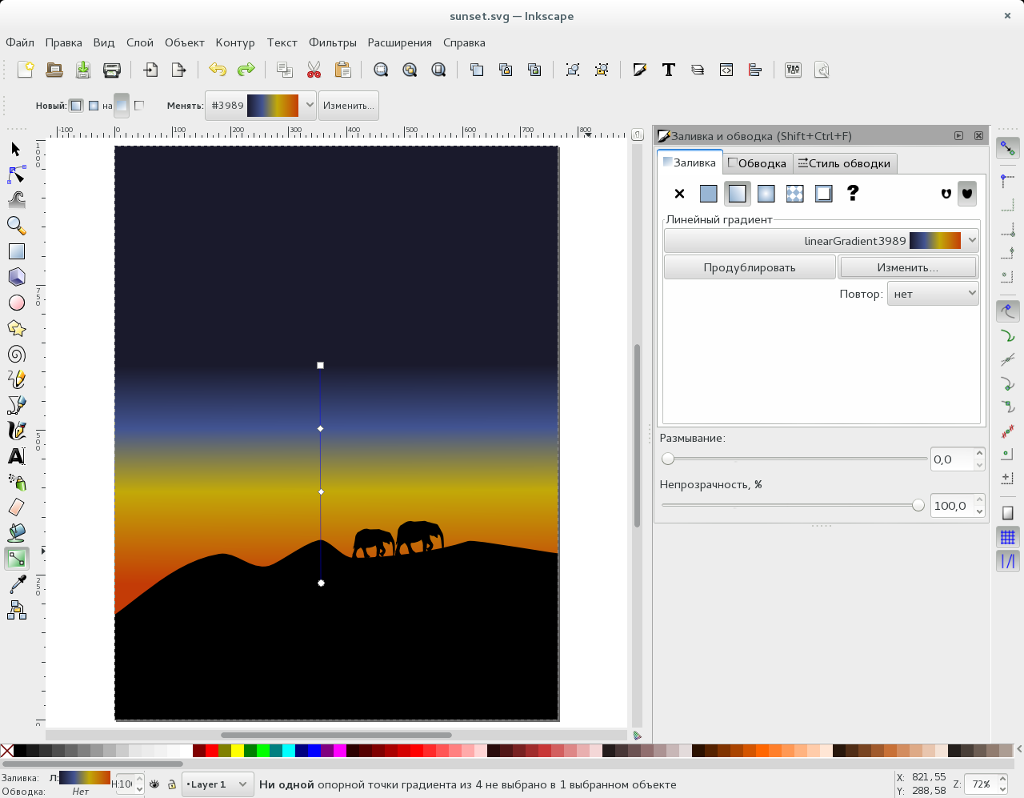
The effectiveness of the Gradient Fill tool is very limited. To position the dark blue color at the top, grab the left gradient manipulator with your mouse and move it to the center of your drawing, while also pointing it up. After this, mark the gradient manipulator with the mouse in the opposite position and, without releasing the mouse button, move it downwards. Below is a screenshot of what happened to me. Move these arms so as to position them in the best possible way. Get what you want, save your work.
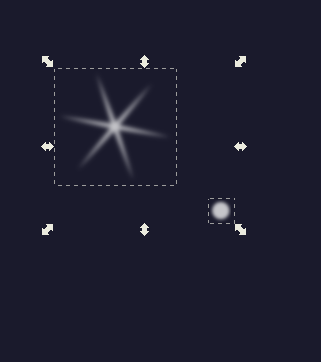
Finally, it's time for the stars. Instead of counting them together innumerable times, moving and resizing them, we will behave differently. But first, we still can not avoid having to make at least one star. Make the star so that for weeks after that you will not be tormented by thoughts that you made it wrong, using the tool for drawing stars and polygons, which you see on your screen to the left. I made a six-pointed star with a small circle in its center. To do this, in contact with this tool, I drew a star characterized by six rays and a radius ratio of 0.08, then, with the help of another tool, a circle, both in white and without stroke. Next, choosing a star and a circle, using the Align and Arrange tool, I centered them, without which I’d be careful not to do it, and then I grouped them.
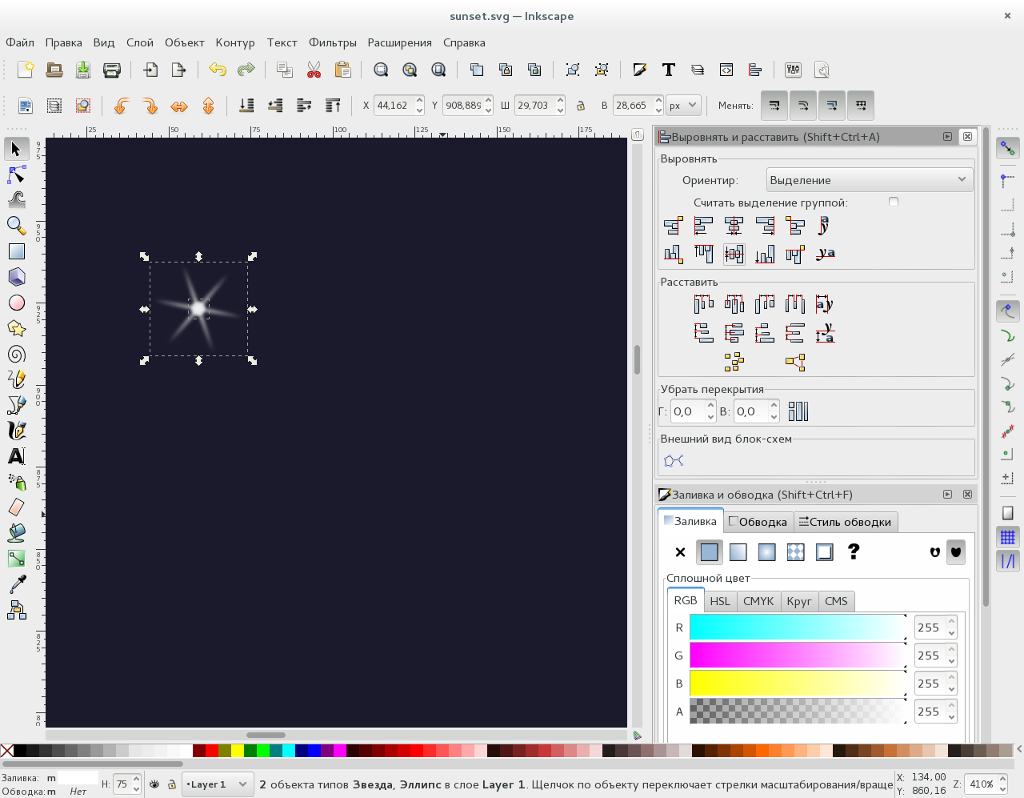
Apply a 5% blur to your star, reduce its size and move it closer to the upper left corner of your drawing. Save your work.

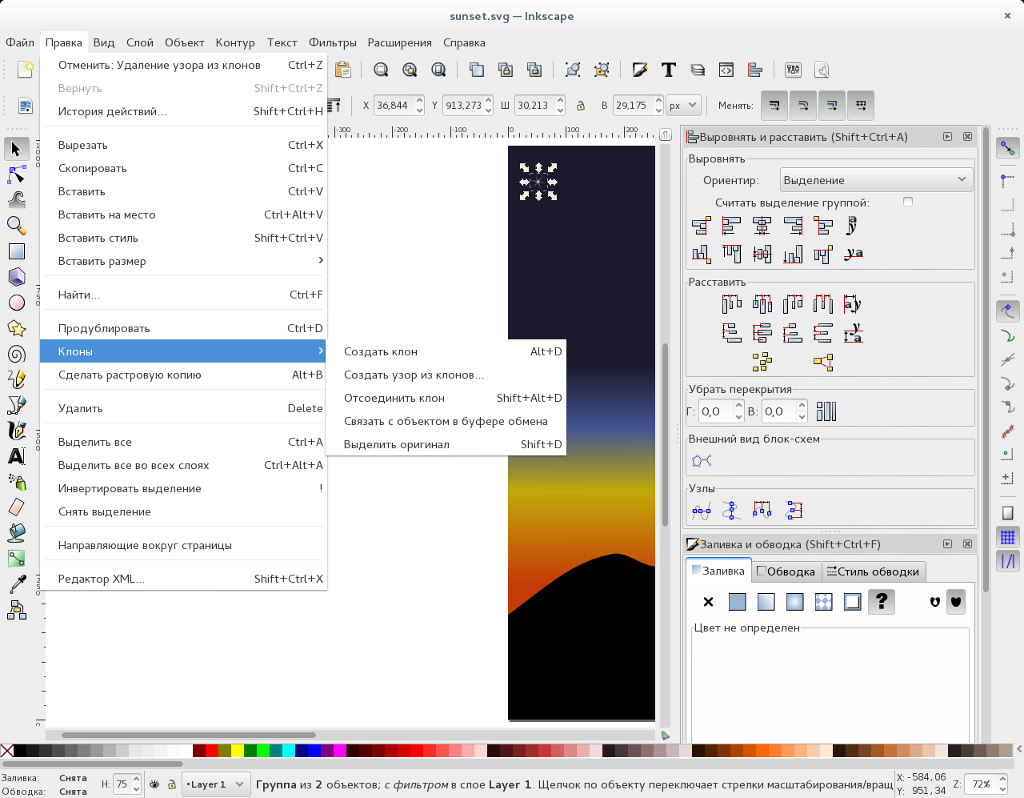
Now we will make a small group of stars. After selecting a star, execute the “Create a pattern from clones ...” command from the “Edit → Clones” menu. A window with multiple tabs will appear.

By resorting to each of these tabs, you can change the entire group at once, depending on the settings found on them. I will note here the settings I used and at the same time I will try to explain them a little.
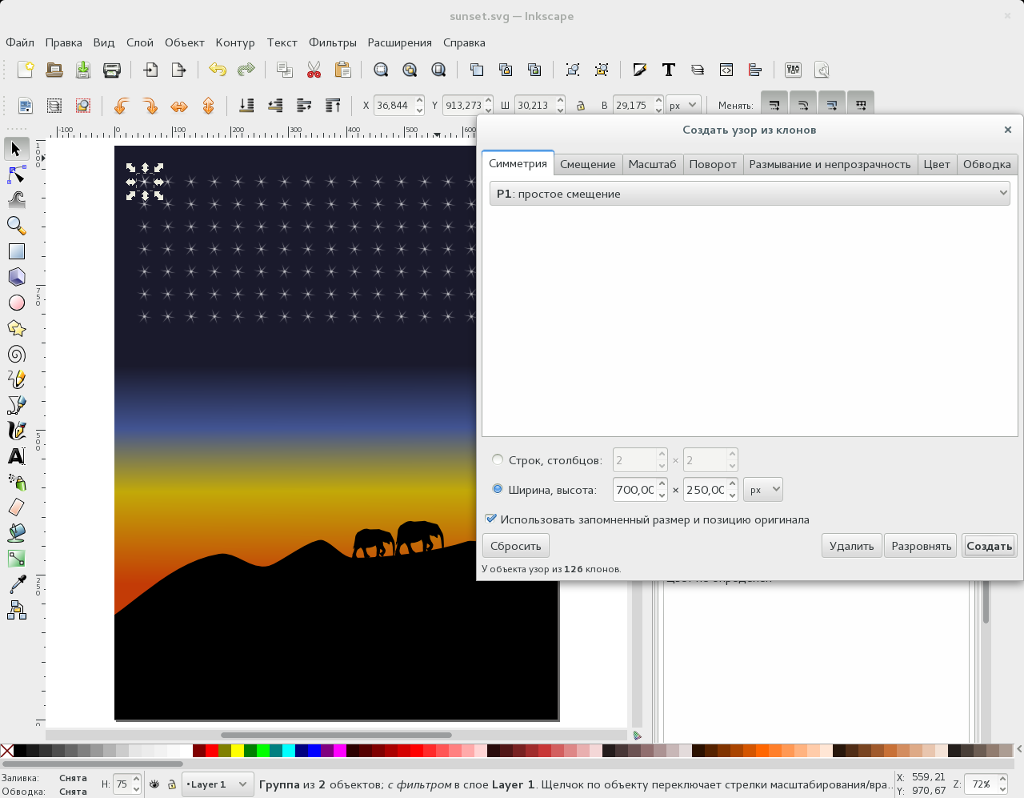
On the first tab, "Symmetry", we will designate how we will distribute the stars. Despite the other options available here, I will use a simple offset (P1), which is selected by default. Below on this tab, we will indicate how large our group of clones will be. To do this, it is possible to measure it in clones, indicating their number in the column and in the row, or in pixels and other similar units of measurement, specifying the width and height of the group. I use a width of 700 and a height of 250 pixels. Notice the three buttons "Delete", "Align" and "Create", which can be found at the bottom of the window. These three buttons play a significant role in testing new settings and displaying the results of their application. If you do not make any more settings, and immediately click on the "Create" button, we will have this:
In this situation, all our stars were built like soldiers in the ranks, which is not at all like real stars. Click on the "Delete" button to try out the settings on the "Offset" tab. For the characteristic “Offset by X - Per column” I use the value 60%, the same value I use for the characteristic “Offset Y - Per line”, and for both properties “Random” I will indicate the value 100%. Once again clicking on the "Create" button, I got this:

Well, that's better. More like a randomly scattered star. If what you saw is unpleasant, you can always repeat this experience by clicking the Delete button again, then the Create button, and the random distribution will be different. However, observing the stars and finding that they all have the same size and brightness, we will risk doing something about it, and, going to the “Scale” tab, we indicate on it for both “Random” properties a value of 50%.

We do one more thing. Click on the Blur & Opacity tab and enter 100% for Opacity - Random.

When you have done all this for you in the best possible way, close the “Create a Clone Pattern” window. Finally, go back to the Fill and Stroke window and reduce the transparency of the stars if you rate them as too bright for sunset. Save your work and export the page.
Since looking at this picture is accompanied by attention to the silhouettes of two elephants, which are terribly difficult to repeat, it becomes easier to draw it when I call the source from where this picture can be downloaded - the Internet. . Do this in advance so that you can export it to the project.
Open the Inkscape window and start drawing. I used the US Letter page size and portrait orientation (990 pixels in height and 765 pixels in width). Create a rectangle of the same size, without stroke, painted in blue color (so that it looks blue, we will repaint it later). Add another rectangle, also the width of the whole page, and about 1/3 of the page height, fill it with black.
Taking a pencil, draw a rough line through the black rectangle, then surround it with your bottom page, and connect the end of this line with its beginning. This will be the outline of the earth. Select the resulting shape and hold down the SHIFT key, and also mark the black rectangle. To finish with drawing the ground, select the Set command in the Object → Clipping Path menu.
')
At this point I imported a picture from clip-art, resized it and placed it on the picture. Now we have reached the moment when it would be nice to save work.
Gradually, we came to heaven. The sunset causes what we illustrate with a gradient. Next, you should take the following actions: click on the blue rectangle, make sure that the “Properties” window is open, and change the accompanying solid fill to a linear gradient fill. In the Properties window, click the Edit button and, in order to make four colors, double-click on the Add Anchor Point button. In this situation, the colors dark blue (almost black), light blue, yellow and orange will go from top to bottom. With this color combination, close the gradient editor and click the Gradient Fill tool offered by Inkscape in the left toolbar. Choose the colors that are right for your situation, but I used the following colors in this picture: 1a1a2cff (dark blue), 425495ff (blue), c2a908ff (yellow) and c33b06ff (orange).
The effectiveness of the Gradient Fill tool is very limited. To position the dark blue color at the top, grab the left gradient manipulator with your mouse and move it to the center of your drawing, while also pointing it up. After this, mark the gradient manipulator with the mouse in the opposite position and, without releasing the mouse button, move it downwards. Below is a screenshot of what happened to me. Move these arms so as to position them in the best possible way. Get what you want, save your work.
Finally, it's time for the stars. Instead of counting them together innumerable times, moving and resizing them, we will behave differently. But first, we still can not avoid having to make at least one star. Make the star so that for weeks after that you will not be tormented by thoughts that you made it wrong, using the tool for drawing stars and polygons, which you see on your screen to the left. I made a six-pointed star with a small circle in its center. To do this, in contact with this tool, I drew a star characterized by six rays and a radius ratio of 0.08, then, with the help of another tool, a circle, both in white and without stroke. Next, choosing a star and a circle, using the Align and Arrange tool, I centered them, without which I’d be careful not to do it, and then I grouped them.
Apply a 5% blur to your star, reduce its size and move it closer to the upper left corner of your drawing. Save your work.
Now we will make a small group of stars. After selecting a star, execute the “Create a pattern from clones ...” command from the “Edit → Clones” menu. A window with multiple tabs will appear.
By resorting to each of these tabs, you can change the entire group at once, depending on the settings found on them. I will note here the settings I used and at the same time I will try to explain them a little.
On the first tab, "Symmetry", we will designate how we will distribute the stars. Despite the other options available here, I will use a simple offset (P1), which is selected by default. Below on this tab, we will indicate how large our group of clones will be. To do this, it is possible to measure it in clones, indicating their number in the column and in the row, or in pixels and other similar units of measurement, specifying the width and height of the group. I use a width of 700 and a height of 250 pixels. Notice the three buttons "Delete", "Align" and "Create", which can be found at the bottom of the window. These three buttons play a significant role in testing new settings and displaying the results of their application. If you do not make any more settings, and immediately click on the "Create" button, we will have this:
In this situation, all our stars were built like soldiers in the ranks, which is not at all like real stars. Click on the "Delete" button to try out the settings on the "Offset" tab. For the characteristic “Offset by X - Per column” I use the value 60%, the same value I use for the characteristic “Offset Y - Per line”, and for both properties “Random” I will indicate the value 100%. Once again clicking on the "Create" button, I got this:
Well, that's better. More like a randomly scattered star. If what you saw is unpleasant, you can always repeat this experience by clicking the Delete button again, then the Create button, and the random distribution will be different. However, observing the stars and finding that they all have the same size and brightness, we will risk doing something about it, and, going to the “Scale” tab, we indicate on it for both “Random” properties a value of 50%.
We do one more thing. Click on the Blur & Opacity tab and enter 100% for Opacity - Random.
When you have done all this for you in the best possible way, close the “Create a Clone Pattern” window. Finally, go back to the Fill and Stroke window and reduce the transparency of the stars if you rate them as too bright for sunset. Save your work and export the page.
Source: https://habr.com/ru/post/326022/
All Articles