From idea to release in one bottle. Cloud Management Development Process - Visual Studio Team Services

When we think about which system to choose to manage the development process, several possibilities come to mind. Larger companies often choose a stack from Atlassian (Jira, Bitbucket, Bamboo). Smaller companies usually prefer solutions from JetBrains (YouTrack, Upsource, TeamCity). Fans of open source are experimenting with GitHub / Lab, Jenkins and numerous task management solutions.
In any case, this is a set of solutions that requires some integration.
However, few people know that since relatively recently, Microsoft has been offering out of the box a fully integrated cloud solution for managing all phases of development. The system is called “ Visual Studio Team Services ” (hereinafter referred to as VSTS ).
')
It includes:
- Private Git repository
- Scrum / Agile Task Management System
- Continuous Integration and Deployment (CI / CD)
- Test module
- Ability to integrate with Power BI to build analytics
All this is provided free of charge for 5 users. If you are participating in the BizSpark startup program, you can connect another 5 for free.
Attempts by Microsoft to become an open source company are reflected in this system. For example, you can build JavaScript projects on a Linux server.
If you are interested to get acquainted with the system, then read on.
Disclaimer. The author of this article has nothing to do with Microsoft. All these facts and thoughts are based solely on my personal experience of working with this system, to a greater degree positive.
It cannot be said that the system today is in high demand, at least in the Russian market. The low popularity of VSTS, in my opinion, is associated with historical distrust of the company's products, especially in terms of supporting non-Microsoft solutions. Also, for the sake of justice, it should be noted that the system is currently actively finishing, which, however, does not prevent us from using it to solve quite serious problems now.
The system has a huge number of settings, but for a holistic acquaintance with it we will consider the minimum set of actions that must be performed in order to turn an idea into an application published in a productive environment.
All names and screenshots will be given for the English-language interface for the convenience of further deeper acquaintance with the system. Attempts to find Russian-language product documentation may encounter some difficulties.
So, we had the idea to create a web server on Node.js, which would greet everyone with the phrase “Hello World”. We want to manage this project using the Agile methodology, store the code in the central private repository, and ensure that the application is automatically published when the code is changed.
Below will be described the minimum set of steps to implement this process.
Small but important lyrical digressions are highlighted in blue italics.
1. Create a Microsoft account
If you do not yet have your personal account in Microsoft (similar to Apple or Google Id), then you need to start it here account.microsoft.com
2. Create a VSTS account
Next, under our personal account created in the previous step, we go to the website www.visualstudio.com/vso , click the button “Get started for free” and come up with a name for the VSTS account, for example, “vasya-pupkin”.
Since all VSTS accounts are registered as third-level domains of the visualstudio.com domain, it makes sense to stake out a beautiful name in advance. At the time of this writing, the name "vasya-pupkin" was free :)
When creating a VSTS account, you must also create your first project. When filling out the form, it is important not to forget to click on the “Change details” link to select the project name and management method (Organize work using). The name of the project can be changed after its creation, but the management method is no longer there.
Let's name the project NodeProject and leave the default control method (Agile).

3. Create a Git repository
After creating the project we will get to the page of work with the Git repository. It can also be accessed through the main menu "Code".

VSTS has one main menu as in the screenshot above and several menu options available when you click on the gear.
There are three levels of settings menu:
- account level (Account Settings)
- Team Level
- project level
Most things are done at the project level, so by default we will keep in mind the project level settings.
The process of working with the Git VSTS repository is no different from working with GitHub, so I will not dwell on it in detail.
Please note that by default VSTS offers to work via https protocol. I recommend working on SSH. The initial setup may take a little longer, but further work will be much more convenient.

4. Create tasks in the Backlog
After creating the repository for storing the code, you can proceed to setting up the task management subsystem. Let me remind you that when creating a project, we chose the Agile process.
The Agile process in the system has a three-level hierarchy of tasks. At the highest level is Epic (disabled by default). Next is the Feature, then the User Story. As a first approximation, User Story can be considered synonymous with the word Task.
To enable Epic, you need to go to "Work" in the settings at the command level.

For our small project, the Epic level can be omitted.
According to the methodology, Agile all tasks in the system fall into the general task list called Backlog. Then these tasks are implemented at a specific point in time. These times are called iterations.
Let's create in the main menu “Work” Feature with the title “Web server” and in it a User Story with the title “Hello world”.

To implement our project, one iteration will be enough. Since the stubs for three iterations are configured by default in VSTS, we will not create new ones, but will configure the current ones. The setting consists in inventing a name and specifying the start and end dates of the iteration. This is done in the project level settings in the Work menu.
If you add a new iteration, you will also have to go to the command level settings and add it there.
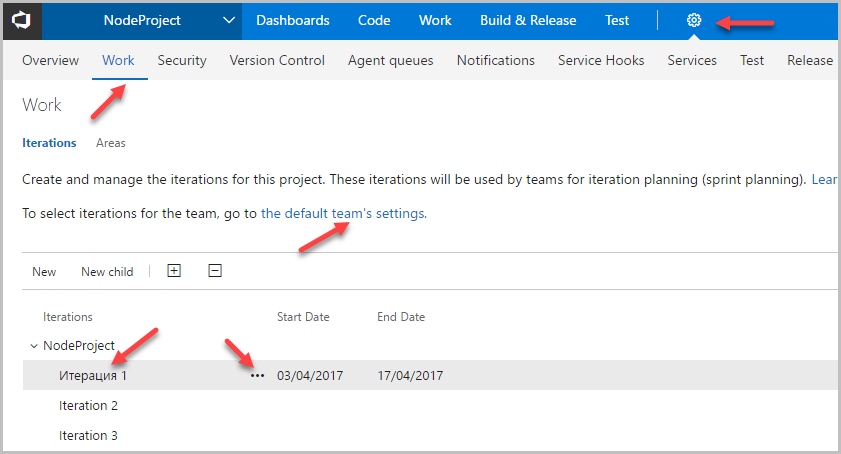
After creating the iteration, you need to specify which tasks we will solve during this iteration. This is usually done on the first day of the iteration. We will do it now. We have only one task (User Story), therefore it should be dragged with the mouse to the newly created iteration. After you have started the task, she needs to set the status to Active. To use different "chips" Agile has also washed the Capacity section for the current iteration.

On this familiarity with the process of configuring VSTS to work with code and tasks can be completed.
Now we move on to the more time-consuming task of setting up Continuous Integration and Continuous Deployment processes (CI / CD)
Why do I need a CI / CD? After writing the code, we will want to place it somewhere. In order not to engage in manual code transfer after each change, you can configure the processes that generally start after each update of the master repository branch (or another). The CI process ensures that the project is successfully assembled and (optionally) tested with automated tests. The CD process places the result of the CI process on the production server.
In general, the CI / CD process is not trivial, and the configuration varies greatly depending on the development technologies and project location. We consider the simplest case for the Node.JS application hosted on a local server in order to understand the principles of working with CI / CD in the VSTS system.
In our example, we will collect the project on a local machine (not in the cloud) and publish it there.
Let's proceed to the steps of setting CI / CD.
6. Install Build / Deploy Agent
Build / Deploy agent is a program that performs the necessary actions on the code to turn it into a final release. If you are using cloud agents, you can skip this step.
You can install the agent on a Windows, Linux or OSX machine. Installing the agent on a local Linux machine is well described here www.visualstudio.com/en-us/docs/build/actions/agents/v2-linux .
You just need to download and install the package, get a token for the agent to communicate with the VSTS and add the agent to the agent pool.
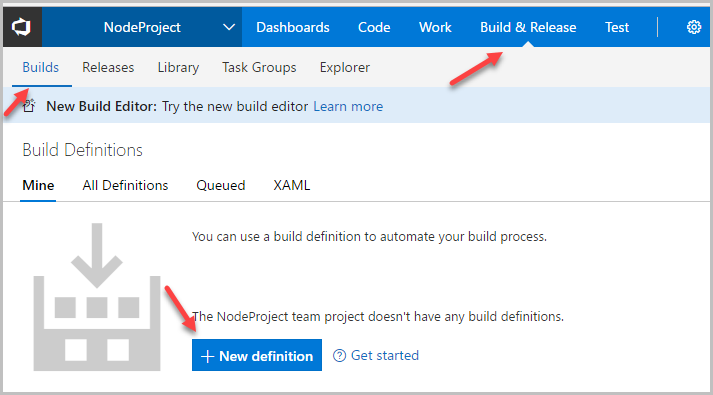
7. Configure CI
The CI process is configured in the main menu item “Build & Release -> Builds”. It consists of two stages.
- creating a new build definition
- adding steps to build definition
After clicking on the Add New Definition button, you can select one of the preset processes or configure it from scratch. We will set it up from scratch.
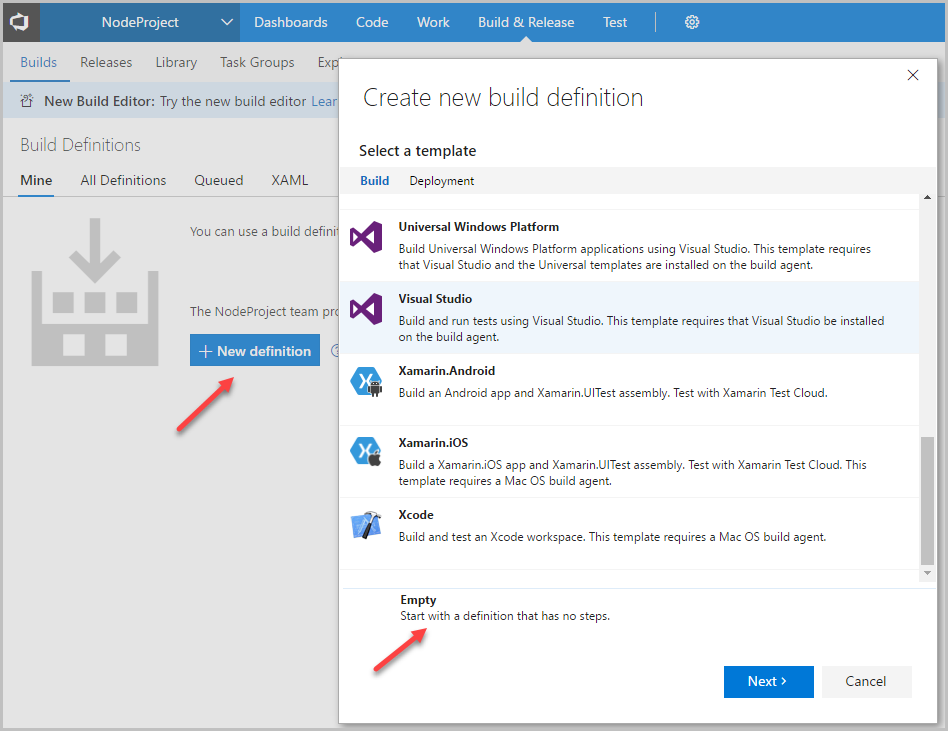
At the next step, we will be asked to decide on which branch of the repository we will do Build and whether we will do it automatically upon updating this branch, i.e. will we actually use CI. Here you also need to specify the agent pool configured in clause 6.

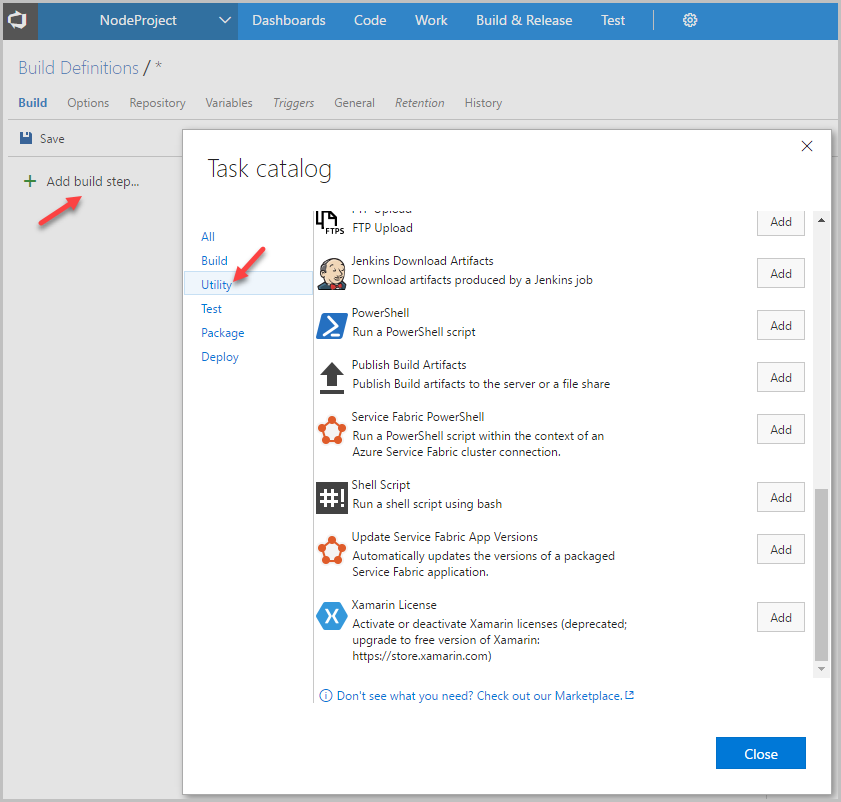
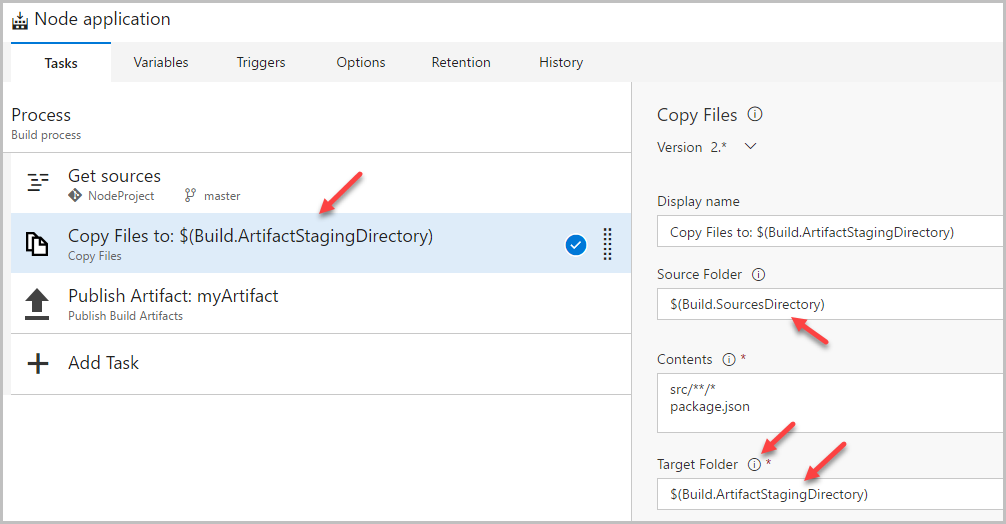
In order to successfully build our Node.js project in the created Build Definition, you need to add two steps:
- Copy files from repository to agent folder (Copy files)
- Publish the result of copying as an artifact (Publish Build Artifacts). This non-obvious step is necessary for integration with the CD process. When you start the CD process, the agent will take this artifact and take the necessary actions with it to publish the project.
Both of these steps are available in the Utility section.
In the process of setting the steps, you will have to actively use system variables. For many of them there is a hint next to the field name.
8. Customize CD
The CD process in the main menu item “Build & Release -> Releases” is configured in the same way.
After creating the New Definition, we select the steps that should occur after the CI process. If we want to run a CD right after the end of the CI process, then we need to tick the appropriate box.
In our case, the CD process will consist of the following steps:
- Delete all old files
- Copy the artifact from CI to the desired folder on the productive server.
- Run npm install (yarn) to download the npm packages described in the package.json file
- Restart the application with the new code. For a Node.js project, it might look like this: “pm2 reload my_application”

Obviously, in each case, the set of steps will be different, but VSTS provides almost all the options of what can be done to successfully work CI / CD. It is only necessary to closely monitor the rights under which the agent works so that it can perform its actions on the server.
Now that we’re all set up, we can get to work on the code. In order to make the most of the integration capabilities of VSTS, we will proceed as follows:
1. Go to our task (User Story) in the main menu “Work” and from it create a new branch in the repository.

2. Copy the branch to the local computer (git pull), write the application and save (git push) changes back to the repository in the same branch.
3. Go back to our task and create a pull request from it .

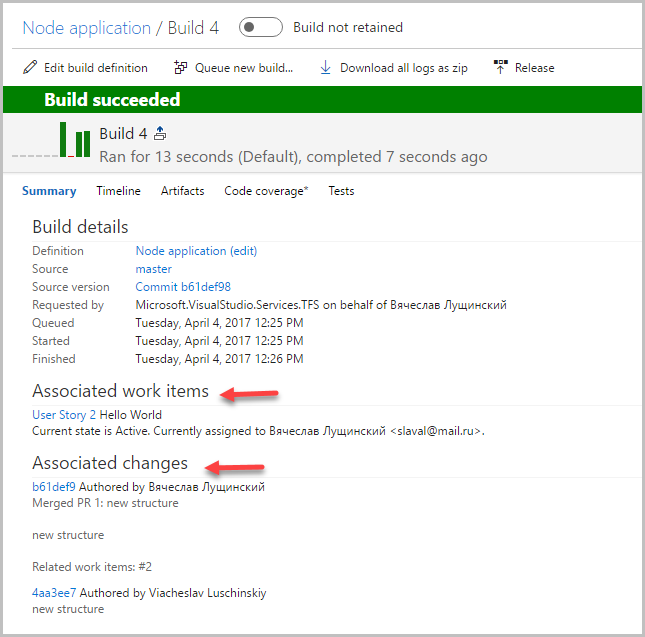
Closing this pull request will lead to merge changes to the master branch, which in turn will lead to the launch of the CI process, which, if successfully completed, will start the CD process, which will result in the publication of our application on a productive server.
It is not always necessary to run the CD automatically after CI. Sometimes it is useful to check with hands the result of CI. To do this, VSTS has the option to set up approval to launch a CD.
Conclusion
Thus, we have gone all the way from idea to release in one system. The presence of a single system makes it easy to track the connection between tasks, branches in the repository and builds.
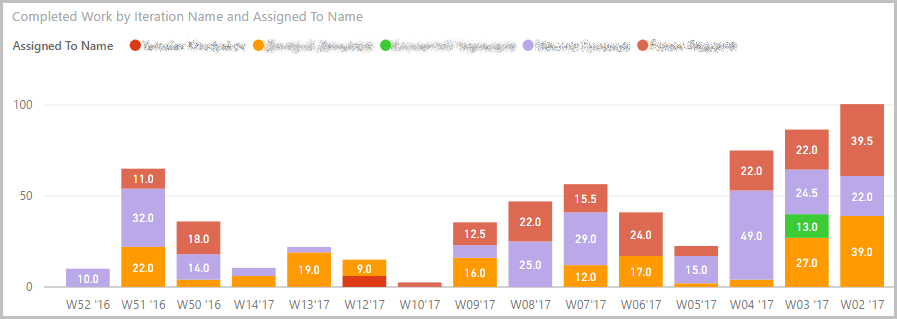
In addition, the system allows you to get interesting statistics on the work on the application in different perspectives when integrated with Power BI . One example would be the number of clocks clocked by people and iterations.
Behind the scenes work remained with the tests. But this is too voluminous topic on which you can write several such articles.
Questions and constructive comments are usually welcome. Below is a set of links for more in-depth familiarity with the system:
Source: https://habr.com/ru/post/325906/
All Articles