Reverse engineering of a radio-controlled tank using GNU Radio and HackRF
A year ago, our CTF-team at a major international competition RuCTF in Yekaterinburg received a radio-controlled tank as one of the prizes.
Why does the hacker team have a toy radio-controlled tank? To reverse it, of course.
In the article, I will tell you how using GNU Radio and HackRF One you can figure out from scratch in a wireless tank control protocol, how to decode its packets and generate them programmatically to control a tank from a computer.

Examination of the test subject
Given:
- Radio-controlled tank
- Remote Control
- Computer with GNU Radio installed
- Hackrf one
Let's look first at the console itself.
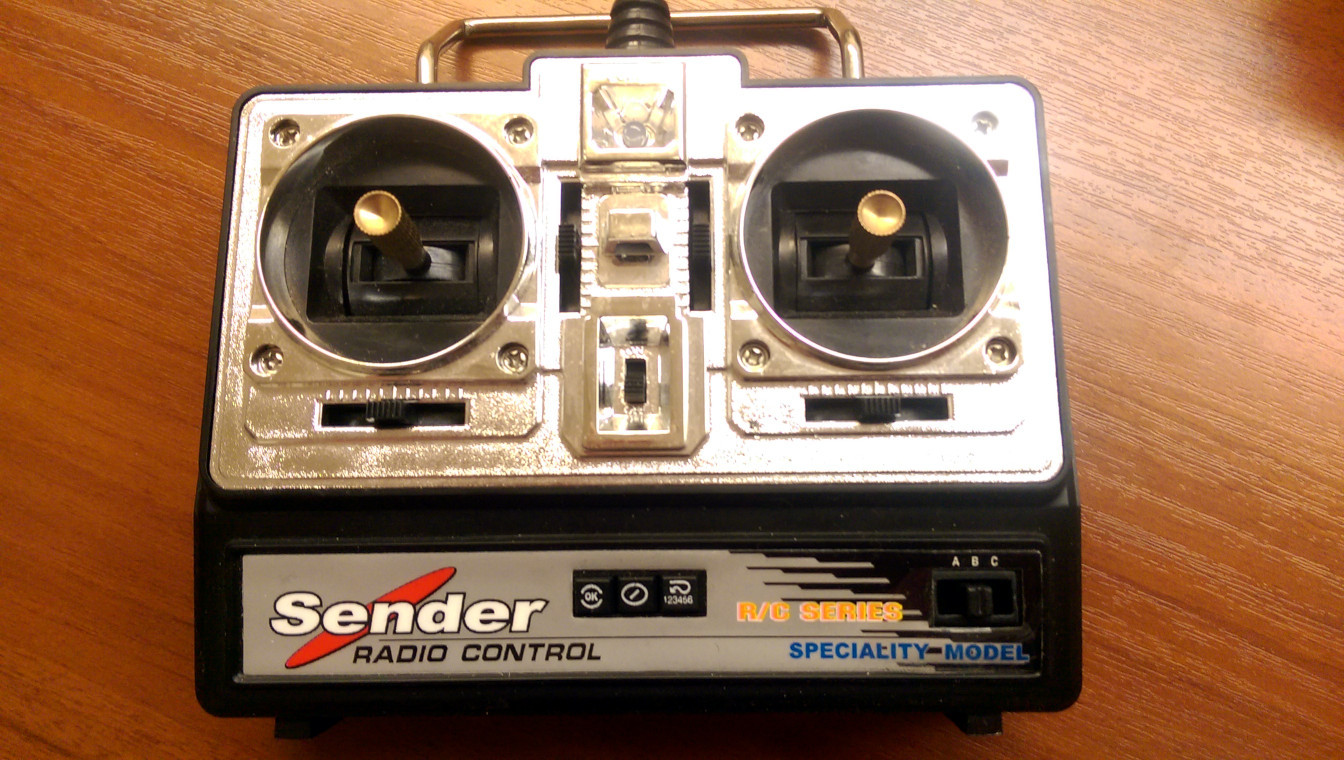
The right joystick of the console is responsible for the movement of the tank: forward, backward, turn in place. The joystick has no intermediate positions, that is, it will not work slowly. You can only go or not go.
The left joystick is responsible for turning the tower and shooting. "Left" - "right" turns the tower itself in the appropriate direction. "Down" allows you to aim vertically: while the joystick is in this position, the barrel cycles vertically up and down. And to shoot, you need to hold the joystick in the "up" position for a few seconds.
At the bottom of the console there is a channel switch with three positions ("A", "B" and "C"), on the bottom of the tank there is the same.
On the remote there are several other buttons. The OK button and 123456 tank does not respond. Pressing the button (/) switches the remote control to some strange mode in which the tank stops responding. A second click returns everything as it was. Most likely, this console can be used for other than tank toys, and there these buttons are already somehow meaningfully involved.
Well, behind the remote there is a very useful for us sticker "27.145 MHz".
SDR
First, we look at the radio broadcast using the gqrx program, which displays it in the form of a beautiful "waterfall" and also allows you to listen to the broadcast.
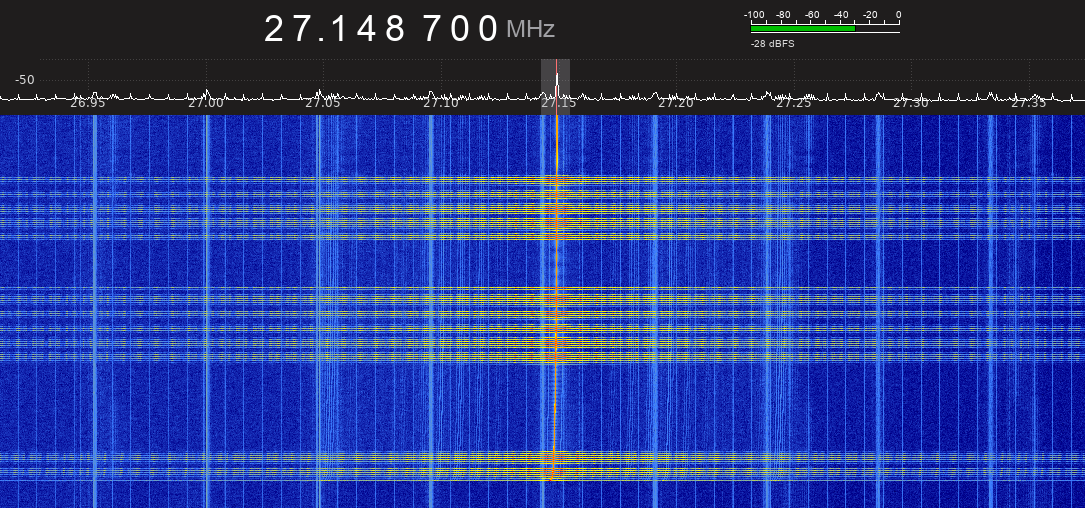
Immediately after switching on, the remote “clicks” a little, and then just leaves a noticeable thin line of a constant signal. When you press the buttons and reject the joysticks, the remote also “clicks”. Well, we found the remote. But for decoding this, of course, is not enough. Moving on to the GNU Radio Companion, where we will assemble various schemes for decoding the signal.
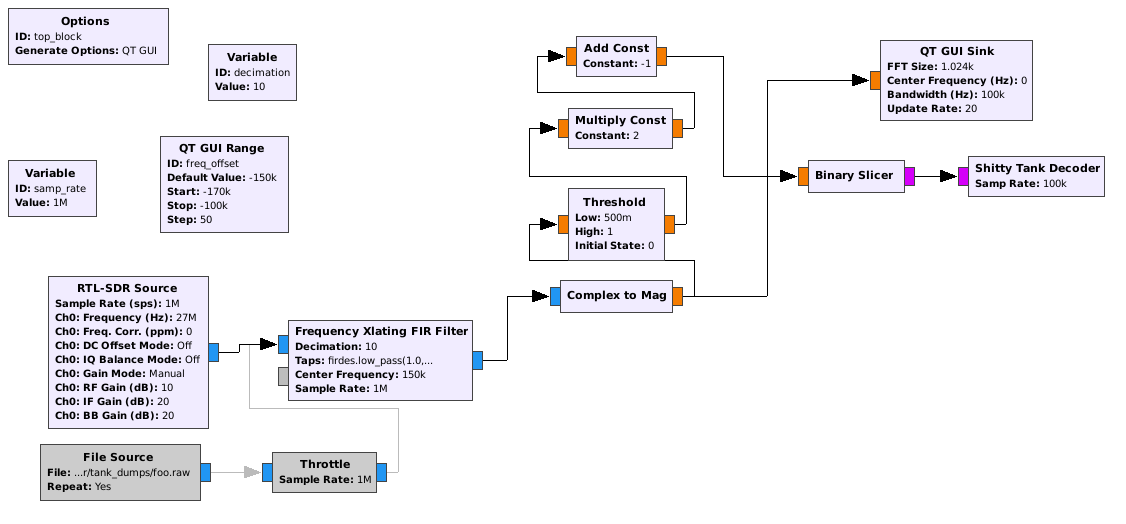
Let's put together a simple scheme in GNU Radio, which allows you to tune in to the frequency and visualize the signal.
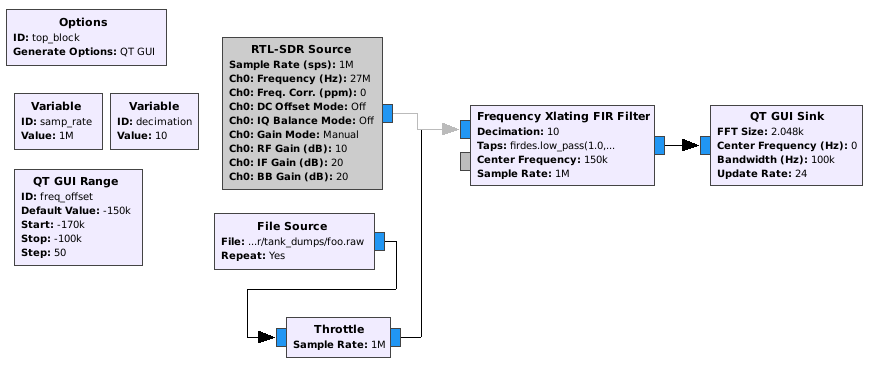
I will try, being myself not an expert in SDR, and acting mainly on a whim, to explain what is happening.
First, as the source, we will use the RTL-SDR Source element, which works with both very cheap RTL-SDR and more advanced devices like HackRF One.
It is important that you do not need to tune exactly at the desired frequency, but a little to the side. This is due to the fact that most SDR for purely hardware reasons have the so-called DC bias. After tuning to a certain frequency exactly “in the middle”, at zero frequency, there will be a constant component, which looks like a fairly powerful constant signal. To bypass this feature, it is enough to tune in a bit to the side, and then, if it is required, to shift the signal by software. Then the peak of DC bias and the signal under study will be sufficiently spaced so as not to influence each other.
The screenshot shows that I used a file as an alternative source. Indeed, why go after the console every time, if you can record it once and then just play it back?
The next element, Frequency Xlating FIR Filter , is a combination unit for signal transfer in frequency, filtering and decimation. After the transfer, the signal of interest to us is at zero frequency, filtering rejects uninteresting frequencies, where there are DC bias and other noises, and decimation lowers the sampling frequency. It is easier and more efficient to work with a low sampling rate signal (it simply requires less CPU resources). Now, unfortunately, I can’t remember from which random blogs and which considerations I picked up such values for the low_pass filter, but they work quite well: firdes.low_pass(1.0, samp_rate, samp_rate / decimation * 0.4, 2e3) .
Hint: in GNU Radio, you can use QT GUI Range widgets as block parameter variables (just by specifying their ID instead of a constant), and then these parameters can be adjusted by the interactive widget right while the circuit is running.
Well, at the end of the scheme there is a universal QT GUI Sink for visualizing the signal in various ways.
After launching the scheme we will see the following picture on the Waterfall Display tab:

Adjust the freq_offset so that the signal is as close to zero as possible. The signal will still float a little in frequency, and this, apparently, can not escape. But this will not prevent us in the future.
And now open the tab Time Domain Display . Having played a little with the FFT Size below, you can get a picture like this:
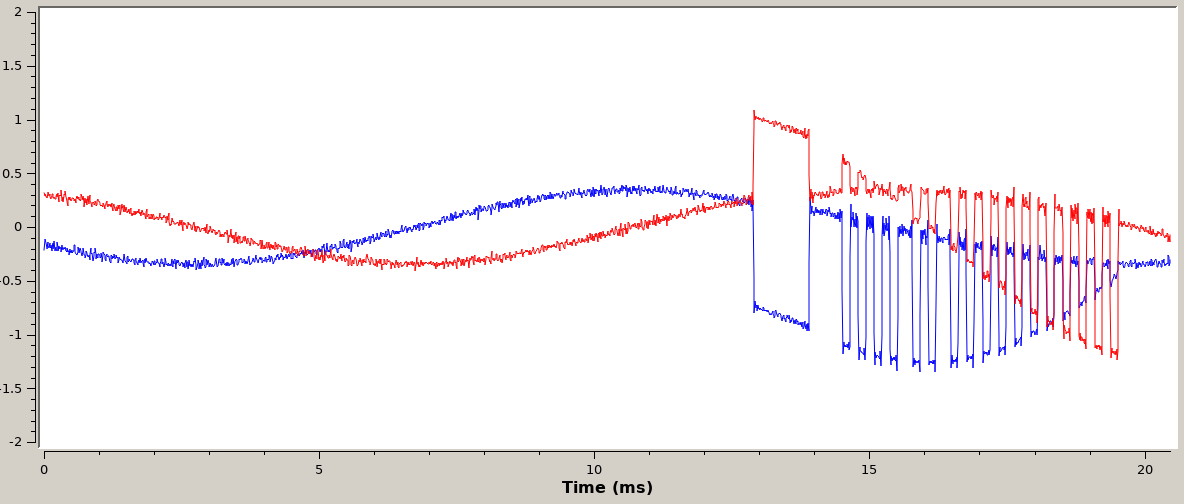
Oops! Yes, it looks like bits!
So, all we did was tune in to the frequency. That is, we have the most ordinary amplitude modulation.
The complex component is confusing, and the schedule intuitively shows that it is not needed here. We need a number module. Select it using the Complex to Mag block and see the schedule again:
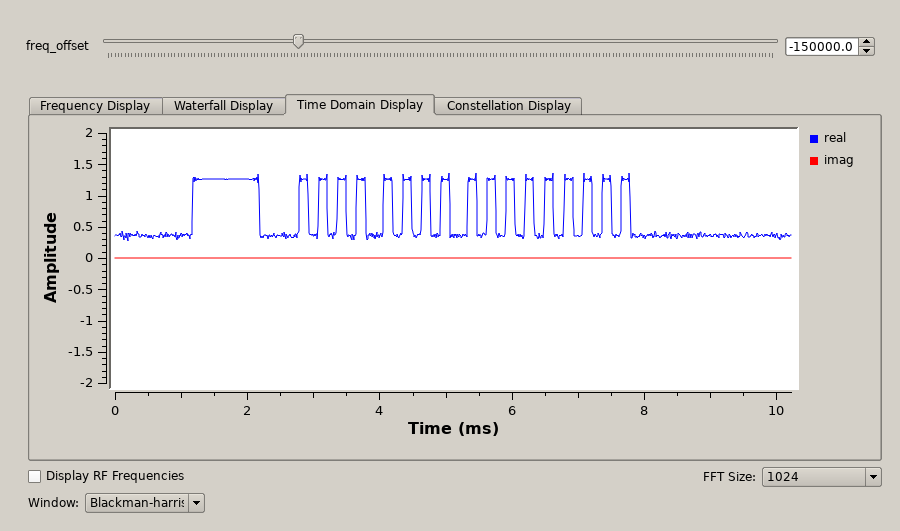
Already much better. Here you can immediately see two logical levels - "0" at around 0.4, and "1" at around 1.3. Well, all this is diluted with a little noise, of course. I want to note that this "0" is not "absolute", but is also transmitted by the remote control. If the console is turned off at all, the signal will go from 0.4 to 0.
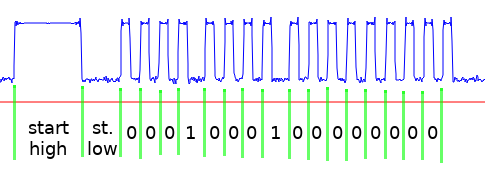
Let's deal with this "frame". The relatively long "1" and the next "0" are apparently special start bits for synchronization.
The value of a bit is encoded in length "0" from one "1" to the following: short "0" is a logical zero, long "0" is a logical one. In one frame, apparently, 16 bits.
Command decoding
Now you can write a special block for GNU Radio in Python, which will decode the frames and write them to the console. Sources of Python Block type blocks can be edited without leaving the GNU Radio Companion! Very comfortably.
I will not focus on the code, anyone can watch it under the spoiler. And the final signal decoding scheme was as follows:
import os import sys import numpy as np from gnuradio import gr class blk(gr.sync_block): def __init__(self, samp_rate=0.0): """arguments to this function show up as parameters in GRC""" gr.sync_block.__init__( self, name='Shitty Tank Decoder', # will show up in GRC in_sig=[np.int8], out_sig=[] ) self._samp_rate = samp_rate self._sync_threshold = samp_rate / 1000 # for tracking state across buffers self._last_idx = 0 self._last_level = 0 # for state machine self._state_machine = None self._last_event = None self._last_cmd = None def start(self): self._log = sys.stderr return True def _on_edge(self, ts, is_raising): if self._state_machine is None: self._state_machine = self._state_machine_gen() self._state_machine.send(None) elif ts - self._last_event > self._sync_threshold * 10: if not is_raising: # stuck on high level? weird return # reset state machine self._state_machine = self._state_machine_gen() self._state_machine.send(None) self._state_machine.send(ts) self._last_event = ts def _state_machine_gen(self): while True: raising = yield falling = yield sync_length = falling - raising if sync_length < self._sync_threshold: continue #print >>sys.stderr, "Sync length", sync_length, "samples" if self._last_cmd is not None: pass #print >>sys.stderr, "Intercommand delay", raising - self._last_cmd res = [] raising = yield sync_length_low = raising - falling #print >>sys.stderr, "Sync low length", sync_length_low, "samples" while len(res) < 16: falling = yield #print >>sys.stderr, "peak length", falling - raising raising = yield if raising - falling < sync_length_low // 6: continue #print >>sys.stderr, "low length", raising - falling res.append([0, 1][int(raising - falling > sync_length_low // 3)]) falling = yield cmd = "".join(str(x) for x in res) print >>self._log, cmd self._last_cmd = falling def work(self, input_items, output_items): data = input_items[0] if self._last_level is not None: data = np.insert(data, 0, self._last_level) else: self._last_idx = 0 edges = np.diff(data) edge_indices = np.where(edges != 0)[0] for i in edge_indices: self._on_edge(self._last_idx + i, edges[i] > 0) self._last_idx += len(data) self._last_level = data[-1] return len(input_items[0]) In general, the scheme was very imperfect. The separation of "0" and "1" at a constant threshold of 0.5 results in the circuit not working at all when the console is too far or too close. This did not prevent further experiments, and in general I noticed this feature only six months later, when I began to write this article. But I will be grateful if someone tells you how to do it right.
Let's understand what the bits in this protocol mean. We assume that the data is transmitted in the order of MSB, that is, from the older bits to the younger ones (this is only a matter of agreement, nothing more).
First, the three low-order bits are responsible for the channel. 000 - A, 010 - B, 100 - C. It was easy to verify experimentally.
A single deviation of the left joystick to the left generates the following sequence of commands (hereinafter the channel will be A):
0000010000000000 0000010000000000 0000000011110000 # <- 20 Rejecting and holding the joystick, we get this:
0000010000000000 0000010000000000 0001010000000000 # <- 0000000011110000 # <- 20 For all other directions, the pattern is similar: the upper three bits remain unchanged and zero, the fourth bit works like a “repeat flag”, the next four bits are responsible for the direction (right, left, up, down, respectively). And at the very end, a rather strange-looking team repeats itself, in semantics, apparently meaning "stop." The same command "stop" remote control broadcasts several times immediately after switching on.
With the right joystick responsible for moving the tank, everything is somewhat more interesting. Let me remind you that "up" - "down" is responsible for moving the tank back and forth, and "left" - "right" - for turning on the spot. These bits go right after the predecessors, just in that position where we saw 1111 when stopped. They change in a rather strange way. Can you guess why?
- 0101 - forward
- 1010 - back
- 0110 - to the left
- 1001 - right
As in the case of the left joystick, with the repetition, the same fourth most significant bit is set, and after releasing it there is a package with four units.
The OK button sends a command with the first high bit lit (that is, 1000000000000000000), a long press generates the same commands with the repeat flag. Tank command ignores.
The (/) button switches the console to a strange mode, where all the joystick commands (except for "stop") add the high bits 2 and 3. The tank does not respond to such commands, as was said at the beginning. Pressing the button again brings the remote back to the original mode.
Button 123456 sends the command "stop" (which is from 1111 in the position of the joystick movement). If you hold the button down, the repeat flag is set. Why is it needed is also unclear.
The assignment of the fourth least significant bit was not possible; it is always equal to zero.
Two joysticks can be rejected at the same time, and packets with non-zero bits in both fields are obtained. It is not combined with the OK button, it takes precedence over joysticks.
Summarizing, the general format of packages is as follows:
K##RTTTTMMMMxCCC R - T - (turret) M - (movement) C - (channel) K - OK # - , (/) x - Tank control from computer
HackRF One can not only receive a signal, but also transmit it. So let's try to control the tank from the computer!
We saw that the modulation of the signal there is very simple. Generating such a signal using GNU Radio will be easy. To do this, it is enough to generate the sequence "0" and "1" with the necessary delays and send them to osmocom Sink , which sends them straight to the air.
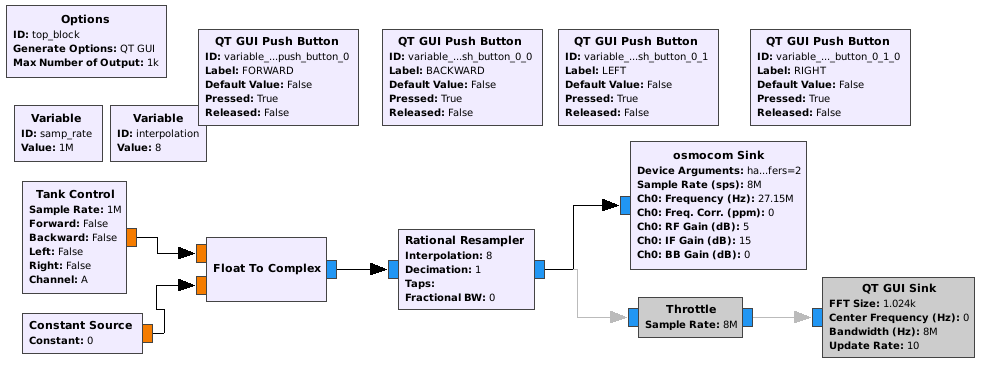
The block given below under the spoiler is able to transmit only movement commands, but it is easy to expand it to support the rest.
from __future__ import print_function import sys import numpy as np from gnuradio import gr LOW_AMPLITUDE = 0.5 HIGH_AMPLITUDE = 1.0 HIGH_PULSE_LENGTH = 1014e-6 LOW_PULSE_LENGTH = 600e-6 PEAK_LENGTH = 140e-6 LOW_LENGTH_ZERO = 150e-6 LOW_LENGTH_ONE = 270e-6 INTERPACKET_PAUSE = 52000e-6 REPEAT_BIT = 0b0001000000000000 CHANNEL_BITS = { "A": 0b000, "B": 0b010, "C": 0b100, } # WTF: 0b0010000001010000 def xround(val): return int(val + 0.5) def encode_action(channel, forward, backward, left=False, right=False): value = 0 value |= CHANNEL_BITS[channel] print(forward, backward, left, right, file=sys.stderr) if 0: value |= 0b0000000011110000 elif forward: value |= 0b1010000001010000 elif backward: value |= 0b1010000010100000 elif right: value |= 0b0000000010010000 elif left: value |= 0b0000000001100000 else: value |= 0b0000000011110000 return value def encode_samples(value, sample_rate): for _ in xrange(xround(HIGH_PULSE_LENGTH * sample_rate)): yield 1 for _ in xrange(xround(LOW_PULSE_LENGTH * sample_rate)): yield 0 for i in range(16): for _ in xrange(xround(PEAK_LENGTH * sample_rate)): yield 1 bit = (1<<15) & (value << i) if bit: for _ in xrange(xround(LOW_LENGTH_ONE * sample_rate)): yield 0 else: for _ in xrange(xround(LOW_LENGTH_ZERO * sample_rate)): yield 0 for _ in xrange(xround(PEAK_LENGTH * sample_rate)): yield 1 class blk(gr.sync_block): def __init__(self, sample_rate=1.0, forward=False, backward=False, left=False, right=False, channel="A"): gr.sync_block.__init__( self, name='Tank Control', # will show up in GRC in_sig=[], out_sig=[np.float32] ) if not channel in ("A", "B", "C"): raise ValueError(channel) self.sample_rate = sample_rate self.forward = forward self.backward = backward self.left = left self.right = right self.channel = channel def start(self): self._generator = self._generate_samples() return True def _should_tx(self): return self.forward or self.backward or self.left or self.right def _generate_samples(self): while True: if self._should_tx(): value = encode_action(self.channel, self.forward, self.backward, self.left, self.right) # output twice without repeat bit # weird, but that's what remote does for _ in xrange(2): for bit in encode_samples(value, self.sample_rate): yield bit for _ in xrange(xround(self.sample_rate * INTERPACKET_PAUSE)): yield 0 value |= REPEAT_BIT while self._should_tx(): for bit in encode_samples(value, self.sample_rate): yield bit for _ in xrange(xround(self.sample_rate * INTERPACKET_PAUSE)): yield 0 # stop thing value = encode_action(self.channel, False, False) for _ in xrange(2): for bit in encode_samples(value, self.sample_rate): yield bit for _ in xrange(xround(self.sample_rate * INTERPACKET_PAUSE)): yield 0 yield 0 def work(self, input_items, output_items): output_items[0].fill(LOW_AMPLITUDE) output_bits = min(len(output_items[0]), int(self.sample_rate / 100)) for i in xrange(output_bits): output_items[0][i] = HIGH_AMPLITUDE if next(self._generator) else LOW_AMPLITUDE return output_bits And this scheme really successfully controls the tank!
The only problem I encountered and could not win until the end is a very significant lag. I was able to reduce this problem by reducing the size of buffers ( hackrf,buffers=2 in the Device Arguments of osmocom Sink ), as well as using a large sample rate. But the unpleasant tangible lag, which is not observed when controlling from the standard console, still remains.
Nevertheless, the "proof of concept" was successfully demonstrated.
Conclusion
This radio-controlled tank works on a very simple protocol that is easily reversed using GNU Radio.
The protocol uses amplitude manipulation with a fairly simple physical encoding, where the packet has a pronounced start mark, and the bits are encoded with a length of "0" (low level).
Each packet has 16 bits of information, and the purpose of almost all of these 16 bits is easy to understand just by experimenting with the console.
It was also very easy to assemble a scheme in the GNU Radio Companion that would send commands to the tank. The only problem that could not be overcome to the end is lag.
application
')
Source: https://habr.com/ru/post/325894/
All Articles