ASP.NET Core: Creating ASP.NET Web API Reference Pages with Swagger
When creating high-load applications, it can be difficult to understand the various APIs. Generating high-quality documentation and reference pages within the web API through Swagger with Swashbuckle integration. NET Core is as easy as adding a couple of NuGet packages and modifying Startup.cs.

1. Creating server services for mobile applications .
2. Develop ASP.NET Core applications using dotnet watch .
3. Creating ASP.NET web API reference pages using Swagger .
4. Open web interface for .NET (OWIN).
5. Choosing the right .NET development environment on the server.
First, let's talk about terminology:
')
This tutorial is written following the example of the tutorial "Creating the first web API using ASP.NET Core MVC and Visual Studio . " If you're interested, you can download it from GitHub .
Swashbuckle consists of two components:
To add Swashbuckle, you can use one of the following methods:
Add SwaggerGen to the set of services in the Configure and ConfigureServices methods, activate the middleware to handle the generated JSON document and the Swagger user interface.
In Visual Studio, press F5 to start the application and go to
Note: Microsoft Edge, Google Chrome and Firefox browsers display JSON documents without additional settings. For Chrome, extensions have been created that allow you to format a document for readability The following is a shorthand JavaScript example.
This document is used for the operation of the Swagger user interface, available at:
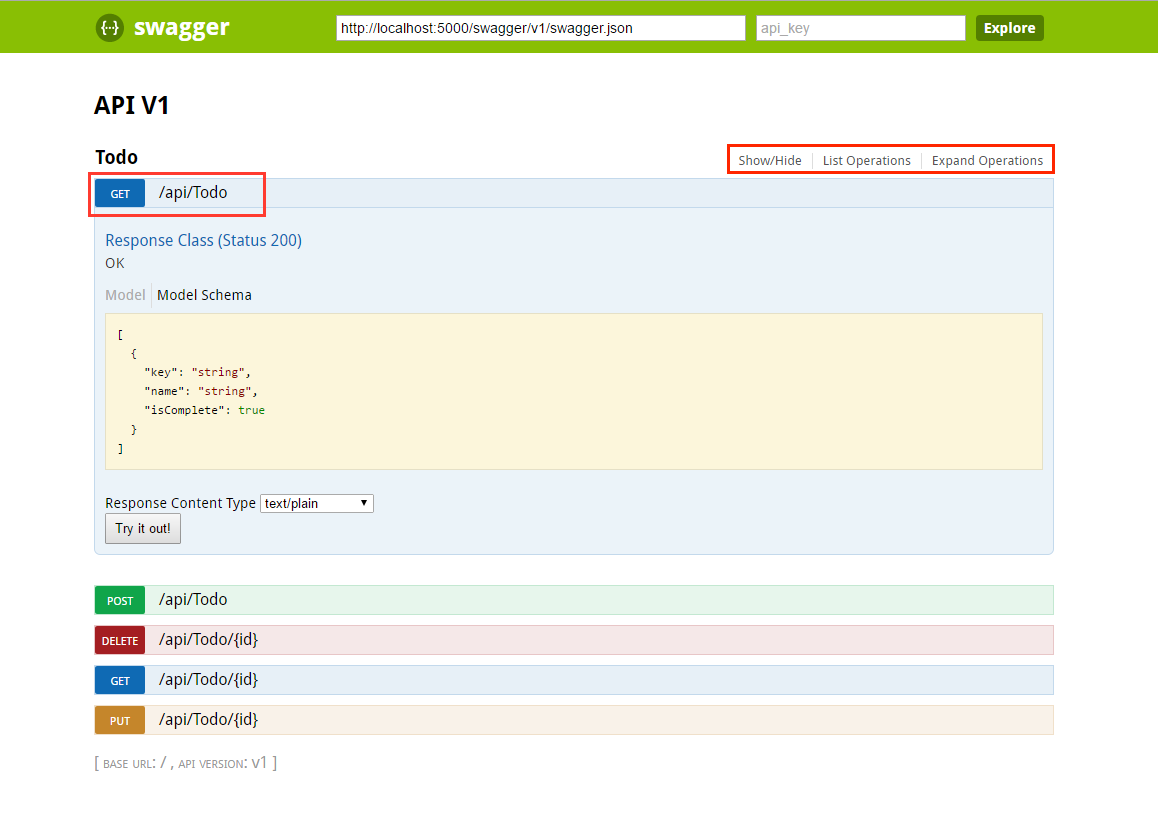
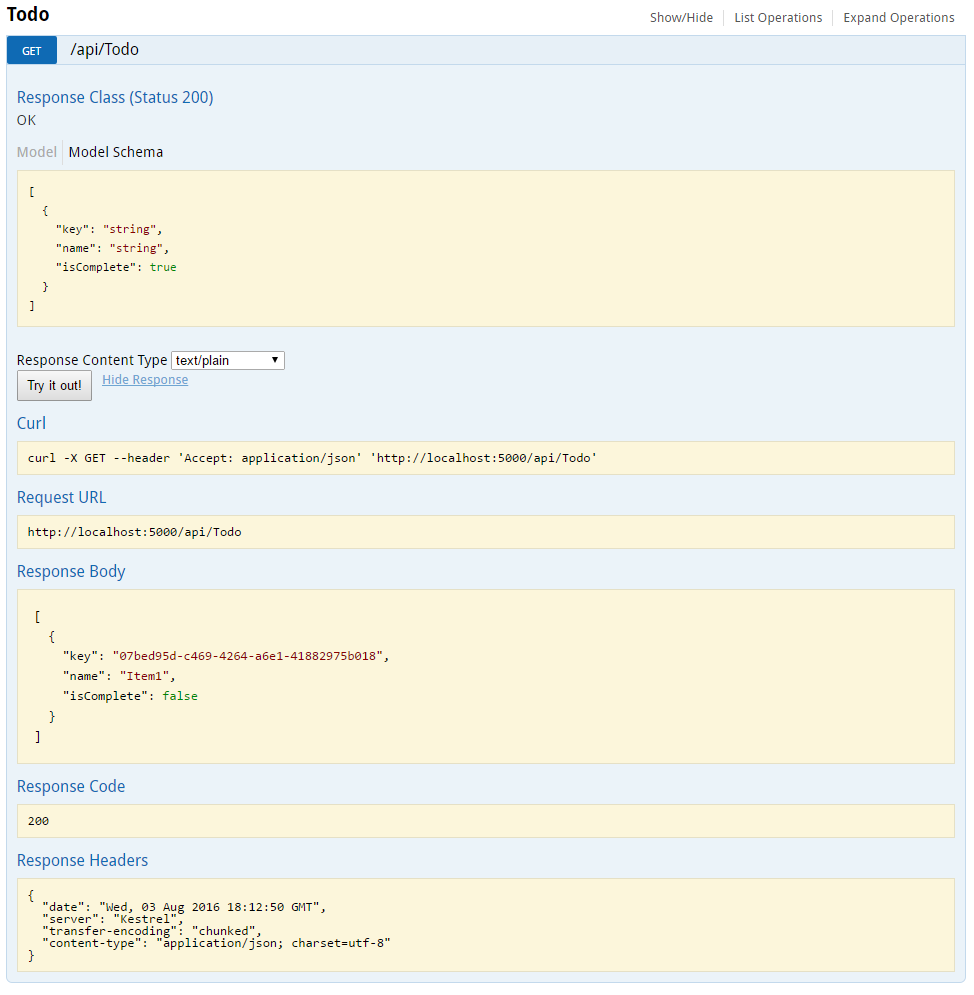
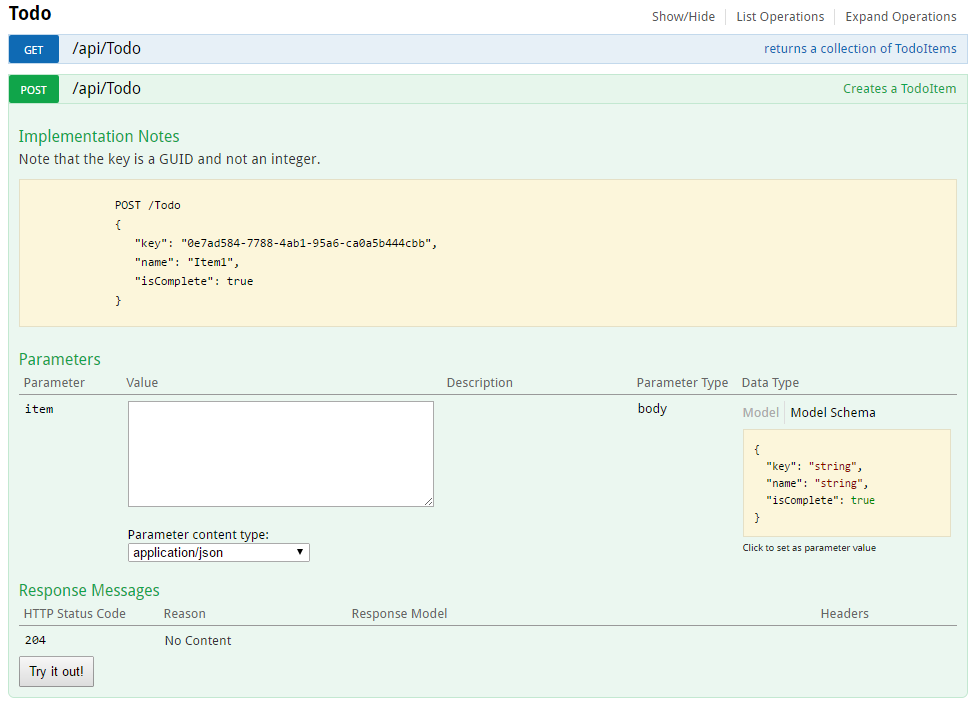
Each method in the ToDo controller can be tested from the user interface. Touch the method to expand the section, add the necessary parameters and click “Try it out!”.
Swagger not only allows you to easily present the API, but also contains functions for documenting the object model and customizing the appearance and language of the interactive user interface.
The
The following image shows the Swagger user interface with version information.

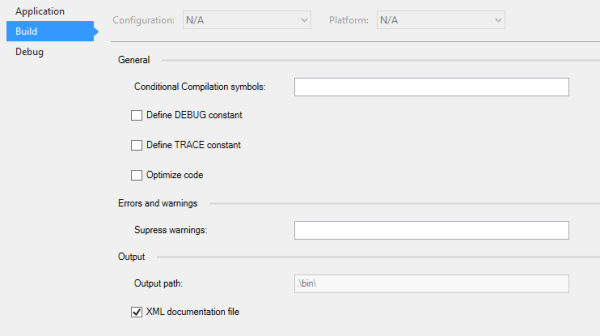
To enable XML comments, right-click the project in Visual Studio and select Properties . Then check the XML Documentation file box under the Output Settings section.
Configure Swagger to use the generated XML file.
Note: For Linux and non-Windows operating systems, file and directory names are case sensitive. For example, searching for a file with the name
In the code above, ApplicationBasePath gets the path to the base directory of the application, which allows you to configure the full path to the XML comments.
If you use comments with three slashes in the method, you can improve the user interface of Swagger: a description will be added to the section header.
Remember that the user interface uses the generated JSON file, and it also contains these comments.
For greater clarity, add
Notice how the user interface has improved with additional comments.
In the API, you can add a
Adding
Developers who create high-load applications pay special attention to the output results, especially the types of responses, error codes (if they are not standard). To do this, use XML comments and DataAnnotations.
For example, take the
The ready user interface is functional and convenient, but when creating documentation pages for the API, you probably want to use your brand or corporate identity.
This can be done using Swashbuckle components. You will need to add resources to serve static files that are usually not included in the web API project, and then create a folder structure to host them.
Add the NuGet
Enable middleware for static files.
Take the index.html file that is used on the Swagger user interface page from the Github repository
Link to custom.css in the index.html file.
The following CSS presents a sample of a customized page header.
Custom.css file
But this is not all that can be done with the page. For a complete list of user interface features, see GitHub in the Swagger UI repository .
The second cycle of articles on ASP.NET Core
1. Creating server services for mobile applications .
2. Develop ASP.NET Core applications using dotnet watch .
3. Creating ASP.NET web API reference pages using Swagger .
4. Open web interface for .NET (OWIN).
5. Choosing the right .NET development environment on the server.
Introduction
First, let's talk about terminology:
')
- Swashbuckle is an open source project for creating Swagger documents for web APIs built using ASP.NET Core MVC.
- Swagger is a machine-readable representation of the RESTful API that provides online documentation support, client-side SDK creation and discoverability.
This tutorial is written following the example of the tutorial "Creating the first web API using ASP.NET Core MVC and Visual Studio . " If you're interested, you can download it from GitHub .
Beginning of work
Swashbuckle consists of two components:
- Swashbuckle.SwaggerGen : contains functions for creating Swagger JSON documents that describe objects, methods, return types, and so on.
- Swashbuckle.SwaggerUI : A built-in version of the Swagger user interface that, using the above documents, creates an individually customizable tool for describing web API functions and contains testing functions for public methods
NuGet Packages
To add Swashbuckle, you can use one of the following methods:
- Using the package manager console:
Install-Package Swashbuckle -Pre - In Visual Studio:
o Right-click the project in Solution Explorer> Manage NuGet Packages.
o Type Swashbuckle in the search box.
Check the Include prerelease checkbox.
o Specify nuget.org as the source for packages.
o Touch the Swashbuckle package (Swashbuckle package) and then Install.
Add Swagger and configure it in middleware
Add SwaggerGen to the set of services in the Configure and ConfigureServices methods, activate the middleware to handle the generated JSON document and the Swagger user interface.
public void ConfigureServices(IServiceCollection services) { // Add framework services. services.AddMvc(); services.AddLogging(); // Add our repository type services.AddSingleton<ITodoRepository, TodoRepository>(); // Inject an implementation of ISwaggerProvider with defaulted settings applied services.AddSwaggerGen(); } // This method gets called by the runtime. Use this method to configure the HTTP request pipeline. public void Configure(IApplicationBuilder app, IHostingEnvironment env, ILoggerFactory loggerFactory) { app.UseMvcWithDefaultRoute(); // Enable middleware to serve generated Swagger as a JSON endpoint app.UseSwagger(); // Enable middleware to serve swagger-ui assets (HTML, JS, CSS etc.) app.UseSwaggerUi(); } In Visual Studio, press F5 to start the application and go to
http://localhost:<random_port>/swagger/v1/swagger.json . Here you will see the created document describing the end points.Note: Microsoft Edge, Google Chrome and Firefox browsers display JSON documents without additional settings. For Chrome, extensions have been created that allow you to format a document for readability The following is a shorthand JavaScript example.
{ "swagger": "2.0", "info": { "version": "v1", "title": "API V1" }, "basePath": "/", "paths": { "/api/Todo": { "get": { "tags": [ "Todo" ], "operationId": "ApiTodoGet", "consumes": [], "produces": [ "text/plain", "application/json", "text/json" ], "responses": { "200": { "description": "OK", "schema": { "type": "array", "items": { "$ref": "#/definitions/TodoItem" } } } }, "deprecated": false }, "post": { ... } }, "/api/Todo/{id}": { "get": { ... }, "put": { ... }, "delete": { ... }, "definitions": { "TodoItem": { "type": "object", "properties": { "key": { "type": "string" }, "name": { "type": "string" }, "isComplete": { "type": "boolean" } } } }, "securityDefinitions": {} } This document is used for the operation of the Swagger user interface, available at:
http://localhost:<random_port>/swagger/ui .Each method in the ToDo controller can be tested from the user interface. Touch the method to expand the section, add the necessary parameters and click “Try it out!”.
Customization and Extensibility
Swagger not only allows you to easily present the API, but also contains functions for documenting the object model and customizing the appearance and language of the interactive user interface.
API information and description
The
ConfigureSwaggerGen method is intended to add information about the author and license, as well as descriptions. services.ConfigureSwaggerGen(options => { options.SingleApiVersion(new Info { Version = "v1", Title = "ToDo API", Description = "A simple example ASP.NET Core Web API", TermsOfService = "None", Contact = new Contact { Name = "Shayne Boyer", Email = "", Url = "http://twitter.com/spboyer"}, License = new License { Name = "Use under LICX", Url = "http://url.com" } }); }); The following image shows the Swagger user interface with version information.
XML Comments
To enable XML comments, right-click the project in Visual Studio and select Properties . Then check the XML Documentation file box under the Output Settings section.
Configure Swagger to use the generated XML file.
Note: For Linux and non-Windows operating systems, file and directory names are case sensitive. For example, searching for a file with the name
ToDoApi.XML is possible in Windows, but not in CentOS. // This method gets called by the runtime. Use this method to add services to the container. public void ConfigureServices(IServiceCollection services) { // Add framework services. services.AddMvc(); services.AddLogging(); // Add our repository type. services.AddSingleton<ITodoRepository, TodoRepository>(); // Inject an implementation of ISwaggerProvider with defaulted settings applied. services.AddSwaggerGen(); // Add the detail information for the API. services.ConfigureSwaggerGen(options => { options.SingleApiVersion(new Info { Version = "v1", Title = "ToDo API", Description = "A simple example ASP.NET Core Web API", TermsOfService = "None", Contact = new Contact { Name = "Shayne Boyer", Email = "", Url = "http://twitter.com/spboyer"}, License = new License { Name = "Use under LICX", Url = "http://url.com" } }); //Determine base path for the application. var basePath = PlatformServices.Default.Application.ApplicationBasePath; //Set the comments path for the swagger json and ui. var xmlPath = Path.Combine(basePath, "TodoApi.xml"); options.IncludeXmlComments(xmlPath); }); } // This method gets called by the runtime. Use this method to configure the HTTP request pipeline. public void Configure(IApplicationBuilder app, IHostingEnvironment env, ILoggerFactory loggerFactory) { app.UseStaticFiles(); app.UseMvcWithDefaultRoute(); // Enable middleware to serve generated Swagger as a JSON endpoint. app.UseSwagger(); // Enable middleware to serve swagger-ui assets (HTML, JS, CSS etc.) app.UseSwaggerUi(); } In the code above, ApplicationBasePath gets the path to the base directory of the application, which allows you to configure the full path to the XML comments.
TodoApi.xml works only in this example, the name of the created XML file with comments is assigned based on the name of the application.If you use comments with three slashes in the method, you can improve the user interface of Swagger: a description will be added to the section header.
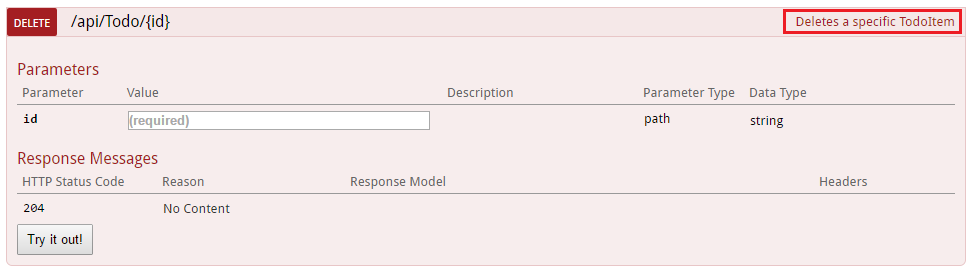
/// <summary> /// Deletes a specific TodoItem. /// </summary> /// <param name="id"></param> [HttpDelete("{id}")] public void Delete(string id) { TodoItems.Remove(id); } Remember that the user interface uses the generated JSON file, and it also contains these comments.
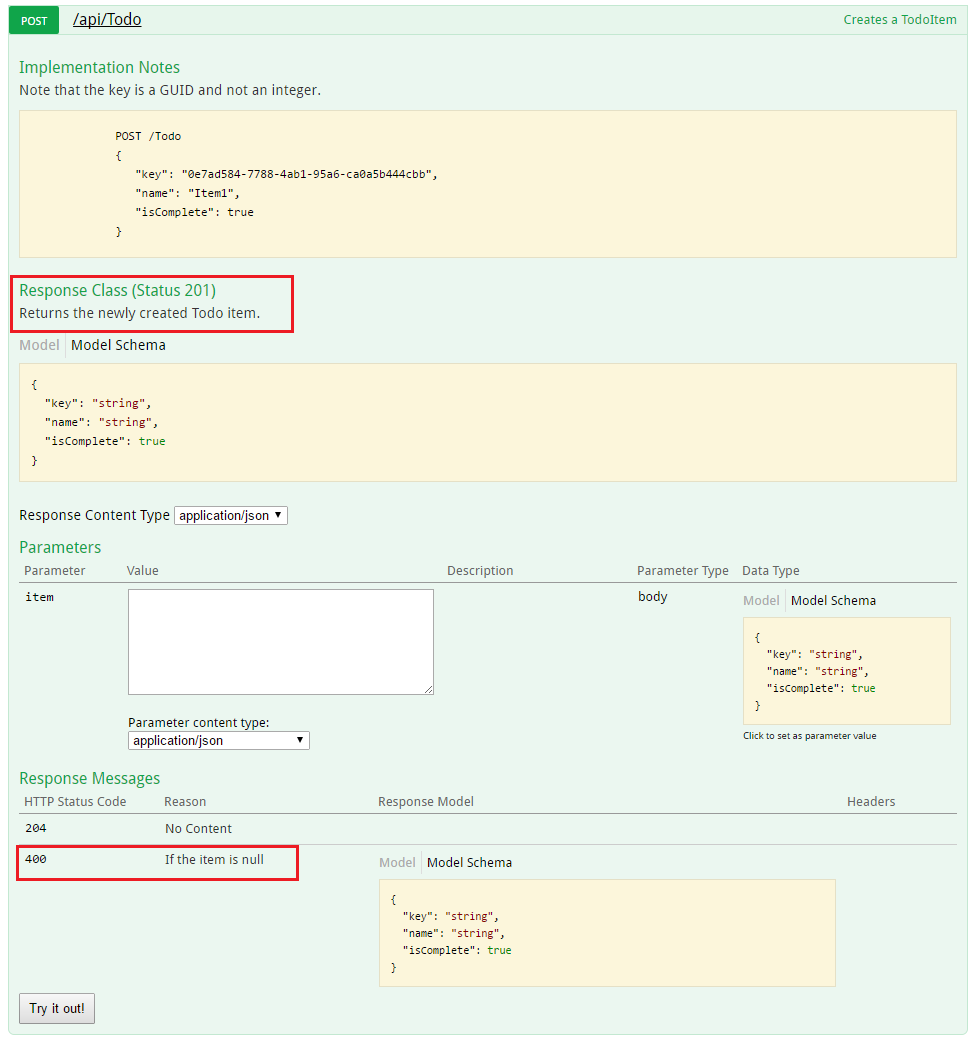
"delete": { "tags": [ "Todo" ], "summary": "Deletes a specific TodoItem", "operationId": "ApiTodoByIdDelete", "consumes": [], "produces": [], "parameters": [ { "name": "id", "in": "path", "description": "", "required": true, "type": "string" } ], "responses": { "204": { "description": "No Content" } }, "deprecated": false } For greater clarity, add
<remarks /> , the contents of which can be text, a JSON object or XML for further documentation of the method. /// <summary> /// Creates a TodoItem. /// </summary> /// <remarks> /// Note that the key is a GUID and not an integer. /// /// POST /Todo /// { /// "key": "0e7ad584-7788-4ab1-95a6-ca0a5b444cbb", /// "name": "Item1", /// "isComplete": true /// } /// /// </remarks> /// <param name="item"></param> /// <returns>New Created Todo Item</returns> /// <response code="201">Returns the newly created item</response> /// <response code="400">If the item is null</response> [HttpPost] [ProducesResponseType(typeof(TodoItem), 201)] [ProducesResponseType(typeof(TodoItem), 400)] public IActionResult Create([FromBody, Required] TodoItem item) { if (item == null) { return BadRequest(); } TodoItems.Add(item); return CreatedAtRoute("GetTodo", new { id = item.Key }, item); } Notice how the user interface has improved with additional comments.
DataAnnotations
In the API, you can add a
System.ComponentModel.DataAnnotations controller to enhance the elements of the Swagger user interface.Adding
[Required] annotation to the Name property of the TodoItem class changes the ModelSchema information in the user interface. Check agents [Produces("application/json")] , RegularExpression and other functions serve to refine the information displayed on the page being created. The more metadata used in the code, the more informative the user interface or API reference page becomes. using System; using System.ComponentModel; using System.ComponentModel.DataAnnotations; namespace TodoApi.Models { public class TodoItem { public string Key { get; set; } [Required] public string Name { get; set; } [DefaultValue(false)] public bool IsComplete { get; set; } } } Description of answer types
Developers who create high-load applications pay special attention to the output results, especially the types of responses, error codes (if they are not standard). To do this, use XML comments and DataAnnotations.
For example, take the
Create() method. By default, it issues the response “201 Created” (if the item is actually created) or “204 No Content” (if no data is sent to the POST body). However, there is no documentation that tells you what the answer will be. To remedy this, add the following code snippet. /// <summary> /// Creates a TodoItem. /// </summary> /// <remarks> /// Note that the key is a GUID and not an integer. /// /// POST /Todo /// { /// "key": "0e7ad584-7788-4ab1-95a6-ca0a5b444cbb", /// "name": "Item1", /// "isComplete": true /// } /// /// </remarks> /// <param name="item"></param> /// <returns>New Created Todo Item</returns> /// <response code="201">Returns the newly created item</response> /// <response code="400">If the item is null</response> [HttpPost] [ProducesResponseType(typeof(TodoItem), 201)] [ProducesResponseType(typeof(TodoItem), 400)] public IActionResult Create([FromBody, Required] TodoItem item) { if (item == null) { return BadRequest(); } TodoItems.Add(item); return CreatedAtRoute("GetTodo", new { id = item.Key }, item); } User Interface Customization
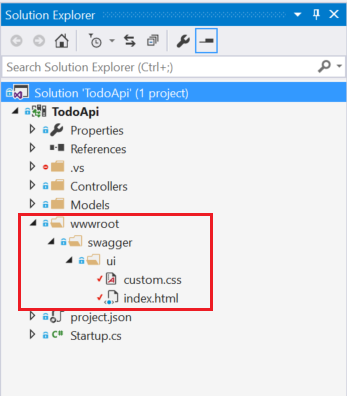
The ready user interface is functional and convenient, but when creating documentation pages for the API, you probably want to use your brand or corporate identity.
This can be done using Swashbuckle components. You will need to add resources to serve static files that are usually not included in the web API project, and then create a folder structure to host them.
Add the NuGet
«Microsoft.AspNetCore.StaticFiles»: «1.0.0-*» package to the project «Microsoft.AspNetCore.StaticFiles»: «1.0.0-*» .Enable middleware for static files.
// This method gets called by the runtime. Use this method to configure the HTTP request pipeline. public void Configure(IApplicationBuilder app, IHostingEnvironment env, ILoggerFactory loggerFactory) { // Enable static files middleware. app.UseStaticFiles(); app.UseMvcWithDefaultRoute(); // Enable middleware to serve generated Swagger as a JSON endpoint app.UseSwagger(); // Enable middleware to serve swagger-ui assets (HTML, JS, CSS etc.) app.UseSwaggerUi(); } Take the index.html file that is used on the Swagger user interface page from the Github repository
<https://github.com/domaindrivendev/Ahoy/tree/master/test/WebSites/CustomizedUi/wwwroot/swagger/ui> _ and move it in the wwwroot/swagger/ui folder, then create a new custom.css file in the same folder.Link to custom.css in the index.html file.
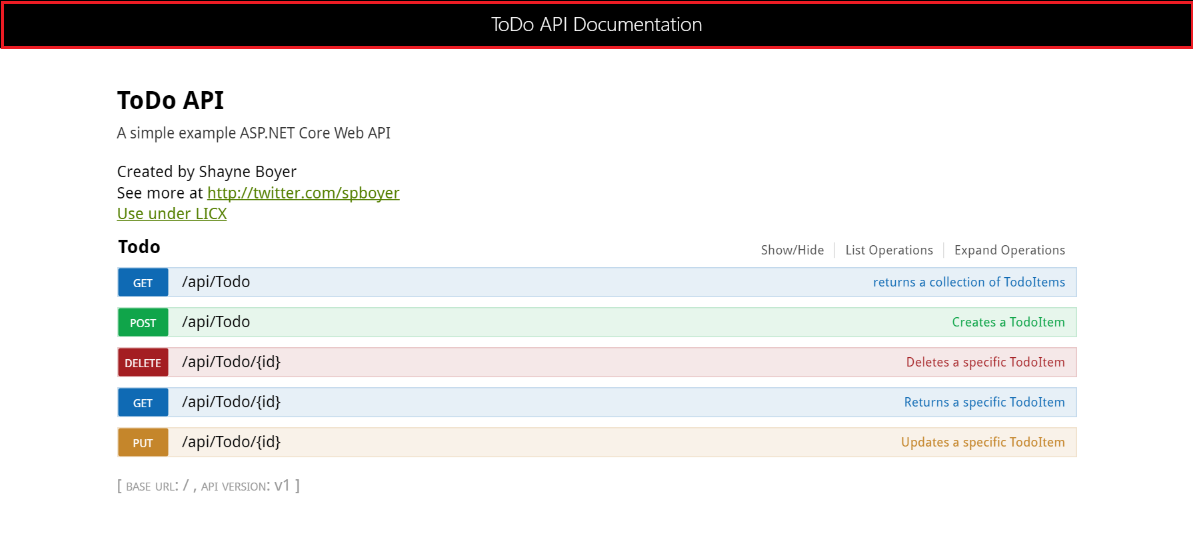
<link href='custom.css' media='screen' rel='stylesheet' type='text/css' />The following CSS presents a sample of a customized page header.
Custom.css file
.swagger-section #header { border-bottom: 1px solid #000000; font-style: normal; font-weight: 400; font-family: "Segoe UI Light","Segoe WP Light","Segoe UI","Segoe WP",Tahoma,Arial,sans-serif; background-color: black; } .swagger-section #header h1 { text-align: center; font-size: 20px; color: white; }</code> <i> index.html</i> <source lang="css"><body class="swagger-section"> <div id="header"> <h1>ToDo API Documentation</h1> </div> <div id="message-bar" class="swagger-ui-wrap" data-sw-translate> </div> <div id="swagger-ui-container" class="swagger-ui-wrap"></div> </body> But this is not all that can be done with the page. For a complete list of user interface features, see GitHub in the Swagger UI repository .
Source: https://habr.com/ru/post/325872/
All Articles